- Настройка обратного прокси Nginx
- Подготовка
- Использование Nginx в качестве обратного прокси
- Передача заголовков запроса
- Настройка Nginx в качестве обратного прокси для прокси-сервера без HTTP
- Общие параметры обратного прокси Nginx
- Выводы
- Guide: Set up a reverse proxy using nginx on Linux
- What exactly are we setting up?
- 1. Install nginx
- Some Basic operating commands
- 2. Configure routes
- SSL/HTTPS
- Using Docker to Set up Nginx Reverse Proxy With Auto SSL Generation
- What is reverse proxy? What are its advantages?
- Setting up Nginx as reverse proxy to deploy multiple services on the same server using Docker
- Prerequisites
- Step 1: Set up Nginx reverse proxy container
- Step 2: Set up a container for automatic SSL certificate generation
- Step 3: Finalize the docker compose file
- Step 4: Verify that Ngnix reverse proxy is working
- Step 5: Run other service containers with reverse proxy
- Do not bind to any port
- (OPTIONAL) Define VIRTUAL_PORT
- Set Let’s Encrypt email specific to a container
- Follow along
Настройка обратного прокси Nginx
Обратный прокси-сервер — это служба, которая принимает запрос клиента, отправляет запрос одному или нескольким прокси-серверам, получает ответ и доставляет ответ сервера клиенту.
Благодаря своей производительности и масштабируемости NGINX часто используется в качестве обратного прокси-сервера для HTTP-серверов и серверов, отличных от HTTP. Типичная конфигурация обратного прокси-сервера — поставить Nginx перед приложениями Node.js , Python или Java .
Использование Nginx в качестве обратного прокси дает вам несколько дополнительных преимуществ:
- Балансировка нагрузки — Nginx может выполнять балансировку нагрузки для распределения запросов клиентов по прокси-серверам, что повышает производительность, масштабируемость и надежность.
- Кеширование. Используя Nginx в качестве обратного прокси-сервера, вы можете кэшировать предварительно обработанные версии страниц, чтобы ускорить загрузку страницы. Он работает путем кэширования содержимого, полученного от ответов прокси-серверов, и использования его для ответа клиентам без необходимости каждый раз связываться с прокси-сервером для получения одного и того же содержимого.
- Завершение SSL — Nginx может выступать в качестве конечной точки SSL для соединений с клиентами. Он будет обрабатывать и расшифровывать входящие SSL-соединения и шифровать ответы прокси-сервера.
- Сжатие — если прокси-сервер не отправляет сжатые ответы, вы можете настроить Nginx для сжатия ответов перед их отправкой клиентам.
- Смягчение DDoS-атак — вы можете ограничить входящие запросы и количество подключений на один IP-адрес до значения, типичного для обычных пользователей. Nginx также позволяет блокировать или ограничивать доступ в зависимости от местоположения клиента и значения заголовков запроса, таких как «User-Agent» и «Referer».
В этой статье описаны шаги, необходимые для настройки Nginx в качестве обратного прокси.
Подготовка
Мы предполагаем, что у вас установлен Nginx на вашем сервере Ubuntu , CentOS или Debian .
Использование Nginx в качестве обратного прокси
Чтобы настроить Nginx в качестве обратного прокси для HTTP-сервера, откройте файл конфигурации блока сервера домена и укажите в нем расположение и прокси-сервер:
URL-адрес проксируемого сервера устанавливается с proxy_pass директивы proxy_pass и может использовать HTTP или HTTPS качестве протокола, доменного имени или IP-адреса, а также необязательного порта и URI в качестве адреса.
Приведенная выше конфигурация указывает Nginx передавать все запросы в /app прокси-серверу по адресу http://127.0.0.1:8080 .
Чтобы лучше проиллюстрировать, как proxy_pass директивы location и proxy_pass , рассмотрим следующий пример:
Если посетитель обращается к http://example.com/blog/my-post , Nginx передаст этот запрос по прокси на http://node1.com:8000/wordpress/my-post .
Когда адрес проксируемого сервера содержит URI, ( /wordpress/ ), URI запроса, который передается на проксируемый сервер, заменяется URI, указанным в директиве. Если адрес прокси-сервера указан без URI, полный URI запроса передается на прокси-сервер.
Передача заголовков запроса
Когда Nginx проксирует запрос, он автоматически определяет два поля заголовка в проксируемых запросах от клиента, Host и Connection , и удаляет пустые заголовки. Host установлен на переменную $proxy_host , а Connection установлено на закрытие.
Чтобы настроить или установить заголовки для прокси-соединений, используйте директиву proxy_set_header , за которой следует значение заголовка. Вы можете найти список всех доступных заголовков запросов и их разрешенные значения здесь . Если вы хотите предотвратить передачу заголовка на прокси-сервер, установите для него пустую строку «» .
В следующем примере мы меняем значение поля заголовка Host на $host и удаляем поле заголовка Accept-Encoding , устанавливая его значение в пустую строку.
Каждый раз, когда вы изменяете файл конфигурации, вам необходимо перезапустить службу Nginx, чтобы изменения вступили в силу.
Настройка Nginx в качестве обратного прокси для прокси-сервера без HTTP
Чтобы настроить Nginx в качестве обратного прокси-сервера для прокси-сервера, отличного от HTTP, вы можете использовать следующие директивы:
- fastcgi_pass — обратный прокси к серверу FastCGI.
- uwsgi_pass — обратный прокси к серверу uwsgi.
- scgi_pass — обратный прокси к серверу SCGI.
- memcached_pass — обратный прокси к серверу Memcached .
Один из наиболее распространенных примеров — использование Nginx в качестве обратного прокси для PHP-FPM :
Общие параметры обратного прокси Nginx
В настоящее время обслуживание контента через HTTPS стало стандартом. В этом разделе мы дадим вам пример конфигурации обратного прокси-сервера HTTPS Nginx, включая рекомендуемые параметры и заголовки прокси-сервера Nginx.
- proxy_http_version 1.1 — определяет версию протокола HTTP для проксирования, по умолчанию она установлена на 1.0. Для Websockets и keepalive соединений вам необходимо использовать версию 1.1.
- proxy_cache_bypass $http_upgrade — Устанавливает условия, при которых ответ не будет взят из кеша.
- Upgrade $http_upgrade и Connection «upgrade» — эти поля заголовка необходимы, если ваше приложение использует веб-сокеты.
- Host $host — Переменная $host в следующем порядке приоритета содержит: имя хоста из строки запроса, или имя хоста из поля заголовка запроса Host , или имя сервера, соответствующее запросу.
- X-Real-IP $remote_addr — перенаправляет удаленный IP-адрес реального посетителя на прокси-сервер.
- X-Forwarded-For $proxy_add_x_forwarded_for — список, содержащий IP-адреса каждого сервера, через который клиент прошел проксирование.
- X-Forwarded-Proto $scheme — при использовании внутри блока HTTPS-сервера каждый HTTP-ответ от проксируемого сервера перезаписывается на HTTPS.
- X-Forwarded-Host $host — определяет исходный хост, запрошенный клиентом.
- X-Forwarded-Port $server_port — определяет исходный порт, запрошенный клиентом.
Если у вас нет существующего сертификата SSL / TLS, используйте certbot для получения бесплатного SSL-сертификата Let’s Encrypt на вашем сервере Ubuntu 18.04 , CentOS 7 или Debian .
Выводы
Вы узнали, как использовать Nginx в качестве обратного прокси. Мы также показали вам, как передавать дополнительные параметры на сервер, а также изменять и устанавливать различные поля заголовка в проксированных запросах.
Если у вас есть какие-либо вопросы или отзывы, не стесняйтесь оставлять комментарии.
Источник
Guide: Set up a reverse proxy using nginx on Linux


A reverse proxy is a server that handles incoming traffic and responds with data this proxy retrieves from one or more instances located in it’s own local network. Look at the reverse proxy as the bridge to the island that is your app environment.
Instance — an optimized computer generally running Linux that is available in your app environment’s local network.
Now why would you need this?
- Load balancing — distribute incoming traffic across multiple server resources to improve performance.
- Web acceleration — compress inbound and outbound data, as well as cache commonly requested content to speed up traffic flow.
- Security — protect the identities of your back end machines. Set up SSL to serve your web app over HTTPS
We’ll be using nginx to set up our reverse proxy on an instance running Linux Debian 9 “stretch”.
This guide requires some basic knowledge of the following subjects: Creating and managing computing instances, SSH, Linux CLI commands, configuring your domain’s A-records.
What exactly are we setting up?
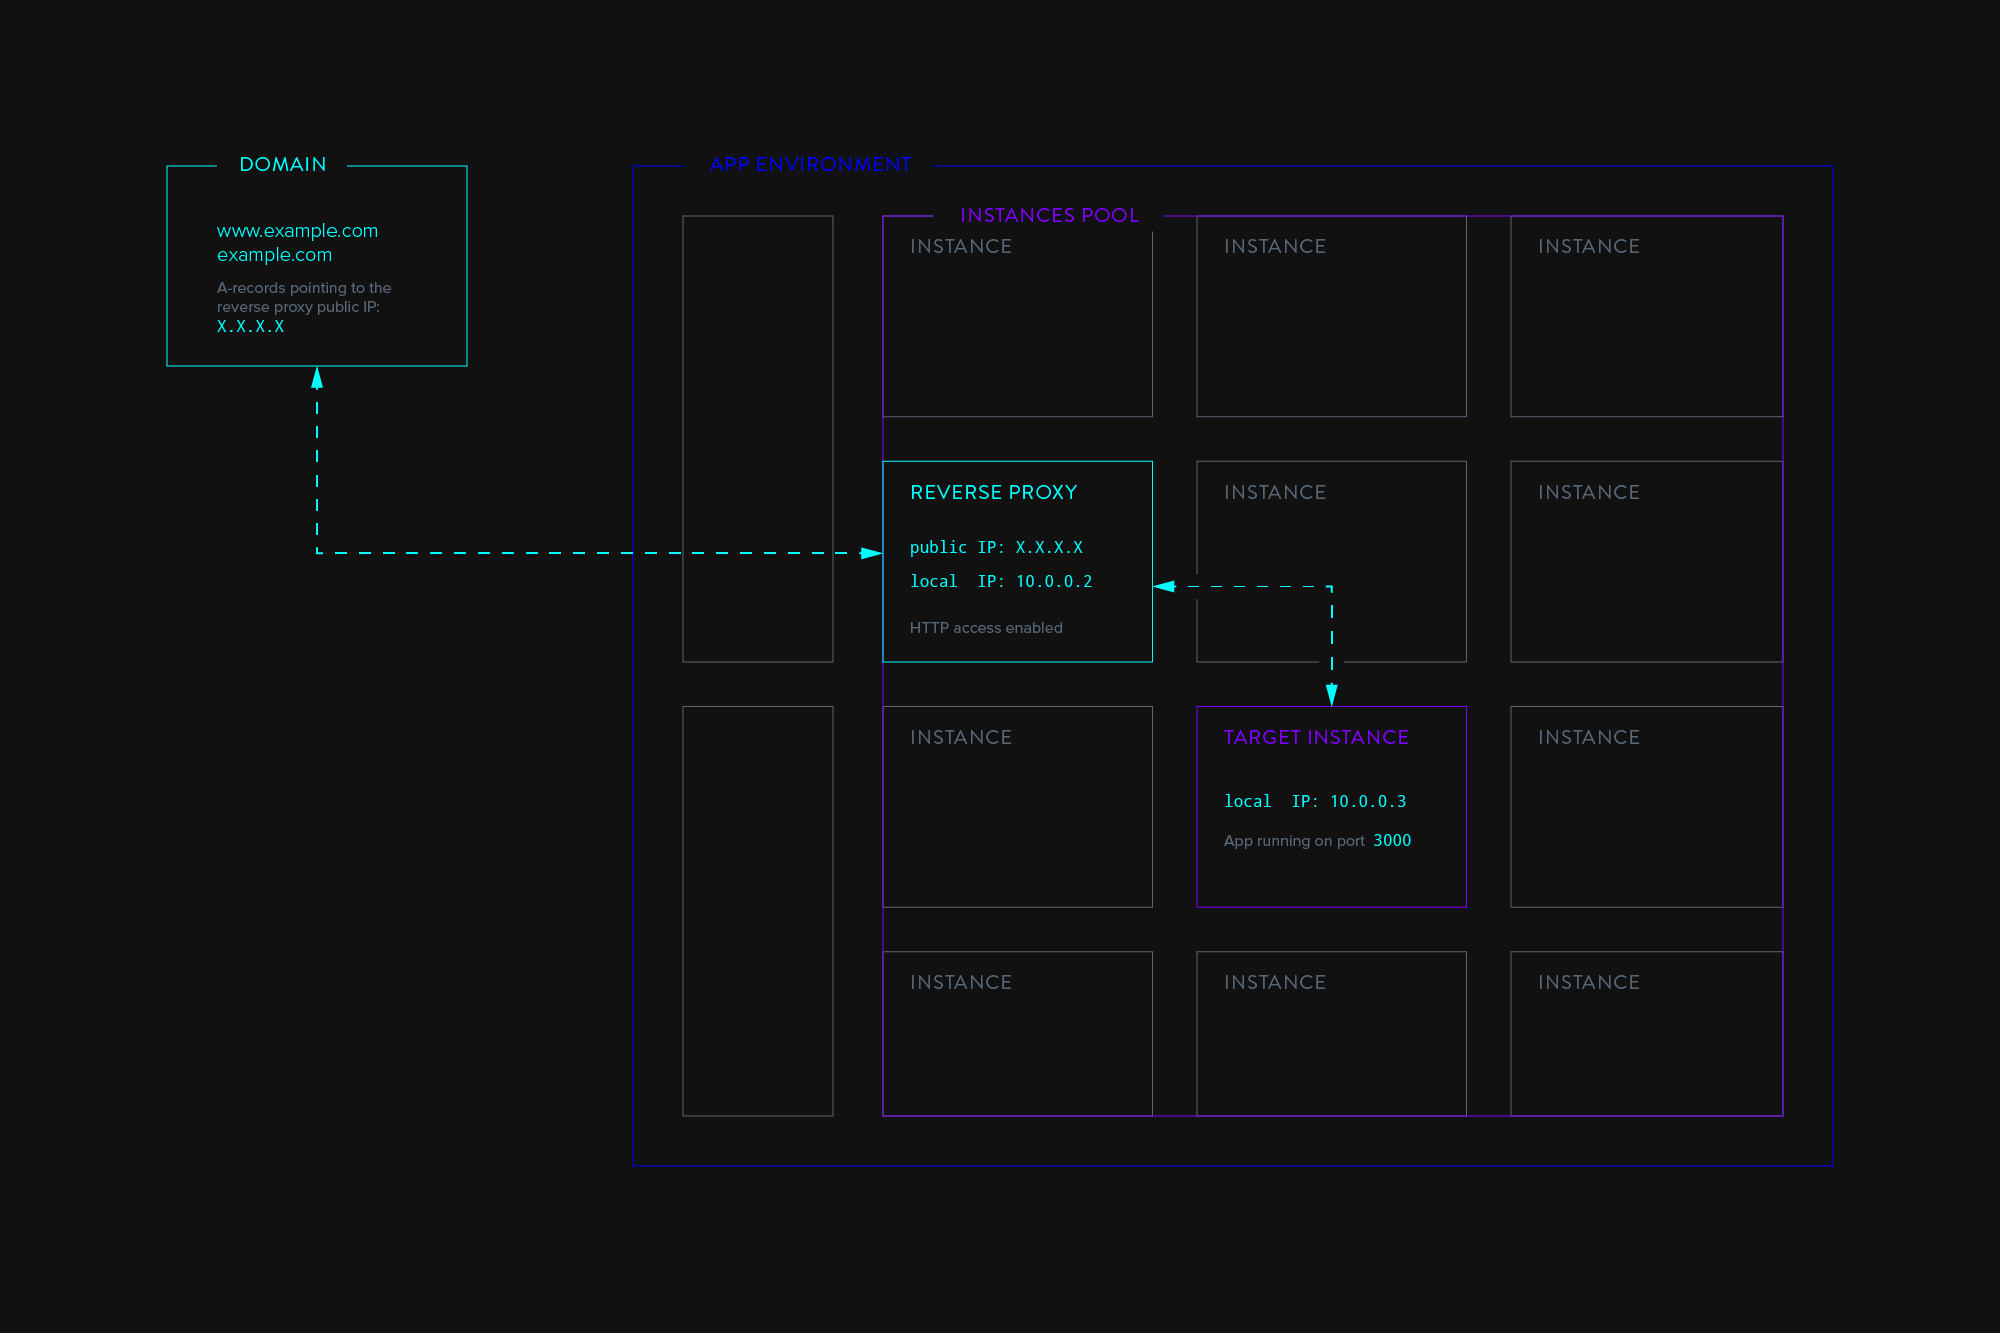
We will be configuring a very basic reverse proxy setup. Our fictional app environment has 2 significant instances: the reverse proxy instance and the target instance that’s running something (e.g. an app) on port 3000. We want to be able to access this app via the reverse proxy when we navigate to our fictional domain www.example.com . Let’s begin!
1. Install nginx
Make sure the instance you set up to act as reverse proxy is configured to allow HTTP traffic. SSH into your reverse proxy instance and run the following commands:
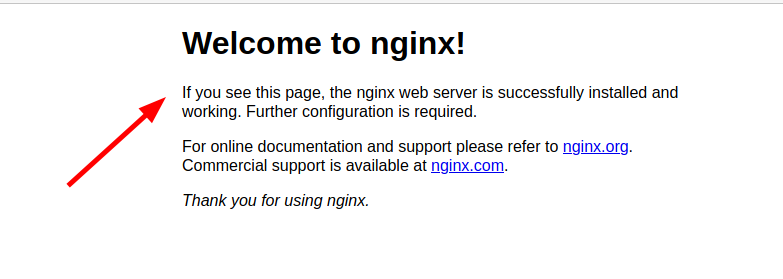
When you navigate to the reverse proxy instance’s public IP using your web browser, you should see a welcome message like this:

Congratulations, your instance is now a server.
Some Basic operating commands
2. Configure routes
Change the working directory to the nginx config files location for sites.
Files containing routing rules go in the sites-available/ folder. To activate those rules you need to create a symlink of those files to the sites-enabled/ folder. By default this has already been done for you with the file default . This file has some example configuration rules. We won’t need them so feel free to delete everything inside the file default . Add following lines to the file default :
You can add multiple config files, a config file can contain multiple server<> server blocks, a server block can contain multiple location<> blocks.
Replace the following parameters with your own:
- example.com www.example.comadd all domains that will need to be handled
- 10.0.0.3 insert the local IP address of the machine that your chosen domains should to redirect to
- 3000 insert the port where your app will be running
Test your nginx configuration and reload to enable the changes.
Important — Don’t forget to point your domain’s A-records to the configured reverse proxy’s public IP address. Depending on your DNS provider A-records can take some time to update.
Done! When you navigate to your domain now, the proxy will respond with the app running on the internal target instance.
SSL/HTTPS
Continue configuring your reverse proxy with our next guide to enable SSL/HTTPS for your domain.
Источник
Using Docker to Set up Nginx Reverse Proxy With Auto SSL Generation
What is reverse proxy? What are its advantages?
What is a reverse proxy? Reverse proxy is kind of a server that sits in the front of many other servers, and forwards the client requests to the appropriate servers. The response from the server is then also received and forwarded by the proxy server to the client.
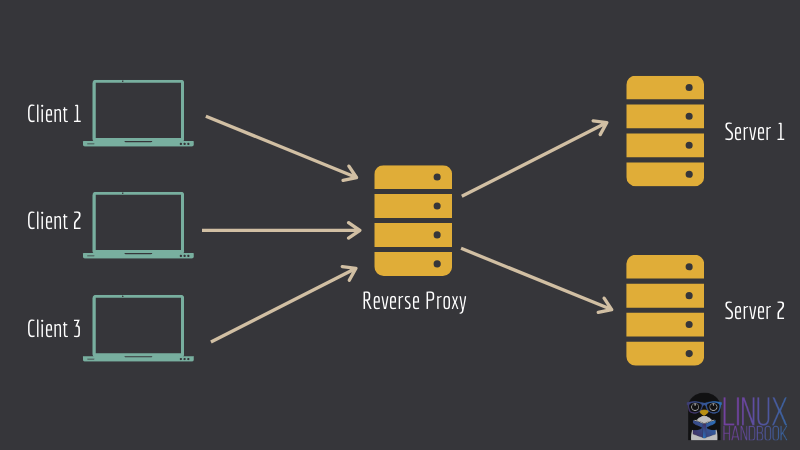
Why would you use such a setup? There are several good reasons for that. This setup can be used to set up a load balancer, caching or for protection from attacks.
I am not going into the details here. Instead, I’ll show you how you can utilize the concept of reverse proxy to set up multiple services on the same server.
Take the same image as the one you saw above. What you can do is to run an Ngnix server in a docker container in reverse proxy mode. Other web services can also be run in their own respective containers.
Nginx container will be configured in a way that it knows which web service is running in which container.
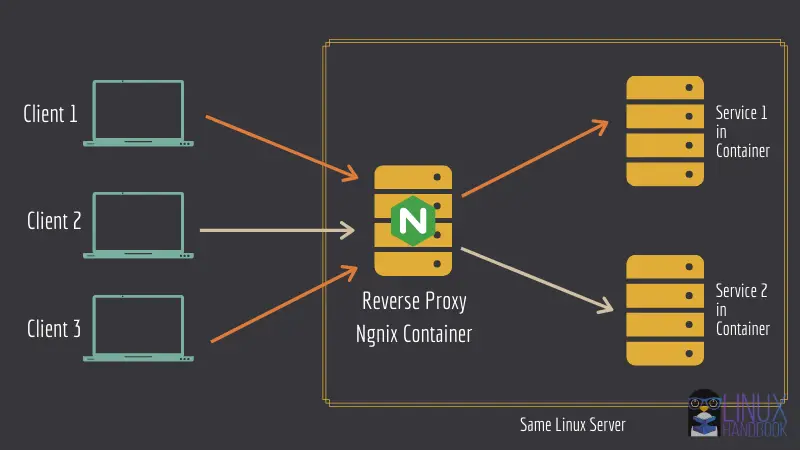
This is a good way to save cost of hosting each service in a different server. You can have multiple services running in the same Linux server thanks to the reverse proxy server.
Setting up Nginx as reverse proxy to deploy multiple services on the same server using Docker
Let me show you how to go about configuring the above mentioned setup.
With these steps, you can install multiple web-based application containers running under Nginx with each standalone container corresponding to its own respective domain or subdomain.
First, let’s see what you need in order to follow this tutorial.
Prerequisites
You’ll be needing the following knowledge to get started with this tutorial easily. Althogh, you can get by without them as well.
- A Linux system/server. You can easily deploy a Linux server in minutes using Linode cloud service.
- Familiarity with Linux commands and terminal.
- Basic knowledge of Docker.
- You should have Docker and Docker Compose installed on your Linux server. Please read our guide on installing Docker and Docker Compose on CentOS.
- You should also own a domain (so that you can set up services on sub-domains).
I have used domain.com as an example domain name in the tutorial. Please make sure you change it according to your own domains or subdomains.
Other than the above, please also make sure of the following things:
Change your domain’s DNS records
In your domain name provider’s A/AAAA or CNAME record panel, make sure that both the domain and subdomains (including www) point to your server’s IP address.
This is an example for your reference:
| Hostname | IP Address | TTL |
|---|---|---|
| domain.com | 172.105.50.178 | Default |
| * | 172.105.50.178 | Default |
| sub0.domain.com | 172.105.50.178 | Default |
| sub1.domain.com | 172.105.50.178 | Default |
Swap space
To make sure all your container apps are at ease and never run out of memory after you deploy them, you must have the necessary swap space on your system.
You can always adjust swap according to the available RAM on your system. You can decide the swap space based on the bundle of app containers on the single server and estimating their cumulative RAM usage.
Step 1: Set up Nginx reverse proxy container
Start with setting up your nginx reverse proxy. Create a directory named «reverse-proxy» and switch to it:
Create a file named docker-compose.yml , open it in your favourite terminal-based text editor like Vim or Nano.
For the nginx reverse proxy, I’ll be using jwilder/nginx-proxy image. Copy and paste the following in the docker-compose.yml file:
Now let’s go through the important parts of the compose file:
- You have declared four volumes, html, dhparam, vhost and certs. They’re persistent data that you’d definitely want to keep even after the container’s been down. The html & vhost volumes will be very important in the next Let’s Encrypt container deployment. They’re designed to work together.
- The docker socker is mounted read-only inside the container. This one’s necessary for the reverse proxy container to generate nginx’s configuration files, detect other containers with a specific environment variable.
- Docker restart policy is set to always . Other options include on-failure and unless-stopped . In this case, always seemed more appropriate.
- The ports 80 and 443 are bound to the host for http and https respectively.
- Finally, it uses a different network, not the default bridge network.
Using a user defined network is very important. This will help in isolating all the containers that are to be proxied, along with enabling the reverse proxy container to forward the clients to their desired/intended containers and also let the containers communicate with each other (Which is not possible with the default bridge network unless icc is set to true for the daemon).
Keep in mind that YML is very finicky about tabs and indention.
Step 2: Set up a container for automatic SSL certificate generation
On the same docker-compose.yml file that you used before, add the following lines:
In this service definition:
- You’re using the same exact volumes as you used for the reverse-proxy container. The html and vhost volumes sharing are necessary for the ACME Challenge of letsencrypt to be successful. This container will generate the certificates inside /etc/nginx/certs , in the container. This is why you are sharing this volume with your reverse proxy container. The dhparam volume will contain the dhparam file. The socket is mounted to detect other containers with a specific environment variable.
- Here you have defined two environment variables. The NGINX_PROXY_CONTAINER variable points to the reverse proxy container. Set it to the name of the container. The DEFAULT_EMAIL is the email that’ll be used while generating the certificates for each domain/subdomain.
- The depends_on option is set so that this service waits for the reverse proxy to start first, then and only then, this’ll start.
- Finally, this container also shares the same network. This is necessary for the two containers to communicate.
Step 3: Finalize the docker compose file
Once the service definitions are done, complete the docker-compose file with the following lines:
The network net is set to external because the proxied containers will also have to use this network. And if we leave the network to get created by docker-comspose , the network name will depend on the current directory. This will create a weirdly named network.
Other than that, other containers will have to set that network to be external anyway, otherwise those compose files will also have to reside in this same directory, none of which is ideal.
Therefore, create the network using
The following is the whole content of the docker-compose.yml file.
Finally, you can deploy these two containers (Ngnix and Let’s Encrypt) using the following command:
Step 4: Verify that Ngnix reverse proxy is working
The container that’ll serve the frontend will need to define two environment variables.
VIRTUAL_HOST : for generating the reverse proxy config
LETSENCRYPT_HOST : for generating the necessary certificates
Make sure that you have correct values for these two variables. You can run nginx-dummy image with reverse proxy like this:
Now if you go to your sub-domain used in the previous command, you should see a message from Ngnix server.
Once you have successfully tested it, you can stop the running docker container:
You may also stop the Ngnix reverse proxy if you are not going to use it:
Step 5: Run other service containers with reverse proxy
The process of setting up other containers so that they can be proxied is VERY simple.
I’ll show it with two instances of Nextcloud deployment in a moment. Let me first tell you what you are doing here.
Do not bind to any port
The container can leave out the port that serves the frontend. The reverse proxy container will automatically detect that.
(OPTIONAL) Define VIRTUAL_PORT
If the reverse proxy container fails to detect the port, you can define another environment variable named VIRTUAL_PORT with the port serving the frontend or whichever service you want to get proxied, like «80» or «7765».
Set Let’s Encrypt email specific to a container
You can override the DEFAULT_EMAIL variable and set a specific email address for a specific container/web service’s domain/subdomain certificate(s), by setting the email id to the environment variable LETSENCRYPT_EMAIL . This works on a per-container basis.
Now that you know all those stuff, let me show you the command that deploys a Nextcloud instance that’ll be proxied using the nginx proxy container, and will have TLS(SSL/HTTPS) enabled.
This is NOT AN IDEAL deployment. The following command is used for demonstrative purpose only.
In the example, you used the same network as the reverse proxy containers, defined the two environment variables, with the appropriate subdomains (Set yours accordingly). After a couple of minutes, you should see Nextcloud running on sub0.domain.com. Open it in a browser to verify.
You can deploy another Nextcloud instance just like this one, on a different subdomain, like the following:
Now you should see a different Nextcloud instance running on a different subdomain on the same server.
With this method, you can deploy different web apps on the same server served under different subdomains, which is pretty handy.

Follow along
Now that you have this set up, you can go ahead and use this in actual deployments with the following examples:
For more articles like these, subscribe to our newsletter, or consider becoming a member. For any queries, don’t hesitate to comment down below.
Источник


