Have a problem opening a .SAM file? We collect information about file formats and can explain what SAM files are. Additionally we recommend software suitable for opening or converting such files.
What is the .SAM file type?
The primary association of the .sam extension belongs to the Sequence Alignment/Map (SAM) file format/type. SAM is an open, well-documented text-based (ASCII) format, in which tab-delimited entries are used to record large genetic-data (DNA) sequences, also referred to as genome sequences or maps. Along with its binary counterpart BAM, SAM is widely used in genetics, bioinformatics, and the related fields.
A .sam file is a listing of DNA sequence reads, following the SAM syntax. Although any .sam file can be opened and viewed with a text editor, its contents would not be human-readable. SAM files can get quite large (several gigabytes) and are processed much slower than their binary versions (.bam). The main tool to work with the SAM/BAM formats is SAMtools, a set of open-source utilities. SAM sequences/maps are also supported by several other genetic-research software tools.
The .sam extension is also conventionally associated with the IBM Lotus Word Pro Document (SAM) file format and type. Word Pro (part of IBM Lotus SmartSuite) is the name of a commercial word-processing software developed and marketed by Lotus (now, IBM). SAM is a proprietary and obscure document format, generally not supported outside IBM Lotus SmartSuite. With SmartSuite withdrawn by IBM since 2013, the use of the .sam format should be discouraged in favor of standard office formats.
Another occurrence of the .sam extension relates to audio sample files. Here, a .sam file is a raw (headerless) audio sample that contains 8-bit signed PCM waveform data. Originating from the era of MOD trackers, such SAM samples usually represent various sound effects and/or noises used in video games.
Additionally, the .sam extension is used by the freeware desktop enhancement and system-monitoring tool Samurize (MS Windows) to denote configuration archive packages exported by the application. Samurize config packages (.sam) are ZIP archives, containing scripts, resource files, etc. required for the config (widget) to function. Such .sam files can be added to Samurize via the Export/Import tool and/or opened and extracted with any ZIP-enabled archiver.
Finally, the .sam extension, short for ‘Sample,’ serves to identify the «lmhosts.sam» file, a sample of the text-based LMHOSTS configuration file used by several Microsoft Windows operating systems to map computers’ IP adresses to their NetBIOS names. The «lmhosts.sam» file is a brief how-to, explaining the LMHOSTS syntax and setup, located in the «%SystemRoot%\System32\drivers\etc» directory (MS Windows 7 and several others). The «lmhosts.sam» file is meant to be taken as a template to modify to one’s needs, openable and editable with any text editor.
.SAM File Extension
File Type 1 LMHOSTS Sample File
Developer
Microsoft
Popularity
What is a SAM file?
Sample of the LMHOSTS setting file used by Microsoft Windows; contains mappings of IP addresses to NetBIOS names of remote servers a computer will communicate with over TCP/IP;
Windows automatically loads the first 100 entries of the LMHOSTS marked with «#PRE» at startup. This number can be changed in the system registry but may be limited by computer performance.
Both the LMHOSTS file and the sample file are located in %windir% on Windows 95, 98, and Millenium Edition. They are located in %windir%system32driversetc. on Windows NT 4.0 through 7 and Windows Server 2003, 2008, and 2008 R2.
NOTE: The LMHOSTS file is not used by Windows 8.
Programs that open SAM files
File Type 2 Samurize Package
Developer
Samurize
Popularity
.SAM File Association 2
File used by Samurize, a program used for customizing the Windows desktop; similar to a Windows .GADGET file and saves images, configuration information, and scripts; used for distributing Samurize packages.
SAM files are .ZIP files with the «.zip» extension renamed to «.sam.» You can install them by double-clicking them (assuming that Samurize is installed).
NOTE: Samurize only supports Windows 2000, XP, and 2003 operating systems.
Programs that open SAM files
File Type 3 MOD Edit Sample File
.SAM File Association 3
Audio sample format used by the MOD Edit audio editing program; contains signed 8-bit raw audio data.
Programs that open SAM files
File Type 4 Ami Pro Document
.SAM File Association 4
Word processing document created by Samna Ami Pro, an early graphical word processor for Windows; was acquired by Lotus in 1988 and later converted to Lotus Word Pro.
Programs that open SAM files
File Type 5 SAM Studio Project
Developer
SAM Labs
Popularity
.SAM File Association 5
A SAM file is a project file created by SAM Studio, an online, block-based coding platform. It contains plain text that defines a program’s inputs, outputs, and behaviors. SAM files are used to install programs on devices built using SAM Labs course, starter, and maker kits.
SAM Studio is a program STEM and STEAM teachers use to teach students how to code. SAM Studio contains two sub-applications, SAM Space and SAM Blockly, that save students’ coding projects as SAM files.
When loaded in SAM Studio, SAM files appear as interactive, block-based coding projects that students use to create simple programs. However, SAM files are actually plain text files. If you open a SAM file in a text editor, you can view the project’s title and the workspaceData that defines how the project appears in SAM Studio.
If you need to determine whether a SAM file was created by SAM Space or SAM Blockly, and you do not have access to SAM Studio, you can open the file in a text editor and view its «type» setting. SAM Space SAM files have the type samspace , while SAM Blockly files have the type beepboop .
After a student finishes creating a SAM Studio program, they can install the program on a corresponding SAM Labs device. To do so, the student must open their SAM file in SAM Studio and pair their device with the application.
How do I open a SAM file?
SAM files are meant to be opened in SAM Studio (Web, Chrome OS). To open a SAM file in SAM Studio, select the gray Import icon that appears on the program’s right-hand side. Then, select Import file .
If you do not have access to SAM Studio, or you want to view your SAM file’s plain text contents, you can also open the file in any text editor.
SAM File Extension
Ami Pro Document
What is SAM file?
File with SAM extension is a document file created with one of the first word processor tools ever released, Samna Ami Pro. In the early 1990s the technology was acquired by Lotus Development Corporation. The software was available for Windows 3.x and offered many advanced features long before MS Word was released. Ami Pro is now distributed as a part of Lotus SmartSuite package Word Pro.
Innovative word processor
Lotus Ami Pro in 1993 shipped with many advanced features that were ahead of its time. Among the features were:
graphical interface,
TrueType fonts,
vector graphics editor,
advanced text formatting settings saved in SAM files.
Programs which support SAM file extension
The following listing features SAM-compatible programs. SAM files can be encountered on all system platforms, including mobile, yet there is no guarantee each will properly support such files.
Programs that support SAM file
How to open file with SAM extension?
Being unable to open files with SAM extension can be have various origins. Fortunately, most common problems with SAM files can be solved without in-depth IT knowledge, and most importantly, in a matter of minutes. The following is a list of guidelines that will help you identify and solve file-related problems.
Step 1. Download and install Ami Pro
Problems with opening and working with SAM files are most probably having to do with no proper software compatible with SAM files being present on your machine. This one is an easy one. Select Ami Pro or one of the recommended programs (for example, Microsoft Word, WordPerfect Office, Ability Write) and download it from appropriate source and install on your system. Above you will find a complete listing of programs that support SAM files, classified according to system platforms for which they are available. If you want to download Ami Pro installer in the most secured manner, we suggest you visit website and download from their official repositories.
Step 2. Verify the you have the latest version of Ami Pro
If you already have Ami Pro installed on your systems and SAM files are still not opened properly, check if you have the latest version of the software. Sometimes software developers introduce new formats in place of that already supports along with newer versions of their applications. This can be one of the causes why SAM files are not compatible with Ami Pro. All of the file formats that were handled just fine by the previous versions of given program should be also possible to open using Ami Pro.
Step 3. Set the default application to open SAM files to Ami Pro
After installing Ami Pro (the most recent version) make sure that it is set as the default application to open SAM files. The next step should pose no problems. The procedure is straightforward and largely system-independent
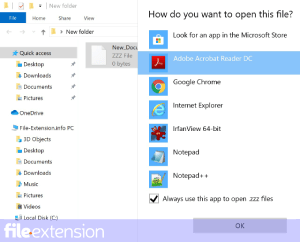
The procedure to change the default program in Windows
Right-click the SAM file and choose Open with option
Next, select the Choose another app option and then using More apps open the list of available applications
To finalize the process, select Look for another app on this PC entry and using the file explorer select the Ami Pro installation folder. Confirm by checking Always use this app to open SAM files box and clicking OK button.
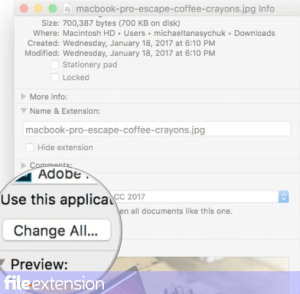
The procedure to change the default program in Mac OS
Right-click the SAM file and select Information
Find the Open with option – click the title if its hidden
Select Ami Pro and click Change for all.
Finally, a This change will be applied to all files with SAM extension message should pop-up. Click Continue button in order to confirm your choice.
Step 4. Verify that the SAM is not faulty
You closely followed the steps listed in points 1-3, but the problem is still present? You should check whether the file is a proper SAM file. It is probable that the file is corrupted and thus cannot be accessed.
1. The SAM may be infected with malware – make sure to scan it with an antivirus tool.
Should it happed that the SAM is infected with a virus, this may be that cause that prevents you from accessing it. Immediately scan the file using an antivirus tool or scan the whole system to ensure the whole system is safe. If the scanner detected that the SAM file is unsafe, proceed as instructed by the antivirus program to neutralize the threat.
2. Ensure the file with SAM extension is complete and error-free
If the SAM file was sent to you by someone else, ask this person to resend the file to you. It is possible that the file has not been properly copied to a data storage and is incomplete and therefore cannot be opened. When downloading the file with SAM extension from the internet an error may occurred resulting in incomplete file. Try downloading the file again.
3. Check if the user that you are logged as has administrative privileges.
There is a possibility that the file in question can only be accessed by users with sufficient system privileges. Log out of your current account and log in to an account with sufficient access privileges. Then open the Ami Pro Document file.
4. Verify that your device fulfills the requirements to be able to open Ami Pro
If the systems has insufficient resources to open SAM files, try closing all currently running applications and try again.
5. Ensure that you have the latest drivers and system updates and patches installed
Latest versions of programs and drivers may help you solve problems with Ami Pro Document files and ensure security of your device and operating system. It is possible that one of the available system or driver updates may solve the problems with SAM files affecting older versions of given software.
Хранение и шифрование паролей Microsoft Windows
Про взлом паролей windows было написано немало статей, но все они сводились к использованию какого-либо софта, либо поверхностно описывали способы шифрования LM и NT, и совсем поверхностно описывали syskey. Я попытаюсь исправить этот неодостаток, описав все подробности о том где находятся пароли, в каком виде, и как их преобразует утилита syskey.
Существует 2 возможности получения пароля — через реестр, или получив прямой доступ к файлам-кустам реестра. В любом случае нужны будут либо привелегии пользователя SYSTEM, либо хищение заветных файлов, например, загрузившись из другой ОС. Здесь я не буду описывать возможности получения доступа, но в целях исследования нагляднее будет выбрать первый вариант, это позволит не заострять внимание на структуре куста реестра. А запуститься от системы нам поможет утилита psExec от sysinternals. Конечно, для этих целей можно использовать уязвимости windows, но статья не об этом.
V-блок
Windows до версии Vista по умолчанию хранила пароль в двух разных хэшах — LM и NT. В висте и выше LM-хэш не хранится. Для начала посмотрим где искать эти хэши, а потом разберемся что из себя они представляют.
Пароли пользователей, а так же много другой полезной информации хранится в реестре по адресу HKLM\SAM\SAM\Domains\Account\users\[RID]\V , известном как V-блок. Раздел SAM находится в соответствующем файле c:\Windows\System32\config\SAM. RID — уникальный идентификатор пользователя, его можно узнать, например заглянув в ветку HKLM\SAM\SAM\Domains\Account\users\names\ (параметр Default, поле — тип параметра). Например, RID учетной записи «Администратор» всегда 500 (0x1F4), а пользователя «Гость» — 501 (0x1f5). Доступ к разделу SAM по умолчанию возможен только пользователю SYSTEM, но если очень хочется посмотреть — запускаем regedit c правами системы:
PsExec.exe -s -i -d regedit.
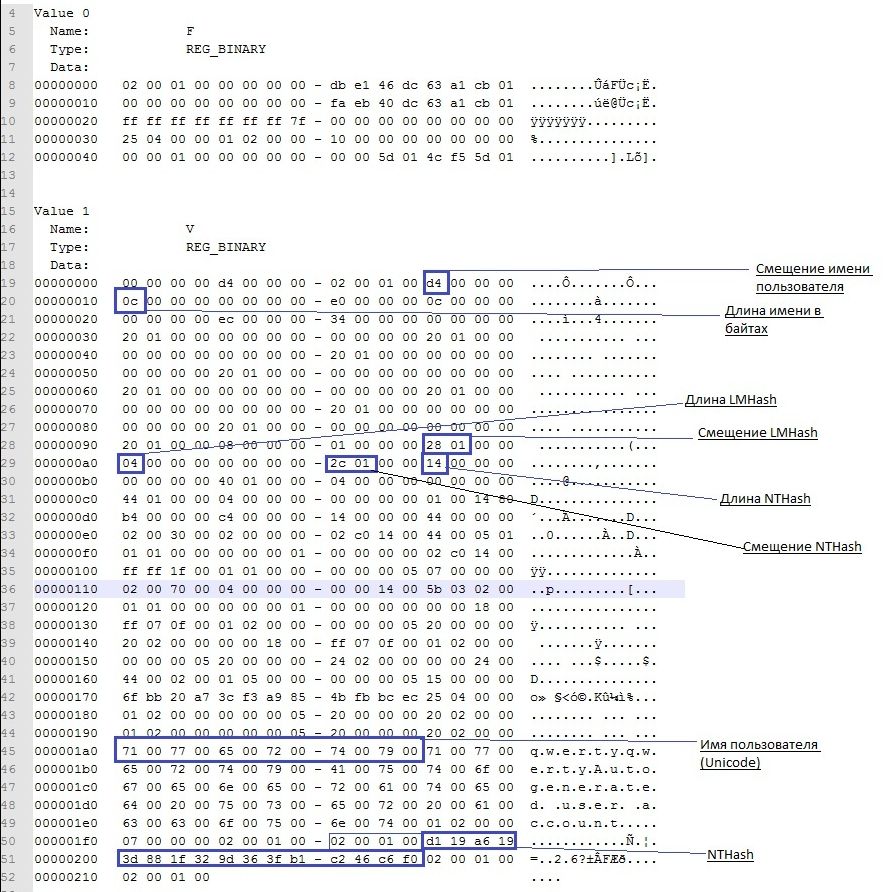
Чтобы наблюдать V-блок в удобном виде можно, например, экспортировать его в текстовый файл (File-Export в Regedit). Вот что мы там увидим: От 0x0 до 0xCC располагаются адреса всех данных, которые находятся в V-блоке, их размеры и некоторая дополнительная информация о данных. Чтобы получить реальный адрес надо к тому адресу, что найдем прибавить 0xCC. Адреса и размеры хранятся по принципу BIG ENDIAN, т.е понадобится инвертировать байты. На каждый параметр отводится по 4 байта, но фактически все параметры умещаются в одном-двух байтах. Вот где искать:
Адрес имени пользователя — 0xС Длина имени пользователя — 0x10 Адрес LM-хэша — 0x9с Длина LM-хэша — 0xa0 Адрес NT-хэша — 0xa8 длина NT-хэша — 0xac
В данном случае имя пользователя найдется по смещению 0xd4 + 0xcc и его длина будет 0xc байт. NT-хэш будет располагаться по смещению 0x12c + 0xcc и его размер (всегда один и тот же) = 0x14.
Еще одна деталь, касающаяся хранения паролей — как к NT- так и к LM-хэшу всегда добавляются спереди 4 байта, назначение которых для меня загадка. Причем 4байта будут присутствовать даже если пароль отключен. В данном случае видно, что длина LM хэша =4 и если посмотреть на его адрес, можно эти 4 байта увидеть несмотря на то что никакого LM-хэша нет. Поэтому при поиске смещений хэшей смело прибавляем 4 байта к адресу, а при учете размеров — вычитаем. Если удобнее читать код — вот примерно так будет выглядеть поиск адресов с учетом инверсии, лишних четырех байтов и прибавления стартового смещения 0xcc (код C#)
int lmhashOffset = userVblock[0x9c] + userVblock[0x9d] * 0x100 + 4 + 0xcc; int nthashOffset = userVblock[0xa8] + userVblock[0xa9] * 0x100 + 4 + 0xcc; int lmhashSize = userVblock[0xa0] + userVblock[0xa1] * 0x100 — 4; int nthashSize = userVblock[0xac] + userVblock[0xad] * 0x100 — 4; int usernameOffset = userVblock[0xc] + userVblock[0xd] * 0x100 + 0xcc; int usernameLen = userVblock[0x10] + userVblock[0x1a] * 0x100; userVblock — значение HKLM\SAM\SAM\Domains\Account\users\\V в виде массива байт. Еще про V-блок можно почитать тут.
Алгоритмы
Теперь разберемся в алгоритмах шифрования. Формирование NT-хэша: 1. Пароль пользователя преобразуется в Unicode-строку. 2. Генерируется MD4-хэш на основе данной строки. 3. Полученный хэш шифруется алгоритмом DES, ключ составляется на основе RID пользователя. Формирование LM-хэша: 1. Пароль пользователя преобразуется в верхний регистр и дополняется нулями до длины 14 байт. 2. Полученная строка делится на две половинки по 7 байт и каждая из них по отдельности шифруется алгоритмом DES. В итоге получаем хэш длиной 16 байт (состоящий из двух независимых половинок длиной по 8 байт). 3. Полученный хэш шифруется алгоритмом DES, ключ составляется на основе RID пользователя.
4. В windows 2000 и выше оба полученых хэша дополнительно шифруются алоритмом RC4 с помощью ключа, известного как «системный ключ» или bootkey, сгенерированого утилитой syskey, и шифруются довольно хитрым образом.
Рассмотрим общую последовательность действий для получения исходного пароля и каждый шаг в отдельности 1. Получаем bootkey, генерируем на его основе ключи для RC4, расшифровываем хэши с помощью RC4 2. Получаем ключи для DES из RID’ов пользователей, расшифровываем хэши DES’ом 3. Полученые хэши атакуем перебором.
Bootkey
Системный ключ (bootkey) разбит на 4 части и лежит в следующих разделах реестра:
Раздел system находится в файле c:\Windows\System32\config\system
Следует отметить, что раздел CurrentControlSet является ссылкой на один из разделов controlset и создается в момент загрузки системы. Это значит что не получится его найти в файле system, если система неактивна. Если вы решили искать ключ в файле — необходимо узнать значение ContolSet по умолчанию в HKLM\SYSTEM\Select\default. например если HKLM\SYSTEM\Select\default = 1 — вместо HKLM\System\CurrentControlSet\ ищем в HKLM\System\controlset001\
У каждого ключа реестра есть некий скрытый атрибут, известный как «class». Regedit его так просто не покажет, однако его можно увидеть, например, если экспортировать эти ключи реестра в текстовые файлы. В winapi для получения этого атрибута есть функция RegQueryInfoKey. Фрагменты хранятся в строковом представлении шестнадцатеричных чисел, причем по принципу BIG ENDIAN (т.е не строка задом наперед, а число). Например мы обнаружили вот такие записи:
Key Name: HKEY_LOCAL_MACHINE\SYSTEM\CurrentControlSet\Control\Lsa\JD Class Name: 46003cdb = <0xdb,0x3c,0x00,0x46> Key Name: HKEY_LOCAL_MACHINE\SYSTEM\CurrentControlSet\Control\Lsa\Skew1 Class Name: e0387d24 = <0x24,0x7d,0x38,0xe0> Key Name: HKEY_LOCAL_MACHINE\SYSTEM\CurrentControlSet\Control\Lsa\GBG Class Name: 4d183449 = <0x49,0x34,0x18,0x4d> Key Name: HKEY_LOCAL_MACHINE\SYSTEM\CurrentControlSet\Control\Lsa\Data Class Name: 0419ed03 =
Собраный из четырех частей ключ будет массивом байт:
Далее элементы этого массива переставляются на основе некоторого константного массива p
key[i] = scrambled_key[p[i]];
В нашем примере получится массив:
этот массив и есть так называемый bootkey. Только в шифровании паролей будет учавствовать не он а некий хэш на основе bootkey, фрагментов f-блока и некоторых констант. Назовем его Hashed bootkey.
Hashed bootkey
для получения Hashed bootkey нам понадобятся 2 строковые константы (ASCII):
string aqwerty = «!@#$%^&*()qwertyUIOPAzxcvbnmQQQQQQQQQQQQ)(*@&%\0»; string anum = «0123456789012345678901234567890123456789\0»; Также понадобится F-блок пользователя (HKLM\SAM\SAM\Domains\Account\users\\F), а именно его 16 байт: F[0x70:0x80]
На основе этих значений, склееных в один большой массив формируем MD5 хэш, который будет являться ключем для шифрования RC4
Последним шагом для получения hashed bootkey будет rc4 шифрование( или дешифрование — в rc4 это одна и та же функция) полученым ключем фрагмента F-блока F[0x80:0xA0];
Hashed bootkey у нас в руках, осталось научиться с ним правильно обращаться.
Дешифруем пароли с помощью Hashed Bootkey
для паролей LM и NT нам понадобятся еще 2 строковые константы —
а так же RID пользователя в виде 4х байт (дополненый нулями) и первая половина Hashed Bootkey (hashedBootkey[0x0:0x10]); Все это склеивается в один массив байт и считается MD5 по правилам: rc4_key_lm = MD5(hbootkey[0x0:0x10] +RID + almpassword); rc4_key_nt = MD5(hbootkey[0x0:0x10] +RID + antpassword);
полученый md5 хэш — ключ для rc4, которым зашифрованы LM и NT хэши в V-блоке пользователя
На этом этапе мы получили пароли пользователя в том виде в каком они хранились бы без шифрования syskey, можно сказать, что самое сложное позади. Переходим к следующему шагу
На основе четырех байт RID’а пользователя с помощью некоторых перестановок и побитовых операций создаем 2 ключа DES. Вот функции, которые осуществляют обфускацию (С#): private byte[] str_to_key(byte[] str) < byte[] key = new byte[8]; key[0] = (byte)(str[0] >> 1); key[1] = (byte)(((str[0] & 0x01) > 2)); key[2] = (byte)(((str[1] & 0x03) > 3)); key[3] = (byte)(((str[2] & 0x07) > 4)); key[4] = (byte)(((str[3] & 0x0F) > 5)); key[5] = (byte)(((str[4] & 0x1F) > 6)); key[6] = (byte)(((str[5] & 0x3F) > 7)); key[7] = (byte)(str[6] & 0x7F); for (int i = 0; i
Ну здесь особо комментировать нечего, кроме функции des_set_odd_parity(ref key) — это одна из функций библиотеки openssl, задача которой добавить некоторые «биты нечетности», используется для повышения стойкости ключа к атакам.
Далее разбиваем NT (или LM) хэш на 2 части по 8 байт и дешифруем DES’ом -одна половина зашифрована ключем сформированым функцией sid_to_key1, вторая — sid_to_key2. obfskey_l = userNTpass[0x0:0x7] obfskey_r = userNTpass[0x8:0xF] byte[] deskey1 = sid_to_key1(RID); byte[] deskey2 = sid_to_key2(RID); byte[] md4hash_l = DES(obfskey_l, deskey1); byte[] md4hash_r = DES(obfskey_r, deskey2);
После склеивания двух половин мы получим md4 хэш -в случае NT, или LanMan (DES) — в случае LM. Полученый хэш полностью готов к атаке перебором. Кстати, md4 Хэш от пустого пароля — 31d6cfe0d16ae931b73c59d7e0c089c0
Исследование проведено на основе исходного кода ophcrack-3.3.1, а так же статьи Push the Red Button:SysKey and the SAM
 Problems with opening and working with SAM files are most probably having to do with no proper software compatible with SAM files being present on your machine. This one is an easy one. Select Ami Pro or one of the recommended programs (for example, Microsoft Word, WordPerfect Office, Ability Write) and download it from appropriate source and install on your system. Above you will find a complete listing of programs that support SAM files, classified according to system platforms for which they are available. If you want to download Ami Pro installer in the most secured manner, we suggest you visit website and download from their official repositories.
 If you already have Ami Pro installed on your systems and SAM files are still not opened properly, check if you have the latest version of the software. Sometimes software developers introduce new formats in place of that already supports along with newer versions of their applications. This can be one of the causes why SAM files are not compatible with Ami Pro. All of the file formats that were handled just fine by the previous versions of given program should be also possible to open using Ami Pro.