- Shut down, sleep, or hibernate your PC
- Turn your PC off completely
- Sleep
- Hibernate
- Sleep function (synchapi.h)
- Syntax
- Parameters
- Return value
- Remarks
- Fix Windows 10 Sleep Mode Not Working [Solved]
- How To Fix Windows 10 Not Sleeping
- Fix 1 – Find out who is stopping windows 10 from sleep
- # To know what are the applications who hinder with sleep mode always run :-
- # To know who prevented your laptop from going to sleep recently run :-
- # To know all the devices who wake up your Computer run:-
- Fix 2 – Disable wake timers
- Fix 3 – Allow Computer To Sleep
- Fix 4 – Disable Fast startup
- Fix 5 – Disable Screensaver
- Fix 6 – Check Sleep settings
- Fix 7 – Do A Clean Boot
- Fix 8 – Use Windows Troubleshooter To Fix Windows 10 Not Sleeping
- Fix 9 – Update Windows 10
- Fix 10 – Disable Hybrid Mode
- Additional Methods
- Fix 11 – Scan PC for Virus/Malware
- Fix 12 – Disconnect Peripheral Devices
- Closing Words
Shut down, sleep, or hibernate your PC
There are many ways to shut down your PC—you can turn the PC off completely, you can make it sleep, or you can hibernate the PC.
Turn your PC off completely
Select Start and then select Power > Shut down.
For Windows 8.1 / Windows RT 8.1
Move your mouse to the lower left-hand corner of the screen and right-click the Start button or press Windows logo key + X on your keyboard. Tap or click Shut down or sign out and choose Shut down.
Click the Start button  and then click the Shut down button.
Sleep
This uses very little power, your PC starts up faster, and you’re instantly back to where you left off. You don’t have to worry that you’ll lose your work because of your battery draining, because Windows automatically saves all your work and turns off the PC if the battery is too low. Use sleep when you’re going to be away from your PC for just a little while—like when you’re taking a coffee break.
For a lot of PCs (especially laptops and tablets), your PC goes to sleep when you close your lid or press the power button.
To make your PC sleep:
Open power options:
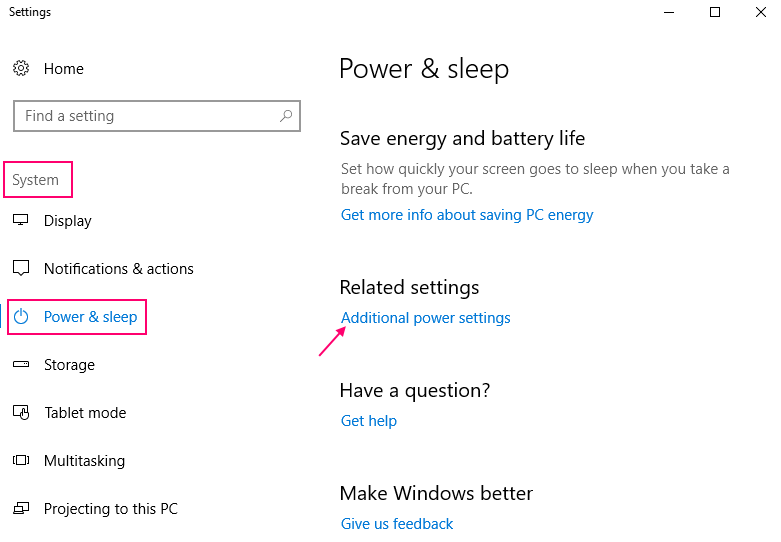
For Windows 10, select Start , then select Settings > System > Power & sleep > Additional power settings.
For Windows 8.1 / Windows RT 8.1, swipe in from the edge of the screen, tap Search (or if you’re using a mouse, point to the upper-right corner of the screen, move the mouse pointer down, and then click Search), enter Power options in the search box, and then tap or click Power options.
For Windows 7, click the Startbutton , click Control Panel, click System and Security, and then click Power Options.
Do one of the following:
If you’re using a desktop, tablet, or laptop, select Choose what the power buttons do. Next to When I press the power button, select Sleep, and then select Save changes.
If you’re using only a laptop, select Choose what closing the lid does. Next to When I close the lid, select Sleep, and then select Save changes.
When you’re ready to make your PC sleep, just press the power button on your desktop, tablet, or laptop, or close your laptop’s lid.
On most PCs, you can resume working by pressing your PC’s power button. However, not all PCs are the same. You might be able to wake it by pressing any key on the keyboard, clicking a mouse button, or opening the lid on a laptop. Check the documentation that came with your computer or go to the manufacturer’s website.
Hibernate
This option was designed for laptops and might not be available for all PCs. (For example, PCs with InstantGo don’t have the hibernate option.) Hibernate uses less power than sleep and when you start up the PC again, you’re back to where you left off (though not as fast as sleep).
Use hibernation when you know that you won’t use your laptop or tablet for an extended period and won’t have an opportunity to charge the battery during that time. First check to see if this option is available on your PC and if it is, turn it on.
To hibernate your PC:
Open power options:
For Windows 10, select Start , then select Settings > System > Power & sleep > Additional power settings.
For Windows 8.1 / Windows RT 8.1, swipe in from the edge of the screen, tap Search (or if you’re using a mouse, point to the upper-right corner of the screen, move the mouse pointer down, and then click Search), enter Power options in the search box, and then tap or click Power options.
For Windows 7, click the Start button , click Control Panel, click System and Security, and then click Power Options.
Select Choose what the power button does, and then select Change settings that are currently unavailable. Under Shutdown settings, select the Hibernate checkbox (if it’s available), and then select Save changes.
Now you’ll be able to hibernate your PC in a few different ways:
For Windows 10, select Start , and then select Power > Hibernate. You can also press the Windows logo key + X on your keyboard, and then select Shut down or sign out > Hibernate.
For Windows 8.1 / Windows RT 8.1, move your mouse to the lower left-hand corner of the screen and right-click the Start button or press Windows logo key + X on your keyboard. Tap or click Shut down or sign out and choose Hibernate. Or, swipe in from the right edge of the screen and then tap Settings. (If you’re using a mouse, point to the lower-right corner of the screen, move the mouse pointer up, and then click Settings.) Tap or click Power > Hibernate.
For Windows 7, click the Start button , click the arrow next to the Shut down button, and then click Hibernate.
Note: If devices connected to your PC (like monitors, printers, or scanners) aren’t working properly after waking up from sleep or hibernate, you might need to disconnect and reconnect your device or restart your PC. You should also make sure that you have the most current drivers for all of your devices.
Sleep function (synchapi.h)
Suspends the execution of the current thread until the time-out interval elapses.
To enter an alertable wait state, use the SleepEx function.
Syntax
Parameters
The time interval for which execution is to be suspended, in milliseconds.
A value of zero causes the thread to relinquish the remainder of its time slice to any other thread that is ready to run. If there are no other threads ready to run, the function returns immediately, and the thread continues execution.WindowsВ XP:В В A value of zero causes the thread to relinquish the remainder of its time slice to any other thread of equal priority that is ready to run. If there are no other threads of equal priority ready to run, the function returns immediately, and the thread continues execution. This behavior changed starting with Windows ServerВ 2003.
A value of INFINITE indicates that the suspension should not time out.
Return value
Remarks
This function causes a thread to relinquish the remainder of its time slice and become unrunnable for an interval based on the value of dwMilliseconds. The system clock «ticks» at a constant rate. If dwMilliseconds is less than the resolution of the system clock, the thread may sleep for less than the specified length of time. If dwMilliseconds is greater than one tick but less than two, the wait can be anywhere between one and two ticks, and so on. To increase the accuracy of the sleep interval, call the timeGetDevCaps function to determine the supported minimum timer resolution and the timeBeginPeriod function to set the timer resolution to its minimum. Use caution when calling timeBeginPeriod, as frequent calls can significantly affect the system clock, system power usage, and the scheduler. If you call timeBeginPeriod, call it one time early in the application and be sure to call the timeEndPeriod function at the very end of the application.
After the sleep interval has passed, the thread is ready to run. If you specify 0 milliseconds, the thread will relinquish the remainder of its time slice but remain ready. Note that a ready thread is not guaranteed to run immediately. Consequently, the thread may not run until some time after the sleep interval elapses. For more information, see Scheduling Priorities.
Be careful when using Sleep in the following scenarios:
- Code that directly or indirectly creates windows (for example, DDE and COM CoInitialize). If a thread creates any windows, it must process messages. Message broadcasts are sent to all windows in the system. If you have a thread that uses Sleep with infinite delay, the system will deadlock.
- Threads that are under concurrency control. For example, an I/O completion port or thread pool limits the number of associated threads that can run. If the maximum number of threads is already running, no additional associated thread can run until a running thread finishes. If a thread uses Sleep with an interval of zero to wait for one of the additional associated threads to accomplish some work, the process might deadlock.
For these scenarios, use MsgWaitForMultipleObjects or MsgWaitForMultipleObjectsEx, rather than Sleep.
Windows Phone 8.1: This function is supported for Windows Phone Store apps on Windows Phone 8.1 and later.
WindowsВ 8.1 and Windows ServerВ 2012В R2: This function is supported for Windows Store apps on WindowsВ 8.1, Windows ServerВ 2012В R2, and later.
Fix Windows 10 Sleep Mode Not Working [Solved]
Windows 10 may sometimes trouble its users with petty issues, such as Sleep Mode Not Working. Many users have complained about Windows 10 Not Sleeping while they try to make it sleep. This is a very common issue, and there could be several reasons for such an issue to occur. Interference of a third party software, inappropriate settings, and device driver issues are the main causes why the computer won’t go to sleep in Windows 10.
There are mainly two types of Sleep Mode issues Windows 10 users may face:
- Computer Won’t Go To Sleep In Windows 10
- Sleep Option Missing in Windows 10
In the following article, we try to find apt solutions to fix the Windows 10 not sleeping issue. Let us take a look.
How To Fix Windows 10 Not Sleeping
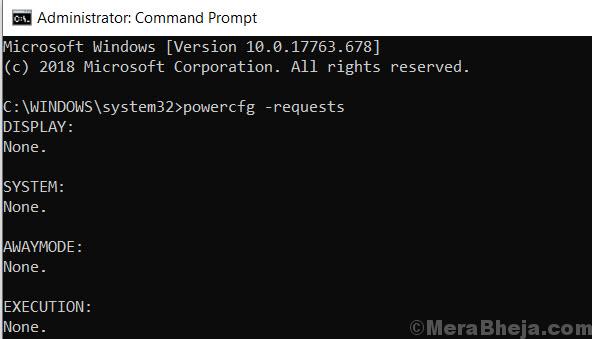
Fix 1 – Find out who is stopping windows 10 from sleep
1. Search CMD in Windows 10 Search Box. Right click on command prompt icon and click on run as administrator.
2. Run the command given below to know which applications hinders sleep mode other than basic needed applications.
# To know what are the applications who hinder with sleep mode always run :-
Note: The result will display all the applications which hinder sleep. Try to find the culprit from the result and uninstall it. If it seems to be originating from a software program you installed, uninstall it from control panel.
If you want to directly disable this process from command prompt, run the command given below.
For example lets say Process yc.exe seems to be culprit. so we will run the following command.
# To know who prevented your laptop from going to sleep recently run :-
# To know all the devices who wake up your Computer run:-
Lets say , the issue seems to be originating from a network adapter, just follow the steps given below.
1. Search device manager in Windows 10 search box.

2. Expand Network adapters.
3. Right click on the Network adapter which seems to be causing the issue and click on properties.
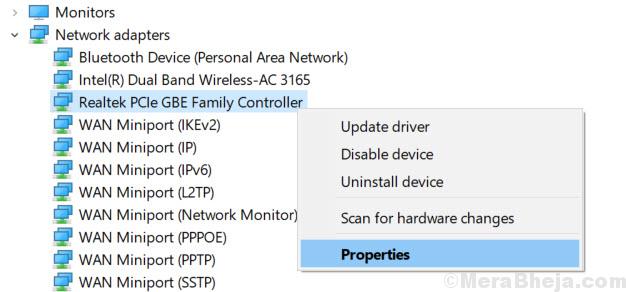
4. Click on power management Tab and check the option saying Allow the computer to turn off this device

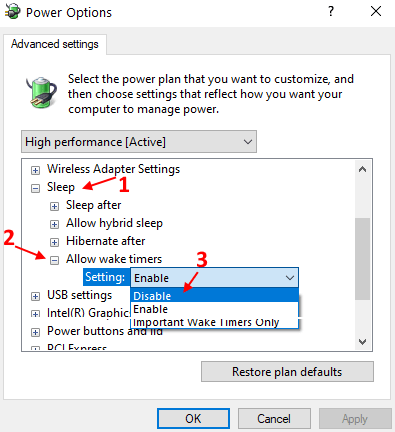
Fix 2 – Disable wake timers
1. Press Windows key + R key together to open run.
2. Copy and paste the path given below to open power options

3. Now, Double Click on sleep to expand
4. Now, Double click on Allow wake timers and choose disable.
In case you are on a laptop, Disable it for both On Battery and Plugged in Options.
Fix 3 – Allow Computer To Sleep
First of all, you will need to make sure that the basic Power settings are set to default that your PC can sleep. Sometimes, third-party software mess with settings and make changes that lead to issues like sleep mode not working in Windows 10. Follow these steps to change the Power settings to default:
Step 1: Search Edit Power Plan in Windows 10 search box.
Step 2 – Click on Edit power plan icon from the search result.

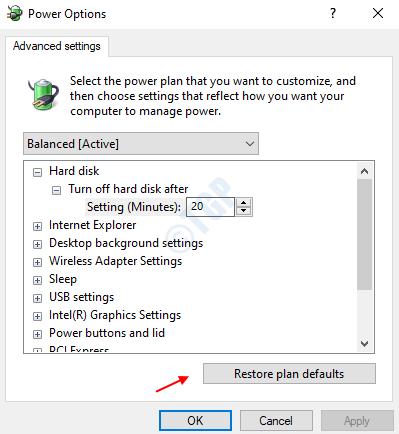
Step 3: Another window will open. Here, click on Change advanced power settings option.
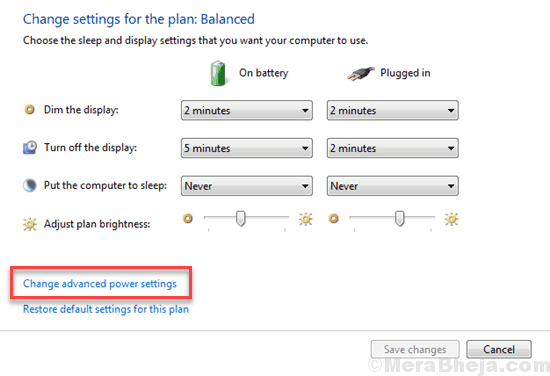
Step 4: A new Power Options windows will open. Here, click on Restore plan defaults.
Step 5: Additionally, in the Power Options window, you can expand the Multimedia settings option, and then expand the When sharing media option. Here, for both On battery and Plugged in options, select Allow the computer to sleep from the drop-down.
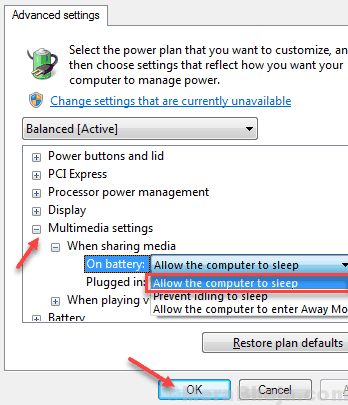
Note: You will not get two options in the When sharing media menu if you are using a PC. You will get just one option. In it, select the Allow the computer to sleep option.
After applying changes, click on Ok to apply the settings. Now, see if you are able to put the computer to sleep. If not, try the next method.
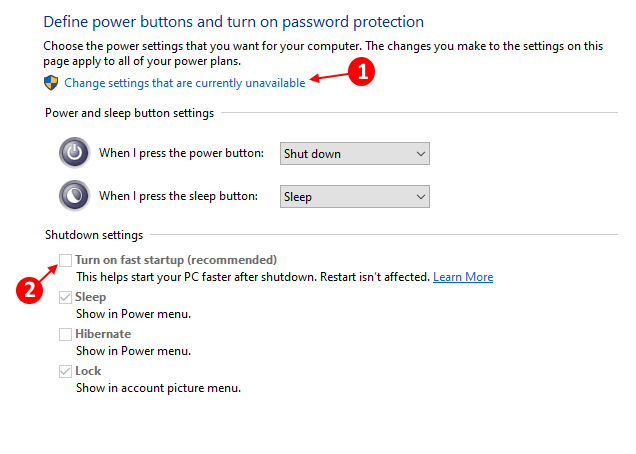
Fix 4 – Disable Fast startup
Fast startup is an useful feature of windows 10 in which the System saves an image of loaded drivers and kernels in C:\hiberfil.sys file. When you restart your PC, it resumes these directly from the hiberfil.sys file. But some older PC / Laptop may not be compatible with this feature and may cause sleep issues in Windows 10. To disable Fast startup just do the following.
1. Search Power options in windows 10 search.

2. In left side , Click on Additional Power settings .
3. Click on “Choose what the power buttons do” from the left hand side of the window

4. Click on Change settings that are currently unavailable;
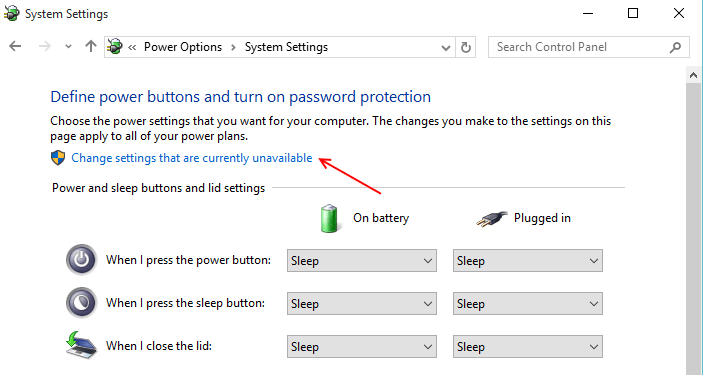
5. Uncheck the checkbox under this category that says “Turn on fast startup (recommended)”.
Fix 5 – Disable Screensaver
1. Search Change screen saver in Windows 10 search box.

2. Select None from the dropdown.

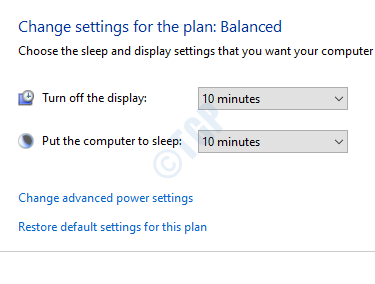
Fix 6 – Check Sleep settings
1. Press Windows key + R to open run.
2. Now, write powercfg.cpl in it and click OK.

3. Click on Choose when to turn off the display from left menu.
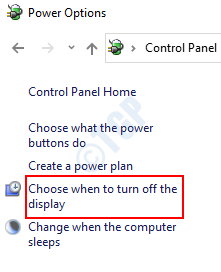
4. Now, check power settings and see that they are correct or not. If not, correct the settings.
Fix 7 – Do A Clean Boot
It might be possible that your PC is not able to sleep because of a third party software installed on it. In such a case, you will need to boot your PC in clean boot mode. In Clean boot mode, your PC starts with just the essential Windows programs and services. This makes sure that no third party software would start when your PC starts. So, if any such software is interrupting the PC to go into sleep mode, Clean Boot will take care of it.
If your PC is not sleeping after Clean Boot, try the next method.
Fix 8 – Use Windows Troubleshooter To Fix Windows 10 Not Sleeping
Windows Troubleshooter can sometimes solve an issue very effectively in Windows 10. The Troubleshooter can be helpful with resolving Windows 10 not sleeping issue. Follow these steps to run the Troubleshooter to fix the sleeping issue:
Step 1: Press Windows key + I to open settings.
Step 2 – Click on Update & Security
Step 3 – Click on Troubleshoot from the left menu.
Step 4 – Scroll down and click on Power.
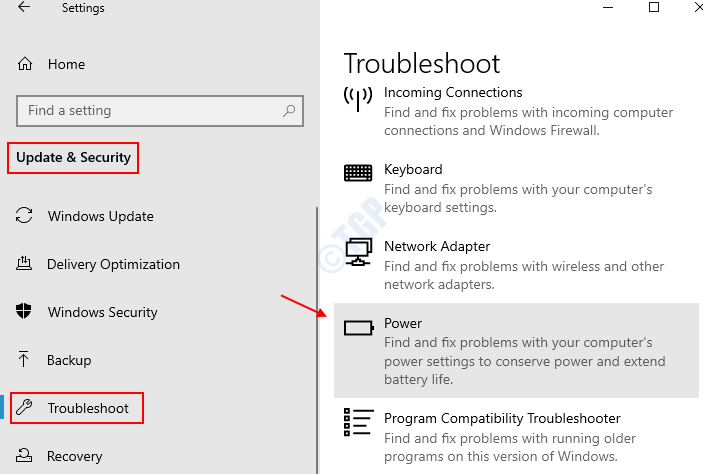
Step 5 – Click on Run the Troubleshooter from the expanded menu.
Step 6 – Let the troubleshooter complete its operation.
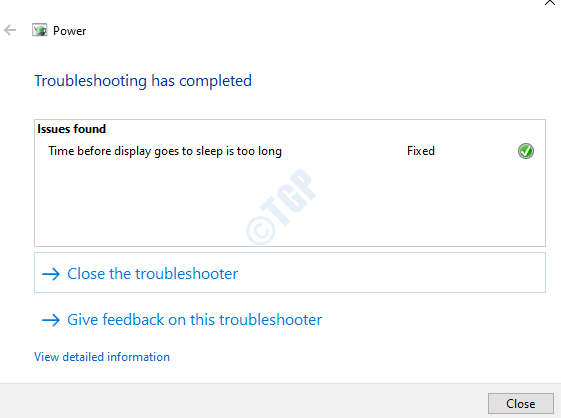
When done, try to check if the Sleep option works. If the Troubleshooter didn’t find any issue or didn’t fix the Windows 10 Not Sleeping issue, move on to the next method.
Fix 9 – Update Windows 10
Outdated Windows device drivers may be the reason to cause Sleep Mode Not Working in Windows 10. Updating Windows 10 to its latest version is something that it takes to update all the device drivers on your PC. After updating Windows 10, the sleep mode might work without any issue.
Here’s a quick article that will tell you how to update Windows 10. After the update is complete, check if the Sleep mode is working in your Windows 10 PC. If not, try out the next method.
Fix 10 – Disable Hybrid Mode
Under Power Options, options to enable/disable Hybrid Mode is available. This mode is a combination of Hibernation and Sleep modes. If the Hybrid Mode is On, it may cause your PC to not sleep. To fix the Windows 10 not sleeping issue by disabling Hybrid Mode, here are the steps to follow:
Step 1: Follow Step 1 to Step 3 from Method # 1. This will open the Advanced Power option settings.
Step 2: In the menu, look for the expandable option Sleep. In the Sleep menu, expand the Allow hybrid sleep, and in the option(s) available there, choose Off from their drop-down menu.
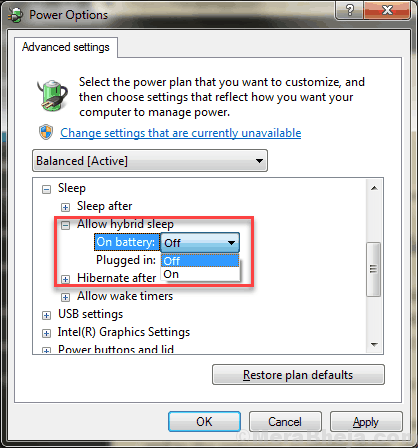
When done, click on the Ok button to apply settings. Then, restart your PC and check if the Sleep Mode not working issue has been fixed or not.
Additional Methods
Fix 11 – Scan PC for Virus/Malware
It might be possible that your PC has some sort of Virus or Malware. And, virus attacks can at times affect the normal functioning of PC, which includes Windows 10 Sleep Node Not Working.
If you do not have an Antivirus installed, get one as soon as possible and scan your PC for virus or malware. Here is a list of best free Antivirus for Windows 10. Scan your PC after installing an Antivirus and see if a threat is detected and removed. Now check if you are able to put your PC to sleep.
Fix 12 – Disconnect Peripheral Devices
Some peripheral devices connected to your PC might be the reason for Windows 10 not sleeping. Remove or disconnect the externally connected peripheral devices on your PC.
Essential devices such as Mouse/Keyboard must not cause any issue. Remove devices such as Printer, Scanner, Webcam, External DVD, etc. connected to your PC and check if that fixes the Windows 10 not sleeping issue.
Closing Words
Windows 10 not sleeping or the Windows 10 Sleep Mode Not Working issue is a very common and easy to fix. The above methods would easily solve the issue for you. Do let us know that which of the methods worked for you to fix this problem on your PC.


