- Solution Menu EX
- FIX: Open with menu option is missing in Windows 10
- How can I fix the Open with menu missing in Windows 10?
- 1. Check your antivirus
- What to Do If Your Windows 10 Start Menu Doesn’t Work?
- Restart the PC
- Look for Corrupted Files
- Restart Windows Explorer
- Start Application Identity Service
- Turn Off Sign-in Info
- Create New Admin Account
- Check Your Apps
- Canon Solution Menu EX for Mac and Windows
- What is Canon Solution Menu EX?
- Windows 10 Start Menu Search Not Working? Here Are Some Fixes
- 1. Roll Back Windows 10 Update
- 2. Enable Background Apps
- 3. Rebuild the Index
- 4. Run Windows Troubleshooter
- 5. Use the System File Checker
- 6. Disable/Restart Third-Party Antivirus, Enable Windows Firewall
- 7. Move or Rebuild Swapfile.sys
- 8. Restart Windows Explorer
- 9. Check Windows Search Service
- 10. Repair Windows Installation
- 11. Or Try “Everything” as a Workaround
- 4 comments
Solution Menu EX

Canon is a producer for a lot of devices such as printers and scanners. This utility is designed to organize your activity when you want to access these devices and accomplish different tasks. This is an application that comes in handy that allows you to have an organized life. You also have a chance to scan photos and images as well as other professional documents.
The program is smart enough to display in a menu the most frequent accessed shortcuts. You have to make sure that you have a help file, you have all the documentation to a point in which you can be able to handle all the functional applications. You can use both the offline and the online version of the tool. That means that you can search the information manually on the internet. This is a test run that prove that this is a function that the functionality and performance. It is a freeware with a bundle of drivers to make sure that you can handle all manner of functions.
It makes sure that it can launch on the desktop to make sure that it can launch in form of a shortcut. This is a simple application that can handle using any person despite the level of experience.
Solution Menu EX is licensed as freeware for PC or laptop with Windows 32 bit and 64 bit operating system. It is in drivers hardware category and is available to all software users as a free download.
FIX: Open with menu option is missing in Windows 10

- Users report that the Open with option is missing from the context menu without any warning or obvious reason.
- We will explore in this article what steps you can do in order to solve this issue, so keep reading.
- Bookmark our Windows 10 Hub for more helpful guides and news.
- Check out our dedicated Fix section for more related information.

If you want to open a certain file with a different program, usually you’ll right-click that file and choose the Open with from the menu.
Many users use the Open with menu on their PC, but sometimes this menu can become missing.
Users reported the following problems:
- Windows 10 Open with not working – This is a strange problem, but you should be able to fix it by keeping your Windows up to date.
- Open with disabled windows 10 –If you’re having this problem, you might have to tweak your registry in order to fix it.
- Windows 10 Open with greyed out – This can be a big problem, but you should be able to fix that by creating a new user account.
- Open with missing from the context menu, right-click – If you’re having this problem, be sure to try some of our solutions.
How can I fix the Open with menu missing in Windows 10?
1. Check your antivirus
An antivirus is a crucial component of every PC because it provides you with protection from online threats.
However, sometimes your antivirus can interfere with Windows and that can cause the Open with menu to become missing.
If you’re having this problem, we advise you to temporarily disable your antivirus and check if that solves the issue.
Now, if that doesn’t help, you might have to uninstall your antivirus. If removing your antivirus solves the problem, you’ll need to switch to a different antivirus solution.
There are many great antivirus tools available on the market, but currently, the best antivirus applications is Bitdefender.
There are many great selling points to why you should use it, and some of them are its excellent protection against viruses and the use of minimal PC resources, although constantly running in the background.
Bitdefender has made a name for itself due to it’s enhanced security and deep scan options that stop any threats even before becoming an issue.
What to Do If Your Windows 10 Start Menu Doesn’t Work?
Don’t panic: just follow these steps
Long-time Windows users know the importance of the Start button. So what if that beloved icon suddenly stops responding? What do you do when the Windows 10 Start menu vanishes from your desktop?
There’s no need to worry. We’ve compiled a list of troubleshooting solutions for common Start menu-related issues.

Restart the PC
It sounds silly having to remind people to restart their computer at the first sign of trouble. You’ll be surprised how most issues resolve themselves by simply restarting the PC. So before anything else, give that a whirl and see if that fixes everything.
Look for Corrupted Files
Windows has a built-in system file checker that fixes corrupted files and restores the computer to its proper state. To perform a system file check (SFC), follow the steps below.
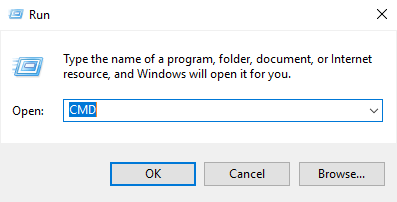
Open Run by holding the Windows button then R on your keyboard.
Use Run to open Command Prompt by typing CMD.
Once in the Command Prompt, type SFC /SCANNOW.
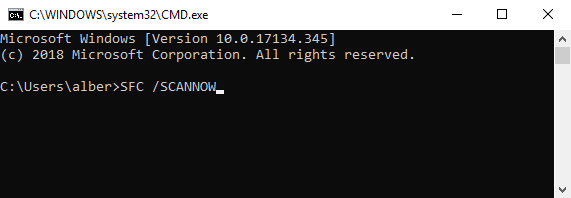
This will instruct Windows to fix any corrupt file in your system. If that method fails, you can use a different command. From the Command Prompt, type:
DISM /ONLINE /CLEANUP-IMAGE /RESTOREHEALTH
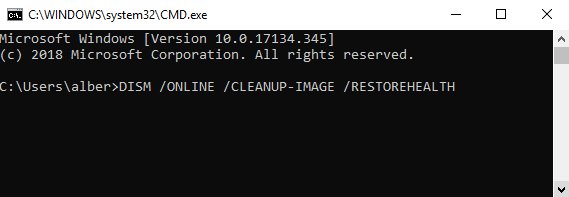
This enables the Deployment Imaging and Servicing Management (DISM) tool. DISM Online Cleanup can fix errors that prevent SFC from doing its job.
Restart Windows Explorer
Windows Explorer is the process that handles the Start menu. Restarting the process can get the Start button to act normally once again.
Open Task Manager by holding CTRL, SHIFT, and ESC at the same time.
Go to the Processes tab. Note: Click More Details if you don’t see tabs.
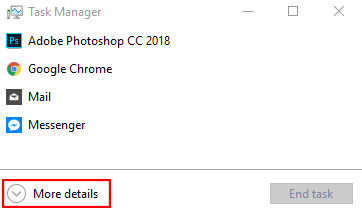
Scroll down and find Windows Explorer from the list of active applications.
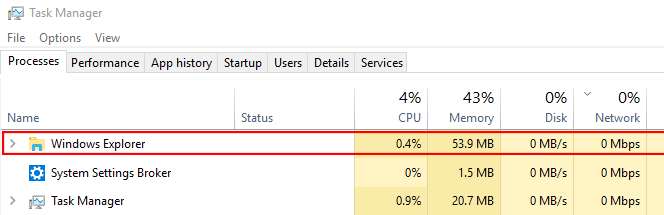
Right-click Windows Explorer and click Restart.
Start Application Identity Service
The Application Identity Service is a Windows 10 service that casual users shouldn’t touch with a ten-foot pole. However, there’s a chance that forcing the application to run can fix the Start menu problem.
Go to Run (Windows + R) and type SERVICES.MSC.
Find Application Identity in the list of services.
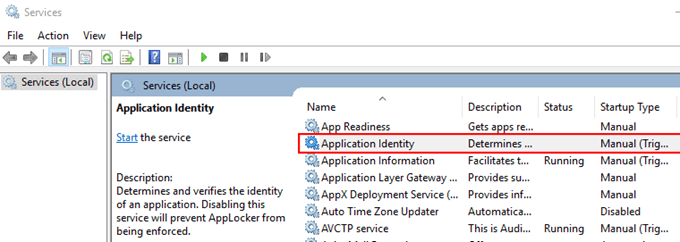
Right-click Application Identity and hit Start. Restart the computer.
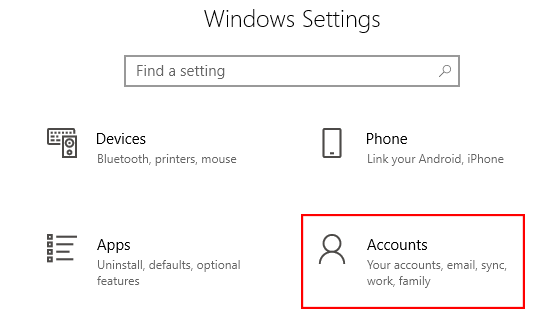
Turn Off Sign-in Info
Having trouble with the Start button as soon as you restart your computer or whenever there’s a Windows update? It could have something to do with your Windows account. Uncoupling your account from the PC could be the solution.
Go to Settings (Windows + I) > Accounts > Sign-in Options.
Scroll down until you find the Privacy options.
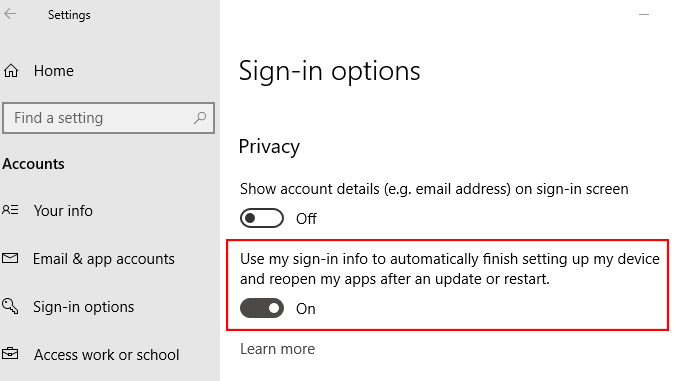
Turn off the option to use your sign-in info to set up your device after an update or restart.
Create New Admin Account
If you have no personal attachment to your current admin account, creating a new one is worth considering. Try creating a fresh admin account and see if the missing Start button issue resolves itself in the process.
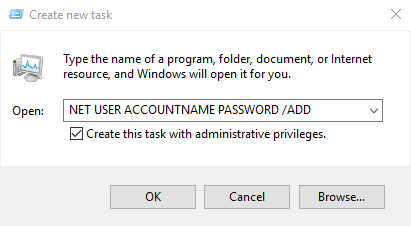
- Open Task Manager (press CTRL + SHIFT + ESC).
- Go to File >Run New Task.
- Type NET USER ACCOUNTNAME PASSWORD /ADD
Note: Replace ACCOUNTNAME with your preferred username. Same with PASSWORD.
Tick the box that enables the account to have administrative privileges.
Log in to the new account. See if the Start button is there or not.
If the new account shows no issues, transfer all your settings from the old account. Log back into your flawed account.
Go to Control Panel (Go to Run and type Control Panel) > System > Advanced System Settings.
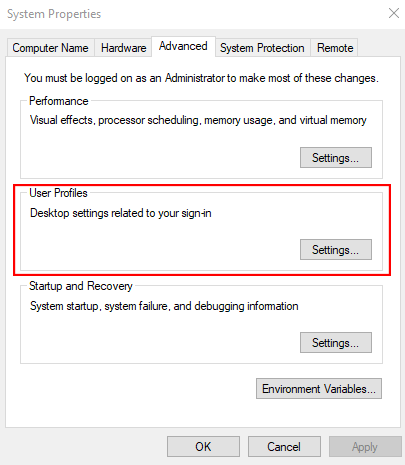
Go to the Advanced tab. Click Settings under User Profiles.
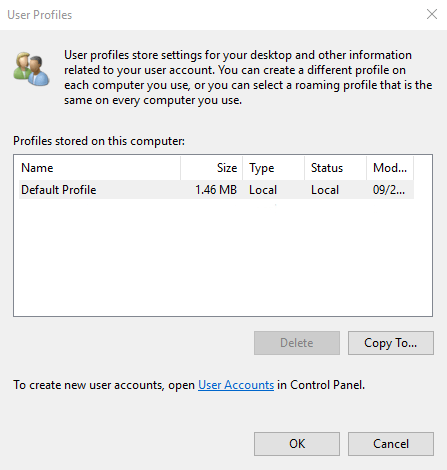
Select your new profile and click Copy To.
Check Your Apps
Have you been installing new apps lately? It’s possible that the Start Menu issue stems from an app you’ve recently installed. Uninstall all new apps and see if that fixes the problem.
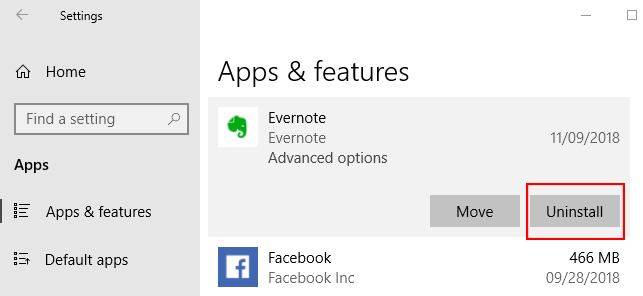
To uninstall an app, go to Settings (Windows + I).
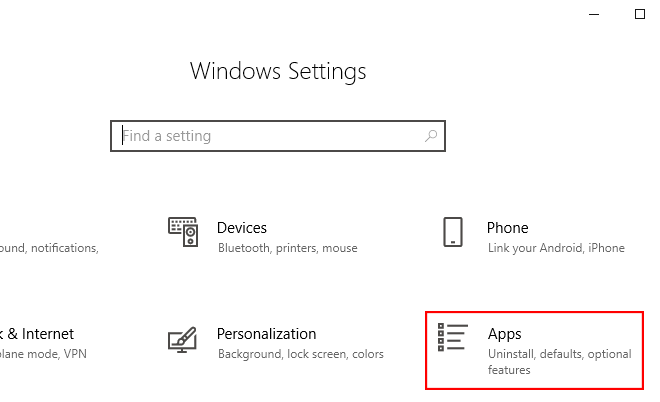
Go to Apps > Apps & Features. Scroll down the list of apps until you find the one you’re looking for. Click the name of the app and click Uninstall.
Alternatively, you can uninstall all your apps through Powershell. Go to Run (Win + R) and type Powershell. Make sure you right-click the Powershell icon and run it as an administrator. Type the following command:

Restart your computer and see if the Start button works again. Enjoy!
Christopher Jan Benitez is a freelance writer for hire who provides actionable and useful web content to small businesses and startups. In his spare time, he religiously watches professional wrestling and finds solace in listening to ’80s speed metal. Read Christopher’s Full Bio
Canon Solution Menu EX for Mac and Windows
What is Canon Solution Menu EX?
The Canon Solution EX menu is a software application that lets you print albums or calendars with all the conveniences, or scan photos and documents. This is an easy-to-use control center for your All-In-One printer scanner.

During setup, the program creates a startup point in Windows to run automatically when the user is booting the PC. Scheduled tasks are added to the Windows Task Scheduler to launch applications at various scheduled times (their schedules vary by version).
The software is designed to connect to the Internet and add Windows Firewall exceptions to do so without interference. The main execution of the program is cnsemain.exe and has been seen to consume an average CPU of less than one percent, and takes up about 37.33 MB of memory.
It also includes a system tray icon displayed in the notification area when the program runs. The setup package installs around 23 files and is typically about 7.91 MB (8,294,015 bytes).
Download – Solution Menu EX Ver. 1.4.1 – (Windows 8.1/8.1 x64/8/8 x64/7/7 x64/Vista/Vista64/XP)
Download – Solution Menu EX Ver. 1.4.1 – (OS X 10.4/10.5/10.6/10.7/10.8/10.9/10.10)
Description:
This file can immediately start the manuals or application software that allows you to print album or calendar easily, or scan photos and documents.
Windows 10 Start Menu Search Not Working? Here Are Some Fixes

The Windows Start Menu search used to be simple – tiles and Cortana did not get in the way of you perusing your PC for the files you want. Things got a bit messy in Windows 10, but recent updates have removed issues like Cortana from the feature, and the May 2019 update revamped the search interface, making your searches feel a bit more detailed and granular.
With Cortana out of the way, the Start menu search is a bit more stable and less bloated. Still, it can sometimes stop working, so we’re here to give some pointers on how to fix it.
1. Roll Back Windows 10 Update
It’s quite often the case (as you’ll see throughout this list) that the Start menu search bar can stop working after a Windows 10 update. Sometimes a solution can be found despite the new Windows update, but if you want to play things safe, then you can always undo the Windows 10 update, taking you back to the last-updated version of Windows.
To do this, go to Windows Update (Settings -> Update & Security -> Windows Update).

From here, click “View update history -> Uninstall updates.”
In the list, organize the updates by their “Installed On” date, right-click the most recent update, then click Uninstall.

We’re constantly keeping track of the latest Windows 10 update problems, so visit this article if you have related issues.
2. Enable Background Apps
Ever since the Creator’s Update back in 2017, there’s been a bug affecting some Windows 10 users, involving the running of the Windows app in the background. Specifically, disabling the option to “Let apps run in the background” in Windows 10 would have the unintended effect of rendering the Start menu search function useless.

This bug exists to this day, so you need to make sure that you have the “Let apps run in the background” master switch set to “On.”
To do this, go to “Settings -> Privacy -> Background apps,” then make sure the “Let apps run in the background” switch is set to “On.” From this same screen, you can individually disable any and all Windows apps from running in the background, but it’s crucial to keep that master switch on.
3. Rebuild the Index
There’s a possibility that the search indexing files in your Windows Search have become corrupted, therefore disabling the Search function. Some people have reported this problem since the Windows 10 May Update (v1903) and the following as a possible solution.
Our next tip shows you how to use the Windows Troubleshooter for search and indexing, but first you can try rebuilding the index, which should eliminate any corruptions.
To do this, go to Control Panel, switch on “Large icons” at the top-right corner, then click “Indexing Options -> Advanced.”

Finally, click Rebuild in the Advanced Options window. Click OK on the pop-up that tells you this may take some time and wait for the process to complete.
4. Run Windows Troubleshooter
The simplest solution is to use the tools built into Windows to help you out. Granted, this is far from a 100 percent solution, but it’s a quick one, so it’s worth a shot.
1. Navigate to the Control Panel. (Click Start, then scroll down the Windows System folder, and you’ll find it there.)
2. Change the view to “Large icons” or “Small icons” if it hasn’t been already, then click “Troubleshooting -> System and Security -> Search and Indexing.”

3. Click “Next” in the Troubleshooter, then check the box that applies to your issue (most likely “Files don’t appear in search results,” though if your Windows Search is working, albeit slowly, you should tick the third box down).

4. Finally, click Next to run the scan, which will automatically attempt to fix any problems.
5. Use the System File Checker
Given that this is one of the simplest things you can do to try and repair your Start menu search, we recommend trying it first. Open an elevated Command Prompt (right-click Command Prompt, then “Run as administrator”), then type the following command:

This will scan your system files for any errors and corruptions and automatically attempt to fix them. Give that the Start menu search is a system process, any errors in it should be detected by using the SFC utility.
In addition, running the SFC utility in Windows 10 Safe Mode could solve the problem for you, so that’s worth a shot if doing it in regular Windows 10 fails.
6. Disable/Restart Third-Party Antivirus, Enable Windows Firewall
To be clear, we’re not suggesting here that you should disable and completely remove all third-party antivirus software from your device, but based on feedback here and across the Internet, certain programs cause Windows Search to malfunction. Avast is one culprit, so try uninstalling that if you have it, then find an alternative if need be. (Windows Defender itself has become a viable, secure option in recent years.)
You could just try disabling your Avast shields temporarily, which should get the Start menu search back. In the case of Avast at least, once you switch the shields back on, the Start menu search may continue working as it should.

On the other hand, enabling Windows Firewall has also helped some users. It seems that Search and indexing is oddly sensitive to your security settings, so tinkering around with them by enabling and disabling things may yield results.
7. Move or Rebuild Swapfile.sys
The Pagefile and Swapfile are two inextricably linked and important functions of Windows 10. The pagefile relieves the weight from your PC RAM by allocating a certain amount of hard drive space to functioning as RAM should you run low on memory. The swapfile performs the same function but specifically for Modern Windows apps, so it’s more targeted in its scope.

Seeing as Cortana is a Modern Windows app, you can try rebuilding the Swapfile to kickstart it – and your Start menu search – back into action. This will also involve rebuilding the Pagefile, as the Swapfile is directly dependent on the Pagefile.
If you want to try this, read our guide on how to move and modify your Pagefile (and therefore Swapfile). While we don’t recommend outright disabling the Pagefile, you can move it to another drive to effectively “restart” it. Or, if you want it on the original drive, you can disable it, reboot your PC, then re-enable it after you’ve rebooted.
If your Start menu search still isn’t working after this, the next tip is a good one to follow up with.
8. Restart Windows Explorer
It goes without saying that the first thing you should try is rebooting your PC, but if that fails, then the slightly more niche solution is to restart the Windows Explorer process. This is responsible for managing files on your PC as well as the smooth functioning of the Start menu.
Press Ctrl + Shift + Esc to jump straight into Task Manager, click “More details” in the bottom-left corner if that hasn’t been selected already, then scroll down to Windows Explorer, right-click it, and hit “Restart.” Have a moment of panic as it looks for a second like your computer might crash, then breathe a sigh of relief as you see that it’s still working, and your Start menu Search button is hopefully fixed!

9. Check Windows Search Service
Another reason why your Start menu search may not be working is because the Windows Search service is not running. Windows Search service is a system service and runs automatically on the system startup.

Check whether the service is running by hitting Win + R , typing services.msc , then scrolling down to find it. If it says “Running” in the Status column, it’s running (obviously). If not, you’ll have to start it manually.

Right-click “Windows Search” and then click “Properties.”

In the Properties window, click on the “Start” button to start the service. Also, make sure that the Startup type is set to “Automatic” or “Automatic (Delayed Start).” This ensures that the service will automatically start at every system startup. Once you are done with the changes, click “OK.”

Once the service has been started, this is what it looks like in your Services window. For me, this method worked perfectly.

Is the Start Menu giving you trouble beyond the Search button? Check out our more general guide on how to fix a broken Start menu in Windows 10.
10. Repair Windows Installation
Before you start worrying that this will delete all your personal data and files, there’s a way to refresh your Windows installation while keeping your vital data. It’s obviously still a more extreme measure than some others others on this list, so scroll down to other headings if you want to try some other solutions first.

First, create a bootable Windows 10 installation disk or USB, then launch it. Follow the instructions to upgrade your Windows 10 installation and make sure that on the “Ready to install” screen that you’ve chosen the option to “Keep personal files and apps.” If it’s not selected by default, click “Change what to keep,” then select “Keep personal files and Window settings.” Click Install, and the latest version of Windows 10 will be installed while holding on to all your data.
This will also reinstall the core files responsible for the Start menu search and therefore fix it.
11. Or Try “Everything” as a Workaround

If these fixes still haven’t solved your problem, then it may be time for a workaround. Void Tools has released an excellent and very lightweight tool called “Everything” which indexes and searches all the files on your computer instantly.
Related:
Content Manager at Make Tech Easier. Enjoys Android, Windows, and tinkering with retro console emulation to breaking point.
4 comments
Thanks for your clear, followable instructions!
Two problems for me are:
1) WHERE is the START “SEARCH” field? When I open START, there isn’t one, but I don’t know exactly where it would show up if it were present. It’s not in the alphabetical list of items in START. The search in my Windows Explorer never works (that is, it never finds what I am looking for although I know it is there), although this search box is present on the top toolbar. There is a search field in the bottom taskbar, right next to the START icon…could that be the one that the article is helping us to fix?
2) The order of the remedies is confusing. Currently, #8 method should (according to the author) be #1, but the reader doesn’t get to it until he or she has tried the previous seven options.
A screenshot of the SEARCH field as it should be, when it is present, would go a long way to clarifying what it is we are trying to “fix.”
Thank you for a very complete article.
I have been dealing with this issue for some time and have tried many suggested fixes with no result.
Option 5: Scannow – resolved the problem immediately.
Everything working perfectly again, thanks.
Thanks a lot I fixed it after trying all the steps here but don’t know which one fixed it though thanks
This is a great article, unfortunately I have not resolved it yet though.
I am guessing it is because of the intrusive, and often damaging, Windows Updates because the search option on my taskbar worked absolutely perfect a few months ago. It now shows the search box then disappears within a second.
Windows Updates are a pointless joke. The most recent one that was forced upon me was simply to update a character within a Japanese language font that I never use.
As well as Windows 10 I also have a Vista machine. I disabled updates on this machine 10 years ago and it has never caused an issue.
Windows updates should be offered with details of what it is for, and an option to accept or decline.
That gives the choice – “If it ain’t broke, don’t fix it!”


