- Free up storage space on your Mac
- Find out how much storage is available on your Mac
- Manage storage on your Mac
- Store in iCloud
- Optimize Storage
- Empty Trash Automatically
- Reduce Clutter
- Where to find the settings for each feature
- Other ways that macOS helps automatically save space
- How to free up storage space manually
- Работа с несколькими пространствами Spaces на Mac
- Создать область
- Перемещение между пространствами
- Перенос окна приложения из одной области в другую
- Назначение пространств для приложений
- Удаление области
- What is spaces in mac os
- Preferences on OS X
- Spaces Preferences
- Windows Of The Current Space
- Putting It All Together
Free up storage space on your Mac
Save space by storing your content in iCloud or using built-in tools to find and remove large or unneeded files.
The Optimized Storage features of your Mac help you save storage space by storing your content in iCloud and making it available on demand:
- When storage space is needed, files, photos, movies, email attachments, and other files that you seldom use are stored in iCloud automatically.
- Each file stays right where you last saved it, and downloads when you open it.
- Files that you’ve used recently remain on your Mac, along with optimized versions of your photos.
If you haven’t yet upgraded to macOS Sierra or later, learn about other ways to free up storage space.
Find out how much storage is available on your Mac
Choose Apple menu > About This Mac, then click Storage. Each segment of the bar is an estimate of the storage space used by a category of files. Move your pointer over each segment for more detail.
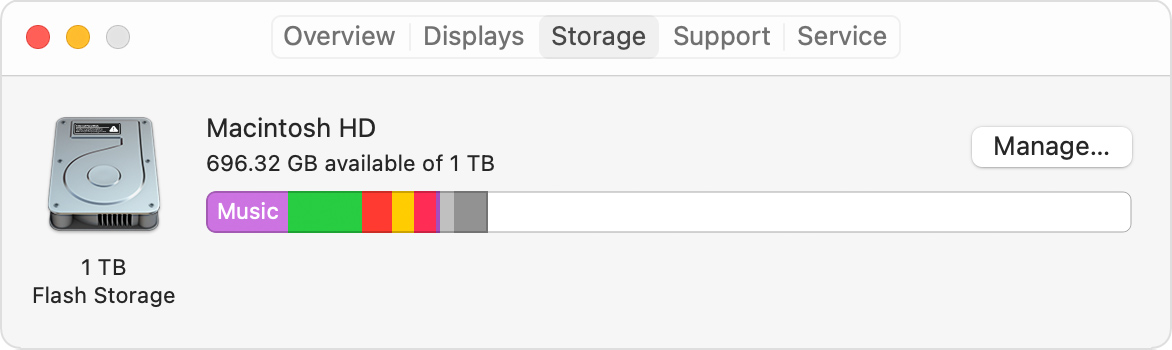
Click the Manage button to open the Storage Management window, pictured below.
Manage storage on your Mac
The Storage Management window offers recommendations for optimizing your storage. If some recommendations are already turned on, you will see fewer recommendations.
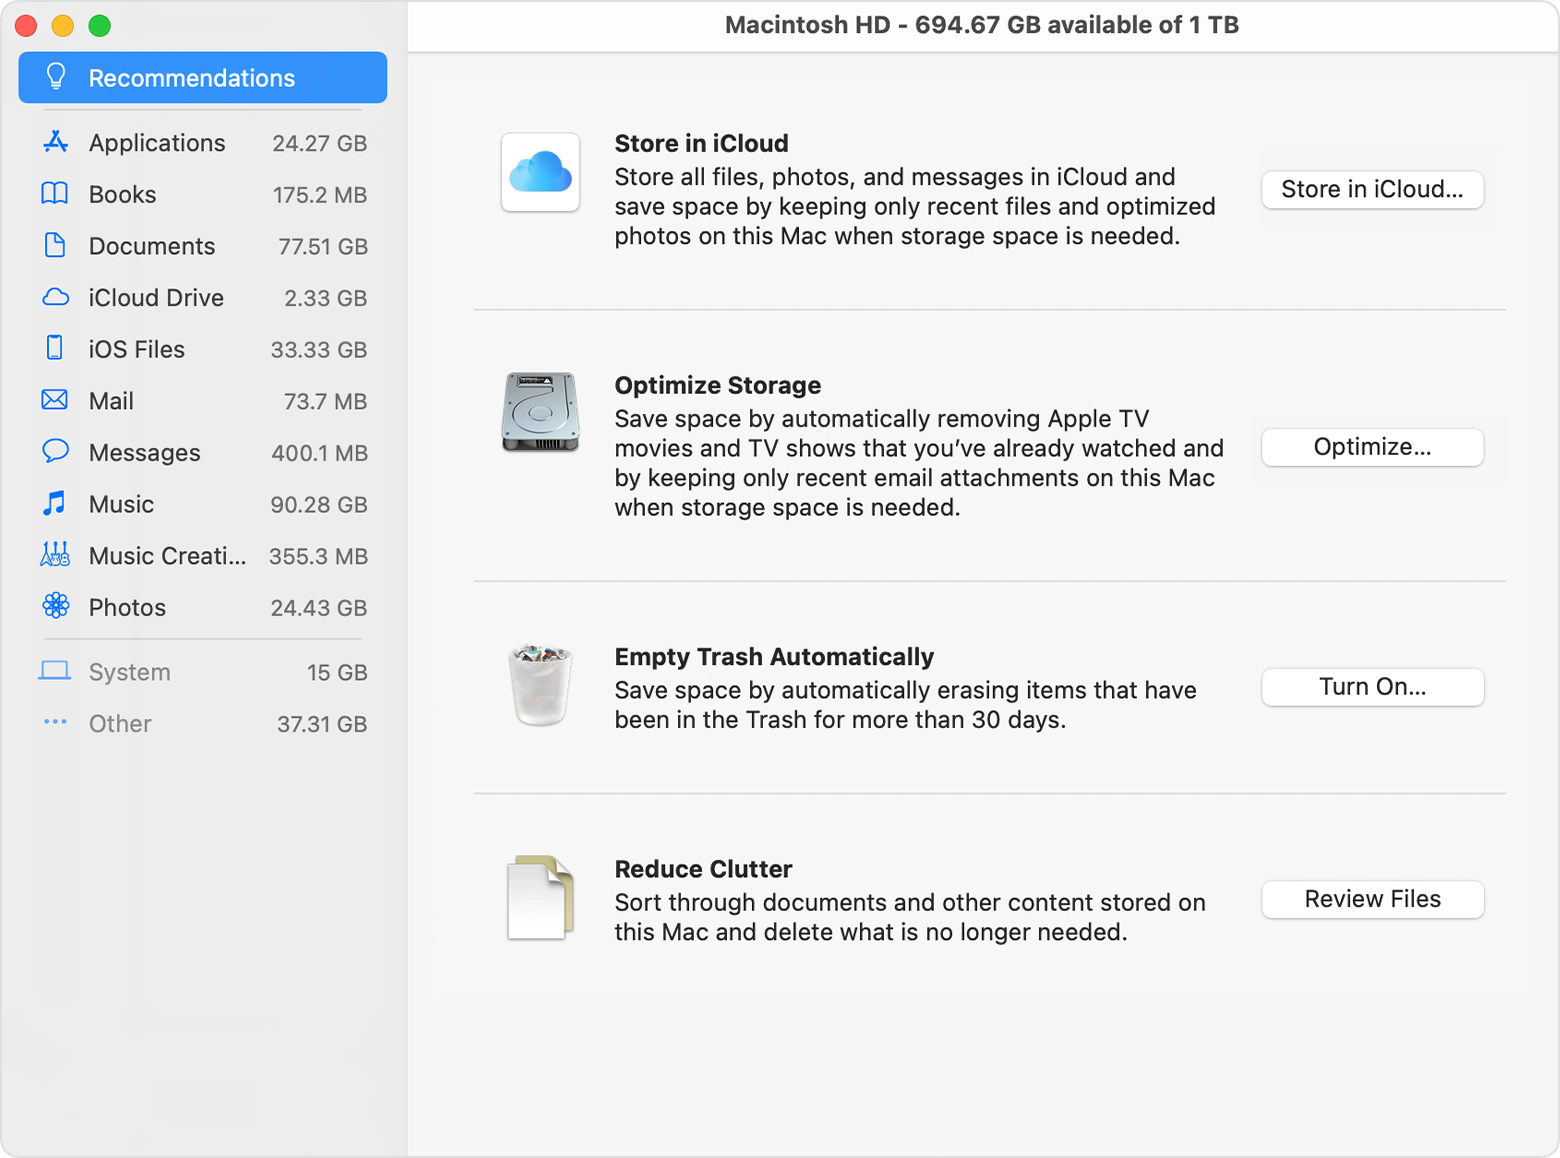
Store in iCloud
Click the Store in iCloud button, then choose from these options:
- Desktop and Documents. Store all files from these two locations in iCloud Drive. When storage space is needed, only the files you recently opened are kept on your Mac, so that you can easily work offline. Files stored only in iCloud show a download icon , which you can double-click to download the original file. Learn more about this feature.
- Photos. Store all original, full-resolution photos and videos in iCloud Photos. When storage space is needed, only space-saving (optimized) versions of photos are kept on your Mac. To download the original photo or video, just open it.
- Messages. Store all messages and attachments in iCloud. When storage space is needed, only the messages and attachments you recently opened are kept on your Mac. Learn more about Messages in iCloud.
Storing files in iCloud uses the storage space in your iCloud storage plan. If you reach or exceed your iCloud storage limit, you can either buy more iCloud storage or make more iCloud storage available. iCloud storage starts at 50GB for $0.99 (USD) a month, and you can purchase additional storage directly from your Apple device. Learn more about prices in your region.
Optimize Storage
Click the Optimize button to save space by automatically removing watched movies and TV shows. When storage space is needed, movies or TV shows that you purchased from Apple and already watched are removed from your Mac. Click the download icon next to a movie or TV show to download it again.
Your Mac will also save space by keeping only recent email attachments on this Mac when storage space is needed. You can manually download any attachments at any time by opening the email or attachment, or saving the attachment to your Mac.
Optimizing storage for movies, TV shows, and email attachments doesn’t require iCloud storage space.
Empty Trash Automatically
Empty Trash Automatically permanently deletes files that have been in the Trash for more than 30 days.
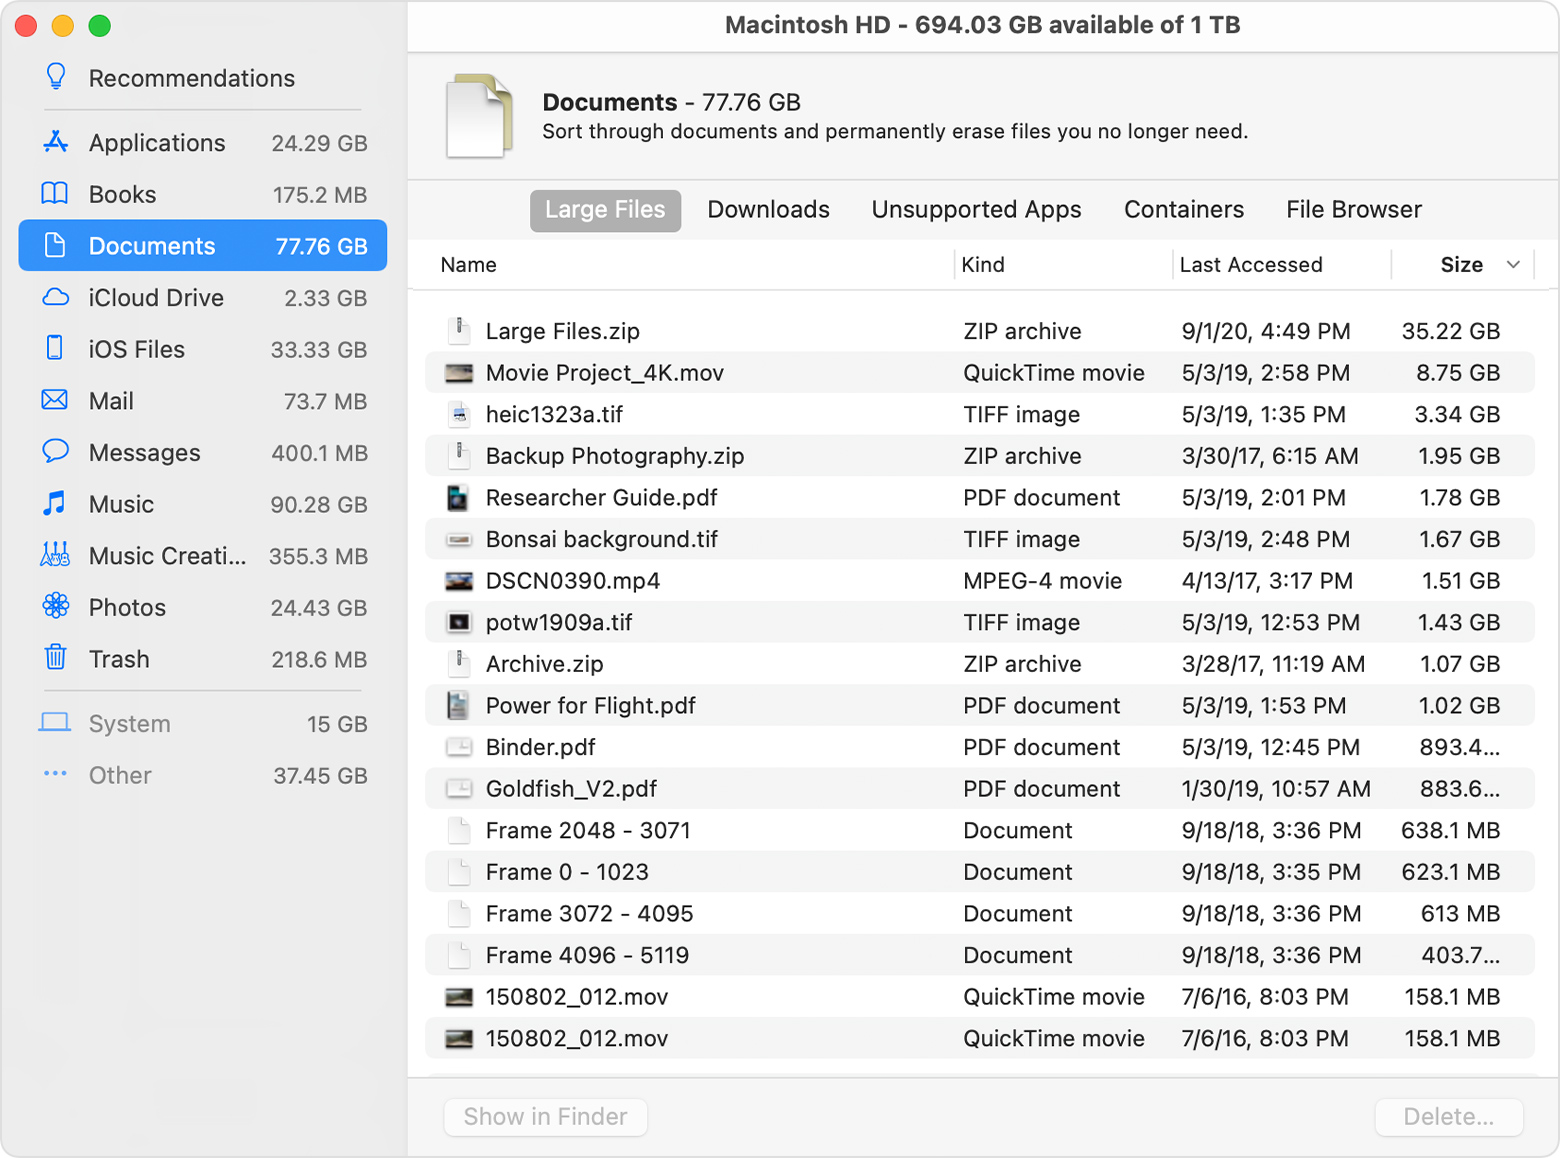
Reduce Clutter
Reduce Clutter helps you identify large files and files you might no longer need. Click the Review Files button, then choose any of the file categories in the sidebar, such as Applications, Documents, Music Creation, or Trash.
You can delete the files in some categories directly from this window. Other categories show the total storage space used by the files in each app. You can then open the app and decide whether to delete files from within it.
Where to find the settings for each feature
The button for each recommendation in the Storage Management window affects one or more settings in other apps. You can also control those settings directly within each app.
- If you’re using macOS Catalina or later, choose Apple menu > System Preferences, click Apple ID, then select iCloud in the sidebar: Store in iCloud turns on the Optimize Mac Storage setting on the right. To turn off iCloud Drive entirely, deselect iCloud Drive.
- If you’re using macOS Mojave or earlier, choose Apple menu > System Preferences, click iCloud, then click Options next to iCloud Drive. Store in iCloud turns on the Desktop & Documents Folders and Optimize Mac Storage settings.
- In Photos, choose Photos > Preferences, then click iCloud. Store in iCloud selects iCloud Photos and Optimize Mac Storage.
- In Messages, choose Messages > Preferences, then click iMessage. Store in iCloud selects Enable Messages in iCloud.
- If you’re using macOS Catalina or later, open the Apple TV app, choose TV > Preferences from the menu bar, then click Files. Optimize Storage selects “Automatically delete watched movies and TV shows.”
- In you’re using macOS Mojave or earlier, open iTunes, choose iTunes > Preferences from the menu bar, then click Advanced. Optimize Storage selects “Automatically delete watched movies and TV shows.”
- In Mail, choose Mail > Preferences from the menu bar, then click Accounts. In the Account Information section on the right, Optimize Storage sets the Download Attachments menu to either Recent or None.
Empty Trash Automatically: From the Finder, choose Finder > Preferences, then click Advanced. Empty Trash Automatically selects “Remove items from the Trash after 30 days.”
Other ways that macOS helps automatically save space
With macOS Sierra or later, your Mac automatically takes these additional steps to save storage space:
- Detects duplicate downloads in Safari, keeping only the most recent version of the download
- Reminds you to delete used app installers
- Removes old fonts, languages, and dictionaries that aren’t being used
- Clears caches, logs, and other unnecessary data when storage space is needed
How to free up storage space manually
Even without using the Optimized Storage features described in this article, you can take other steps to make more storage space available:
- Music, movies, and other media can use a lot of storage space. Learn how to delete music, movies, and TV shows from your device.
- Delete other files that you no longer need by moving them to the Trash, then emptying the Trash. The Downloads folder is good place to look for files that you might no longer need.
- Move files to an external storage device.
- Compress files.
- Delete unneeded email: In the Mail app, choose Mailbox > Erase Junk Mail. If you no longer need the email in your Trash mailbox, choose Mailbox > Erase Deleted Items.
Источник
Работа с несколькими пространствами Spaces на Mac
Если при открытии приложений беспорядок на рабочем столе Mac растет, можно использовать Mission Control для создания дополнительных рабочих столов, которые называются пространствами. Когда Вы работаете в области Spaces, Вы видите только те окна, которые находятся в этой области Spaces.
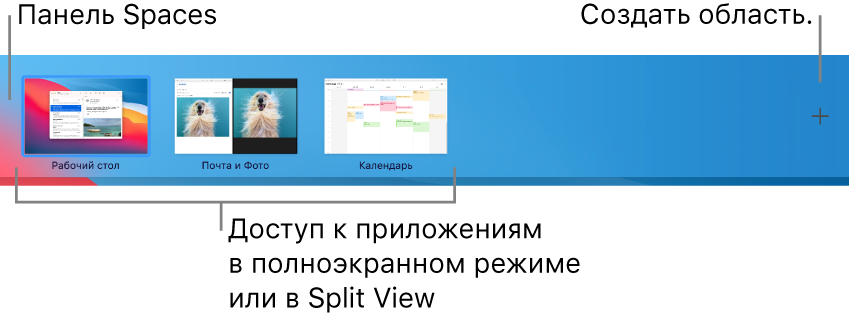
Создать область
Если Вы работаете с приложениями в полноэкранном режиме или Split View, миниатюры приложений отображаются в панели Spaces.
В панели Spaces нажмите кнопку добавления  .
.
Система поддерживает до 16 пространств.
Закончив, нажмите миниатюру пространства, чтобы открыть его.
Совет. Сделайте каждое пространство уникальным, назначив всем пространствам разные картинки рабочего стола. Для этого назначьте всем рабочим столам Системные настройки (см. информацию о назначении приложений ниже) и измените картинку рабочего стола в каждом из пространств.
Перемещение между пространствами
На Mac можно сделать следующее.
При использовании трекпада смахните влево или вправо тремя или четырьмя пальцами. На Magic Mouse смахните двумя пальцами.
Нажмите клавишу Control и клавишу со стрелкой вправо или влево.
Войдите в Mission Control, переместите указатель к верхнему краю экрана, затем нажмите пространство в панели Spaces.
Если у Вашего Mac есть панель Touch Bar, можно включить показ пространств в панели Touch Bar, используя раздел настроек «Клавиатура». Затем можно будет просто коснуться пространства в панели Touch Bar, чтобы его открыть.
Перенос окна приложения из одной области в другую
На Mac можно сделать следующее.
Перетяните окно приложения, которое хотите переместить, к краю экрана. Через короткое время окно перемещается в следующую область.
Перейдите в пространство, в котором находится окно для переноса, войдите в Mission Control, затем перетяните окно вверх в пространство, которое хотите использовать.
Перетянув окно на приложение в полноэкранном режиме в панели Spaces, можно использовать приложения в режиме Split View.
Назначение пространств для приложений
Если Вы используете две области или более, Вы можете назначить приложение (или Системные настройки) определенной области, чтобы оно всегда открывалось в этой области.
На Mac нажмите значок приложения в Dock, удерживая клавишу Control.
Возможно, Вам придется сначала открыть приложение, чтобы увидеть его значок в панели Dock.
В появившемся контекстном меню выберите «Параметры», затем выберите один из следующих вариантов.
Все Рабочие столы. Приложение открывается во всех областях.
Этот Рабочий стол. Приложение открывается только в текущей области. Если Вы используете приложение в полноэкранном режиме, оно отображается в своей собственной области.
Рабочий стол на дисплее [номер]. Приложение открывается в текущей области на определенном дисплее (если доступно несколько дисплеев).
Нет. Приложение открывается в той области, в которой Вы работаете в данный момент.
По умолчанию при переходе к приложению автоматически отображается пространство, в котором находятся открытые окна этого приложения. Например, если Вы создаете новый документ TextEdit на рабочем столе 3, однако окна TextEdit уже открыты на рабочем столе 2, новый документ открывается на рабочем столе 2. Чтобы изменить эту настройку, откройте меню «Apple»

> «Системные настройки», нажмите «Mission Control» и снимите флажок переключения.
Удаление области
На Mac войдите в Mission Control, затем переместите указатель к верхнему краю экрана.
В панели Spaces наведите указатель на область, которую хотите удалить, затем нажмите появившуюся кнопку «Удалить»  .
.
Если в области есть открытые окна, они будут перемещены в другую область.
Чтобы быстро выйти из полноэкранного режима приложения или режима Split View, наведите указатель на миниатюру в панели Space, а затем нажмите появившуюся кнопку «Выход»  .
.
Источник
What is spaces in mac os
I recently implemented a featured in Amethyst that allowed every space to have its own unique set of resources. In implementing this feature I ran into a problem: how do you determine which space you’re currently on?
One might think that this would be a sensible piece of information to expose, but alas and alack it is hidden behind private APIs. So what is a tiling-window-management-inclined programmer to do? Dig into a bunch of weird pieces of public information. The first being the preferences of spaces itself.
Preferences on OS X
The first piece of information to know is how preferences work. Here’s a lightning overview. You may be familiar with NSUserDefaults . It is used to store application preferences. By default it accesses the application’s preferences, which are backed by a file in
/Library/Preferences named using your application’s bundle identifier. Amethyst, for example, has a file at
Additionally, NSUserDefaults has an interesting method -[NSUserDefaults addSuiteNamed:] , which takes a single argument called suiteName . From the docs
The suiteName domain is similar to a bundle identifier string, but is not tied to a particular application or bundle. A suite can be used to hold preferences that are shared between multiple applications.
How does this help us? Well, you can look for yourself and note that
/Library/Preferences/com.apple.spaces.plist exists. You can read that file using the defaults command.
There’s a whole bunch of data. And if you try [[NSUserDefaults standardUserDefaults] addSuiteNamed:@»com.apple.spaces»] you will indeed have access to all of that data. Progress!
Spaces Preferences
So let’s dig into what’s actually in the preferences. There’s a list of spaces:
Great. They’ve got uuids! We can use those as identifiers. And if we look closely there seems to even be a specific preference for the current space!
Now just to confirm you can switch to a different space and read the defaults again and get:
Wait. The uuid didn’t change at all. What the hell? Okay, well, it’s not going to be that easy. So let’s look at something else. There’s a list of windows in each space, that’s promising.
Here’s an excerpt of what it looks like on my machine right now for one of my spaces:
Okay, so we’ve got a name which seems to be the space’s uuid and a list of window numbers. That’s useful. Maybe we can find the window numbers on the current space and use that to match up to a space identifier. So let’s take a look at windows and window numbers.
Windows Of The Current Space
It turns out there is a public API for accessing all of the windows on the current space. It is done using the method
The options for option are
We can not specify a relativeToWindow ID and use the option kCGWindowListOptionOnScreenOnly to get all windows that are on the screen right now. That means all the windows in the current space, as any other windows are not on screen.
It gives you a bunch of dictionaries that look like
which conveniently has a window number under the key kCGWindowNumber .
Putting It All Together
Okay, so we can get a list of windows connected to space uuids and we can get a list of windows on the current space. We should be able to cross-reference the lists to figure out the uuid of the current space. Great.
But there’s one subtle problem here. Windows can be on many spaces. So we have to make sure to ignore any windows on more than one space.
The final code looks like:
But wait! What if there’s no windows in a space? Well, it turns out that unless you’re doing something really weird there’s always something in every space because the system has a bunch of hidden windows you never see. If you’re doing something really weird and you actually encounter a space with no windows in it I would love to hear about it.
Источник


