- Service Principal Name (SPN)
- Содержание
- Общая информация
- Команда setspn
- Работа над ошибками
- Не доступны сетевые ресурсы сервера по DNS имени
- Kerberos with Service Principal Name (SPN)
- Configure Service Principal Names (SPN)
- Failure to provide permissions for SPN registration/modification
- Service Principal Names
- Service Principal Name
- Overview
- Extended Protection Scenarios
- Additional Information
- Compatibility
- Setup
- Windows Server 2012 or Windows Server 2012 R2
- Windows 8 or Windows 8.1
- Windows Server 2008 or Windows Server 2008 R2
- Windows Vista or Windows 7
- How To
- How to enable Extended Protection for Windows authentication
- Configuration
- Attributes
- Child Elements
- Configuration Sample
- Sample Code
Service Principal Name (SPN)
Содержание
Общая информация
Service Principal Name (SPN) — Первичное имя сервиса. Это в некотором роде Windows аналог /etc/hosts в Linux. Здесь указываются имена сервера, которые используются установленными на нём сервисами. Только в SPN могут заводиться записи не только для компьютеров, но и для пользователей. Официальное название объекта в SPN: участник-служба.
Команда setspn
- Посмотреть все записи SPN можно командой:
- Добавить новый новое DNS имя newname.domain.local для сервера servname можно командой:
- команда setspn запущенная без параметров, покажет как и для чего ей можно пользоваться, а также предоставит примеры.
Работа над ошибками
Не доступны сетевые ресурсы сервера по DNS имени
Такое может произойти в случае если DNS имя компьютера не совпадает c «простым» NetBIOS именем.
Например, у нас компьютера (сервер) имеет несколько имён:
- Alfa — простое имя компьютера, имя NetBIOS
- alfa.domain.local — имя в домене , но мы также создали ему псевдоним (алиас, alias, CNAME запись в DNS)
- music.domain.local — псевдоним (алиас, alias, CNAME запись в DNS) по выполняемой функции
- zeta.domain2.local — DNS имя (CNAME запись) в другом домене
В описанном случае замечались проблемы с получением списка SMB ресурсов сервера по DNS имени, хотя все имена разрешались (резолвились) корректно и пинговались (ping). Причём проблема была при обращение с компьютеров Windows XP, с Windows 7 все ресурсы были доступны.
Решается проблема добавлением SPN записей на сервере (не всегда [1] ). Для нашего случая это выполняется командами, запускаемыми на alfa:
Kerberos with Service Principal Name (SPN)
Applies to: Windows Server 2019
Network Controller supports multiple authentication methods for communication with management clients. You can use Kerberos based authentication, X509 certificate-based authentication. You also have the option to use no authentication for test deployments.
System Center Virtual Machine Manager uses Kerberos-based authentication. If you are using Kerberos-based authentication, you must configure a Service Principal Name (SPN) for Network Controller in Active Directory. The SPN is a unique identifier for the Network Controller service instance, which is used by Kerberos authentication to associate a service instance with a service login account. For more details, see Service Principal Names.
Configure Service Principal Names (SPN)
The Network Controller automatically configures the SPN. All you need to do is to provide permissions for the Network Controller machines to register and modify the SPN.
On the Domain Controller machine, start Active Directory Users and Computers.
Select View > Advanced.
Under Computers, locate one of the Network Controller machine accounts, and then right-click and select Properties.
Select the Security tab and click Advanced.
In the list, if all the Network Controller machine accounts or a security group having all the Network Controller machine accounts is not listed, click Add to add it.
For each Network Controller machine account or a single security group containing the Network Controller machine accounts:
a. Select the account or group and click Edit.
b. Under Permissions select Validate Write servicePrincipalName.
d. Scroll down and under Properties select:
Read servicePrincipalName
Write servicePrincipalName
e. Click OK twice.
Repeat step 3 — 6 for each Network Controller machines.
Close Active Directory Users and Computers.
Failure to provide permissions for SPN registration/modification
On a NEW Windows Server 2019 deployment, if you chose Kerberos for REST client authentication and don’t grant permission for Network Controller nodes to register or modify the SPN, REST operations on Network Controller fails preventing you from managing the SDN.
For an upgrade from Windows Server 2016 to Windows Server 2019, and you chose Kerberos for REST client authentication, REST operations do not get blocked, ensuring transparency for existing production deployments.
If SPN is not registered, REST client authentication uses NTLM, which is less secure. You also get a critical event in the Admin channel of NetworkController-Framework event channel asking you to provide permissions to the Network Controller nodes to register SPN. Once you provide permission, Network Controller registers the SPN automatically, and all client operations use Kerberos.
Typically, you can configure Network Controller to use an IP address or DNS name for REST-based operations. However, when you configure Kerberos, you cannot use an IP address for REST queries to Network Controller. For example, you can use , but you cannot use . Service Principal Names cannot function if IP addresses are used.
If you were using IP address for REST operations along with Kerberos authentication in Windows Server 2016, the actual communication would have been over NTLM authentication. In such a deployment, once you upgrade to Windows Server 2019, you continue to use NTLM-based authentication. To move to Kerberos-based authentication, you must use Network Controller DNS name for REST operations and provide permission for Network Controller nodes to register SPN.
Service Principal Names
A service principal name (SPN) is a unique identifier of a service instance. SPNs are used by Kerberos authentication to associate a service instance with a service logon account. This allows a client application to request that the service authenticate an account even if the client does not have the account name.
If you install multiple instances of a service on computers throughout a forest, each instance must have its own SPN. A given service instance can have multiple SPNs if there are multiple names that clients might use for authentication. For example, an SPN always includes the name of the host computer on which the service instance is running, so a service instance might register an SPN for each name or alias of its host. For more information about SPN format and composing a unique SPN, see Name Formats for Unique SPNs.
Before the Kerberos authentication service can use an SPN to authenticate a service, the SPN must be registered on the account object that the service instance uses to log on. A given SPN can be registered on only one account. For Win32 services, a service installer specifies the logon account when an instance of the service is installed. The installer then composes the SPNs and writes them as a property of the account object in Active Directory Domain Services. If the logon account of a service instance changes, the SPNs must be re-registered under the new account. For more information, see How a Service Registers its SPNs.
When a client wants to connect to a service, it locates an instance of the service, composes an SPN for that instance, connects to the service, and presents the SPN for the service to authenticate. For more information, see How Clients Compose a Service’s SPN.
Service Principal Name
Overview
The element adds a Service Principal Name (SPN) to the collection of SPNs. Each SPN specifies a unique endpoint for client activity using the extended protection features for Windows authentication.
Extended protection enhances the existing Windows authentication functionality in order to mitigate authentication relay or «man in the middle» attacks. This mitigation is accomplished by using security information that is implemented through two security mechanisms:
- Channel-binding information that is specified through a Channel Binding Token (CBT), which is primarily used for SSL connections.
- Service-binding information that is specified through a Service Principal Name (SPN), which is primarily used for connections that do not use SSL, or when a connection is established through a scenario that provides SSL-offloading, such as a proxy server or load-balancer.
The element may contain a collection of elements, each of which contains a unique SPN for the service binding information. Each SPN represents a unique endpoint in the connection path, which may be a Fully Qualified Domain Name (FQDN) or NetBIOS name of the destination server or a proxy server. For example, if a client is connecting to a destination server through a proxy server, the SPN collection on the destination server would need to contain the SPN for the proxy server. Each SPN in the collection must be prefixed with «HTTP,» so the resulting SPN for «www.contoso.com» would be «HTTP/www.contoso.com.»
There are two attributes of the element that configure the channel-binding and additional behavior for IIS extended protection:
The tokenChecking attribute configures the behavior for checking for channel-binding tokens. The possible values for this attribute are:
| Name | Description |
|---|---|
| None | This value specifies that IIS will not perform channel-binding token checking. This setting emulates the behavior that existed before extended protection. The numerical value is 0 . |
| Allow | This value specifies that channel-binding token checking is enabled, but not required. This setting allows secure communication with clients that support extended protection, but still supports clients that are not capable of using extended protection. The numerical value is 1 . |
| Require | This value specifies that channel-binding token checking is required. This setting does not provide support for clients that do not support extended protection. The numerical value is 2 . |
The flags attribute configures additional behavior for extended protection. The possible flags are:
| Name | Description |
|---|---|
| None | This flag specifies that no additional behavior is enabled for extended protection. (For example, no proxy server is being used and SPN checking is enabled and requires FQDNs.) The numerical value is 0 . |
| Proxy | This flag specifies that part of the communication path will be through a proxy, or that the client is connecting directly to the destination server over HTTP. The numerical value is 1 . |
| NoServiceNameCheck | This flag specifies that SPN checking is disabled; this flag should not be used in scenarios where only SPNs are being checked. The numerical value is 2 . |
| AllowDotlessSpn | This flag specifies that SPNs are not required to be FQDNs. Setting this flag allows NetBIOS-based SPNs. Note: Setting this flag is not a secure scenario; non-FQDN-based names are vulnerable to name resolution poisoning attacks. The numerical value is 4 . |
| ProxyCohosting | This flag specifies that the entire client-to-server communication path will use HTTP only; no part of the communication path will use SSL, and SPN checking will be used. Note: When you specify this flag, you must also specify the Proxy flag. The numerical value is 32 . |
Extended Protection Scenarios
Consider the following example scenarios:
- In each of the following scenarios, you could also specify the AllowDotlessSpn flag if your networking environment supports NetBIOS-based SPNs; however, NetBIOS-based SPNs are not secure.
- For each of the following scenarios where SPN checking will be used and channel-binding token checking will not be used, you should not specify the NoServiceNameCheck flag.
| Scenario | Flags | Description |
|---|---|---|
| Client connects directly to destination server using HTTP | Proxy , ProxyCohosting | SPN checking will be used and channel-binding token checking will not be used. |
| Client connects directly to destination server using SSL | None | Channel-binding token checking is used and SPN checking is not used. |
| Client connects to destination server through a proxy server using HTTP for the entire path | Proxy , ProxyCohosting | SPN checking will be used and channel-binding token checking will not be used. |
| Client connects to destination server through a proxy server using SSL for the entire path | Proxy | SPN checking will be used and channel-binding token checking will not be used. |
| Client connects to proxy server using SSL and proxy server connects to the destination server using HTTP (SSL off-loading) | Proxy | SPN checking will be used and channel-binding token checking will not be used. |
Additional Information
More information about Extended Protection is available in the following topic:
Compatibility
| Version | Notes |
|---|---|
| IIS 10.0 | The element was not modified in IIS 10.0. |
| IIS 8.5 | The element was not modified in IIS 8.5. |
| IIS 8.0 | The element was not modified in IIS 8.0. |
| IIS 7.5 | The element of the element was introduced in IIS 7.5. |
| IIS 7.0 | N/A |
| IIS 6.0 | N/A |
Setup
The default installation of IIS 7 and later does not include the Windows authentication role service. To use Windows authentication on IIS, you must install the role service, disable Anonymous authentication for your Web site or application, and then enable Windows authentication for the site or application.
After you install the role service, IIS 7 commits the following configuration settings to the ApplicationHost.config file.
Windows Server 2012 or Windows Server 2012 R2
- On the taskbar, click Server Manager.
- In Server Manager, click the Manage menu, and then click Add Roles and Features.
- In the Add Roles and Features wizard, click Next. Select the installation type and click Next. Select the destination server and click Next.
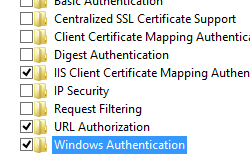
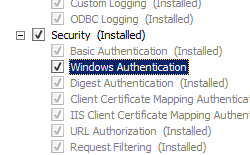
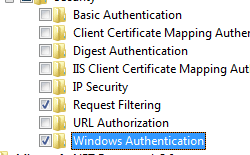
- On the Server Roles page, expand Web Server (IIS), expand Web Server, expand Security, and then select Windows Authentication. Click Next.
 .
. - On the Select features page, click Next.
- On the Confirm installation selections page, click Install.
- On the Results page, click Close.
 .
.Windows 8 or Windows 8.1
- On the Start screen, move the pointer all the way to the lower left corner, right-click the Start button, and then click Control Panel.
- In Control Panel, click Programs and Features, and then click Turn Windows features on or off.
- Expand Internet Information Services, expand World Wide Web Services, expand Security, and then select Windows Authentication.
- Click OK.
- Click Close.
Windows Server 2008 or Windows Server 2008 R2
- On the taskbar, click Start, point to Administrative Tools, and then click Server Manager.
- In the Server Manager hierarchy pane, expand Roles, and then click Web Server (IIS).
- In the Web Server (IIS) pane, scroll to the Role Services section, and then click Add Role Services.
- On the Select Role Services page of the Add Role Services Wizard, select Windows Authentication, and then click Next.
- On the Confirm Installation Selections page, click Install.
- On the Results page, click Close.
Windows Vista or Windows 7
- On the taskbar, click Start, and then click Control Panel.
- In Control Panel, click Programs and Features, and then click Turn Windows Features on or off.
- Expand Internet Information Services, then World Wide Web Services, then Security.
- Select Windows Authentication, and then click OK.
How To
How to enable Extended Protection for Windows authentication
Open Internet Information Services (IIS) Manager:
If you are using Windows Server 2012 or Windows Server 2012 R2:
- On the taskbar, click Server Manager, click Tools, and then click Internet Information Services (IIS) Manager.
If you are using Windows 8 or Windows 8.1:
- Hold down the Windows key, press the letter X, and then click Control Panel.
- Click Administrative Tools, and then double-click Internet Information Services (IIS) Manager.
If you are using Windows Server 2008 or Windows Server 2008 R2:
- On the taskbar, click Start, point to Administrative Tools, and then click Internet Information Services (IIS) Manager.
If you are using Windows Vista or Windows 7:
- On the taskbar, click Start, and then click Control Panel.
- Double-click Administrative Tools, and then double-click Internet Information Services (IIS) Manager.
In the Connections pane, expand the server name, expand Sites, and then the site, application, or Web service for which you want to enable Extended Protection for Windows authentication.
Scroll to the Security section in the Home pane, and then double-click Authentication.
In the Authentication pane, select Windows Authentication.
Click Enable in the Actions pane. 
Click Advanced Settings in the Actions pane.
When the Advanced Settings dialog box appears, select one of the following options in the Extended Protection drop-down menu:
- Select Accept if you want to enable extended protection while providing down-level support for clients that do not support extended protection.
- Select Required if you want to enable extended protection without providing down-level support.

Click OK to close the Advanced Settings dialog box.
Configuration
The element of the element is configurable at the site, application, or virtual directory level in the ApplicationHost.config file.
Attributes
| Attribute | Description |
|---|---|
| name | Optional string attribute. |
Specifies a unique SPN.
There is no default value.
Child Elements
Configuration Sample
The following sample displays a element that demonstrates enabling Windows authentication with extended protection for the Default Web Site, and adds two SPN entries to the collection of SPNs.
Sample Code
The following examples demonstrate configuring Windows authentication with extended protection for the Default Web Site, and adds two SPN entries to the collection of SPNs.


