- Изменяем файл подкачки(swap file) Windows
- Зачем изменять файл подкачки?
- Какое это имеет отношение к дамп памяти?
- Каким должен быть размер файла подкачки?
- Как это делать?
- Indiana University Indiana University Indiana University
- ARCHIVED: In Windows, what is a swap file?
- Windows 7 and Vista
- Windows XP
- What is Swapfile.sys and do I need it on my Windows 10 PC?
- What does Swapfile.sys do when it is enabled?
- What happens when Swapfile.sys is disabled?
- Less stress?
- What do we recommend?
- How do I disable Swapfile.sys?
- How to disable Swapfile.sys without also disabling Pagefile.sys
- Your opinion
- Halo: MCC’s live service elements make it better, not worse
- Microsoft’s Surface Duo is not ‘failing up’
- Here’s what you can do if Windows 10 update KB5001330 is causing issues
- These external monitors go perfectly with the Lenovo ThinkPad X1 Carbon
Изменяем файл подкачки(swap file) Windows

Ф айл подкачки – это отдельный файл, который Windows создает на жестком диске, чтобы выгружать туда данные, которые не помещаются в оперативную память. Также виртуальная память (файл подкачки) записывает в себя данные о критической ошибке (дамп), когда процесс непредвиденно завершается.
Процессор работает с ОЗУ в разы быстрее, чем с HDD. Поэтому желательно, чтобы объем ОЗУ был достаточно большой, чтобы система только изредка обращалась к файлу подкачки. Другими словами, чем больше ОЗУ (а это самое главное), и чем меньше файл подкачки – тем быстрее работает компьютер.
Зачем изменять файл подкачки?
Система определяет размер файла подкачки автоматически и в большинстве случаев этого достаточно, но есть некоторые нюансы. Windows обычно выделяет больше мегабайт, чем нужно. Когда оперативная память заполнена полностью, система начинает заполнять файл подкачки. Когда оперативка освобождается – система зачастую продолжает использовать файл подкачки. В результате ОЗУ свободна, и никто ею не пользуется. Поэтому лучше выставлять файл подкачки меньше, чем объем ОЗУ.
Какое это имеет отношение к дамп памяти?
Разный тип дампа памяти (малый дамп, дамп ядра, полный дамп) требует разный объем файла подкачки: малый – 2 Мб, дамп ядра – около 30 % от объема ОЗУ, полный – двойной объем ОЗУ. Скорее всего, вы не собираетесь отправлять файл дампа разработчикам Microsoft, поэтому тип дампа вас не должен беспокоить. Если хотите, можете и вовсе его отключить.
Каким должен быть размер файла подкачки?
Размер файла подкачки зависит от размера ОЗУ. Чем больше оперативной памяти, тем меньше нужно виртуальной памяти. Например:
- ОЗУ 1 Гб, ФП (файл подкачки) 1312 Мб.
- ОЗУ 2 Гб, ФП – 1 Гб;
- ОЗУ 4 Гб, ФП – 768 Мб;
- ОЗУ 8 Гб, ФП можно отключить.
Как это делать?
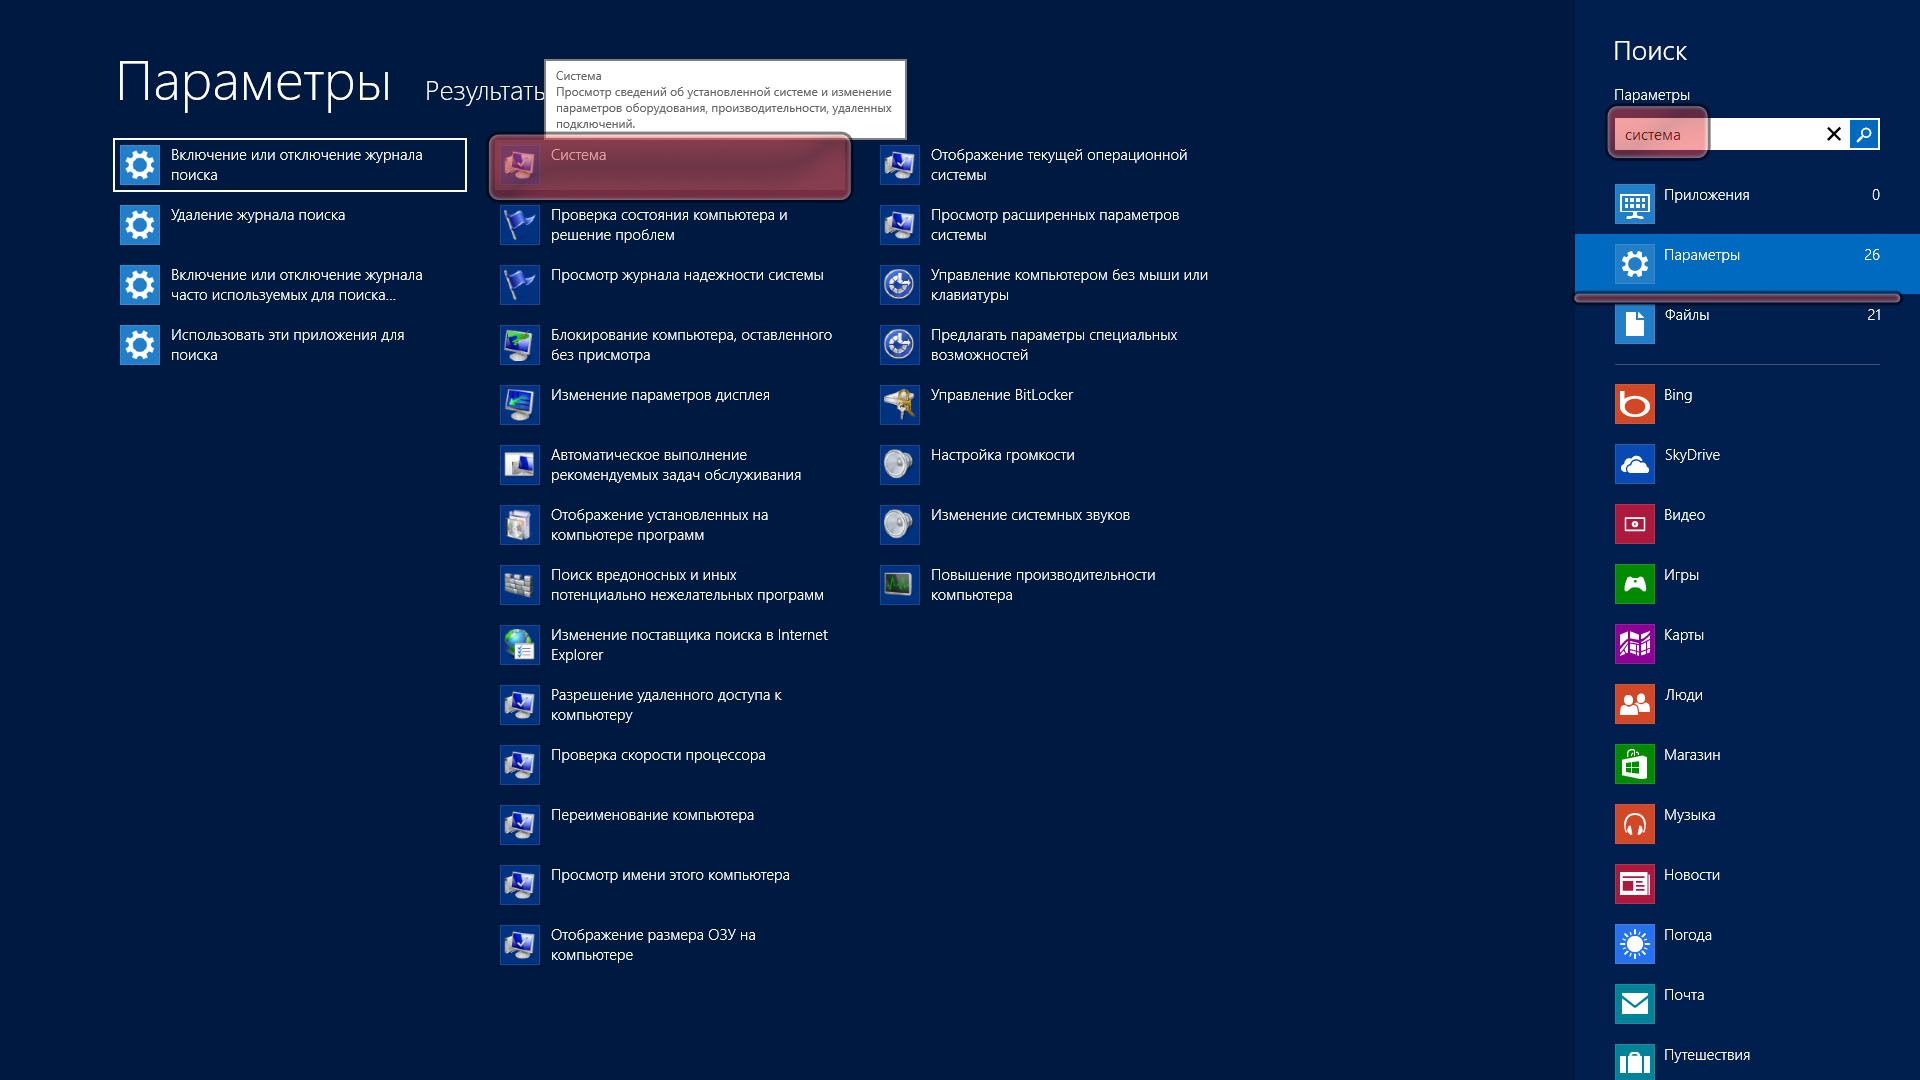
1. Заходим в меню «Пуск» и в строке поиска для параметров вводим слово «система». Нажимаем на появившийся пункт «Система».
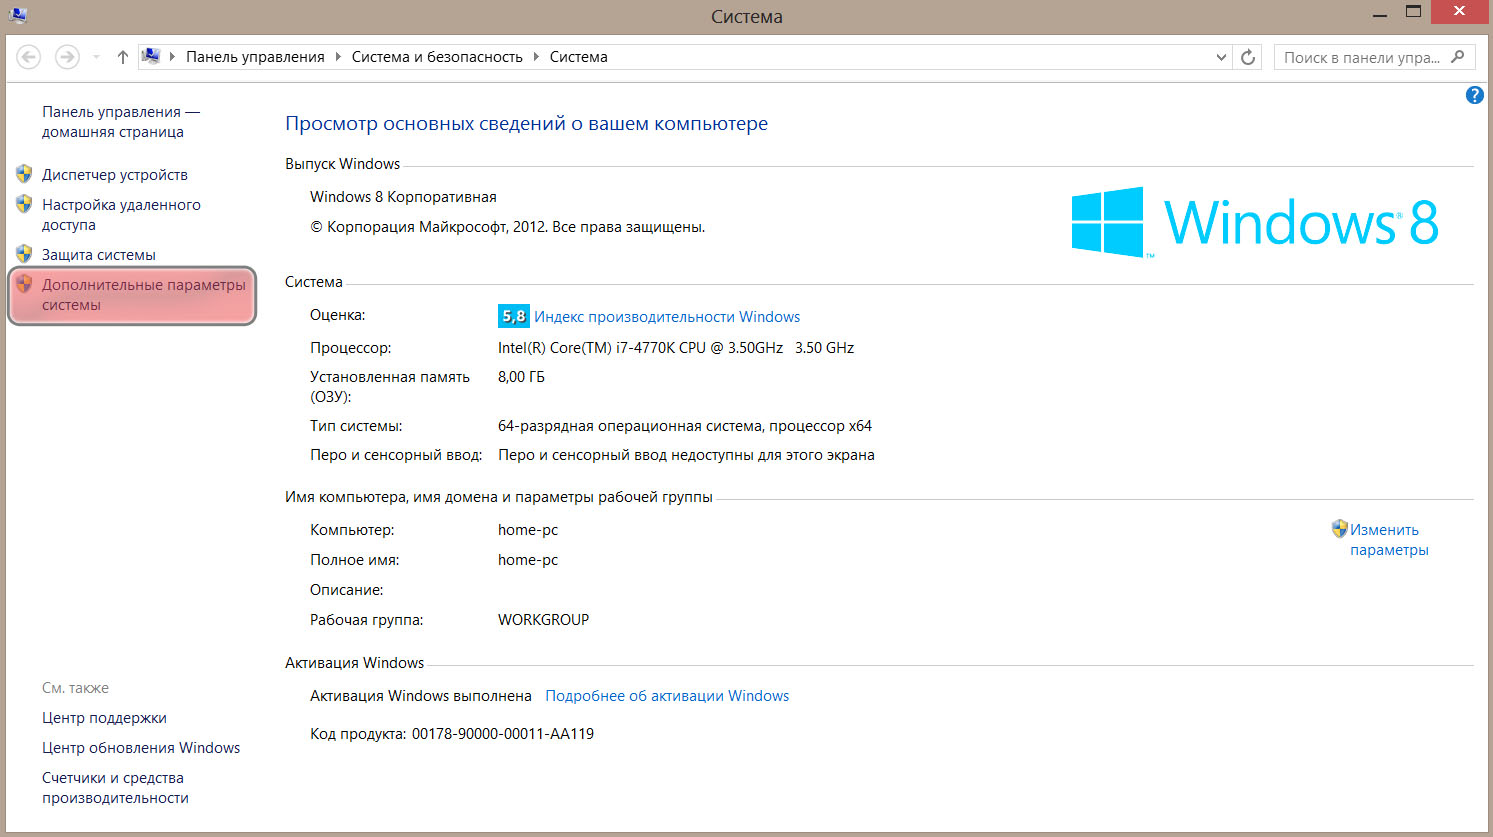
2. Справа наверху выбираем «Дополнительные настройки системы».
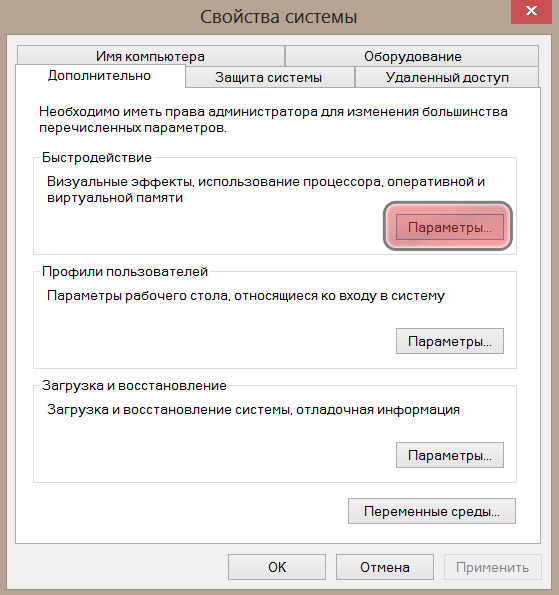
3. В открывшемся окне много вкладок. Нас интересует «Дополнительные». В этой вкладке есть пункт «Быстродействие», а возле него кнопка «Настройки», которую мы и выбираем.
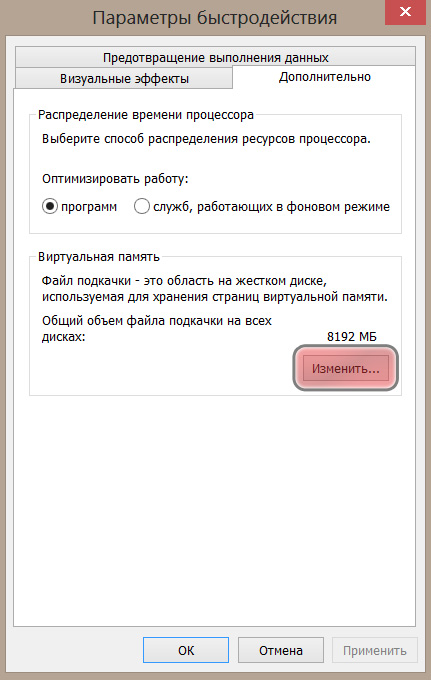
4. Поверх окна «Параметры системы» откроется еще одно – «Параметры быстродействия». Там есть три вкладки, нам нужна «Дополнительно», подпункт – «Виртуальная память», кнопка – «Изменить».
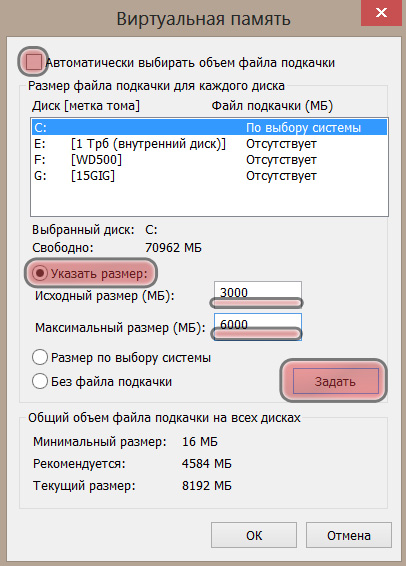
5. Откроется еще и третье окно. Тут уже можно снять автоматическое установления размера файла и установить, какой нужно. Удостоверьтесь, что выбран раздел «С» – где установлена система. К нему система обращается быстрее.
Итак, самый верный способ повысить продуктивность «машины» — это установить достаточный объем ОЗУ и минимизировать таким образом обращение процессора к файлу подкачки. Чтобы узнать, сколько ОЗУ для вас достаточно, поставьте себе на «Рабочий стол» специальный гаджет и время от времени обращайте внимание, насколько ОЗУ заполнена. Если около 20–30 % ОЗУ всегда свободно, то больше вам и не нужно.
 Indiana University Indiana University Indiana University
 Indiana University Indiana University Indiana University
 ARCHIVED: In Windows, what is a swap file?
A swap file, also called a page file, is an area on the hard drive used for temporary storage of information. Windows uses the swap file to improve performance. A computer normally uses primary memory , or RAM , to store information used for current operations, but the swap file serves as additional memory available to hold additional data.
Note: Microsoft recommends that you allow Windows to manage the Virtual Memory settings for you (i.e., leave the default setting as is). Only experienced users should change this setting, as it can adversely affect system performance.
Also note that you can manually move the location of the swap file to a different drive. In some situations, this can be advantageous. If you have a drive with more free space or a faster access time, you may improve performance by moving the swap file to this drive.
Windows 7 , Vista , and XP allow you to set up swap files for each drive on your system. In these versions of the Windows operating system, the swap file is dynamic and hidden.
Windows 7 and Vista
To view your current swap file information in Windows 7 and Vista:
- From the Start menu, right-click My Computer or Computer , and then select Properties .
Note: If this doesn’t match what you see, refer to Get around in Windows.
Windows XP
The name of the Windows XP swap file is pagefile.sys , located in the root directory. The swap file is dynamic, changing size depending on system conditions. If you run several applications at once, the swap file will grow to accommodate the additional information required to run each application smoothly. This is a hidden file, so you will have to change your folder view setting to be able to see the file.
To view your current swap file information in Windows XP:
- Right-click My Computer , and then select Properties .
Note: If this doesn’t match what you see, refer to Get around in Windows.
This is document ahbb in the Knowledge Base.
Last modified on 2018-01-18 12:43:28 .
What is Swapfile.sys and do I need it on my Windows 10 PC?

Similar to Pagefile.sys, Swapfile.sys is a Windows 10 feature that takes advantage of space on your hard drive when your RAM either fills up or can be used in a more efficient way.
You might be asking: Why do I need a swap file when I already have a page file? The swap file deals with modern Windows apps (the kind you download from the Windows Store), moving them to the hard drive in a sort of hibernation state when not in use, while the page file takes individual pages (4KB in size) of a process and moves them back and forth as needed. The page file and the swap file work in conjunction — disabling the page file without editing your Registry will also disable the swap file.
The debate over whether or not your page file and swap file are really necessary rages on. Many Windows users claim their devices are much faster without them, while others will feel their blood pressure rise as they wait for those systems without the files enabled to crash and burn (the latter figuratively, of course).
Let’s take a closer look at Swapfile.sys, whether or not you need it enabled on your Windows PC, and how to disable it if you choose to run without.
What does Swapfile.sys do when it is enabled?

Let’s say you have a PC with 2GB of RAM — this is the minimum recommended amount of RAM for 64-bit Windows 10. That RAM is going to fill up awfully fast if you’re a multitasker, and free RAM is needed to keep your PC running smoothly. Don’t get me wrong; utilizing all your RAM isn’t a bad thing, but not having any RAM leftover for incoming processes is a different story.
Rather than having Windows completely grind to a halt for lack of RAM, any running but unused Windows apps — e.g. any minimized to the taskbar — will be moved over to your hard drive where they will reside in a swap file until you need them again. This frees up some space in your RAM for those incoming processes.
If you attempt to access an app that currently resides in the swap file and you have insufficient space in your RAM, another process in your RAM will be swapped out to make room for the app you’d like to use. Swapfile.sys works in conjunction with Pagefile.sys to help keep RAM freed up.
What happens when Swapfile.sys is disabled?
Without a swap file, some modern Windows apps simply won’t run — others might run for a while before crashing.
Not having a swap file or a page file enabled will cause your RAM to work inefficiently, as it has no «emergency backup» in place. If an app has a 2GB memory footprint, that footprint will stay on your RAM whether or not it’s all utilized. When your RAM is full and has no file on your hard drive to move to, it will begin to cannibalize itself, which causes apps running normally to malfunction. At this point, you’ll likely see a spectacular crash.
Less stress?
Some users claim that disabling Swapfile.sys will cause less stress on your hard drive, and this is indeed true. The question, though, is whether or not you will really notice. It’s hard to say and really depends on your specific hardware, but most drives will last so long in the hands of regular users that having a swap file won’t make a discernible difference regarding the longevity of your storage.
Also concerning your hard drive is space on smaller devices; usually tablets. For example, you might be tempted to disable the swap file and page file on your tablet with a 32GB hard drive. The problem then is an unstable RAM environment and a device that can crash at any time.
What do we recommend?
Unless you’re an experienced Windows user who can deal with the potential fallout of tweaking these settings, leave the swap file and page file on your PC alone. By default, Windows will automatically size these files as necessary, and it does a decent job of it.
Most people hoping to speed up their device or create more room on their hard drive by disabling Swapfile.sys or Pagefile.sys should look at an alternative route, namely adding more RAM or a new solid-state drive. Disabling the swap file and page file shouldn’t be a permanent solution.
How do I disable Swapfile.sys?
Note: Do not attempt this method unless you’re an experienced user. Disabling the swap file and page file can lead to unexpected results.
If you really want to disable the swap file on your PC, you can do so without editing the Registry. Following this process, you will also disable the page file.
- Right-click the Start button.
- Click Control Panel.
Click System.

Click the Advanced tab at the top of the window.
Click the Advanced tab at the top of the window.

Click the checkbox next to Automatically manage paging file size… so that the checkmark disappears.
Click Set.
Click OK.

Both Swapfile.sys and Pagefile.sys will be gone when your computer restarts.
To reinstate them both, simply follow steps 1-9 so that a check mark reappears in the check box and then restart your computer.
How to disable Swapfile.sys without also disabling Pagefile.sys
Note: Do not attempt this method unless you’re an experienced user. Editing your PC’s Registry can lead to irreversible and fatal errors.
If, for whatever reason, you want to remove Swapfile.sys but leave Pagefile.sys intact, you can do so through the Windows registry.
- Right-click the Start button.
- Click Run.
Type regedit.exe and hit Enter on your keyboard.

Double-click SYSTEM.
Double-click Control.
Click Memory Management.
Click New.
Type SwapfileControl and hit Enter on your keyboard.
If you’d like to re-enable Swapfile.sys, head back into the registry and delete the SwapfileControl entry.
Your opinion
What do you have to say about Swapfile.sys? Are you on the side of Let It Be or are you on the side of Let It Be Gone? Let us know in the comments section!
![]()
Halo: MCC’s live service elements make it better, not worse
Halo: The Master Chief Collection is more popular than ever, but some fans don’t agree with the live service approach 343 Industries has taken with it. Here’s why those elements are, at the end of the day, great for the game and for Halo overall.
![]()
Microsoft’s Surface Duo is not ‘failing up’
Microsoft announced this week that it was expanding Surface Duo availability to nine new commercial markets. While Surface Duo is undoubtedly a work in progress, this is not a sign of a disaster. It’s also doesn’t mean that Surface Duo is selling a ton either. Instead, the reason for the expansion is a lot more straightforward.
![]()
Here’s what you can do if Windows 10 update KB5001330 is causing issues
In this guide, we’ll show you the steps to get rid of the update KB5001330 to fix profile, gaming, and BSoD problems with the Windows 10 October 2020 Update and May 2020 Update.
![]()
These external monitors go perfectly with the Lenovo ThinkPad X1 Carbon
The Lenovo ThinkPad X1 Carbon is an excellent laptop, but what if you want to project the display onto a larger screen? You’ll need an external monitor for that. Here are our favorite options.


