- Recovery Partition After Upgrading to Windows 10 from Windows 7/8
- What Is Recovery Partition?
- Windows recovery partition
- OEM recovery partition
- Why An Extra Recovery Partition Created During Upgrade?
- How to Delete Recovery Partition in Windows 10?
- How o Create A Recovery Partition?
- Recovery options in Windows 10
Recovery Partition After Upgrading to Windows 10 from Windows 7/8
After upgrading Windows 7 or 8 to Windows 10, you find an extra recovery partition in Disk Management. What’s it for? Can you delete it? This article will tell you all about recovery partition.

By AOMEI  / Last Updated December 18, 2020
What Is Recovery Partition?
Recovery partition is a small partition on your hard drive that can help you restore your Windows or troubleshoot system issues. There are two kinds of recovery partitions you may see in Windows 10/8/7.
Windows recovery partition
When installing a Windows operating system (OS) on a hard drive, and if you use Windows Setup to create new partition on an MBR disk, Windows will create a system reserved partition, and if it is a GPT disk, then Windows will create a recovery partition and an EFI system partition without drive letter. The recovery partition on Windows 10 consumes about 450MB, Windows 8/8.1 200MB, and Windows 7 100MB.
This recovery partition is to hold the Windows Recovery Environment (WinRE), which can be explored if you manually assign a drive letter to it. If you delete this partition, you won’t be able to use Windows Recovery options. If you create Windows 10 recovery disk, Windows will give you an option to remove the recovery partition. With the recovery drive, you can still use Windows recovery options. Otherwise, if you install Windows on a hard drive containing multiple partitions, Windows will save the WinRE in a folder named Recovery in the root directory of your system drive (C: drive) without leaving a recovery partition.
OEM recovery partition
Apart from the recovery partition of Windows, there may be another recovery partition created by the computer manufacturer like Lenovo and Dell that has made their computer comes with an OEM recovery partition consuming about 7 to 20 GB, which contains the WinRE and their factory installation files.
On some computers, the WinRE and the factory installation are separately stored on two partitions, so you may see two OEM partitions on your computer. This OEM partition allows you to press a specified key to boot into Recovery Environment, so you can recover your OS to factory setting without a Windows installation disc. If you have a copy of Windows installation, you can delete this OEM partition to free up more disk space.
Why An Extra Recovery Partition Created During Upgrade?
Every time when you upgrade Windows to the next version, the upgrade program will create a recovery partition if it detects that there is no sufficient space on your recovery partition (GPT disk) or system reserved partition (MBR disk). There is no wonder that you have many recovery partitions after upgrading to Windows 10. If you don’t want Windows to create another recovery partition, you can increase the size of recovery partition or system reserved partition before upgrading to Windows 10.
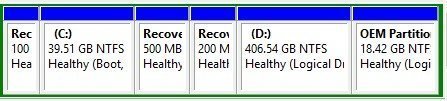
According to Microsoft, the previous Windows version recovery partition will be nonfunctional, so you can delete the previous recovery partition to free up some disk space. As you may know that Windows can only shrink a partition from its right side, so you can tell which recovery partition was newly created by upgrading to Windows 10. For example, as the screenshot below, the 100MB recovery partition was created when installing Windows 7, the 200MB recovery partition was created when upgrading Windows 7 to Windows 8, the 500MB recovery partition was created when upgrading Windows 8 to Windows 10, and the OEM recovery partition created by PC manufacturer before shipping.
As you see the new created Windows recovery partition stands in the way of extending system partition. If you do not want to delete the recovery partition, you can move Windows 10 recovery partition without data loss.
How to Delete Recovery Partition in Windows 10?
You cannot delete a recovery partition with Windows 10 Disk Management for it has crucial files, but you can use diskpart.exe to delete recovery partition. However, you still cannot extend the remaining partition with the new created unallocated space if the recovery partition appears before the C: drive. Hence, you need third-party partition software to do this job. AOMEI Partition Assistant Standard, a free partition software, can delete the recovery partition and extend a partition as long as there is unallocated space on the disk.
1. Download this free software. Install and launch it.
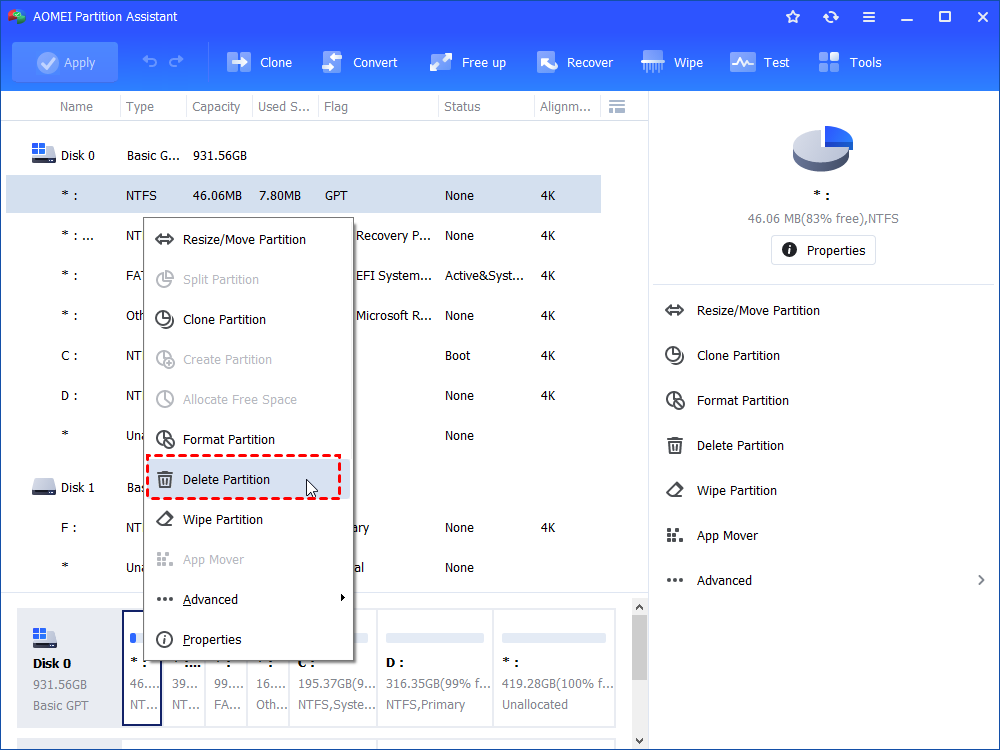
2. Right-click the recovery partition you want to delete and select «Delete Partition». Then you can see the recovery partition becomes an unallocated space. Actually no changes will be made until you confirm and click Apply.
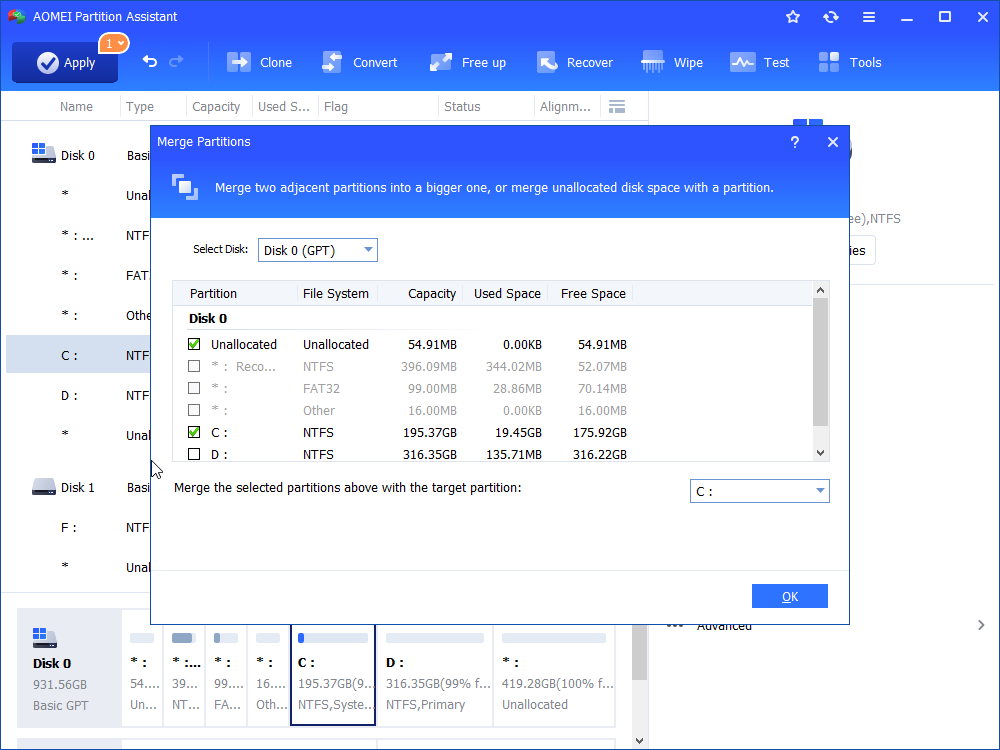
3. Click «Merge Partitions«. In the pop-out window, check the unallocated space and the partition you want to extend.
4. Check the pending operations and click «Apply» and «Proceed» to save the changes.
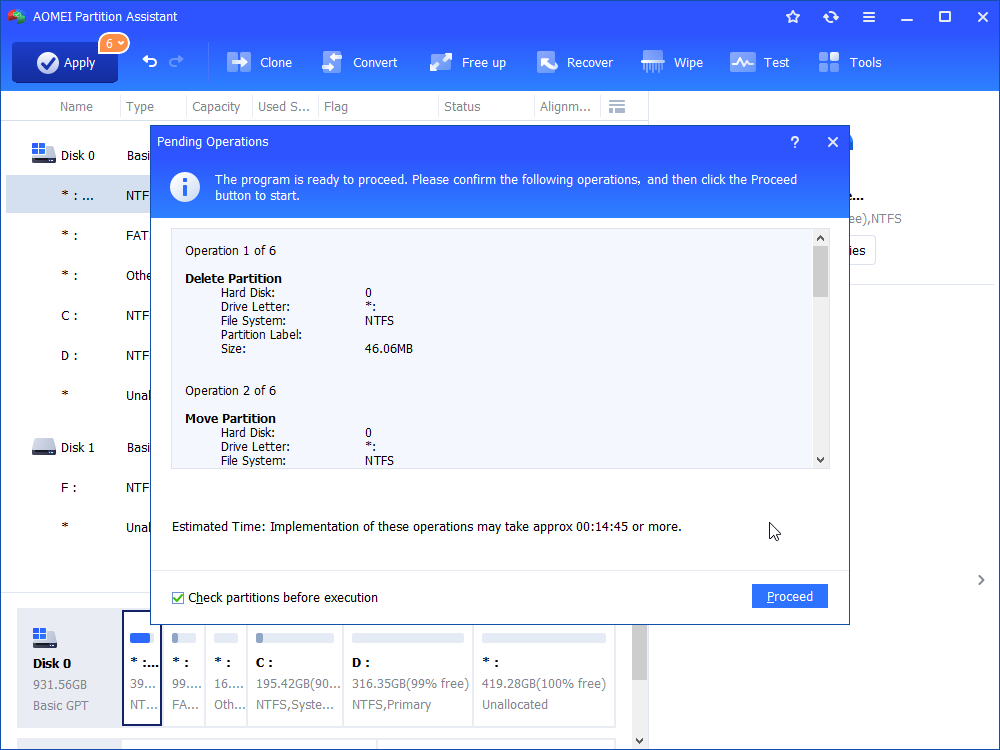
This operation will complete under AOMEI PreOS mode, so do not be panic when your computer reboot.
How o Create A Recovery Partition?
Many users have met the problem that OEM partition won’t work after upgrading to Windows 10. What to do when you want to use recovery options only to find you have mistakenly deleted the recovery partition? You can use AOMEI OneKey Recovery to create a recovery partition on Windows 10 to backup and restore your current system including all the programs installed on C: drive. It also allows you to press a specified key “F1” or “A” to boot into AOMEI OneKey Recovery environment when your computer starts.
After creating the recovery partition, you can also keep the system backup image files in other locations besides the recovery partition, which means you can keep many system backups at the same time. When system fails to work, you can just press the Specified key to boot into AOMEI OneKey Recovery and select the system backup to restore system.
The recovery partition after upgrading to Windows 10 won’t consume much space on your hard drive, so it is recommended to leave it be. If you really want to get rid of recovery partition, backup essential files before deleting.
Recovery options in Windows 10
If you’re having problems with your PC, the following table can help you decide which recovery option to use.
See this section
Your PC isn’t working well and you recently installed an update.
Your PC isn’t working well and it’s been a while since you installed an app, driver, or update.
Your PC won’t start, you haven’t created a recovery drive, and resetting your PC didn’t work.
Your PC won’t start and you haven’t created a recovery drive.
Your PC won’t start and you’ve created a recovery drive.
You want to reinstall your previous operating system.
Your PC isn’t working well and you recently installed an app.
Click one of the recovery options below and follow the steps to try to get things working again.
If you’ve recently installed a Windows update, uninstall the update to try to resolve the issue.
Select the Start button, then select Settings > Update & Security > Windows Update > View your update history > Uninstall updates.
View update history settings
Right-click the update you want to remove, and then select Uninstall.
Important: If you’ve encrypted your device, you’ll need your BitLocker key to reset your PC If you don’t know your BitLocker key, see Find my BitLocker recovery key.
Resetting reinstalls Windows 10, but lets you choose whether to keep your files or remove them, and then reinstalls Windows. You can reset your PC from Settings, the sign-in screen, or by using a recovery drive or installation media.
Reset your PC from Settings
Select the Start button, then select Settings > Update & Security > Recovery .
Open Recovery settings
Under Reset this PC, select Get started and then choose from the options and/or settings in the table below.
Keep my files > Change settings > Preinstalled apps On
Reinstalls Windows 10 and keeps your personal files.
Removes apps and drivers you installed.
Removes changes you made to settings.
Restores any apps your PC manufacturer installed if your PC came with Windows 10.
Keep my files > Change settings > Preinstalled apps Off
Reinstalls Windows 10 and keeps your personal files.
Removes apps and drivers you installed.
Removes changes you made to settings.
Removes any apps your PC manufacturer installed.
Reinstalls Windows 10 and removes your personal files.
Removes apps and drivers you installed.
Removes changes you made to settings.
Removes any apps your PC manufacturer installed. (If your PC came with Windows 10, apps from your PC manufacturer will be reinstalled.)
Note: Remove everything > Change settings gives you two options.
Data erasure On removes files and cleans the drive. If you’re planning to donate, recycle, or sell your PC, use this option. This might take an hour or two, but it makes it harder for other people to recover files you’ve removed.
Data erasure Off just removes files. It takes less time, but is less secure.
Reset your PC from the sign-in screen
If you can’t open Settings, you can reset your PC from the sign-in screen. Here’s how:
Press Windows logo key + L to get to the sign-in screen, and then restart your PC by pressing the Shift key while you select the Power button > Restart in the lower-right corner of the screen.
Your PC will restart in the Windows Recovery Environment (WinRE) environment.
On the Choose an option screen, select Troubleshoot > Reset this PC, and then choose one of the options in the previous table.

Connect the installation media you created to your PC and reinstall Windows 10.
Open File Explorer and select the drive with the installation media.
From the root directory of the drive, double-click setup.exe, and then select Yes when asked if you’d like to allow the app to make changes to your device.
Select Change what to keep.
Select one of the following options, and then select Next:
Keep personal files and apps – This will preserve your personal data, apps, and settings.
Keep personal files only – This will preserve your personal data and settings, but all your apps will be removed.
Keep nothing – This will remove all personal data, settings, and apps.
Warning: You cannot undo a reinstallation of Windows 10. Be sure to back up your files first if you choose the Keep nothing option.
To finish, select Install to start reinstalling Windows 10 on your PC.
Your PC will restart several times during the resinstallation.
Important: If you’ve encrypted your device, you’ll need your BitLocker key to use a recovery drive to restore or reset your PC If you don’t know your BitLocker key, see Find my BitLocker recovery key.
If your PC won’t start and you haven’t created a recovery drive, download installation media and use it to restore from a system restore point or reset your PC.
Download the Windows 10 media creation tool and then run it.
Select Create installation media for another PC.
Choose a language, edition, and architecture (64-bit or 32-bit).
Follow the steps to create installation media, and then select Finish.
Connect the installation media you created to your nonfunctional PC, and then turn it on.
On the initial setup screen, enter your language and other preferences, and then select Next. If you don’t see the setup screen, your PC might not be set up to boot from a drive. Check your PC manufacturer’s website for info on how to change your PC’s boot order, and then try again.
Select Repair your computer.
On the Choose an option screen, select Troubleshoot. From there, you can:
Restore from a system restore point by selecting Advanced options > System Restore. This will remove recently installed apps, drivers, and updates that might be causing your PC problems. Restoring from a restore point won’t affect your personal files.
Important: If you’ve encrypted your device, you’ll need your BitLocker key to use a recovery drive to restore or reset your PC If you don’t know your BitLocker key, see Find my BitLocker recovery key.
If your PC won’t start, you can use a recovery drive to restore from a system restore point or recover your PC. For info on how to create a recovery drive on a working PC, see Create a recovery drive.
Note: If you are using a Surface, see Creating and using a USB recovery drive for Surface to download and create a USB recovery image specifically for your Surface device.
To restore or recover using the recovery drive:
Connect the recovery drive and turn on your PC.
Press Windows logo key + L to get to the sign-in screen, and then restart your PC by pressing the Shift key while you select the Power button> Restart in the lower-right corner of the screen.
Your PC will restart in the Windows Recovery Environment (WinRE) environment.
On the Choose an option screen, select Troubleshoot, and then select one of the following two options. (If you don’t see the Choose your option screen, your PC might not be set up to boot from a drive. Check your PC manufacturer’s website for info on how to change your PC’s boot order.)
To restore from a system restore point, select Advanced Options > System Restore. This won’t affect your personal files, but it will remove recently installed apps, drivers, and updates that might be causing your PC problems.
To reinstall Windows 10, select Advanced Options > Recover from a drive. This will remove your personal files, apps and drivers you installed, and changes you made to settings.
For a limited time after upgrading to Windows 10, you’ll be able to go back to your previous version of Windows by selecting the Start button, then select Settings > Update & Security > Recovery and then selecting Get started under Go back to the previous version of Windows 10. This will keep your personal files, but it’ll remove apps and drivers installed after the upgrade, as well as any changes you made to settings. In most cases, you’ll have 10 days to go back.
Open Recovery settings
To go back, you’ll need to:
Keep everything in the windows.old and $windows.
bt folders after the upgrade.
Remove any user accounts you added after the upgrade.
Know the password you used to sign in to Windows 7 or Windows 8.1 (if you used one).
Have the USB drive you used to upgrade to Windows 10 (if you used one).
Note: If you go back to Windows 8.1, some apps that came with Windows, like Mail and People, might not work anymore. To fix the apps, reinstall them from the Microsoft Store.
Note: The option in Settings to go back to your previous version of Windows is only available for a limited time after upgrading.
Info for Windows Insiders
If you’re an Insider and the current preview build isn’t working for you, select the Start button, then select Settings > Update & Security > Recovery . Under Go back to the previous version of Windows 10, select Get Started. This won’t remove your personal files, but it’ll remove recently installed apps and drivers, and change settings back to their defaults.
Going back to an earlier build won’t remove you from the Insider Program. When the next preview build is ready, it’ll be installed on your PC.
This option takes your PC back to an earlier point in time, called a system restore point. Restore points are generated when you install a new app or driver, and when you create a restore point manually. Restoring won’t affect your personal files, but it will remove apps, drivers, and updates installed after the restore point was made.
In the search box on the taskbar, type control panel,andthen choose it from the list of results
In the Control Panel search box, type recovery.
Select Recovery > Open System Restore.
In the Restore system files and setting box, select Next.
Select the restore point that you want to use in the list of results, and then select Scan for affected programs.
If you don’t see the restore point that you want to use, select the Show more restore points check box to see more restore points.
If you’re not seeing any restore points, it might be because system protection isn’t turned on. Here’s how to check:
In the search box on the taskbar, type control panel,andthen choose it from the list of results.
In the Control Panel search box, type recovery.
Select Recovery > Configure System Restore > Configure and see if the Turn on system protection option is selected.
If the Turn on system protection option is not selected, system protection isn’t turned on and there aren’t any restore points. In this scenario, you won’t be able to recovery your PC using a system restore point and will need to use one of the other recovery options listed on this page.
If the Turn on system protection option is selected, continue with step 6.
You’ll see a list of items that will be deleted if you remove this restore point. If you’re OK with the deletions, select Close> Next > Finish.


