- Все, что вы хотели знать про загрузку Windows, загрузчики и восстановление загрузки ОС
- Принципы загрузки операционных систем
- Типы MBR
- Разнообразие PBR
- What is bootloader and what is it used for? Find out in our guide
- Jump to section:
- What is bootloader
- Why manufacturers lock the bootloader
- Bootloader locked: what to do?
- Bootloader
- Contents
- What does a boot loader do
- Loading your kernel
- Giving the kernel its information
- Establishing an environment
- Bootloader design
- Single Stage Bootloader
- Two-Stage Bootloader
- Mixed Bootloader
- Booting multiple OSes
Все, что вы хотели знать про загрузку Windows, загрузчики и восстановление загрузки ОС
В этой статье я не планирую подробно рассказывать обо всех типах загрузчиков, но хочу свести воедино всю необходимую информацию, которую нужно знать для создания загрузочных дисков, флэшек, а также для восстановления загрузчиков.
Принципы загрузки операционных систем
При включении компьютера управление процессором получает BIOS, и если он настроен на загрузку (boot) с винчестера, то он подгружает в оперативную память компьютера первый сектор диска (MBR) и передает управление ему. Если у вас несколько жестких дисков, то каждый из них содержит свою MBR. В этом случае можно или менять порядок загрузки дисков в BIOS, или же прописать все операционные системы с разных дисков в один PBR загрузчик, об этом ниже.
Сразу оговоримся, что если у BIOS у вас включен режим загрузки UEFI, то структура разделов диска у вас должна быть не MBR, а GPT. GPT имеет не только другую структуру разделов, но и другую структуру загрузочной области. Там в первый сектор записывается «заглушка» для BIOS (Protective MBR), которая служит для того, чтобы старый Legacy BIOS мог загрузиться с GPT диска в режиме совместимости, если ОС была установлена на GPT (часто в BIOS его называют CSM – Compatibility Support Module). Однако, вы никогда не сможете загрузить ОС с MBR диска, если в BIOS выставлена загрузка в режиме UEFI.
При загрузке операционной системы, сначала считывается первый сектор с устройства загрузки, представляющий собой главную загрузочную запись (Master Boot Record — MBR). Стандартно, в качестве MBR выступает первый сектор загрузочного диска. MBR содержит список разделов, признак активного раздела (раздела, с которого будет выполняться загрузка ОС), некоторые служебные данные, а также программный код для считывания в память загрузочного сектора активного раздела (Partition Boot Record — PBR) и передачи ему управления.
Размер сектора на жестком диске — 512 байт. В секторе MBR хранятся данные, которые должны заканчиваться специальной сигнатурой. Этим словом называется специальная, строго установленная, последовательность из 2 байт с шестнадцатеричными значениями 55h AAh, которая записывается в последние 2 байта сектора и соответственно имеет смещение от начала сектора 1FEh. Если хотя бы один из двух последних байтов отличается по значению, считается, что первый сектор не является MBR и не содержит осмысленной информации. Если компьютер при старте, прочитав первый сектор, не обнаружит правильной сигнатуры, он не будет передавать управление располагающемуся там коду, даже если он правильный, а выдаст сообщение о том, что главная загрузочная запись не найдена.
Общая структура MBR может быть представлена следующей таблицей:
Смещение Длина Описание
000h 446 Код загрузчика
1BEh 64 Таблица разделов
1CEh 16 Раздел 2
1DEh 16 Раздел 3
1EEh 16 Раздел 4
1FEh 2 Сигнатура (55h AAh)
Длина указана в байтах.
Как видно, MBR может содержать информацию максимум о 4 разделах. Каждый 16-байтовый блок, содержащий информацию о разделах, в своем начале содержит признак активности раздела — т.е. признак того, что операционную систему следует загружать именно из этого раздела — может иметь значения 80h (раздел активен) и 00h (раздел не активен). Количество активных разделов должно быть не более одного.
Шестнадцатеричный однобайтовый код далее указывает на тип (ID) раздела. Например, 07h – раздел типа NTFS, 0Bh – FAT32, 17h – скрытый NTFS раздел, 27h – системный скрытый NTFS раздел для восстановления системы.
Типы MBR
Выше мы увидели, что в сектор MBR записывается код загрузчика. Что же это? Дело в том, что в MBR может быть записан как «стандартный» загрузчик, так и альтернативные загрузчики.
Существуют следующие распространенные типы MBR:
- Windows NT версий 5.х и 6.x, занимает 1 сектор. Может загружать ОС только с первичного активного раздела.
- GRUB4DOS версий 5.х и 6.x – занимает 16 секторов. Представляет собой файл gbldr.mbr. также его можно установить в качестве PBR прямо в раздел.
- GRUB 2.0 – универсальный загрузочный менеджер, занимает 63 сектора. Состоит из файлов boot.img и core.img. Может работать с любыми файловыми системами и загружать ОС как с первичных, так и логических разделов.
- PLoP – занимает 62 сектора и имеет продвинутый интерфейс. Позволяет организовать загрузку с CD/Floppy/USB без поддержки и обращения к BIOS.
- UltraISO USB-HDD – занимает 1 сектор и позволяет выполнять загрузку с внешних USB HDD дисков.
Конечно, с учетом многообразия ОС, существует масса других MBR, но они не так популярны.
Операционные системы дружат только с определёнными типа загрузчиков, однако это не значит, что их нельзя модифицировать для поддержки других ОС. Так, в Windows MBR можно добавить информацию о Linux разделе, но этого недостаточно, чтобы Linux стал грузиться. Для этого также потребуется редактировать и PBR. Однако линуксовый LDLINUX.SYS требует наличия своего микрокода в MBR, чтобы обращаться к нему в процессе загрузки, то есть если у вас загрузочная запись Windows NT MBR, а загрузчик GRUB, то такая схема работать не будет. Виндовсовые загрузчики могут обойтись без наличия соответствующего микрокода в MBR, поэтому они могут грузиться и через GRUB MBR.
Главное, что вам нужно понять, что MBR содержит микрокод, инструкции для процессора, а не файлы. PBR же указывает на загрузчик, который является файлом.
Разнообразие PBR
Мы с вами выяснили, что MBR передает управление на активный раздел с PBR. PBR (Partition Boot Record), так же называют volume boot record (VBR) – это микрокод в начальном секторе раздела диска (часто это сектор 63), который содержит информацию, какой же загрузчик искать.
Существуют следующие загрузчики:
Тип MBR — NT 5.x/6.x, 1 сектор
- io.sys для MS-DOS, Windows 95/98/МЕ
- ntldr для Windows 2000/XP/2003
- bootmgr для Windows Vista/7/8/8.1/10
Тип MBR — Grub4DOS, 18 секторов
Тип MBR — LILO/GRUB и др. линуксовые (к-во секторов зависит от версии и количества файлов)
- ldlinux.sys – основной базовый модуль
- syslinux.sys — для загрузки с FAT, FAT32, NTFS
- isolinux.bin — для загрузки с iso9660
- pxelinux — для загрузки по PXE
- extlinux для загрузки с ext2/ext3/ext4 или btrfs
Как я сказал выше, загрузчик является не загрузочной областью, а бинарным файлом.
- Файлы Windows NTLDR или BOOTMGR должны лежать в корне активного системного раздела и работают они по-разному. Об этом ниже.
- Файл GRLDR используется Grub4DOS также должен лежать в корне партиции, с котрой выполняется загрузка
- Syslinux – универсальный загрузчик, содержащий много модулей и поддерживающий загрузку с файловых систем ext2/¾, FAT, NTFS, CD/DVD дисков, по сети через PXE. Позволяет организовать текстовое или графическое загрузочное меню.
Чаще всего этот загрузчик используют для запуска Linux с файловых систем FAT/NTFS или же создания мультизагрузочных USB флэшек, позволяющих загружать как Linux-совместимые приложения под DOS, так и Windows PE.
Например, типичные пример создания мультизагрузочной флэшки – Multiboot USB 2k10, создаваемые уважаемыми conty9 & korsak7. Мультизагрузочный диск системного администратора с возможностью загрузки c CD/DVD, флешки, USB-HDD и обычного HDD и состоящий из нескольких Windows PE-сборок, а также DOS версий продуктов компании Acronis – например Acronis True Image (выполнены на Linux-ядре). Именно из-за этого смешанного зоопарка систем и приходится использовать загрузчик Syslinux (хотя можно и Grub4DOS).
В своем арсенале вам необходимо обязательно иметь утилиту BootICE. Уникальная в своём роде утилита для изменения или бэкапа/восстановления MBR (Master Boot Record) или PBR (Partition Boot Record). С BOOTICE, вы можете легко изменять тип MBR/PBR. Поддерживается загрузочные записи: Grub4DOS, SysLinux, PLoP, MS NT52/60… Например, с помощью этой утилиты, вы можете установить Grub4DOS вашим MBR или PBR, установить NTLDR или BOOTMGR к вашему PBR, установить SYSLINUX на PBR, и так далее.
What is bootloader and what is it used for? Find out in our guide
3 min read 3 min

If you own a smartphone and are interested in tech, then it is only a matter of time before you read or hear about locked bootloaders, on how to unlock them and the fact this could void your phone’s warranty. Let’s get the facts straight: what is a bootloader and what is it used for?
Jump to section:
What is bootloader
Let’s start from the beginning. The bootloader is a program that starts whenever a device is powered on to activate the right operating system. It is therefore not only a trait reserved to Android, but also one that can be find out all devices with an operating, be it a smartphone, a tablet, a PC etc.
It may occur that a device, a computer for example, may be equipped with two different operating systems (dual boot). In this case, either one or the other bootloader starts, depending on the user’s preference or what has been pre-programmed to happen automatically.
The same principle also applies to Android devices, except that there is only one operating system in this case. The bootloader determines when to run Android or when to enter ecovery mode, which is an independent runtime environment in a partition separate from the main Android OS that can be found on all Android devices.
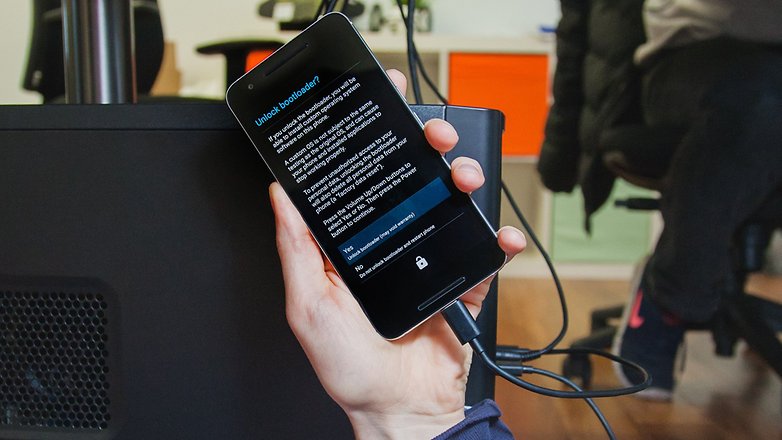 An action shot of unlocking the bootloader of our Nexus 6P. / © NextPit
Why manufacturers lock the bootloader
Manufacturers lock the bootloader of their devices so that only the operating system installed on the device can be used. Not all brand acts in the same way either: some manufacturers release their smartphones with the bootloader already unlocked (to the delight of most computer geeks).
To run a custom ROM, you need to unlock the bootloader first
Unlocking the bootloader allows you to install unauthorized software, this operation voids the warranty of your device.
Bootloader locked: what to do?
The bootloader is provided directly by the manufacturer of the device and, given its importance; is found in a section of the phone’s memory that can’t easily be modified by the user (even though we know how much you’d like to have this freedom!). When you want to modify your own device, one of the biggest obstacles is the locked bootloader. What is involved?
A locked bootloader will only load the authorized operating systems with a digital signature. Almost every smartphone manufacturer decides to lock it by only allowing its own personalized Android to load, preventing the installation of other custom ROMs. But as you know, behind every Android problem, there is always a solution. To be able to run a custom ROMs, you first need to unlock the bootloader, which allows you to start the “unauthorized” operating system.
The method to unlock bootloaders varies per manufacturer who provide different procedures, from sending a simple command from the PC via the USB connection, to download a specific program.
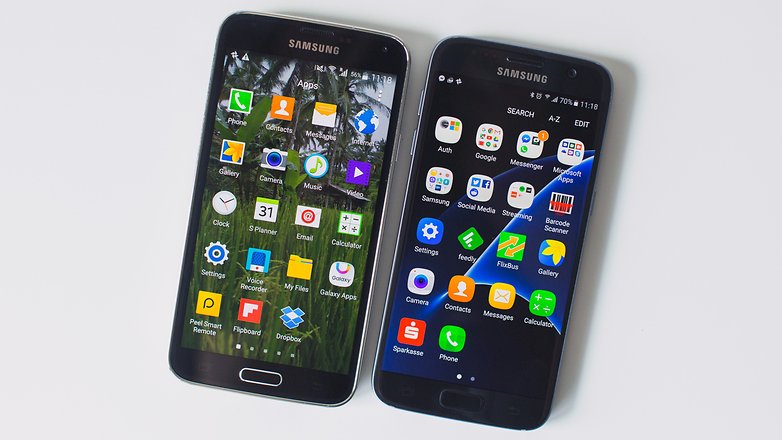 Most Samsung devices come with the bootloader unlocked! / © NextPit
Unlocking the bootloader often requires authorized root access on your device. Before taking action, secure your data by backing it up and take a look at our guides dedicated to the root:
Have you ever unlocked the bootloader of your Android? Which manufacturer do you have and how did you go about it?
Bootloader
A bootloader is a program written to load a more complex kernel. Implementation details are gathered in Rolling Your Own Bootloader
Contents
What does a boot loader do
The boot loader ultimately has to:
- Bring the kernel (and all the kernel needs to bootstrap) into memory
- Provide the kernel with the information it needs to work correctly
- Switch to an environment that the kernel will like
- Transfer control to the kernel
On the x86, the boot loader runs in Real Mode. Consequently it has easy access to BIOS resources and functions. Therefore it’s a good place to perform memory map detection, detection of available video modes, loading of additional files, etc. The boot loader will collect this information and present it in a way the kernel will be able to understand.
Loading your kernel
The bits of your kernel are somewhere on some disk (presumably the booting disk, but this is not mandatory). Question is: where on the disk? Is it a regular file on a FAT-formatted partition? Is it a collection of consecutive sectors in the «reserved area» of the FAT file system (in which case you may need a dedicated tool to format the disk and install the kernel on it)? Or is the disk / partition simply left unformatted and the kernel pasted directly with a disk image tool?
All the above options are possible. Maybe the one I’d choose myself would be to reserve enough space on a FAT file system to store the list of sectors used by the kernel file. The field reserved sectors in the BPB is a perfect place for this. The «advantage» of being fully-FAT is that you don’t need to re-write the bootsector every time you rewrite the kernel.
What needs to be loaded mainly depends on what’s in your kernel. Linux, for instance, requires an additional ‘initrd’ file that will contain the ‘initialization process’ (as user level). If your kernel is modular and if Filesystems are understood by some modules, you need to load the modules along with the kernel. Same goes for ‘microkernel services’ like disk/files/memory services, etc.
Giving the kernel its information
Some kernels require some extra information to run. For example, you’ll need to tell Linux the root partition to start from. Pretty useful information to have is a map of the address space — effectively a map of where physical memory is and where it’s not. Other popular queries regard video modes.
In general, anything that involves a BIOS call is easier to do in Real Mode, so better do them while in real mode than trying to come back to real mode for a trip later.
Establishing an environment
Most kernels require protected mode. For these kernels you’ll have to
before giving control to the kernel.
It’s common for the loader to keep interrupts disabled (the kernel will enable them later when an IDT is properly set up).
Note: take time to think about whether or not you’ll enable paging here. Keep in mind that debugging paging initialization code without the help of exception handlers may quickly become a nightmare!
Bootloader design
Virtually any bootloader follows a common design.
Single Stage Bootloader
A single stage bootloader consists of a single file that is loaded entirely by the BIOS. This image then performs the steps described above to start the kernel. However, on the x86 you are usually limited to 512 bytes for a first stage (An exception is no-emulation El-Torito), which is not much. Also, a lot of this size may be dedicated to bios structures and FAT headers, which leaves even less space to work with
Two-Stage Bootloader
A two-stage bootloader actually consists of two bootloaders after each other. The first being small with the sole purpose of loading the second one. The second one can then contain all the code needed for loading the kernel. GRUB uses two (or arguably, three) stages.
Mixed Bootloader
Another way to avoid the 512-byte barrier is to split the bootloader in two parts, where the first half (512 bytes) can load the rest. This can be achieved by inserting a ‘512-bytes’ break in the ASM code, making sure the rest of the loader is put after the bootsector.
Booting multiple OSes
The easiest way to boot another OS is a mechanism called chainloading. Windows stores something akin to a second-stage bootloader in the boot sector of the partition it was installed in. When installing Linux, writing e.g. LILO or GRUB to the partition boot sector instead of the MBR is also an option. Now, the thing your MBR bootsector can do is to relocate itself (copying from 0x0000:0x7c00 to, traditionally, 0x0060:0x0000), parse the partition table, display some kind of menu and let the user choose which partition to boot from. Then, your (relocated) MBR bootsector would load that partition boot sector to 0x0000:0x7c00, and jump there. The partition boot sector would be none the wiser that there already was a bootsector loaded before, and could actually load yet another bootsector — which is why it’s called chainloading.
You see that with displaying a menu in some intelligible way and accepting keystrokes, such a multi-option bootloader can get quite complex rather quickly. We didn’t even touch the subject of booting from extended partitions, which would require sequentially reading and parsing multiple extended partition tables before printing the menu.
Taken to the extreme, bootmanagers like that can become as complex as a simple OS, GRUB being a good example: It offers reading from various filesystems, booting Multiboot kernels, chainloading, loading initrd ramdisks etc. etc.


