- Запускаем Internet Explorer под Mac OS X
- How To Get Internet Explorer For Mac in 2021 (inc Big Sur, Catalina & Mojave)
- Can You Still Download Internet Explorer On Mac?
- How To Use Internet Explorer on a Mac
- 1. Run Internet Explorer on Mac in Windows
- 2. Emulate IE For Mac In Your Browser
- Safari
- Google Chrome
- Firefox
- 3. Use Microsoft Edge
- Windows Explorer for Mac – Easy Guide For PC Switchers
- Starting, Opening and Closing Finder
- How to access Finder in Mac
- How to quit Finder in Mac
- How to open a new Finder window
- How to switch between Finder windows
- Tabs in the Finder
- How to Navigate in Finder
- Sidebar
- Main Window
- Navigating with Folders
- Creating new folders
- Current Path Tips
- How to show full path in Finder
- How to copy the full path to the clipboard
- Where is C drive on Mac
- Working With Files
- How to select multiple files and folders
- How to copy and paste files
- How to move files (cut and paste)
- How to delete files and folders
- How to rename a file
- How to create a new file
- How to batch rename files
- How to find files in Finder
- How to show hidden files
- How to open a file
- How to Preview files
- How to email a file as an attachment
- Customizing Finder
- How to add to Favorites
- How to show hard drives
- How to clear Recents folder in Finder
- Advanced Techniques
- Open terminal in Mac
- Using Finder tags
- Recent Posts
- About Me
Запускаем Internet Explorer под Mac OS X
 Всем привет! Хочу поделиться ответом на вопрос, который в свое время сам задавал на различных конференциях, как только обзавелся макинтошем. К сожалению, компания Microsoft давно уже перестала заниматься поддержкой своего любимого браузера под платформу Mac, поэтому для этой ОС существует IE только старой версии — 5. Более поздних версий уже не выпускалось и для разработчиков стало проблемой запустить последние версии IE на макинтоше. Как запустить Internet Explorer на машине с установленной Mac OS X,
Самый простой способ это сделать — скачать и установить дистрибутив VMWare Fusion, после чего поставить на него Windows XP, для которого существует такой софт, как IE Tester. Эта замечательная программка разработана специально для Windows и содержит в себе сразу несколько версий нашего «любимого» Internet Explorer — 5.5/6/7/8. Также, вы можете использовать Parallels или Bootcamp. Для того, чтобы воспользоваться этими виртуалками, ваш макинтош должен быть на Intel-платформе. Если это не так, то есть еще один способ — ies4osx, который запускается под Darwine (это программа, позволяющая запускать софт для семейства Windows не запуская саму операционную систему).
Если вы знаете еще какие-то способы — пишите, с удовольствием добавлю.
если еще не стоит, то ставим macports (www.macports.org/)
$ sudo port selftupdate
$ sudo port install wine winetricks
$ winetricks ie6
$ wine
/.wine/drive_c/Program\ Files/Internet\ Explorer/iexplore.exe
UPD. еще можно проверить сайт в IE (да и в других браузерах тоже) в он-лайн сервисах, таких как — browsershots.org и ipinfo.info/netrenderer (если нужен только IE, то отдаю предпочтение последнему ресурсу, для остальных браузеров — первый ресурс)
UPD. народ, вы если минусуете — объясняйте хотя бы почему. Может надо дополнить еще или подправить? Зачем минусовать, не объясняя. Если вы не пользуетесь Mac’ом — зачем ставить минус?
How To Get Internet Explorer For Mac in 2021 (inc Big Sur, Catalina & Mojave)
If you’ve just switched to Mac from Windows, you might be surprised to find that Internet Explorer for Mac doesn’t exist.
The problem for Mac users is that some websites such as corporate intranets, HR and banking sites still require Internet Explorer to access them.
Microsoft has since replaced IE on Windows with Microsoft Edge and the company has confirmed that Internet Explorer will be officially discontinued in August 2021.
In some cases, you may be able to just use Microsoft Edge for Mac to access sites that only work with IE.
However, there are still some sites that won’t accept Microsoft Edge and will only work with Internet Explorer so in this article we show you various ways of getting around this on the latest versions of macOS including Big Sur, Catalina and Mojave.
You May Also Like:
Can You Still Download Internet Explorer On Mac?
There’s no way to even download IE on Mac anymore because the Mac version was discontinued by Microsoft way back in 2005.
If you search for “download Internet Explorer for Mac” you may find sites that claim to offer it but do not download them as the truth is IE for Mac does not exist anymore.
Some sites claiming that you can download and install IE on a Mac may even install malware on your Mac such as the recent Silver Sparrow malware.
The last version of Internet Explorer that worked on Mac was for OS X 10.6.8 Snow Leopard which is now obsolete so don’t be fooled by any site that claims you can download it still.
How To Use Internet Explorer on a Mac
In a nutshell, there are two ways to get Internet Explorer on a Mac nowadays:
- Install Windows on your Mac
There are various ways to do this the easiest being with a Virtual Machine which allows you to run macOS and Windows at the same time. In fact, if the website you’re trying to access requires ActiveX, you will have to install Windows on your Mac because it’s the only way to access websites that require it.
- Simulate IE in another browser
If you don’t need ActiveX support, the simplest way to get IE or Edge on your Mac is to simulate them in your current browser such as Chrome, Safari or Firefox. This can easily be done by changing the “user agent” settings in your browser so that the site thinks you’re using Internet Explorer even though, you’re using Chrome, Firefox, Safari etc.
With this in mind, here’s the best ways to view websites on your Mac that require Internet Explorer in 2021.
1. Run Internet Explorer on Mac in Windows

Running Windows on your Mac is the surest way to access sites that will only work with Internet Explorer.
Although the second method covered here (emulation) will work for most sites, there are some websites that simply can’t be fooled into thinking you’re using Internet Explorer on a Mac.
This is definitely the case for websites that require Microsoft ActiveX.
The easiest way to do this is using Parallels which allows you to run macOS and Windows at the same time so you can switch between them easily.
Parallels allows you to run Windows simultaneously with macOS and the good news is that nowadays, you can run Windows 10 on Mac for free.
This is because Microsoft no longer requires users to activate Windows 10 with a product key in order to actually use it.
The only advantage of activating Windows 10 with a product key is that it allows you to customize the look of Windows, which isn’t exactly essential for most Mac users.
Running Windows on your Mac almost guarantees access to any IE only or Edge only sites on Mac.
Effectively, you are emulating a PC on your Mac so it’s just like accessing a website as if you were a PC user using Internet Explore or Edge.
Alternatively, you can also install Windows in a partition on your Mac hard drive using Boot Camp so you can boot your Mac in Windows.
The disadvantage of this method that you can’t switch between macOS and Windows instantly – you have to boot and then re-boot in one or the other.
2. Emulate IE For Mac In Your Browser
The easiest, quickest and simplest way to run Internet Explorer on Mac works by “fooling” sites into thinking you are using IE even though you are using another browser.
This is free and very easy to do. All you have to do is change a few settings in your browser.
This works with Safari, Chrome, Firefox and a lesser known browser called iCab.
It works by activating the Developer Mode in the browser then switching the User Agent to Internet Explorer, making the site think you’re accessing it using IE.
iCab does a similar thing except the ability to switch browser identities is a standard feature.
Here are instructions how to emulate Internet Explorer in each of these browsers starting with Safari.
Safari
Important Update: If you’re using macOS Catalina or Big Sur you can only simulate Microsoft Edge in Safari. You need macOS Mojave or lower to simulate Internet Explorer.
- Open Safari on your Mac. If you can’t find it, search for “Safari” in Spotlight in the top right of your Mac.
- When Safari is open, select Safari and then Preferences… in the top left corner.

- Select the Advanced tab on the far right. Then select the checkbox “Show Develop menu in menu bar” at the bottom:

- Close the Preferences and you’ll see a new “Develop” option in the Safari Menu Bar at the top of the screen. Click on it and you’ll see the option User Agent. You can then instruct Safari to appear to websites as Internet Explorer.
- Select Internet Explorer 11 unless you know that the site you’re trying to access only works with Internet Explorer 8.0 or 9.0. Note that if you’re using macOS Catalina or higher, Internet Explorer no longer appears in the User Agent list.


You should now be able to access sites that require Internet Explorer.
As you can see from the other options available in the User Agent, you can also make Safari pretend your Mac is a PC or Mac using Chrome, Firefox or Opera.
Google Chrome
If you’re using Google Chrome, here’s how to emulate IE on a Mac:
- Go to the View menu at the top of Chrome and select Developer and then Developer Tools.

A panel will open to the right of your browser window.
- Make sure that Console is selected in the upper Menu and then go to the bottom of the browser and click on the three dots next to Console as illustrated by the arrows below:

- From the pop-up Menu that appears, select Network Conditions.

- Next to user agent, deselect the option “Select Automatically” and then click on the Custom Menu and select the version of Internet Explorer you want Chrome to use.

Any websites you visit will then think you are using Internet Explorer on your Mac.
You can leave the console open or close it.
When you close the tab completely, Chrome will revert to being Chrome again – there’s no further action needed on your part.
If you have problems doing this, an even easier solution is to use the Chrome Agent Switcher Plugin.
This automatically allows you to select which browser you want Chrome to appear as.

Firefox
You can run also emulate Internet Explorer in Firefox although it’s slightly more complicated and messy than doing it via Safari or Chrome.
However, the process is made incredibly easy if you just install the User-Agent Switcher Add-On for Firefox.
This useful Add-On allows you to easily select what you want Firefox to run as, including Internet Explorer.
As you can see, you can even make Firefox appear like it’s also a mobile device or even coming from an entirely different operating system such as Windows or Linux.

iCab is a free browser that like Safari, allows you to run as Internet Explorer on your Mac.
It’s also a pretty darn quick browser too although a bit dated nowadays.
Here’s how to run IE on your Mac using iCab.
- Download and install iCab. Open iCab – you don’t even need to drag it into your Applications folder. You can just double click on the iCab icon.
- When iCab is open, simply go to View then Browser Identity and select one of the Internet Explorer options.
Unlike with the Safari method, you can even disguise iCab as the last version of Internet Explorer that ever worked on Mac – Internet Explorer 5.2.
Beyond that though, iCab only goes up to Internet Explorer 7.0 on Windows which some sites may not support but if you’ve had no luck with Safari, iCab is definitely worth a shot.

3. Use Microsoft Edge
Some sites that require Internet Explorer may work with Microsoft Edge. Microsoft Edge is Microsoft’s replacement for Internet Explorer and Microsoft Edge for Mac is now available.
However, it’s a completely different browser to IE and it’s quite possible that websites that only work in IE, won’t work in Microsoft Edge.
Windows Explorer for Mac – Easy Guide For PC Switchers
If I have to name number one application that was driving me crazy when I switched to Mac the Finder would be the top contender. If you browse Apple forums you will often see questions like “is anyone else is frustrated with Finder” and “Why Finder is so weird”.
The truth is that Finder is not bad or weird, you just need to learn to use it properly, like a Pro.
The first question that PC users ask when switching to Mac what is the equivalent of Windows Explorer on a Mac? The equivalent of Windows Explorer on a Mac is the Finder app. Finder is a file manager and it does everything that explorer does: browse folders, search, copy and delete files and folders, start applications and so on. This article explains how to configure the Finder to behave like Windows Explorer.
Are there any alternatives to Finder?
The following apps are considered to be alternatives to Finder:
- TotalFinder from BinaryAge. It costs $12 and requires a system tweak to work.
- XtraFinder from Tran Ky Nam. It has an unlimited trial and paid ($4.99) versions.
- Path Finder from Cocoatech. It costs $40.
- FinderPath from Bahoom. Free.
- Marta from marta.yanex.org. Free.
Let’s now learn how to configure and use Finder.
Starting, Opening and Closing Finder
How to access Finder in Mac
The only way to access the Finder in Mac is by clicking on the leftmost icon in the Dock. Finder is a fundamental part of Mac Desktop so it is always the first icon in the dock, it cannot be removed or swapped places with other icons.
Often Mac users ask how to open Finder on Mac with a keyboard. Unfortunately, currently, there is no way to start Finder from the keyboard. It is possible to open a Finder window in a specific location with a keyboard, but only when Finder is active in the menu.
To activate Finder without clicking on its icon minimize all applications and then left click on the Desktop. If you see Finder option in the system menu (top bar) next to the Apple logo it means that Finder is currently active. Once active you can use keyboard shortcuts such Shift-Command-H to open the Home folder or Shift-Command-O to open Documents.
How to quit Finder in Mac
Unlike all other applications, the Finder app does not have Quit option in the menu. Since Finder is a part of macOS responsible for drawing the Desktop screen there at least one instance of Finder running all the time. If there are multiple instances of the Finder it is possible to close them all by clicking the red icon at the top left corner of the Finder window.
While quitting or hiding Finder is not an option, it is possible to relaunch the Finder. If there is a need to restart the Finder without restarting the Mac then start the Terminal and type the following command: “killall Finder”. This will kill all Finder instances and immediately start a new one.
How to open a new Finder window
There are three ways to open a new Finder window:
- When Finder app is active use Command-N key combination.
- Select New Finder Window option in Finder’s File menu.
- Right click on Finder icon in the Dock and click on New Finder Window option.
How to switch between Finder windows
If there are multiple instances of Finder open then switch between them by right-clicking on Finder icon in the Dock and select the instance at the top of the context menu. Like with most applications in macOS use Command and
(tilde) keys to switch between Finder windows.
Tabs in the Finder
Tabs are another way to have multiple Finder windows.
To open a new tab use Command-T shortcut. Once more than one tab is open you can use plus icon at the right. To open a folder in another tab, select the folder and then click on a gear looking icon in the Finder toolbar and select Open in New Tab option.
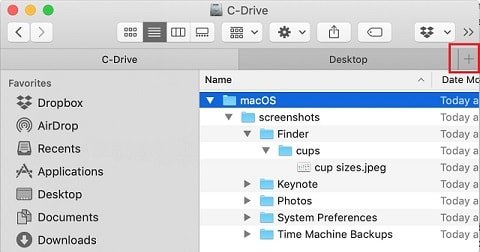 Opening Finder tabs
And finally, the three key combination Shift, Command and Backslash will bring tab overview window from which you can see all open tabs and add a new one if needed.
To switch between tabs in the Finder use Command and number key. For instance, if you have 3 tabs open then Command-1 will make the first tab active, and Command-2 will activate the second.
How to Navigate in Finder
Finder window consist of 4 main parts:
- Sidebar
- Main window
- Toolbar
- Preview pane (hidden by default)
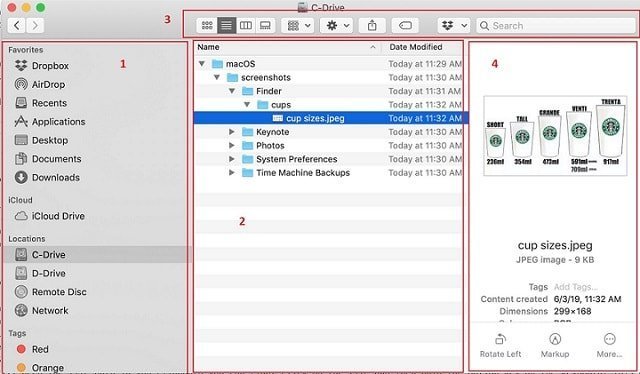 Finder Parts
Sidebar
The Sidebar is probably where you start browsing in the most cases. It consists of Favorites, iCloud, Locations, and Tags.
To customize the Sidebar click on Finder window to activate it and then either use Command and comma (,) key combination or select Preferences option from the Finder menu. This will bring up the Finder Preferences window. Click on Sidebar tab and include or exclude things you want to see in the Sidebar.
If for any reason you don’t want to see the Sidebar pane at all you can show/hide it from the View menu or by using Option (Alt), Command and S keys.
Main Window
In this window, you can navigate between folders and perform the majority of operations on files and folders.
You can change the way the items appear in the main window by choosing from one of four possible options in the toolbar. You can see items as a collection of icons, as a list, in columns, and in the gallery view.
My favorite view is the list. When you switch to this view files and folder in the current directory will appear a table of items. By default, items will be sorted by Name. You can always change the sorting by clicking on the Sort icon.
If you sort the list view by None then it will display items in a tree view from which you can see all folders as a hierarchy.
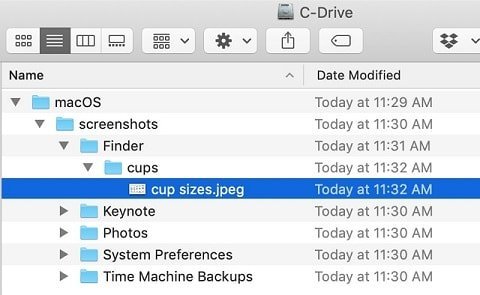 TreeView with Finder List View option
Here are several tips when working with folders in the tree view.
- To expand all folders hold Option (Alt) key and click on the little triangle in front of the top folder or use Option-Command-Right Arrow key combination.
- To collapse all folders in the Finder hold Option (Alt) key and click on the little triangle in front of the folder or use Option-Command-Left Arrow key combination.
Navigating with Folders
To open a folder in Mac either double click on the folder name or select the folder and the use Down Arrow button while holding Command button.
If you want to go one level up then use Up Arrow while holding Command key.
If you want to go back in Finder to a previously opened folder use left and right arrow icons under red, yellow and green circles in Finder window.
You can always go directly to a specific folder by using Go to Folder (Shift-Command-G) option in the Go menu.
Creating new folders
To create a folder in the Finder first browse to the parent folder and open it. Then right click on free space inside the parent folder and select New Folder option (usually at the top) in the pop-up menu. The new folder will be created under the name of “untitled folder” which can be changed.
Current Path Tips
There are times when you need the full path of the file or the folder. By default, the full path is not visible, but there several tricks to reveal it.
How to show full path in Finder
There are two easy ways to show full path in Finder:
- Hold Command key and click (or use right click) on the Title bar of the Finder window
- Select Show Path Bar in Finder’s View menu. Once the option is enabled the full path will always appear at the bottom.
 Full Path in Title bar and in Path Bar
You can also use Option-Command-P key combination to show/hide the Path Bar.
You can quickly switch to any parent folder by clicking in Path Bar or Title.
How to copy the full path to the clipboard
To copy the full path of the folder or the file in Finder right click on the item to bring up a context menu. Now hold Option (Alt) key and the menu option Copy “foldername” will change to Copy “foldername” as Pathname. Clicking on this option will copy the full path to the clipboard.
Where is C drive on Mac
As you can see from the picture above the path in macOS goes as Macintosh HD > Users > UserName > FolderName.
PC users used to see C drive as the root of the folder hierarchy. In macOS the role of C drive performed by Macintosh HD.
If you want to create a logical drive equivalent in macOS you can do it in Disk Utility (for macOS High Sierra and later versions):
- Start Disk Utility with Spotlight Search
- Select Macintosh HD in the left pane
- In the toolbar click on Partition
- The Disk Utility will ask if you want to create Partition or APFS volume. Choose volume.
- Enter the name of the volume, e.g. D-Drive. Do not click on Size Options. If not size is selected then volumes can grow until they reach the disk limit.
Working With Files
macOS supports most common keyboard shortcuts when working with files. Let’s go over them.
How to select multiple files and folders
To select a range of files first select the first file in the range, then hold Shift Key and click on the last file in the range. To select multiple files in random order hold Command key and then click on the files to add to the selection. To select all files in the folder use Command-A key combination.
How to copy and paste files
To copy files to another folder, first select the files and/or folders, then either use Command-C key shortcut or right-click and choose Copy option in the pop-up menu. Then, browse to the destination folder and then use Command-V shortcut to paste the files.
How to move files (cut and paste)
There is no Command-X shortcut in the Finder. To move (cut and paste) files and/or folders, first select the files, then either use Command-C key shortcut or right-click and choose Copy option in the pop-up menu. Then, browse to the destination folder and then use Option-Command-V shortcut to paste the files.
How to delete files and folders
To delete a file or a folder select it in the Finder and then use Command-Delete keyboard shortcut to send the file or the folder to Trash. To delete the file permanently use Option-Command-Delete shortcut and the file will be deleted forever.
To restore deleted file from the Trash, double click on the Trash icon, find the file, right click on it and select Put Back option in the pop-up menu. The restore file will be put back to the original location.
How to rename a file
To rename a file in the Finder either hit Enter when the file is selected or right click on the file and choose Rename option in the pop-up menu. The name portion (before the extension) will change to edit mode. Type the new name and hit Enter.
How to create a new file
There is no button or menu option in the Finder to create a new file, so I wrote an extensive article on this topic you may want to check:
How to Create New File on Mac
How to batch rename files
- Select the files to rename
- Right-click on one of the files
- Choose Rename N items… option in the pop-up menu
- Use Add Text, Replace Text or Format options to batch rename files
- Hit Rename button
Example 1: Adding text
If I want to add word original after or before the name of each file I have to choose Add Text option from the dropdown, type original and choose if I want to have it before or after the filename. Note that there is a preview which will show how the filename will change before renaming happens.
Example 2: Replace Text
If I want to replace word cup to mug in all selected files I can use Replace Text option.
Example 3: Number files
Let’s assume that you have pictures you took during your vacation on a cruise to the Bahamas and when you uploaded them from your camera they have names DSC001.jpeg, DSC0002.jpeg, etc. To rename them to Bahamas1.jpeg, Bahamas2.jpeg, etc. use Format option, type Bahamas in Custom Format, and hit Rename button.
How to find files in Finder
I wrote a very detailed article on this topic: How to find any file on Mac
How to show hidden files
To show hidden files (files started with dot or system files) use three keys Command, Shift and dot. To hide them again use the same keyboard shortcut.
How to open a file
To open a file in a default application either double click on the file or use Command and Down Arrow keys.
To open a file in a non-default application right click on the file and choose Open With option in the pop-up menu.
To change the default application for all files with specific extension first use Command-I shortcut to open file information dialog. Expand Open With section and select the new application. Click on Change All… button.
How to Preview files
One of the best features of macOS is the ability to preview almost any type of file. To quick look a file just hit Spacebar on the file and it will do what you expect it to do: show file contents if it’s a document, show images, play sound if it’s an audio file, play video if it’s a movie.
You can even quick look multiple files by selecting them and hitting a Spacebar. You can move between files using arrows or switch to a list view by hitting Command and Enter keyboard shortcut.
 Preview multiple files in Finder
Alternatively, you can enable a Preview pane in the Finder by using Shift-Command-P shortcut or choosing Show Preview option in View menu. Once enabled you can move between files and see their contents in the Preview pane.
How to email a file as an attachment
To send a file to Mail application select the file in the Finder. Then click on “Share the select items” icon that looks like a square with an arrow and click on Mail. This will open a new email message with the file attached. Alternatively, drag the file from the Finder to the open email message.
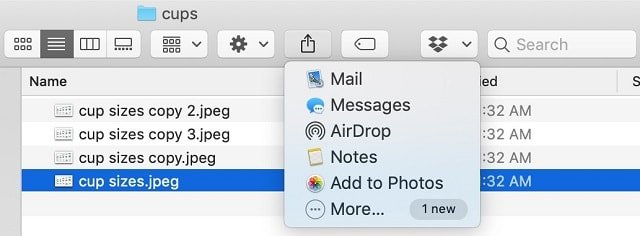 Email File as Attachment
Customizing Finder
Almost all parts of the Finder can be customized so you can configure the app the way you want it. Let’s review the most common customization tips below.
How to add to Favorites
To add a folder to the Favorites section in the Finder Sidebar first select the folder and then either use Control-Command-T keyboard shortcut or choose Add to Sidebar option in Finder’s File menu. To delete the folder from the Sidebar right click on it and choose Remove from Sidebar option in the context menu.
How to show hard drives
To show hard drives in the Finder Sidebar, go to Finder Preferences in the menu, select the Sidebar tab and enable Hard Disks checkbox under Locations. To show hard drives on the Desktop enable Hard Disks checkbox in the General tab.
Check Finder Preferences for all other things to show/hide in the Finder: file extensions, Documents, Desktop, Downloads folders, etc.
How to clear Recents folder in Finder
Every time you touch a file or folder on your Mac the macOS remembers it in the Recents folder. While in most cases it is a very useful feature in some cases you wish to avoid being tracked.
It is not possible to clear Recents folder in the Finder because Recents is not an actual folder. It is so called a smart folder which is populated automatically based on the last accessed time of the file or the folder. Deleting an item in Recents will delete the actual file or folder. There is, however, a way to prevent some “sensitive” from being tracked.
To add a folder to a not follow list open System Preferences, click on Spotlight icon, click on Privacy tab, click on the plus icon and add all folders or entire disk to the list.
In case you need to hide Recents folder completely from the Finder go to Finder Preferences and uncheck it from the Sidebar configuration.
Advanced Techniques
Open terminal in Mac
There are many instances when the Terminal needs to be opened with a specific folder. To open the Terminal app from the Finder, first browse to the desired folder, then right click on the folder and choose New Terminal at Folder option in the pop-up menu. To add a tab in the open Terminal window choose New Terminal Tab at Folder.
Using Finder tags
I wrote an article about organizing your files with colored tags on Mac which may be helpful for you.
That’s all. Please send me an email at [email protected] if you have any questions.
Topics:
Hi, I am Al. I’ve been working with computers for more than 20 years and I am passionate about Apple products. You can reach me at [email protected]
Recent Posts
Setting up your router may be a very foreign idea for most of us since a cyberattack seems highly unlikely until it happens to us. In fact, even famous people are always prone to cyberattacks, so it.
This article will discuss the eligibility of Apple’s AirPods Pro, as well as Beats earphones and headphones for replacement under Apple’s warranty policy.AppleCare and AppleCare+ for.
About Me
Hi, I am Al. I’ve been working with computers for more than 20 years and I am passionate about Apple products. You can reach me at [email protected]


