- How to Edit Startup Programs in Windows 10
- 1 – Task Manager Startup
- 2 – Startup Folder
- 3 – The Rest (Advanced)
- You Might Also Like
- Take control of your Windows start-up
- Landmark
- How to Change Startup Programs in Windows 7, 8 And 10
- Dillion Megida
- In Windows 7
- Open the Startup Apps Control Panel
- Disable/Enable Startup App
- Add Startup App
- In Windows 8
- Open the Startup Apps Control Panel
- Disable/Enable Startup App
- Add Startup App
- In Windows 10
- Open the Startup Apps Control Panel
- Disable/Enable Startup Apps
- Add Startup App
- Wrap Up
- Dillion Megida
How to Edit Startup Programs in Windows 10
By Mitch Bartlett 3 Comments
Take control of startup programs in Microsoft Windows 10 and gain an edge in performance. Here’s how anybody can edit programs that start at bootup.
Note: As with anything, be careful not to disable anything important like sound card or network adapter software. When in doubt, leave it alone.
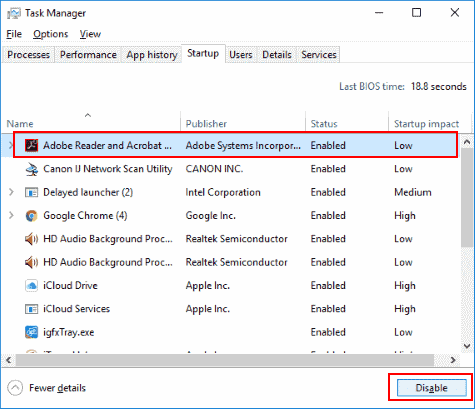
1 – Task Manager Startup
- Right-click a blank area on the task bar, then choose “Task Manager“.
- Select the “Startup” tab.
- Select any item you wish to disable or enable, then choose the “Disable” or “Enable” button at the lower right corner of the window.

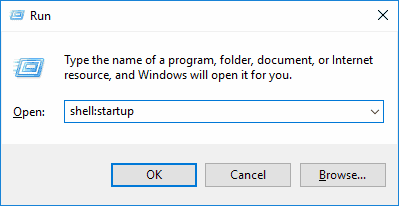
2 – Startup Folder
- Hold the Windows Key and press “R” to bring up the Windows Run dialog.
- Type “shell:startup“, then press “Enter“.
- The “Startup” folder appears. By default, there is usually nothing in it. Place the icons of any applications you would like to run at startup in this folder. Delete any icons of applications you don’t want running at startup.
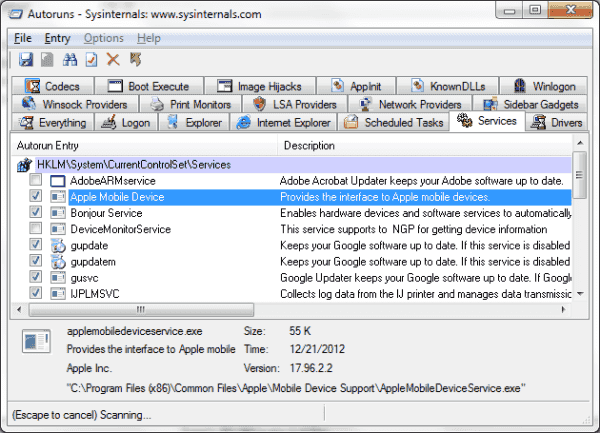
3 – The Rest (Advanced)
Taking control of the Startup Folder and Startup area in Task Manager works for most people. If you want to go a step further and you know what you’re doing, try this.
Download and run Autoruns for Windows. The utility allows you to control any items that are running in Windows 10 that you may not know about including Scheduled Tasks, Internet Explorer plugins, and Print Monitors.
Did this tutorial help you? How do you handle items that startup automatically in Windows 10? please share your experience in the comments.
You Might Also Like
Filed Under: Windows Tagged With: Windows 10
Take control of your Windows start-up
The articles set out below are articles created and/or produced by Future Publishing Limited. Microsoft is not responsible for the content, accuracy or opinions expressed in these articles.
Landmark
Are you sacrificing memory space and performance for mystery programs? Then it’s time to regain control of your PC. We take an in-depth look at Windows startup options
It doesn’t take long for the number of programs installed on your PC to get out of control. Between utilities to block pop-up windows, instant messaging programs and download managers, your Windows system tray can quickly become a distorted rainbow of icons whose purpose may be a mystery.
Unfortunately, as more and more utilities are designed to start automatically upon loading Windows, system performance tends to suffer. Not only do these utilities lengthen the time that your system takes to load, but they also consume valuable memory space – often needlessly. The good news is that regaining control of your PC is possible without the need to uninstall programs used only occasionally. With a quick look at the Windows start-up process and few different utilities, you can be back in control of your system in no time.
The start-up folder
When a Windows system boots, shortcuts to programs contained in your start-up folder are launched automatically. Many installed programs will add a shortcut to this folder as part of their installation process. For example, if you have Microsoft Office installed, there’s a good chance that you’ll find a shortcut to the Office toolbar stored in this folder. When the shortcuts contained in this folder are deleted, the particular program will no longer launch automatically. Although having some programs load immediately is useful, a number of those placed in the start-up folder are more obscure and probably not of much use to you on a daily basis.
The key to dealing with the start-up folder is finding it. On a Windows 98 system, this folder is accessible from the Start menu, Program Files, Startup section. Pointing to this location will display a list of shortcuts to programs set to run automatically. Then you can right-click the Start menu shortcut and delete them.
If the start-up folder doesn’t hold the key to all those utilities that launch automatically, the answer is almost always found in the Windows Registry. Although you should generally avoid manually editing the Registry unless you know what you’re doing, this is the place where you’ll find the definitive answer to what Windows is loading automatically.
Later in this article we’ll take a look at various utilities that enable you to control your PC’s start-up environment. Ultimately, each of these tools provides a prettier interface from which you can more safely edit Registry values.
The Windows Registry is by its nature a complex beast, which is part of the reason why we generally recommend staying away from it. Prior to making any Registry changes, always ensure that you’ve backed it up.
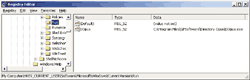
The two main tools used to interact with the Registry are Regedit.exe and Regedt32.exe. The settings that control which utilities always run automatically at startup tend to be stored in four different locations: two under HKEY_LOCAL_MACHINE, and another two under HKEY_CURRENT_USER.
In both cases, the most common place to look for startup settings is under the \Software\Microsoft\Windows\CurrentVersion\ folder (or key), where you’ll find two important folders: Run and RunServices. Both folders will contain values that specify the path to programs or services to be launched automatically, as shown below.
To prevent a program or service from starting automatically, delete the value associated with the offending program. However, be sure to note exactly which programs you need to remove prior to taking this action. You won’t be prompted to save any of your changes, and mistakenly deleting a required application or service may render your system unbootable.
System configuration utility
For those who would rather stay out of the Registry, a much simpler solution exists in the form of the Microsoft System Configuration Utility (Msconfig). This easy-to-use utility included with most Windows versions provides you with a graphical interface that enables you to control a variety of system start-up options, including which programs and services are configured to load automatically. The main area of interest in the program is the Startup tab, which provides a list of all start-up items, enabling you to easily enable or disable individual entries.
Msconfig goes a long way beyond simply enabling you to control start-up items. The program also makes it possible to change common Windows start-up files such as Config.sys, Autoexec.bat, Win.ini and System.ini. The ability to selectively enable, disable and edit these files through the Msconfig interface helps to avoid syntax errors and makes it easy to return files to a previous state.
For troubleshooting purposes, Msconfig enables you to back up and restore your current or previous settings, as well as control which files should be processed or advanced elements configured to troubleshoot the start-up process. For example, you might choose to process only certain system files when the PC next starts to test changes, or disable scandisk after a bad shutdown.
Alternative start-up managers
Given the popularity of customising or ‘tweaking’ a system to better meet individual needs, it’s little surprise that a variety of third-party start-up manager programs exist. Of the different freeware and shareware programs available, two of the most popular are Xteq X-Start from Xteq Systems, and Startup Control Panel by Mike Lin. X-Start is a full-blown tweaking utility that’s free for non-commercial use, and enables you to edit just about every element of a Windows system, including relevant startup and shutdown settings. The explanations provided for each setting are particular helpful, as is the wizard feature that will take an inexperienced user through the settings.
If it’s a more simple utility that you’re after, then Startup Control Panel is probably your best bet. This utility adds an additional applet to the Control Panel called Startup. Accessing the applet provides you with a quick and easy way to both enable and disable start-up options according to their system location. While many utilities provide a myriad of complex options, Startup Control Panel does an excellent job of keeping things simple for users looking to control their start-up environment.

First steps in Msconfig
Use the little utility that makes it easy to control Windows start-up items
1. From the Run command, open Msconfig. This opens the application to the General tab, as shown above. Click the Create Backup button to back up your current settings.
2. Click the Startup tab. Scroll through the items configured to start automatically, unchecking those that you no longer wish to have started when Windows loads.
3. Click OK to close Msconfig. Click Yes when prompted to reboot your PC. View the system tray to check your work.

Tweak UI
Sometimes the best Microsoft utilities aren’t installed with Windows
Although the Msconfig utility does a good job of enabling you to quickly and effectively control your PC’s start-up environment, Microsoft also has another great program that enables you to tweak and tune to a greater degree: Tweak UI.
While Windows 98 doesn’t give you the option to specifically control which programs load at boot time, Tweak UI does provide a few nifty features that will spare you the pain of digging through the Registry or endlessly clicking through the Windows interface. Among our favourite features are those found on the Paranoia tab. Settings here enable you to clear your Documents automatically, Internet Explorer and Run command history at logon, and the name of the last user who logged on to the system, all giving you a little more privacy. The Windows 98 version of the tool is available for download from the Microsoft Web site.
This material is the copyright material of or licensed to Future Publishing Limited, a Future Network plc group company, UK 2004. All rights reserved.
How to Change Startup Programs in Windows 7, 8 And 10

Dillion Megida

Startup programs are programs which run automatically when a system is booted. This is a good practice for programs which you use frequently. It saves you the stress of looking for those programs, or, in some cases, manually setting them up.
Some programs also have this feature by default when they are newly installed.
But if you have too many startup programs it can slow down the boot process. This has a negative effect especially on systems with small capabilities or less processing power.
In this article, we’ll learn how to open the startup apps control panel, how to enable and disable startup apps, and finally how to add our desired startup programs in Windows 7, 8 and 10.
In each of these Windows versions, there is a Control Panel for Startup Apps which shows a list of applications that can be run automatically on startup. These applications are either enabled for startup or disabled.
So let’s look at the process for each Windows version.
In Windows 7
Open the Startup Apps Control Panel
Open the windows startup menu, then type «MSCONFIG«. When you press enter, the system configuration console is opened. Then click the «Startup» tab which will display some programs that can be enabled or disabled for startup.
Disable/Enable Startup App
The checkboxes beside the applications indicate the status. If checked, it is enabled for startup, otherwise, it is disabled.
To disable an enabled app, simply uncheck the checkbox and click apply.
To enable a disabled app, check the checkbox and click apply.
These two processes require the system to be restarted before the changes are applied on the applications.
Add Startup App
To add an app, you’ll need to explore the Startup Folder. To do this, try any of the following methods;
- Open the start menu and type «Startup» (to search for it). When found, right-click and select Explore to open the folder.
- Open the start menu, select «All Programs» and scroll down the list until you find the Startup Folder. When found, Explore it.
Create a shortcut of your desired program, then copy it and paste it in this folder. After this, the program will automatically be added to the panel with a status of «enabled«.
In Windows 8
Open the Startup Apps Control Panel
To open the panel, try any of the following;
- Open «Task Manager» and select the «Startup» tab
- Open windows startup menu, and type «Startup» to search for the program. Then select any of the options provided.
Disable/Enable Startup App
To disable a startup app which is enabled, right-click on the app and select «Disable«.
To enable a startup app which is disabled, right-click on the app and select «Enable«.
Add Startup App
Press the window and letter R key to open the Run dialog. Then enter %AppData%. This will open a roaming folder.
Navigate to \Microsoft\Windows\Start Menu\Programs\Startup. In this folder, paste the shortcut of your desired app. This will make it a startup application with a status of «enabled».
In Windows 10
Open the Startup Apps Control Panel
- Open the start menu, type «Startup Apps» (to search for it) and click any of the results.
- Open «Task Manager«, then select the «Startup» tab
Disable/Enable Startup Apps
To disable a startup app, right-click on any app in the list with a status of «enabled» and select «disable«.
To enable a startup app in the list which is disabled, right-click on the app and select «enable«.
Add Startup App
Hold the windows and letter R key on the keyboard. In the run dialog, enter «shell:startup«.
In the folder, you can add any application of your choice which you’d want to run at startup. They’ll be added to the list so when you access your Startup Apps, you can disable or enable them.
Wrap Up
If there’s any application which you always run when you boot up your system, it is good practice to make it a startup program.
When your system becomes slow to boot, it’s most likely because startup programs are responsible. Now you know how to disable or reduce them.
Dillion Megida
Frontend Web Engineer and Technical Writer. I love teaching what I know. Javascript / ReactJS / NodeJS
If you read this far, tweet to the author to show them you care. Tweet a thanks
Learn to code for free. freeCodeCamp’s open source curriculum has helped more than 40,000 people get jobs as developers. Get started
freeCodeCamp is a donor-supported tax-exempt 501(c)(3) nonprofit organization (United States Federal Tax Identification Number: 82-0779546)
Our mission: to help people learn to code for free. We accomplish this by creating thousands of videos, articles, and interactive coding lessons — all freely available to the public. We also have thousands of freeCodeCamp study groups around the world.
Donations to freeCodeCamp go toward our education initiatives, and help pay for servers, services, and staff.


