- UEFI/GPT-based hard drive partitions
- Partition Requirements
- System partition
- Microsoft reserved partition (MSR)
- Other utility partitions
- To set partitions as utility partitions
- To verify that system and utility partitions exist
- Windows partition
- Recovery tools partition
- Data partitions
- Partition layout
- Sample files: configure drive partitions by using WindowsВ PE and DiskPart scripts
- To partition hard drives and prepare to apply images
- Next steps
- 2021 Best Two Useful Disk Utilities in Windows (10/8/7/Vista/XP)
- Contents
- 1. Disk Utility in Windows — Disk Management
- How to Use Disk Management
- 2. EaseUS Disk Utility in Windows — EaseUS Partition Master
- How to Use EaseUS Disk Utility — Partition Master:
- Other Disk Utilities in Windows
UEFI/GPT-based hard drive partitions
Create custom partition layouts for your hard disk drives (HDDs), solid-state drives (SSDs), and other drives when deploying Windows to Unified Extensible Firmware Interface (UEFI)–based devices.
If you use a custom partition layout on WindowsВ 10 for desktop editions (Home, Pro, Enterprise, and Education), update the push-button recovery script so the recovery tools can recreate the custom partition layout when needed.
Partition Requirements
When you deploy Windows to a UEFI-based device, you must format the hard drive that includes the Windows partition by using a GUID partition table (GPT) file system. Additional drives may use either the GPT or the master boot record (MBR) file format.
A GPT drive may have up to 128 partitions.
Each partition can have a maximum of 18 exabytes (
18.8 million terabytes) of space.
System partition
The device must contain a system partition. On GPT drives, this is known as the EFI System Partition, or the ESP. This partition is usually stored on the primary hard drive. The device boots to this partition.
The minimum size of this partition is 100 MB, and must be formatted using the FAT32 file format.
This partition is managed by the operating system, and should not contain any other files, including Windows RE tools.
For Advanced Format 4K Native drives (4-KB-per-sector) drives, the minimum size is 260 MB, due to a limitation of the FAT32 file format. The minimum partition size of FAT32 drives is calculated as sector size (4KB) x 65527 = 256 MB.
Advanced Format 512e drives are not affected by this limitation, because their emulated sector size is 512 bytes. 512 bytes x 65527 = 32 MB, which is less than the 100 MB minimum size for this partition.
Microsoft reserved partition (MSR)
In WindowsВ 10, the size of the MSR is 16 MB.
Add an MSR to each GPT drive to help with partition management. The MSR is a reserved partition that does not receive a partition ID. It cannot store user data.
Other utility partitions
Any other utility partitions not managed by Windows must be located before the Windows, data, and recovery image partitions. This allows end users to perform actions such as resizing the Windows partition without affecting system utilities.
Protect end users from accidentally modifying utility partitions by identifying them using a GPT attribute. This prevents these partitions from appearing in File Explorer.
To set partitions as utility partitions
- When you’re deploying Windows by using DiskPart, use the attributes volume set GPT_ATTRIBUTE_PLATFORM_REQUIRED command after you create the partition to identify the partition as a utility partition. For more information, see the MSDN topic: PARTITION_INFORMATION_GPT structure.
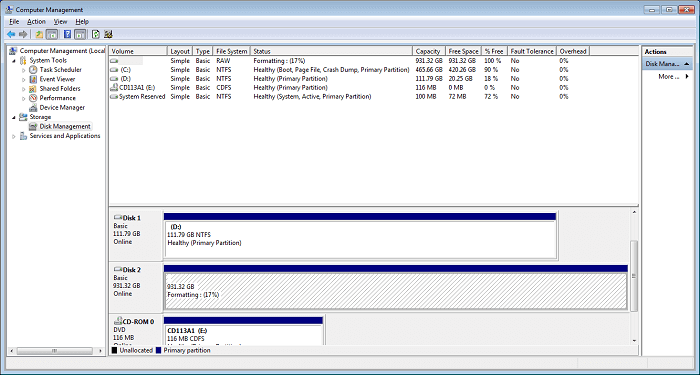
To verify that system and utility partitions exist
- Click Start, right-click This PC, and then click Manage. The Computer Management window opens.
- Click Disk Management. The list of available drives and partitions appears.
- In the list of drives and partitions, confirm that the system and utility partitions are present and are not assigned a drive letter.
Windows partition
- The partition must have at least 20 gigabytes (GB) of drive space for 64-bit versions, or 16 GB for 32-bit versions.
- The Windows partition must be formatted using the NTFS file format.
- The Windows partition must have 16 GB of free space after the user has completed the Out Of Box Experience (OOBE) and Automatic Maintenance has completed.
Recovery tools partition
This partition must be at least 300 MB.
The Windows Recovery Environment (Windows RE) tools require additional free space:
- A minimum of 52 MB is required but 250 MB is recommended, to accomodate future updates, especially with custom partition layouts.
When calculating free space, note:
- The recovery image, winre.wim, is typically between 250-300MB, depending on what drivers, languages, and customizations you add.
- The file system itself can take up additional space. For example, NTFS may reserve 5-15MB or more on a 750MB partition.
This partition must use the Type ID: DE94BBA4-06D1-4D40-A16A-BFD50179D6AC.
The recovery tools should be in a separate partition than the Windows partition to support automatic failover and to support booting partitions encrypted with WindowsВ BitLocker Drive Encryption.
We recommend that you place this partition immediately after the Windows partition. This allows Windows to modify and recreate the partition later if future updates require a larger recovery image.
Data partitions
The recommended partition layout for WindowsВ 10 does not include data partitions. However, if data partitions are required, they should be placed after the Windows RE partition. This allows future updates to Windows RE to grow the Windows RE partition by shrinking the Windows partition.
This layout makes it more difficult for end users to remove the data partition and merge the space with the Windows partition. To do so, the Windows RE partition must be moved to the end of the unused space reclaimed from the data partition, so that the Windows partition can be extended.
WindowsВ 10 does not include functionality or utility to facilitate this process. However, manufacturers can develop and provide such a utility if PCs are shipped with data partitions.
Partition layout
The default partition layout for UEFI-based PCs is: a system partition, an MSR, a Windows partition, and a recovery tools partition.

This layout lets you use WindowsВ BitLocker Drive Encryption through both Windows and through the Windows Recovery Environment.
Sample files: configure drive partitions by using WindowsВ PE and DiskPart scripts
For image-based deployment, boot the PC to Windows PE, and then use the DiskPart tool to create the partition structures on your destination PCs.
In these DiskPart examples, the partitions are assigned the letters: System=S, Windows=W, and Recovery=R. The MSR partition does not receive a drive letter.
Change the Windows drive letter to a letter that’s near the end of the alphabet, such as W, to avoid drive letter conflicts. Do not use X, because this drive letter is reserved for Windows PE. After the device reboots, the Windows partition is assigned the letter C, and the other partitions don’t receive drive letters.
If you reboot, WindowsВ PE reassigns disk letters alphabetically, starting with the letter C, without regard to the configuration in Windows Setup. This configuration can change based on the presence of different drives, such as USB flash drives.
The following steps describe how to partition your hard drives and prepare to apply images. You can use the code in the sections that follow to complete these steps.
To partition hard drives and prepare to apply images
Copy and save the CreatePartitions-UEFI.txt file to a USB flash drive.
Use WindowsВ PE to boot the destination PC.
Clean and partition the drive. In this example, F is the letter of the USB flash drive.
- If you use a custom partition layout on WindowsВ 10 for desktop editions, update the push-button recovery script so the recovery tools can recreate the custom partition layout when needed.
To avoid bare metal recovery boot issues due to partition size, manufacturers should allow the bare metal recovery feature’s auto generation script to create the partition used for the recovery WIM. If manufacturer’s want to use a custom DISKPART script to create partitions, the recommended minimum partition size is 990MB with a minimum of 250MB of free space.
Next steps
Use a deployment script to apply the Windows images on the newly created partitions. For more information, see Capture and Apply Windows, System, and Recovery Partitions.
2021 Best Two Useful Disk Utilities in Windows (10/8/7/Vista/XP)
This page offers two best free disk utility for Windows 10/8/7/Vista, etc. With the program, you can put your partitions in proper order, speed up the system with better performance:
- #1. Windows Disk Utility — Disk Management
- 1. Extend, Shrink, Delete, Create Volume
- 2. Defrag Partition
- 3. Convert Disk to Dynamic
- #2. EaseUS Disk Utility — Partition Master
- 1. Extend, Shrink, Delete, Create Volume
- 2. Convert Disk to Dynamic or Basic, GPT or MBR
- 3. Clone Partition, Clone Hard Drive
- More.
Have you received this warning— «Sorry, you are running out of space»? When you want to install (run) your long-awaited games or other system programs, this little blue frame may make you confused. This article will introduce two useful and simple disk utilities— Windows built-in tool and EaseUS Partition Master in Windows to you.
Disk Utility is a system utility for performing disk and disk volume-related tasks on the operating system. EaseUS Partition Master is a free Windows partition software which can help you create, resize, clone, move, merge, and format partitions, and much more. If you prefer any function we have, please get ready with me!
Contents
1. Disk Utility in Windows — Disk Management
Your computer already has a Windows disk utility — Disk Management. It enables you to perform advanced storage tasks, including initializing a new disk, shrink essential volume, extend a primary size, format a volume, delete a basic volume, and change drive letter and paths.
How to Use Disk Management
Step 1. Open Disk Management
- On Windows 8/10: Right-click on the Windows start button and choose «Disk Management».
- You also try the shortcut Win+X combination on your keyboard, then click «Disk Management» to open it.

On Windows Vista/7: Just right-click on Computer and choose «Manage», then click «Disk Management».
Step 2. Manage Hard Drive Disk in Disk Management
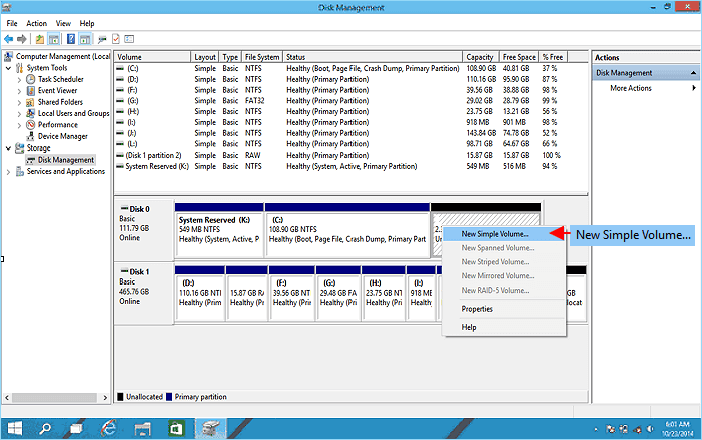
- Create New Partition:В Right-click unallocated space and select «New Simple Volume». And complete the process.
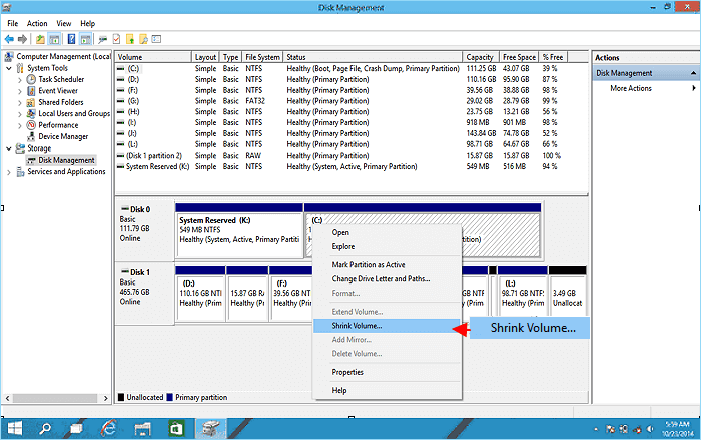
- Shrink Volume:В Right-click target volume and select «Shrink Volume». Adjust the size you want to shrink.
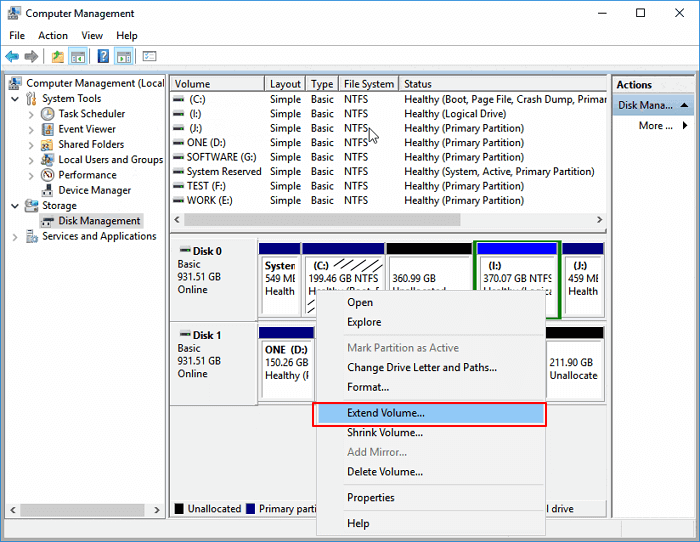
- Extend Volume:В With unallocated space next to the target partition, right-click target volume and select «Extend Volume».
- Format Volume:В Right-click target partition and select «Format». Set a new file system and drive letter, click «OK» to confirm.
- Initialize New Disk: Right-click on disk, select «Initialize Disk». Set the partition style as «MBR» or «GPT» and click «OK».
- Convert Disk to MBR/GPT: Right-click to delete all volumes. Right-click disk and select «Initalize Disk». Select «MBR» or «GPT».
Disk Management has limited functions and cannot be optimized and upgraded. Here is a better partition tool for you.
2. EaseUS Disk Utility in Windows — EaseUS Partition Master
EaseUS is easy for beginners without data loss, increasing your computer speed. It has more features that Disk Management doesn’t have. Its function is more effective than the former. Cleanup and optimization may give you a surprise.
Besides basic disk management features, EaseUS Partition Master even offers some advanced features to help you manage disk, such as migrate OS, clone disk, etc.
How to Use EaseUS Disk Utility — Partition Master:
Step 1. Check for free space
To devide a disk partition into multiple ones, you must ensure that there is adequate free space to be allotted.
Step 2. Shrink a disk partition to create unallocated space
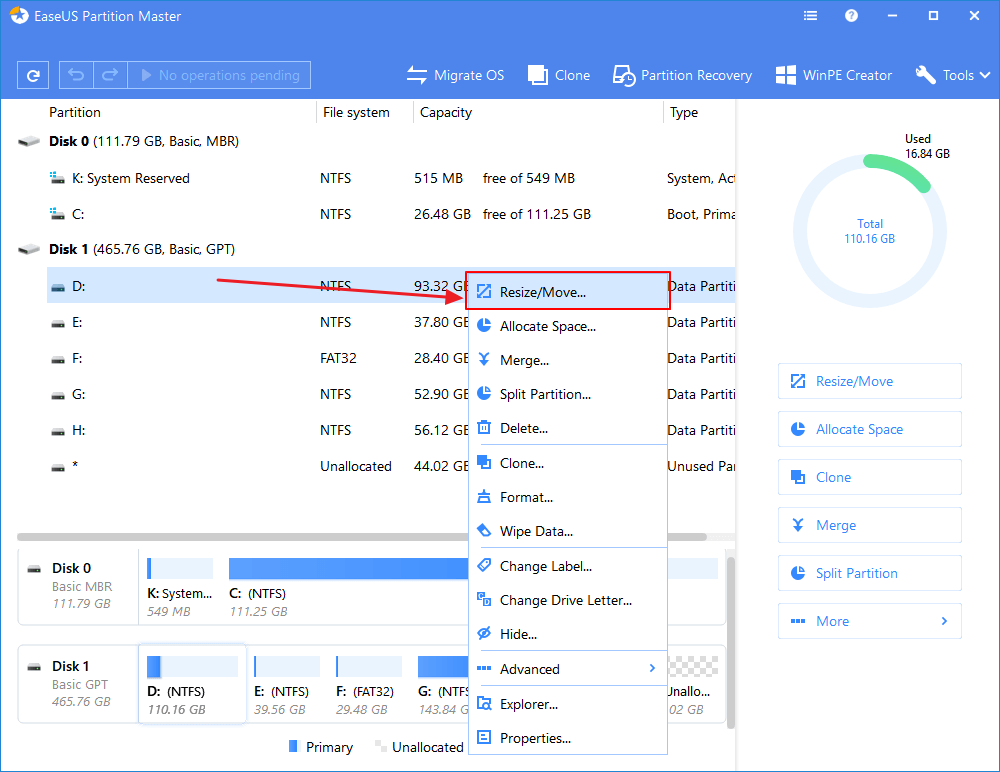
By doing so, start with the «Resize/Move» feature. Right-click on a partition with a lot free space and select «Resize/Move»
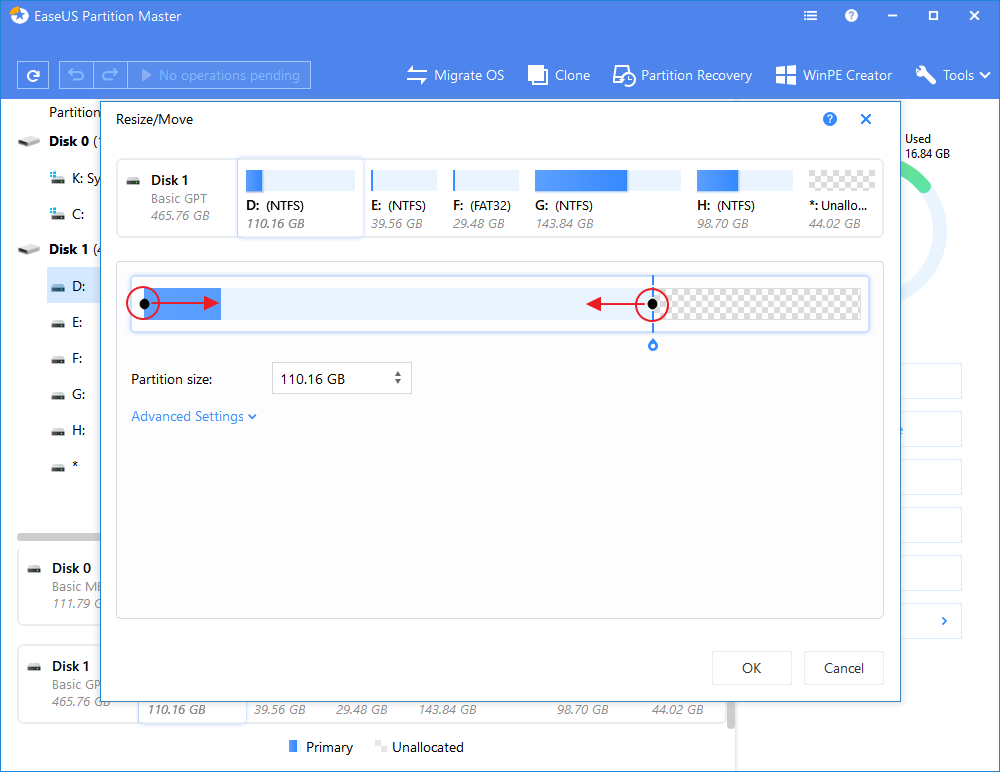
Drag either end of the partition rightwards or leftwards so you can shrink its size as the red arrow does, in order to get ample unallocated space. You can visually know how much space you’ve decreased in the «Partition size» area. Click «OK».
At last, you need to click the «Execute xx Operation» on the top menu and then «Apply» to save all the changes. Go back on the main window, there should be unallocated space appearing under the same disk of the shrinked one.

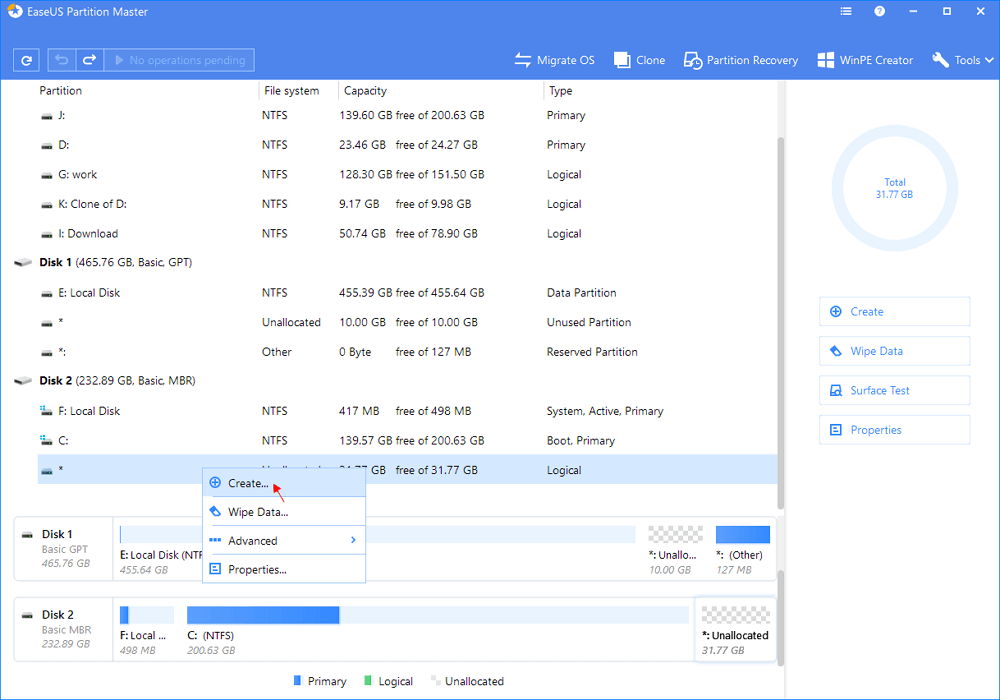
Step 3. Create a new partition on unallocated space
The last step is to turn the unallocated space into a usable partition drive with a recognized file system. Right-click on the unallocated space and choose «Create. «.
Customize the partition information by choosing a drive letter, partition label, file system (NTFS, FAT32, EXT2. )В and many more settings in the Advanced Settings. Click «OK».

Finally, cick «Apply» to confirm that you want to create a partition on the unallocated space. Repeat the whole steps to partition a hard drive in many more partitions.

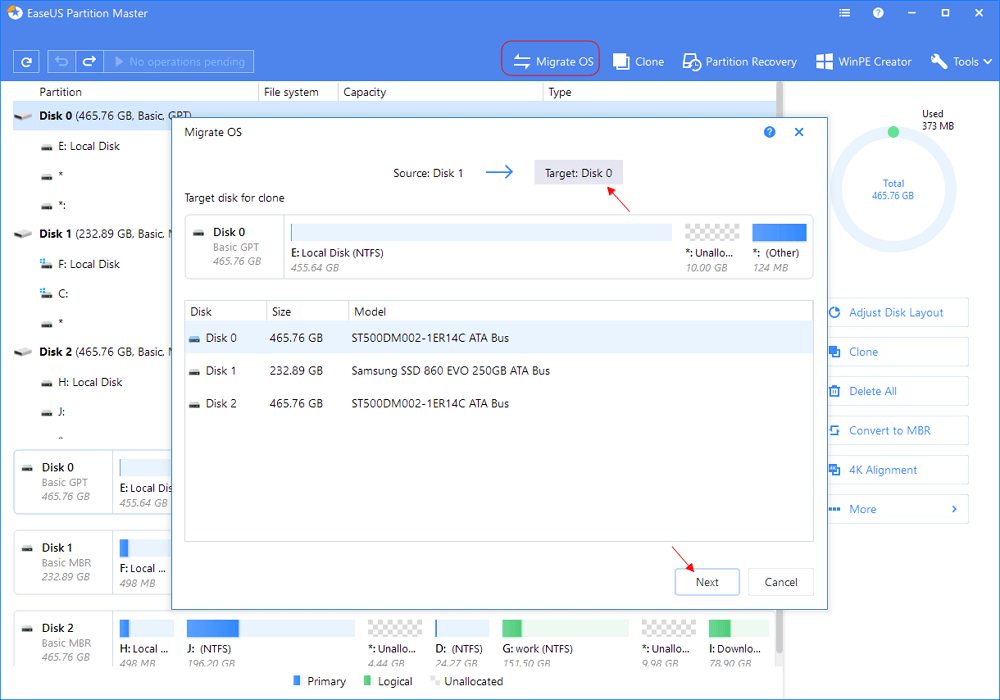
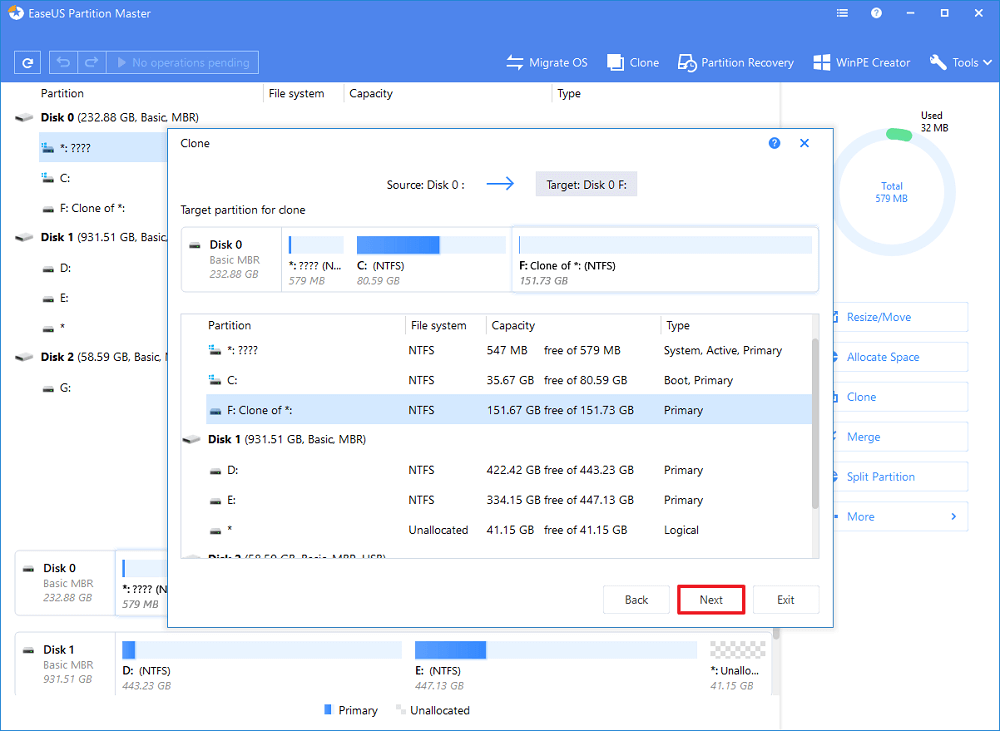
Many users find it particularly annoying to re-install the operating system and hard drive. This software is a right hand to migrate OS and copy disk/partition.
No data loss and Windows reinstallation is needed. Follow to learnВ how to transfer Windows 10 to a new hard drive(HDD/SSD) and how to migrate Windows 7/10 to SSD.
- Clone HDD to SSD — Upgrade Hard Drive
When your hard drive is too small, it is easy for you to apply the disk/partition copy feature for upgrading disk.
You may followВ clone 1TB HDD/SSD to 512GB SSDВ as a guide.В You can also apply this feature toВ clone SD card in Windows 10.
- Partition Recovery
It brings huge convenience to help you immediately restore the partition and data when you accidentally deleted a volume.
Other Disk Utilities in Windows
Free application for Windows, designed to defragment files and folders on a hard drive, consolidate free space, and optimize file placement. Large contrast in interface color. If you intend to get more info, please click links.
Disk Space Fan 4 is a disk space analyzer and duplicate file remover software. It takes 1 minute to scan and show space with a pie chart. You can free up disk space and delete big files.
This software contains disk management, defragmentation at system boot time and game optimization. The last feature optimizes game experience, saving long load time.
WinDirStat is a disk usage statistics viewer and cleanup tool for various versions of Microsoft Windows. The main window is the same as the built-in computer tool. But one difference is each file represented by a colored rectangle, which is proportional to the file size.
UltraDefrag is a disk fragmentation for Windows, which can defrag locked system files at the beginning of the PC boot process.
Extra Subst is a virtual disk management tool that allows users to more easily access commonly used folders in the computer, and can create, edit, and delete virtual drives on the PC, and may also create virtual drives based on the selected folders.
1. How to wipe the disk with EaseUS Partition Master?
You can use the Wipe feature to wipe out a disk with EaseUS Partition Master, which alternatively overwrites the disk. In most cases, the data cleaned with this feature are not able to be retrieved.
2. What does disk utility do?
Disk Utility is used to erase, format, or manage internal disks and external storage devices. Disk Utility can also be used to add and control volumes, or if you want to organize your data into partitions. Disk Utility can be useful if you are working with RAID sets.
3. How do I know if disk utility is working on Mac?
- Open Disk Utility.
- Select your device that you are having problems with from the sidebar.
- Click on First Aid.
- Disk Utility will check the partition maps on the disk and check each volume.
4. Is there a disk utility for Windows?
Disk Management is a system utility in Windows that enables you to perform advanced storage tasks. Here are some of the things Disk Management is suitable for: To set up a new drive, see Initializing a new drive. To extend a volume into space that’s not already part of a volume on the same hard drive, see Extend a primary volume.


