- How to boot your Mac in Verbose Mode
- What is Verbose Mode?
- How to boot in Verbose Mode
- How to always boot in Verbose Mode
- Things your Mac does in Verbose Mode
- When to boot in Verbose Mode
- Still having issues?
- See also:
- Как запустить Mac в режиме Verbose Mode
- Как запустить Mac в режиме Verbose Mode?
- Загрузка macOS в безопасном режиме Safe Boot и Verbose mode
- Запуск компьютера Mac в безопасном режиме или режиме подробного протоколирования
- Boot into Mac OS X Verbose Mode
- How to Boot a Mac with Verbose Mode
- How to boot your Mac in verbose mode
- Before we start
- What is verbose mode?
- What’s the difference between verbose mode and safe mode?
- When should verbose mode be used?
- How to boot your Mac in verbose mode
- How boot your Mac in verbose mode by default
- How to use CleanMyMac X to perform maintenance on your Mac
How to boot your Mac in Verbose Mode
We previously discussed how booting your Mac into macOS’ Safe Mode can help troubleshoot various issues with your computer. In more obscure situations and borderline cases, however, Safe Mode may not be enough to understand why your Mac freezes or crashes during the system boot process.
Enter macOS Verbose Mode.
Not only does Verbose Mode makes it easy to access detailed status messages as your Mac is starting up, but also lets you see what’s really going on behind the scenes and watch as macOS loads kernel extensions and other startup items.
In this tutorial, we’re going to cover booting your Mac in macOS’ Verbose Mode, explain in which situations it might come in handy and give you some handy tips related to using Verbose Mode.
What is Verbose Mode?
Verbose Mode is like normal booting mode, with one exception: instead of watching the progress bar filling or the spinning indicator spinning, it gives you peek under the hood and see the output of what’s happening every time the system starts up.
As such, Verbose Mode is useful for troubleshooting software issues you may be experiencing with macOS or third-party apps. It’s also indispensable for software development.
How to boot in Verbose Mode
To startup your Mac in Verbose Mode, follow these simple steps:
Step 1: If your Mac is on, turn it off by choosing Shut Down in the Apple menu.
Step 1: Now press the power button to start your Mac.
Step 1: Right upon hearing the startup chime, press and hold the Command (⌘) – V key combination for Verbose Mode.
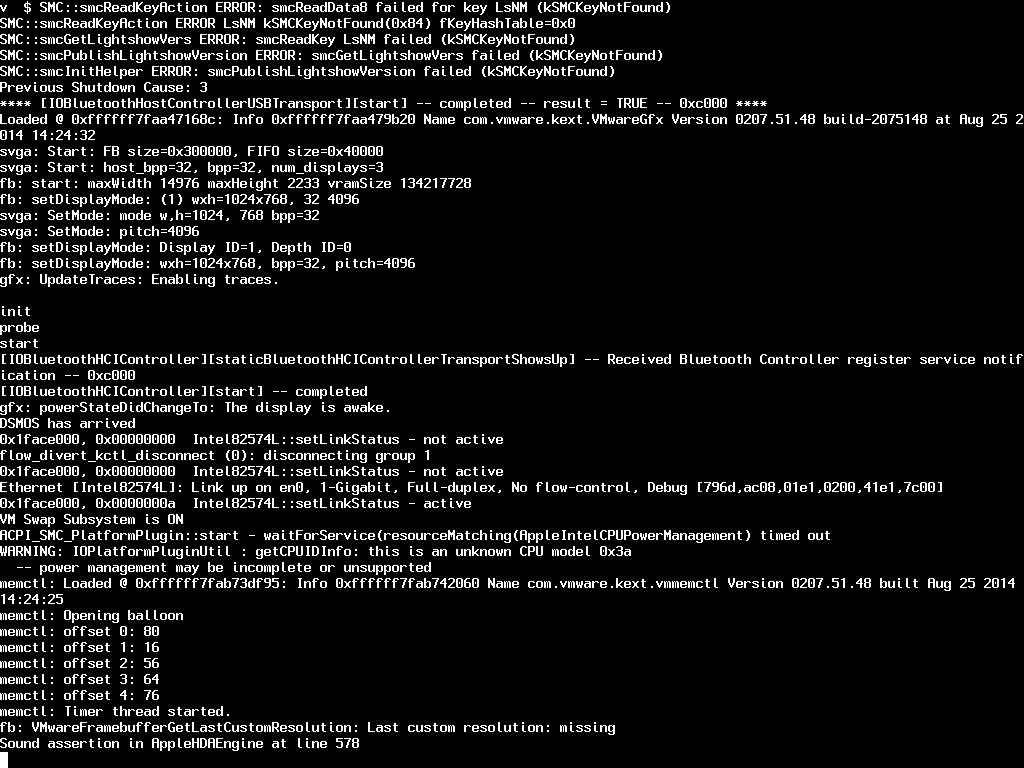
You’ll know that you have successfully entered Verbose Mode when you see white text appear on the screen as if you were in the MS-DOS text mode from the 1980’s, as depicted on the screenshot at the top of the post.
You will automatically exit Verbose Mode when the Mac’s startup process progresses sufficiently and the macOS login screen or desktop appears.
Tip: If your Mac does not progress beyond Verbose Mode, just press the power button until it shuts down. If your Mac is connected to a faulty external keyboard causing it to detect a wrong key press during boot, unplug the keyboard when booting, use your Mac notebook’s built-in keyboard, or hook up another wired or wireless keyboard.
How to always boot in Verbose Mode
Normally, hitting Command (⌘) – V starts up your Mac in Verbose Mode until next restart.
Making macOS always boot into Verbose Mode involves a little bit of Terminal trickery to adjust your Mac’s firmware with the ‘nvram’ command.
Step 1: Navigate to your Mac’s Applications > Utilities folder and open the Terminal application. Alternatively, click the Spotlight icon in the menu bar and search for ‘terminal’.
Step 1: Type the following command into the Terminal window and hit Return. You might need to provide your Mac’s administrator password.
Executing this command will ensure that every system boot from now on is in Verbose Mode, whether you invoke it manually upon hearing the startup chime or not.
Step 3: To disable automatic booting in Verbose Mode, execute the following command in Terminal:
Now macOS will start up normally at each booth unless of course you hit the modifier keys immediately upon hearing the system’s boot chimes.
Tip: Using Terminal can be a nice shortcut for starting up a remote Mac in Verbose Mode, especially if it doesn’t have a keyboard attached to it. Just log into a remote Mac using SSH and execute the aforementioned Terminal command.
Things your Mac does in Verbose Mode
Verbose Mode is no different than macOS’ normal booting mode.
In a nutshell, Verbose Mode replaces the startup graphics with a text-only mode to show you everything the computer is doing during the boot process. All Startup Items and Login Items are loaded normally in Verbose Mode, as are required kernel extensions, user-installed fonts, drivers and so forth.
When to boot in Verbose Mode
Some of the situations that warrant booting into Verbose Mode include:
- If you’re a developer—If you develop software for a living, you’ll want to boot into Verbose Mode to troubleshoot issues with your app.
- If you have startup issues—Sometimes your Mac may crash during startup and Verbose Mode is one way to troubleshoot a startup issue. In fact, Verbose Mode is especially useful when used in conjunction with macOS’ Safe Mode booting.
- If you have custom hardware setup—People who hook up specialized peripherals to their Mac, like DJ decks, Thunderbolt drives, digitizers and so forth can identify problems in Verbose Mode by checking out the messages to see if software support for your peripheral has loaded successfully.
- If you’re curious—As mentioned before, Verbose Mode lets you peek behind the scenes and see what exactly is going on during the macOS booting process.
Again, as no feature is disabled or crippled in Verbose Mode, feel free to use it without fearing that booting in this mode will limit what you can do on your Mac.
Still having issues?
If you’re having issues entering Verbose Mode, or it’s not helping fix issues your Mac may be exhibiting, try the following:
- I cannot enter Verbose Mode—You will not be able to use Verbose Mode if the Mac owner or administrator has enabled Open Firmware Password Protection.
- Verbose Mode didn’t solve my issue—Your next best bet is Safe Mode. Learn how, when and why you should use macOS’ Safe Mode. Booting your Mac in Safe Mode loads only essential macOS items, helping isolate any software problems you might have.
Because Startup Items and Login Items are disabled in Safe Mode and certain features are turned off, such as native display drivers, advanced Wi-Fi and file sharing, some apps might not work correctly in Safe Mode.
See also:
If you like this tip-to, please pass it along to your friends.
Источник
Как запустить Mac в режиме Verbose Mode
При поиске неисправностей в программной части компьютеров Mac (в случае, когда не загружается система), первым делом пользователи загружаются в безопасном режиме Safe Mode. Однако он не даёт представления о том, на каком именно этапе и отчего компьютер подвисает или аварийно перезагружается. В этом деле режим Verbose Mode сможет внести некоторые ясности.

Кому может понадобиться запуск Mac в режиме Verbose Mode:
- разработчику;
- пользователю, который пытается найти программную неисправность;
- людям, которые подключают к Mac специфическую периферию (например, диджеям). В этом режиме можно отследить корректность работы загруженного ПО для новых устройств.
Как запустить Mac в режиме Verbose Mode?
Сделать это достаточно просто. Сразу же после включения кнопки питания зажмите комбинацию клавиш Command + V (⌘ + V). Явным признаком запуска Verbose Mode станет усеянный белым текстом на тёмном фоне дисплей. Запуск системы в таком режиме произойдёт единожды.
Если вы хотите, чтобы Mac всегда запускался в режиме Verbose Mode, то пропишите в Терминале следующую команду:

Потребуется ввод пароля администратора.
Чтобы отключить постоянный запуск системы OS X в режиме Verbose Mode, воспользуйтесь следующей командой для Терминала:
Источник
Загрузка macOS в безопасном режиме Safe Boot и Verbose mode

Перестала запускаться macOS на ноутбуке: по центру экрана горит яблоко, индикатор процесса загрузки медленно доползает до середины или до конца и зависает. Больше ничего не происходит, сколько не жди. Что делать? Как понять в чём проблема и с чего начинать реанимацию операционной системы? Сегодня расскажу о двух дополнительных режимах загрузки macOS, позволяющих разобраться с проблемами запуска на маках.
При всей надёжности macOS, с ней тоже случаются форс-мажорные ситуации, из-за которых операционная система может не загружаться и кроме яблока на экране вы больше ничего не увидите. На этом фоне, Windows с её синими экранами смерти, кажется верхом информативности.
На самом деле, в плане диагностики ошибок, macOS не в пример более информативна, правда большинство пользователей об этом даже не догадывается. И это не удивительно, ведь под красивой оболочкой скрывается обычная unix-подобная операционная система со всеми преимуществами последней.
Запуск компьютера Mac в безопасном режиме или режиме подробного протоколирования
Прежде чем начинать разбираться в причинах зависания загрузки macOS, можно попробовать просто загрузиться в безопасном режиме (Safe Boot), удерживая клавишу Shift при включении ноутбука. В ряде случаев, этого бывает достаточно для нормального старта операционной системы, пусть загрузка и длится несколько дольше. О безопасном режиме загрузки можно почитать на сайте Apple https://support.apple.com/ru-ru/HT201262.
Если чуда не произошло, то можно посмотреть на чём стопорится загрузка. Для этого запускаем компьютер, удерживая комбинацию клавиш [Command] + [V] до тех пор, пока не появится черный экран с белыми буками. Таким образом мы включили режим подробного протоколирования загрузки, хорошо знакомый пользователям Linux (ссылка на страничку техподержки https://support.apple.com/ru-ru/HT201573).
Собственно, непонятные белые буквы, бегущие по экрану показывают что происходит в текущий момент с вашим компьютером или ноутбуком. Как только всё остановилось или начали повторяться, читаем что про нам пишет система.
Тут уже нужно обладать некоторыми знаниями, чтобы разобрать что же стало причиной остановки и дальнейшие действия будут зависеть исключительно от вашего умения анализировать увиденное. а то у нас, порой, любят с многозначительным видом пялиться под капот автомобиля ничего в этом не понимая 🙂
В моём случае наблюдалась некая дичь.

. которая закончилась бесконечным экраном с повторяющейся ошибкой «crashed: locationd. Too many corpses being created.»

И тут я понял, что больного уже не спасти. В следующей статье расскажу как сохранить данные, если Мак перестал загружаться. [Инструкция по выживанию]. А пока можете почитать о другом способе восстановления данных с диска на Mac из Single User mode.
Если считаете статью полезной,
не ленитесь ставить лайки и делиться с друзьями.
Источник
Boot into Mac OS X Verbose Mode
 Booting a Mac with Verbose Mode can be a helpful troubleshooting trick for some obscure situations where users are trying to determine what is going wrong with a Mac during the system boot process. Just as it sounds, verbose mode is verbose, meaning it lists everything going on behind the scenes, and you’ll watch as items and extensions are loaded into the kernel and Mac OS X proceeds with the boot process.
How to Boot a Mac with Verbose Mode
You can boot into Mac OS X verbose mode just once, meaning on that specific boot, by holding down Command+V immediately after powering on a Mac (or immediately after reboot).
The exact steps to boot a Mac in Verbose Mode are as follows:
- Boot the Mac as usual by pressing the Power key (or restart the Mac)
- Immediately start holding down Command + V keys as soon as the Mac boots or when you hear the boot chime
- Continue holding Command + V on boot until you see white text against a black background appear on screen, signifying Verbose Mode is active on that system start
You’ll know you’re in verbose mode because you’ll see lots of text reminiscent of the command line rather than your standard Mac OS X boot screen. Verbose Mode should look something like this:
Verbose mode can be very useful when troubleshooting Macs and developers often use it too. Aside from practical applications of Verbose Mode, some Mac users also just think it looks interesting and like it because it reveals additional boot details, sort of like booting a PC or unix machine – and don’t forget that MacOS / Mac OS X is based on Unix after all!
Aside from troubleshooting, which Safe Boot mode is often better suited for, the standard user probably has no need to be in verbose boot, but it can still be fun to look at the underpinnings of Mac OS X as they go on during the starting process.
Finally, if you just hold down the key combination, your next reboot of the Mac will be normal again. The key combination approach just boots Verbose Mode on a one-off basis, but you can also set your Mac to always boot in verbose mode if you wanted to always see the text that way or consistently boot with Verbose Mode without having to hold down the key combination.
Do you know of any other interesting tricks or tips involving verbose mode in Mac OS? Share with us in the comments below!
Источник
How to boot your Mac in verbose mode

Before we start
Having spent some years coding applications for macOS we’ve created a tool that everybody can use. The all-round problem fixer for Mac.

So here’s a tip for you: Download CleanMyMac to quickly solve some of the issues mentioned in this article. But to help you do it all by yourself, we’ve gathered our best ideas and solutions below.
Features described in this article refer to the MacPaw site version of CleanMyMac X.
There are different ways in which you can boot your Mac to troubleshoot when it’s having problems. One option is verbose mode. Verbose mode is a way to boot your Mac with command line showing. We’ll explain why and when you might want to use it.
What is verbose mode?
As its name suggests, the verbose mode is a method of booting up your Mac that, instead of an Apple logo and progress bar, displays text descriptions of precisely what’s going on behind the scenes. As each element loads and starts, it is described on screen.
By following the on-screen descriptions, you can sometimes work out where in the boot process, a problem is occurring.
Of course, the messages aren’t written in easy-to-understand full sentences. And so to understand them, you’ll need to either be familiar with Unix and its commands and terminology or frequently refer to Google. If you do understand Unix, however, the verbose mode is very useful.
 The image is Creative Commons
If your reasons for using the verbose mode to boot your Mac is that it’s behaving strangely or not working as it should, it’s probably time to run some maintenance routines and clear out junk files you no longer need, but that might be causing problems. CleanMyMac X can do that quickly and easily. It has several different modules designed to optimize and maintain your Mac and manage launch agents and login items, which may help when your Mac has problems booting. We’ll show you how to use it later in the article.
What’s the difference between verbose mode and safe mode?
Safe mode loads only essential kernel extensions, the ones needed for your Mac to run. It doesn’t load, for example, login items or launch agents. Verbose mode loads everything but describes what it’s doing as it does it.
When should verbose mode be used?
There are a couple of reasons you might want to use verbose mode — assuming you’re not a developer.
- Your Mac is having trouble starting up
- You have lots of peripherals connected and want to make sure the drivers for each of them are loaded properly
How to boot your Mac in verbose mode
- Click on the Apple menu and choose Shutdown.
- Restart your Macб and as soon as it starts to boot, press Command-V (If your Mac plays a startup chime, press Command-V as soon as you hear it).
- Wait until you see white text on the screen and release the keys.
Your Mac will continue booting, displaying each item it loads and processes it completes as text until it has finished booting and displays the login window. You’ll need to watch carefully and note down anything you see that seems like it could be causing a problem.
How boot your Mac in verbose mode by default
You can use Terminal to set your Mac up so that it always boots in verbose mode, without you having to press Command-V. The circumstances under which you would want to do that are very limited, but if you do, here’s how to do it.
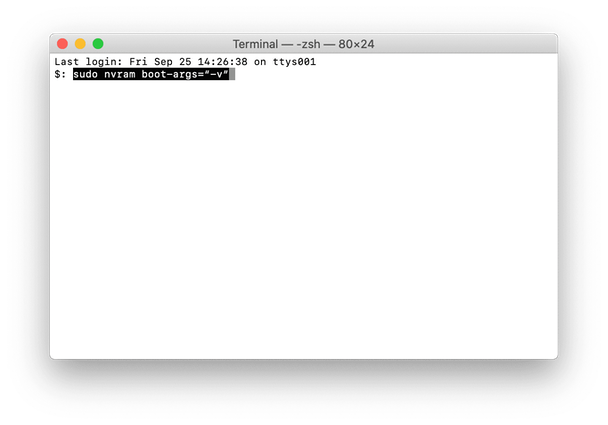
- Go to Applications > Utilities and launch Terminal.
- Type the following command: sudo nvram boot-args=“-v”
- Press Return.
- Type in your admin password if it asks for it.
- Quit Terminal
To disable booting in verbose mode, enter this command in the Terminal: sudo nvram boot-args=
How to use CleanMyMac X to perform maintenance on your Mac
Using CleanMyMac X to protect your Mac from malware, optimize its performance, or manage personal or sensitive data is just as easy. Each routine takes more than a few clicks. It can also uninstall apps completely, leaving no trace of them behind. Its System Junk module can free up several gigabytes of space — useful if your SSD is running close to capacity.
- Download CleanMyMac X for free here.
- Install it and launch it from your Applications folder.
- Choose Maintenance in the sidebar.
- Check the box next to the tasks you want to run and press Run.

And if you want to clear up some storage, just go to System Junk and press Scan.
Verbose mode is useful for detecting problems when your Mac starts up. It can also be used to make sure peripheral drivers are loading properly. It won’t harm your Mac, and it loads all extensions and other components, unlike safe mode. So you can use it freely without worrying about it. If you’re looking for an easier way to identify and fix problems with your Mac, however, you should definitely give CleanMyMac X a try.
Источник


