- Эффект Aero Glass — что это такое?
- Эффект Aero Glass: что это?
- Автоматическая установка официальной утилиты Aero Glass для Windows 8.1 (8 или 10)
- Ручная инсталляция через системный реестр
- Что делать, если установка не запускается?
- Что делать, если на экране постоянно «висит» надпись?
- Вопросы настройки параметров
- Заключение
- Windows Aero
- Содержание
- Системные требования
- Возможности
- Компоненты
- Как установить Windows 10
- AERO Glass для Windows 10
- AERO Glass для Windows 10
- Windows Aero
- Contents
- Enabling Aero [ edit | edit source ]
- Windows Longhorn build 4038 to build 4042 (Lab06_n) [ edit | edit source ]
- Windows Longhorn builds 4074 to 4082 [ edit | edit source ]
- Video Drivers and Theme Files [ edit | edit source ]
- The Transparency and Desktop Window Manager [ edit | edit source ]
- Windows Vista pre-Beta 2 builds [ edit | edit source ]
- Video Drivers [ edit | edit source ]
- Enabling Aero [ edit | edit source ]
- Optional Keys [ edit | edit source ]
- Bugs and quirks [ edit | edit source ]
- Aero in Windows 8/8.1 [ edit | edit source ]
Эффект Aero Glass — что это такое?
С появлением восьмой версии Windows и выше многие пользователи явно заскучали по графической оболочке «семерки», которая, в сравнении с совершенно плоским интерфейсом «восьмерки», выглядела воздушной. Это обеспечивала специальная тема оформления с эффектом Aero Glass для Windows 7, установленная по умолчанию. Как вернуть его в более новых системах, сейчас и будет рассмотрено.
Эффект Aero Glass: что это?
Так чем же пользователей привлекал интерфейс «семерки»? Небеспочвенным будет утверждение, что это был уникальный по своей природе эффект Aero Glass, который заключался в том, что все элементы графической оболочки были выполнены в полупрозрачном виде (окна, иконки, панели, меню и т. д.). Это касалось и еле заметных отбрасываемых ими теней.
Однако, начиная с Windows 8, разработчики этого семейства операционных систем от эффекта Aero Glass решили отказаться. В первую очередь это было связано с желанием снизить потребление системных и энергоресурсов компьютерной системы. Действительно, хотя седьмая версия в плане производительности и сейчас радует пользователей быстродействием, тем не менее достаточно большой их объем отводится именно под функционирование графического интерфейса, так что выполнение ресурсоемких приложений иногда становится не только проблематичным, но и даже невозможным.
Сегодня же системные конфигурации шагнули далеко вперед, поэтому использование эффекта Aero Glass ощутимо на производительности компьютеров, ноутбуков и даже мобильных девайсов не отражается. Что же потребуется для того, чтобы вернуть эффект прозрачности в версиях Windows 8 и выше?
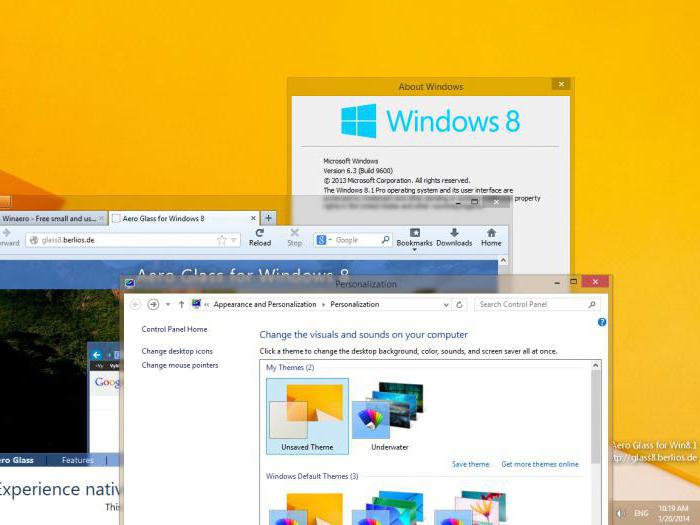
Автоматическая установка официальной утилиты Aero Glass для Windows 8.1 (8 или 10)
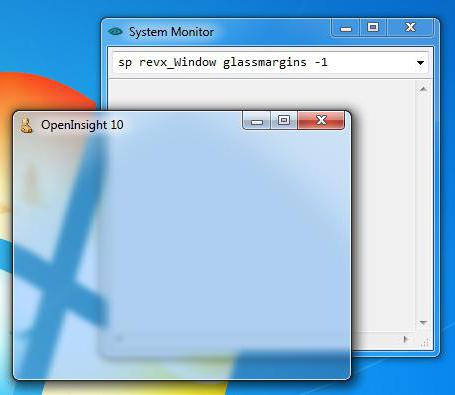
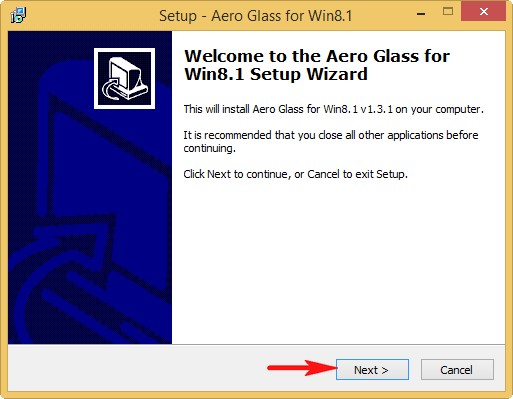
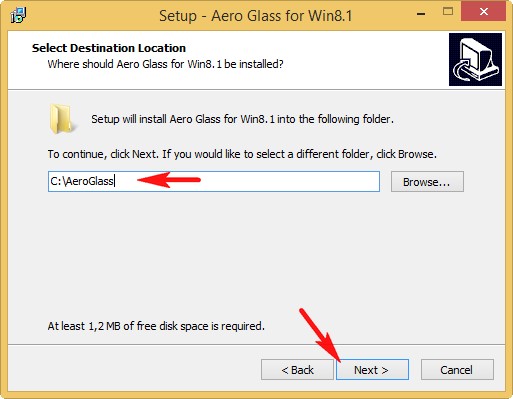
Как уже понятно, собственных средств в системах 8 и выше для применения такого эффекта даже при условии наличия соответствующей темы нет. Поэтому придется воспользоваться специальной утилитой под названием Aero Glass for Windows (иногда в названии содержится Win8, Win8.1, Win10 с указанием сборки системы).
Скачать ее можно в интернете с официального сайта. При этом доступны не только дистрибутивы для конкретных версий и сборок операционных системы, но и варианты для установки в ОС с архитектурами 32 и 64 бита.
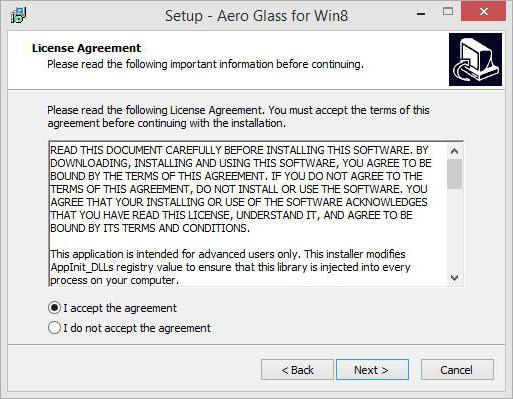
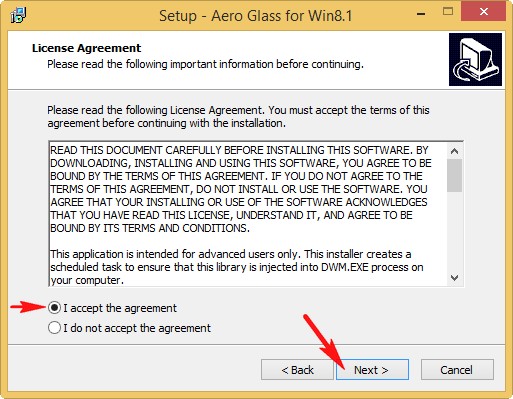
Процесс инсталляции обычно проходит без проблем и особых сложностей не вызывает. Но стоит обратить внимание, что в ходе установки будет предложено инсталлировать специальный апплет, касающийся панели персонализации, а также согласиться с отказом от подписи некоторых тем оформления. В принципе, параметры установщика по умолчанию можно не изменять. По окончании процесса систему следует перезагрузить, после чего эффект Aero Glass вступит в силу.
Ручная инсталляция через системный реестр
У автоматического инсталлятора есть только один недостаток. Он устанавливает абсолютно все, а это зачастую большинству пользователей не нужно. В такой ситуации можно оставить либо отдельные элементы, либо тестовую версию.
Делается это исключительно при помощи системного реестра. Доступ к редактору осуществляется посредством команды regedit, которую нужно ввести в меню «Выполнить», она вызывается сочетанием Win + R.
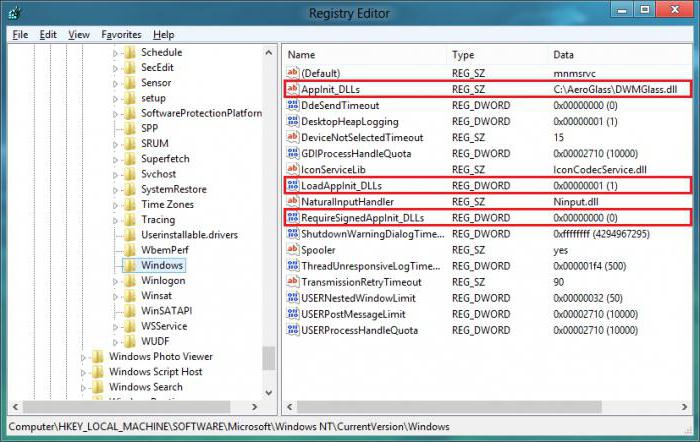
Сначала распаковываем загруженный архив в папку Aero Glass, которая должна находиться непосредственно в системном разделе (как правило, это диск C). В реестре используем ветку HKLM и через раздел Software добираемся до папки Windows, которая расположена в директории текущей версии (CurrentVersion). Тут нас интересует три основных ключа:
- AppInit_DLLs – в поле значения указывается полный путь к файлу DWMGlass.dll, который должен находиться в вышеуказанной папке;
- LoadAppInit_DLLs – значение (1);
- RequireSignedAppInit_DLLs – значение (0).
После задания всех этих параметров, как и в предыдущем случае, производится рестарт системы.
Что делать, если установка не запускается?
В некоторых случаях установщик может по каким-либо причинам не срабатывать. Для решения этой проблемы изначально нужно использовать инсталлятор исключительно от имени админа. В противном случае он просто может не запуститься.
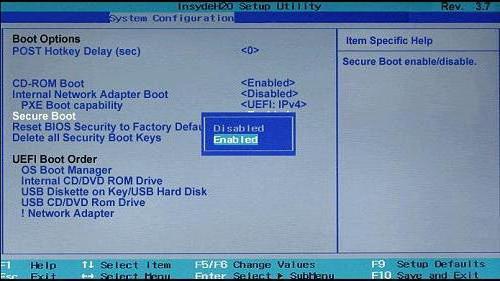
Еще одна причина сбоя кроется в настройках первичной системы ввода/вывода BIOS. В некоторых версиях встречается пункт безопасной загрузки Secure Boot. Эту функцию настоятельно рекомендуется отключить, то есть установить значение Disabled. Далее просто сохраняем изменения и выходим из настроек (F). После перезагрузки системы искомая утилита должна установиться без проблем.
Наконец, обратите внимание на разрядность самой программы (версия приложения 64 бита в архитектуру системы с 32 битами не установится).
Что делать, если на экране постоянно «висит» надпись?
Все! Утилита установлена, и пользователь вроде бы добился желаемого результата. Но вот незадача – внизу экрана постоянно «висит» название эффекта, от которого избавиться невозможно. Его присутствие объясняется достаточно просто: сама утилита платная, а пользователь устанавливает тестовую демо-версию. Посмотрим, как в Aero Glass убрать надпись с названием.
В самом простом случае многие юзеры предлагают скачивать не официальную, а уже «крэкнутую» утилиту, однако такой подход противоречит международным законам о защите авторских прав. Другие советуют исправить ситуацию при помощи крохотного приложения, убирающего надпись. Название его не приводится только по причине того, что опять же оно является своеобразным «крэком». В общем, убрать надпись можно только нелегальными методами, но лучше всего изначально приобрести официальную программу.
Вопросы настройки параметров
Что же касается основных настроек, в случае установки официальной утилиты регулировать можно все и вся. Но вот при инсталляции «крэкнутой» версии без специальных исправлений к ней изменять параметры будет невозможно. К тому же и прозрачность оказывается на таком уровне, что работать с интерфейсом крайне неудобно. Придется искать и загружать еще несколько небольших программ, которые исправляют управление тем или иным параметром, что очень неудобно. К тому же еще неизвестно, насколько чистыми они окажутся. Ведь именно в них наиболее часто содержатся вирусы и потенциальные угрозы, так что лучше не рисковать, а то ведь и система может запросто «слететь», а потом мороки с восстановлением ее работоспособности будет намного больше.

В некоторых случаях можно установить дополнительное приложение под названием Classic Shell версии 4.1 или любой другой. Оно позволит в той же Windows 8.1 изменить меню «Пуск», которое все равно отображается в виде плиток, на классический вид, как в «семерке». Применение этой или любой другой подобной утилиты многие пользователи называют достаточно удобным, ведь некторые юзеры, несмотря на каждодневную работу с восьмой версией, к ее внешнему виду так и не смогли привыкнуть.
Заключение
Как видно из всего вышесказанного, установка и применение эффекта Aero Glass сложностей вызвать не должны. С надписью, которая постоянно отображается на экране, дела обстоят намного хуже. Остается только купить приложение или на свой страх и риск использовать неофициальные утилиты, исправляющие эту ситуацию, хотя когда нашего человека это останавливало?
Windows Aero
| Windows Aero | |
|---|---|
 Windows Flip 3D в Windows 7 | |
| Тип | Среда рабочего стола |
| Разработчик | Microsoft |
| Операционная система | Windows Vista, Windows 7 |
| Первый выпуск | ноябрь 2006 года |
| Последняя версия | 6.1.7601 |
| Лицензия | Microsoft EULA |
| Сайт | |
| Type | visual style |
| Introduced in | Windows Longhorn build 4038 |


Aero is a transparent Windows visual style used from Milestone 6 Longhorn builds to Windows 7 (window transparency was removed in 8). The first build to have working Aero is Windows Longhorn build 4038, and the last build to use Aero (with window transparency) is Windows 8 build 8424 (fbl woa drop). In Windows Longhorn, Aero effects relied on the Desktop Composition Engine (or Desktop Window Manager in newer builds), which only worked in a few builds such as 4038, 4039, 4042, 4066, and 4074. In Windows Vista and 7, it relies on a WDDM driver due to the use of hardware acceleration, otherwise the Windows Basic theme would be used. This requirement was dropped since at least Windows 8 build 7880 with the introduction of a software rendering fallback to the Desktop Window Manager.
Contents
Enabling Aero [ edit | edit source ]
Windows Longhorn build 4038 to build 4042 (Lab06_n) [ edit | edit source ]
First, install a compatible Direct3D driver and ensure it works via dxdiag.exe . While you can run sbctl start in C:\WINDOWS\i386 to enable the borders, they will be opaque. In order to enable transparent borders, you need to go into C:\WINDOWS\Resources\Themes and copy the Plex folder. Paste back into the Themes folder and the new folder should automatically rename itself to «Plex — Copy». Rename the pasted folder to «Aero» and rename the msstyles file inside the folder to aero.msstyles . After that, restart the Theming service (either running net stop winux and net start winux or logging off and back on will work). At this point, you can run sbctl start again to enable the glass borders.
Windows Longhorn builds 4074 to 4082 [ edit | edit source ]
This is a guide on how to enable Aero in Longhorn build 4074 to 4082, adapted from the tutorial at the Experience Longhorn Project. The patched ISO known as ‘Longhorn The Way It Was Meant To Be’ (Longhorn TWIWMTB) has all these features in place. If you have a standard copy of this build, here’s how to get Aero working:
Note: This guide won’t work on the x64 version of build 4074, except for basic DWM effects.
Video Drivers and Theme Files [ edit | edit source ]
You should use the SVGA driver pack if you have VMware 7.1. Installing this driver is fairly simple: go to the Device Manager, and under ‘Graphics’ click ‘Update Driver’ with the mounted or burned driver pack ISO (Device Manager is buggy in build 4081 and 4082 because hdwwiz.cpl is missing, it is possible to port hdwwiz.cpl from another build to the \WINDOWS\SYSTEM32 directory in order to get it to work). Builds 4081 and 4082 requires booting into VGA display mode after updating the driver, otherwise it will result in a 0x000000B4 BSOD.
Builds 4081 and 4082 ship with an incomplete DirectX, which will cause a black screen when enabling DWM (see below). The missing components can be obtained from the DirectX 9.0b installer for Windows XP (9.0c may also work, but not tested). The installer itself will refuse to install on Longhorn, but this can be bypassed by manually extracting the contents of dxnt.cab and installing all of the .inf files found within from their right-click menus (answer no to all overwrite prompts), and copying any remaining files from dxnt.cab into System32. Verify successful installation by running the Direct3D tests in dxdiag (it may complain about DirectShow not being registered, but the spinning 3D cube animation can still confirm DirectX is functional).
Now we need to reconstruct the Aero theme files. This is done by using the Jade theme files and copying these to the desktop. The ‘Jade’ folder and the files ‘Jade.theme’ and ‘Jade.msstyles’ should be renamed, respectively, to ‘Aero’ (folder), ‘Aero.theme’ and ‘Aero.msstyles’. Now, open ‘Aero.theme’ as a text file and change [email protected],-203 to DisplayName=Aero . Replace all instances of ‘Jade’ with ‘Aero’ then in the text file. Save the theme and put the theme files back into the directory.
The Transparency and Desktop Window Manager [ edit | edit source ]
Now we need to go to the registry. Navigate in the registry to HKEY_CURRENT_USER\SOFTWARE\Microsoft\Windows\CurrentVersion\Explorer and create 2 DWORDs. Call the first DWORD MILExplorer and set the value to 1. The second is optional (setting it enables Aero stars on the Desktop): call it MILDesktop and set the value to 1. Save the registry. Go to Control Panel → Display → Themes and choose the Aero theme. After some seconds, you will see a lovely transparent taskbar and sidebar. If you added the MILDesktop key and if you have the drivers, you will also see the Aero Stars (animating stars on the desktop).
At this moment we run into a problem. Trying to open a window will do nothing. That’s because the window is completely transparent. Even though we enabled Aero transparency, we haven’t yet enabled the Desktop Window Manager. In build 4081 or 4082, this can be done easily by just pressing Ctrl + Shift + F9 , but this is broken in build 4074.
To start DWM in build 4074, create a Notepad text file and paste in the following code. Save it as a ‘.bat’ (batch file). Then run it, and the DWM should be on.
Alternatively, copy desksrv.dll from build 4081 or 4082 to make Ctrl + Shift + F9 work.
Please note that if you don’t install the drivers, DWM will likely not load. Also, if you restart, the transparency will disappear by default. This can be avoided by adding a shortcut to your DWM-starting batch file to the Startup folder.
Do note that by default, Explorer borders will be green on an unmodifed copy of the build. TWIWMTB and patched Aero themes can add transparent borders to the build.
Windows Vista pre-Beta 2 builds [ edit | edit source ]
This is a guide to enable Windows Aero (i.e. Desktop Window Manager) in Windows Vista build 5212 to build 5284 in VMware Workstation and Player. It is recommended to use the version 11 (Workstation) or 7 (Player) or older, as newer versions starting from 12 has rendering problems in which the display would flicker and only active window or part of it will render properly. This is likely due to changes in display engine to support DirectX 10 and OpenGL 3.3 [1] [2] .
Video Drivers [ edit | edit source ]
First, the SVGA driver pack must be used and installed via Device Manager. Any SVGA driver from VMware version 6.0-7.1 will work, however VMware 6.0 compatibility must be used on build 5231 due to the BSOD bug.
Enabling Aero [ edit | edit source ]
- After you installed the drivers, open regedit.exe . If you’re running build 5048 to 5231.2, browse to HKEY_LOCAL_MACHINE\Software\Microsoft\DWM (if the DWM key does not exist, create it). If you’re running build 5259 to 5284, then browse to HKEY_CURRENT_USER\Software\Microsoft\DWM instead (create the DWM key if it’s not there).
- Create a DWORD key named EnableMachineCheck (UseMachineCheck for 5259-5284) and set its value to 0. Log off and back on and Aero should automatically be enabled.
Optional Keys [ edit | edit source ]
You can also use these DWORDs in the DWM key you created to get various effects.
- Blur — set it to 0 to disable blur, else set it to 1.
- BlurSigma (build 5212-5270 only) — set it to a decimal value between 1 and 30, depending on the value it will control the blur intensity. If set to a value out of the 1-30 range, it will disable transparency and make borders black.
- Animations- if set at 1, the Aero animation effects will be enabled. It can be disabled by setting the key to 0.
- AnimationsShiftKey — set it to 1 to be able to press Shift key during animations to slow them down.
- RenderClientAreaOnly — setting it to 1 will cause the window borders and title bars to disappear, use with caution!
Bugs and quirks [ edit | edit source ]
- Since these builds uses LDDM instead of the WDDM used in newer builds, Vista drivers will not work. Windows XP drivers are required to enable Aero in these builds.
- Aero is not known to work on builds 5098 and 5112 outside of real hardware due to 5098/5112’s DWM requiring LDDM drivers. However, if one was to replace uxss.exe in either builds with a patched uxss.exe made by ComputerHunter, it is possible to use DWM with XPDM drivers.
- When Aero is enabled on build 5212, the borders becomes transparent, but the taskbar doesn’t.
- Before build 5259, there is a bug that causes Aero animations to lag. It is possible to work-around this by ending and restarting the uxss.exe process.
- Flip3D is activated via the Windows Key + Spacebar in build 5212 and build 5219, rather than Windows Key + Tab in later builds.
- The Vista WDDM driver can be installed starting from beta 2 to RC1 builds (tested on 5384 and 5600) with a replaced msvcrt.dll from an RC2 or RTM build, but this results in triggering a license error.
Aero in Windows 8/8.1 [ edit | edit source ]
Early builds of Windows 8 use the same Aero theme as Windows 7. It was later modified to have a bigger, centered title bar caption in build 7850, then a smaller close button on dialogs in build 7880 (which also no longer requires a WDDM driver to be installed, as the DWM can now run in software-rendering mode), and remained the same until Windows 8 Developer Preview, which now has sharp corners instead of rounded in most elements.
In Windows 8 Developer Preview, it’s possible to enable the glass effects in the Aero Lite theme (referred to as Windows Basic) by running WindowsAnytimeUpgradeResults.exe .
While Windows 8 build 8432 and later builds (including the RTM and Windows 8.1) removed the glass effects, it is possible to get it back, though not fully functional as it was more of a bug than a workaround. There’s two methods to do so:
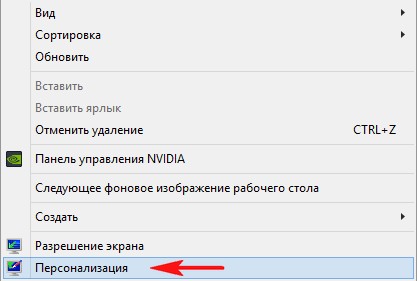
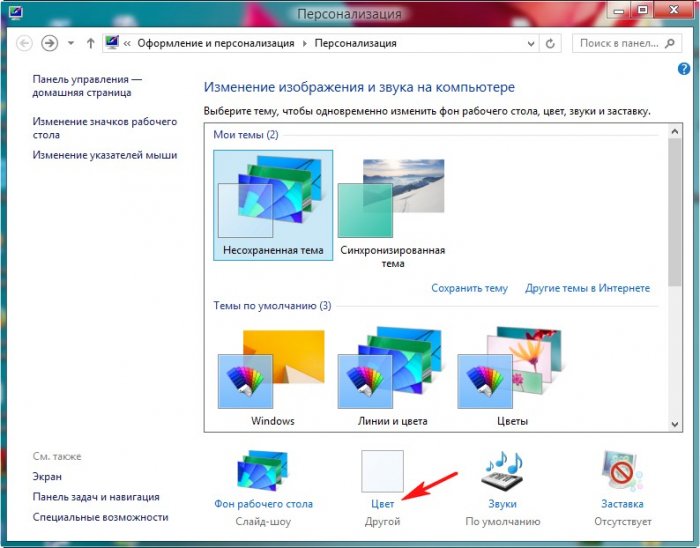
- Method 1 (resulting in the Aero Lite theme): Right click the desktop and open up Personalization. Select any of the high contrast themes to apply it. Once applied, click on Window color to open it up. Leave the page open and minimize it. Open a separate personalization window and apply the theme you used before applying high contrast and close out of the personalization window you just opened. Go back to the other personalization window that you minimized and click save changes to save the high contrast colors. To disable, reselect your current theme or change the desktop background or the color of your taskbar and window borders. This also works on Windows 10 as well, but it changes the Aero theme to Aero Lite (except for applets like volume control). The same bug can also be used to enable transparency when using the Aero Lite theme on Windows 8 Consumer Preview and Release Preview, albeit being more stable with full colorization.
- Method 2 (using the default theme):
- Press Win+R, type regedit , then hit Enter to open Registry Editor.
- Navigate to HKEY_CURRENT_USER\SOFTWARE\Microsoft\Windows\DWM and change the value ColorizationGlassAtribute to 2.
- Open Task Manager, in the «Process» tab, end Desktop Window Manager.


