What blinds are best for large windows?

- Homepage
- >
- Vertical Blinds
- >
- What blinds are best for large windows?
What blinds are best for large windows?
What blinds are best for large windows? We’ve spent 130 years learning what is and what isn’t right for certain windows or doors.
Our recommendations are always based on 2 things.
- Reliability. Will it last? We will never recommend blinds that we know are not suitable and will not last.
- Easy to use. If the blinds are not easy to use, again we would not consider them suitable.
Here are our recommendations based on our years of experience.
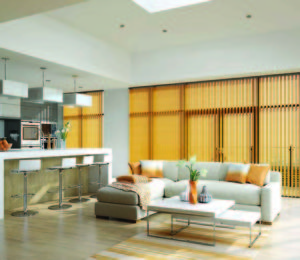
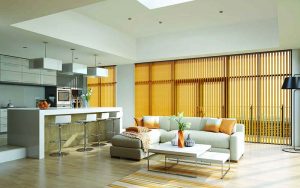
Vertical Blinds. These are the perfect solution for large windows. Very reliable and easy to use. Tilt the louvres to adjust the light entering the room and simply move the fabric across the rail to allow for a full view of the outdoors.
Multiple fixing points is another reason why vertical blinds would be our blind of choice for your large windows.
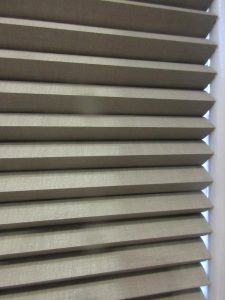
Duette Blinds. Also know as honeycomb blinds. Available up to 3300mm wide and up to 3000mm deep you could have one blind to cover your large windows, or you could choose to split it in 2.
I would recommend the side chain operation as this is the most reliable for blinds of this size.
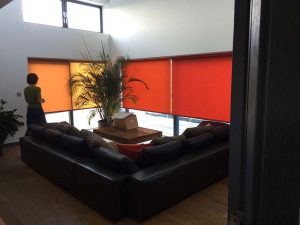
Roller Blinds. Are another option for your windows.
I would recommend having 2 blinds to cover large windows because roller blinds only having a bracket at each end, wide blinds will bow in the centre and cause a ripple in the fabric.
By splitting them in 2 they will be easier to operate and more practical.
Side Chain operation is a good choice, also with the price of remote control as low as £99 per blind this could look great with no cords or chains.
Wooden Venetian Blinds. Can be made up to 3000mm wide, but there is a down side with wooden blinds of this size. THEY ARE VERY HEAVY to lift up and down.
They ate perfect for filtering the light by tilting the slats, but blinds of this size should only be raised and lowered for cleaning the windows. Raised and lowered regularly will affect the longer term reliability of the blind.
I hope this information is of some use in making the decision of which blinds are best for your large windows.
Thinking of curtains and blinds ? Our Allusion Blinds combines to two……..

If you are in Leicestershire then great news you can visit our showroom on Uppingham Road or we can bring our range to you. If you are outside Leicestershire I hope this information has been useful and you should be able to find a supplier local to you.
A History of WindowBlinds
Article posted on 9/3/2020
Today we’re going to talk a bit about the history and evolution of WindowBlinds, which released all the way back in 1999 (for the mathematically challenged, that’s 21 years ago. yikes!). WindowBlinds was the first program that let users customize the look and feel of the Windows GUI and is still widely popular today.
Although the start of WindowBlinds was long before I came to Stardock (I started here in September 2015), I took a dive through the forums and the website to take a look all the way back at the beginning. So, let’s start there with version 1.
Version 1
Released September 20, 1999

Version 1 released and rose to immediate popularity with over 1 million downloads on CNET’s Download.com before the end of the year. Above, you can see the customized window frames and menu bars, and, if you can say you happened to use version 1, you probably feel a little old right now.

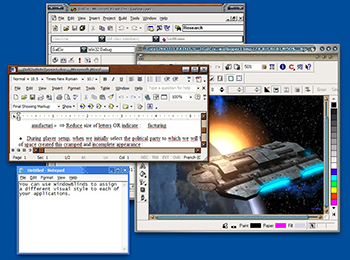
While digging through the WindowBlinds website archives, I found this early Drengin image from the 90’s.
The Drengin have also come a long way in the last 20 or so years. but that’s another blog.

Our product UI has definitely changed and improved a whole lot in the last 20+ years.

To be honest, I picked the above image mostly because I liked the rainbow spiral. It showcases a good variety for WinCustomize v1.0, though.
Version 2
Released October 11, 2000

Version 2 added per-window skinning, semi-transparent explorer windows, and skin colorizing.

Check out that retail box! Who even remembers a time when you bought PC software in the store anymore? To be honest, I sort of miss it, though it’s hard to argue against the convenience and ease of online purchases anymore.

WindowBlinds skins supported adding buttons and other objects into the frames (such as this stock ticker).

Remember AOL? I sure do, I spent WAY too many hours of my youth on Instant Messenger. That said, I’ve heard it was a pain to skin — but check out that classic Stardock logo!
Version 3
Released November 13, 2001

Designed with Windows XP in mind, Version 3 was the first version that could skin every part of the Windows GUI. This version took advantage of the new API framework at the time and made its skins «native» to Windows XP.
WindowBlinds 3 loaded a «skin» from the disk and then applied the skin to the Windows GUI. With it, users could customize title bars, borders, push buttons, radio buttons, combo boxes, scrollbars, status bars, properties dialogs, tab controls, header controls, list boxes, and pretty much every other element.

WindowBlinds 3 was more than just aesthetically pleasing! It added a bunch of new usability features, transitioning WindowBlinds from being more of an «eye candy» product into a true productivity tool for Windows users. It could also make Windows look like other OSes. something that received mixed feedback from the community.
Version 4
Released April 8, 2003

Version 4 was designed almost entirely with Windows XP in mind.

WindowBlinds 4 skinned virtually every aspect of the Windows GUI, including things that were previously thought to be unskinnable like logon/logoff dialogues, the «please wait» dialogue, backgrounds in the Control Panel, and more.

Man, I miss the GameCube. From what I could find when digging through old website and archives, it seems like some companies partnered with us to create skins for Windows using some of their IPs, which is pretty cool.

Options, options, options. so many of them!
Version 5
Released November 29, 2005

WindowBlinds 5 was designed to support per-pixel alpha blending, toolbar button changing, progress animation improvements, animated per-pixel Start menus, title bars, and tons more.

When Version 5 released, WindowBlinds was the most popular desktop-enhancement utility of all time, according to CNET’s Download.com. We had over 8 million users worldwide and had passed the 9 million downloads mark.

Remember how I mentioned skins featuring different IPs? Yep, found one for World of Warcraft!
Version 6
Released October 2, 2007

WindowBlinds 6 added the ability to apply effects like Gaussian blurs to skins in real-time. The new configuration was, perhaps, the biggest change.

Anyone remember a little game called Elemental? Check out this WindowBlinds 6 skin themed after it.

This version of WindowBlinds also added advanced animation support for skins, which allowed our user base to do some pretty wild things.
Version 7
Released November 17, 2009

I’m told this was a coincidence and not at all intended, but WindowBlinds 7 happened to be ready just in time for the arrival of Windows 7. In this version, we introduced a new type of skinning format called UIS0, which allowed users to just modify the existing Aero skin. This made WindowBlinds a lot more popular for people who liked Aero, but wanted a bit nicer look and feel to it.

WindowBlinds 7 included a new configuration program that made it easy to access the new features of the program, like adding textures to existing skins.
Version 8
Released June 19, 2013

Version 8 was mostly about getting WindowBlinds to work on Windows 8. This version worked on Windows 7 also, and included SkinStudio for free, which would allow users to design their own skins.

SkinStudio made it easy for inexperienced users to create a great skin quickly, while advanced users could still enjoy designing every aspect of the windows interface.
Version 9
Released. never!
Because I was trying to be as thorough as possible with this recap for WindowBlinds,
I spent entirely too long last night digging for the history of Version 9.
Except, there is no Version 9. We skipped 9 and went straight to 10, like Windows.
Don’t ask me why the number 9 seems to get no love, I couldn’t tell you.
Version 10
Released March 15, 2016

A year after I arrived at Stardock, WindowBlinds 10 made its debut. We needed to make sure we had a product that was fully compatible with Windows 10, and of course it came with a shiny new UI and plenty of never-before-seen skins that offered a broader customization experience for our users.

As you can see, better looking versions of old OSes are still pretty popular. Re-live the good old Windows 7 days!

WindowBlinds 10 still has plenty of customization options — far more than ever before — so that you can tweak your desktop down to the most minute of details.

I think one of my absolute favorite features of WindowBlinds 10 is the randomization. If I like a bunch of skins, I can use this option to have my computer cycle through them at random intervals, giving me a fresh look and a bit of a surprise every time I boot up. The per-application skinning is great for variety, too — I can use one skin for my word processing software, and use a different skin for something like Premiere.
So, that’s the history of WindowBlinds — phew! How long have you been using the program and what are some of your favorite skins?
What is windows blinds

What is a Visual Style?
In WindowBlinds, the computer graphics (i.e. colour (color), style) is referred to as any of the following: Visual Style, Skin, or Personality. These terms all refer to the same thing and are used interchangeably in WindowBlinds and this documentation. Though the term «Skin» is the most common. The term Texture is also used to refer to the colouring & pattern of the skin graphics.
Visual Styles may include any of the following additional elements: Styles (substyles), Textures, Wallpapers, and Fonts.
Terminology Used in WindowBlinds
Your Windows desktop is made up of a number of separate items that WindowBlinds and this documentation will refer to. To help you understand the terms used, here are some of the most common ones.
Default — (as used in this documentation) means that when an option (i.e. checkbox, menu choice) is set to say, «Play sounds defined by the skin (if any)». And it has a checked box, that means that this option was set that way when WindowBlinds was installed (or how Windows is setup when new). This is handy, in case you want to return a setting to the default.
A Dialog Box — asks you do something, such as this «Delete tag» box. It’s a simple Yes or No and includes: window frame, titlebar, and buttons that can be skinned:

The Notification Area (formerly called System Tray) — is (by default) in the lower, right-hand corner of your screen with the clock.

Start Menu — is the menu that appears in the lower, right corner after clicking the Windows orb button.

The Taskbar — (by default) is located on the bottom on your desktop and may include minimized applications / windows. The Start button (to open the Start menu) is located on the far left.

The Titlebar — is the top most frame of a window, and typically includes: an icon (far left) that if you click will open the system menu, title of the application or window (i.e. Calculator), and buttons (minimize, maximize, close).

The User Interface (UI) — is what you see on the screen when an application runs, such as: window, frame, title bar, buttons, various types of menus, etc..
The Wallpaper — is the graphic image (or color) of the background on your desktop (monitor). Windows has a default wallpaper when it is first installed and includes other wallpapers you can change it to. You may also use a photo as wallpaper.
The Window Frame — is around each window, each skin can change the colour and style of this frame.

Texture — is a new feature that allows you to add a textured graphic to various elements of the desktop.

Differences Between Windows 7, Vista and XP
There are some options in WindowBlinds that are only available (visible) in Windows 7, Vista and XP. This manual will notify you if a feature is for only one operating system, otherwise assume it is available for all versions of Windows (i.e. 7/Vista/XP).
Installation
WindowBlinds can be installed through stand-alone installer for the 30-day Trial version.
Otherwise, locate the icon on the Start Menu by doing the following:
|

WindowBlinds 7 Configuration initially displays a menu across the top, a large preview area in the center, then below are filter options, thumbnails of each installed Visual Style and a tabbed menu at the bottom with the «Visual Styles» tab selected by default. The other tabs relate to the selected visual style, with grayed out tabs not available for that style. Not all features are available for all skins, as a result, some tabs are grayed out (unavailable) and some tabs will not support all features as shown in this manual.
The top menu consists of the following items:
- Apply changes — after a visual style has been selected or changes made, this will apply the changes to your desktop.
- Skin Options — offers a sub-menu of options to Install new (visual style), Download more skins, Edit in SkinStudio (if installed), Change Colour (shortcut to «Colours» sub-tab (bottom menu), Delete (visual style), Rebuild List, and Apply changes.
- Settings — allows you to make changes that affect various aspects of WindowBlinds.
- About WindowBlinds — displays important information about WindowBlinds, helpful if you ever need to contact Stardock Support.
- Get more Skins! — offers the option to download more skins (visual styles) from WinCustomize.com.
 (Help) — opens the default web browser and displays this manual on the Stardock web site.
 (Help) — opens the default web browser and displays this manual on the Stardock web site.
In the center of the WindowBlinds application window is the preview area which will display the selected visual style and any changes you select. The type (i.e. UIS0 Skin, UIS1 Skin, UIS2 Skin) of visual style will be displayed under the preview as a caption.

When the «Visual Styles» tab (bottom) is selected, under the preview area are options to «Filter by». This allows you to view just the thumbnails for the visual styles meeting either the rating and/or the text you type into the Search field. As you download and accumulate more skins, these options will quickly aid you in searching for just the right one.
 |  |
Under the filter options, are thumbnails of available visual styles displaying a small sample of the skin. The same visual styles are included on Windows 7/Vista/XP, except XP lacks the new UIS0 format skins.

Finally, on the bottom of the WindowBlinds window is a tabbed menu of options that changes depending on the type of visual style selected. Black text on white means the option is available, while gray text on white means the option is not available. Clicking on each tab changes the thumbnails area to settings related to that tab. For instance, clicking on the «Aero Colours» visual style thumbnail, then clicking on the «Colours» tab, will display a list of colours you can change that skin to. Clicking on a solid color box will update the preview area so you can see how it will look, before applying to your desktop.

When you make a change to a setting on a tab, you will notice a checkmark next to the title of the tab. So in the case of the «Colours» tab, if you selected red, the checkmark will be in a red circle  to show that you made a change to the colour of the skin. This is a quick way to find what areas of the visual style you changed.
In the lower right corner of WindowBlinds, to the right of the last menu tab, you may see an animated busy  icon anytime WindowBlinds is working. You may see it as you change between visual styles, make changes, etc..
The WindowBlinds application window can be downsized vertically to reduce the visible footprint on your desktop to hide the preview area.

All of these menu options & tabs will be covered in greater detail in the following pages.


