- File Caching
- Microsoft Comes Clean on Windows 10 Data Collection – Here’s Everything Your OS Sends to Redmond
- Windows 10 data collection — Summaries of Basic and Full level published
- Collect data using Network Monitor
- Collect data using Enterprise Site Discovery
- Before you begin
- What data is collected?
- Understanding the returned reason codes
- DocMode reason
- Browser state reason
- Where is the data stored and how do I collect it?
- WMI Site Discovery suggestions
- Getting ready to use Enterprise Site Discovery
- WMI only: Running the PowerShell script to compile the .MOF file and to update security privileges
- WMI only: Set up your firewall for WMI data
- Use PowerShell to finish setting up Enterprise Site Discovery
- Use Group Policy to finish setting up Enterprise Site Discovery
- Combining WMI and XML Group Policy settings
- Use Configuration Manager to collect your data
- Collect your hardware inventory using the MOF Editor while connected to a client device
- Collect your hardware inventory using the MOF Editor with a .MOF import file
- Collect your hardware inventory using the SMS\DEF.MOF file (System Center Configuration Manager 2007 only)
- View the sample reports with your collected data
- SCCM Report Sample – ActiveX.rdl
- SCCM Report Sample – Site Discovery.rdl
- View the collected XML data
- Turn off data collection on your client devices
- Delete already stored data from client computers
File Caching
By default, Windows caches file data that is read from disks and written to disks. This implies that read operations read file data from an area in system memory known as the system file cache, rather than from the physical disk. Correspondingly, write operations write file data to the system file cache rather than to the disk, and this type of cache is referred to as a write-back cache. Caching is managed per file object.
Caching occurs under the direction of the cache manager, which operates continuously while Windows is running. File data in the system file cache is written to the disk at intervals determined by the operating system, and the memory previously used by that file data is freed—this is referred to as flushing the cache. The policy of delaying the writing of the data to the file and holding it in the cache until the cache is flushed is called lazy writing, and it is triggered by the cache manager at a determinate time interval. The time at which a block of file data is flushed is partially based on the amount of time it has been stored in the cache and the amount of time since the data was last accessed in a read operation. This ensures that file data that is frequently read will stay accessible in the system file cache for the maximum amount of time.
This file data caching process is illustrated in the following figure.
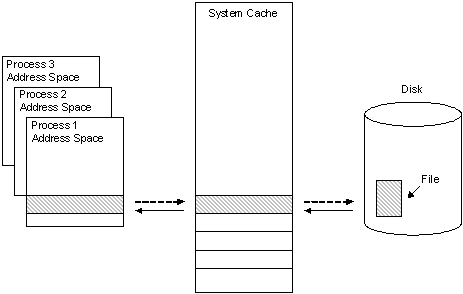
As depicted by the solid arrows in the previous figure, a 256 KB region of data is read into a 256 KB cache «slot» in system address space when it is first requested by the cache manager during a file read operation. A user-mode process then copies the data in this slot to its own address space. When the process has completed its data access, it writes the altered data back to the same slot in the system cache, as shown by the dotted arrow between the process address space and the system cache. When the cache manager has determined that the data will no longer be needed for a certain amount of time, it writes the altered data back to the file on the disk, as shown by the dotted arrow between the system cache and the disk.
The amount of I/O performance improvement that file data caching offers depends on the size of the file data block being read or written. When large blocks of file data are read and written, it is more likely that disk reads and writes will be necessary to finish the I/O operation. I/O performance will be increasingly impaired as more of this kind of I/O operation occurs.
In these situations, caching can be turned off. This is done at the time the file is opened by passing FILE_FLAG_NO_BUFFERING as a value for the dwFlagsAndAttributes parameter of CreateFile. When caching is disabled, all read and write operations directly access the physical disk. However, the file metadata may still be cached. To flush the metadata to disk, use the FlushFileBuffers function.
The frequency at which flushing occurs is an important consideration that balances system performance with system reliability. If the system flushes the cache too often, the number of large write operations flushing incurs will degrade system performance significantly. If the system is not flushed often enough, then the likelihood is greater that either system memory will be depleted by the cache, or a sudden system failure (such as a loss of power to the computer) will happen before the flush. In the latter instance, the cached data will be lost.
To ensure that the right amount of flushing occurs, the cache manager spawns a process every second called a lazy writer. The lazy writer process queues one-eighth of the pages that have not been flushed recently to be written to disk. It constantly reevaluates the amount of data being flushed for optimal system performance, and if more data needs to be written it queues more data. Lazy writers do not flush temporary files, because the assumption is that they will be deleted by the application or system.
Some applications, such as virus-checking software, require that their write operations be flushed to disk immediately; Windows provides this ability through write-through caching. A process enables write-through caching for a specific I/O operation by passing the FILE_FLAG_WRITE_THROUGH flag into its call to CreateFile. With write-through caching enabled, data is still written into the cache, but the cache manager writes the data immediately to disk rather than incurring a delay by using the lazy writer. A process can also force a flush of a file it has opened by calling the FlushFileBuffers function.
File system metadata is always cached. Therefore, to store any metadata changes to disk, the file must either be flushed or be opened with FILE_FLAG_WRITE_THROUGH.
Microsoft Comes Clean on Windows 10 Data Collection – Here’s Everything Your OS Sends to Redmond

So after Apple apologized to its users out of nowhere, Microsoft is out now to give us a few more shocks. The company is «finally» telling us how much data it’s collecting with its highly popular and equally controversial Windows 10 operating system. What’s happening to everyone this year? No clues, but it’s all in favor of the end user. In a blog post today, the company detailed what data users should expect the company to collect when they use Windows 10 Creators Update.
«For the first time, we have published a complete list of the diagnostic data collected at the Basic level,» Windows chief Terry Myerson explained in a blog post. «We are also providing a detailed summary of the data we collect from users at both Basic and Full levels of diagnostics.»
While Microsoft has repeatedly claimed that Windows 10 doesn’t violate user privacy, we had to take its word because the company never shared exactly what diagnostic data it was collecting. Today, the company has shared details of both the data collected at the Basic and Full level. While we already (kinda) knew what to expect when you go Full (default settings), the summary published today shows the entire summary of collected data, which is a little concerning.
Windows 10 data collection — Summaries of Basic and Full level published
As previously reported, the Redmond software maker is also introducing better data collection controls to allow users to switch between basic and full levels and learn about what data is being sent to the company. «Our teams have also worked diligently since the Anniversary Update to re-assess what data is strictly necessary at the Basic level to keep Windows 10 devices up to date and secure,» Myerson wrote. «As a result, we have reduced the number of events collected and reduced, by about half, the volume of data we collect at the Basic level.»
The TechNet summary detailed the data collection at Basic level, which is information that Microsoft considers «critical for understanding the device and its configuration including: basic device information, quality-related information, app compatibility, and Windows Store.»
The Basic level helps to identify problems that can occur on a particular device hardware or software configuration. For example, it can help determine if crashes are more frequent on devices with a specific amount of memory or that are running a particular driver version. This helps Microsoft fix operating system or app problems.
The Full level includes all the information that Microsoft collects with Basic level, and more. This additional data includes device connectivity and configuration data, content consumption, Inking typing, and browser, search and query data, among others. To give you a glimpse, here is what Microsoft collects about web browsing, search and query activity in the «Microsoft browsers and Cortana, and local file searches on the device.»
Browser Data — Information about Address bar and search box performance on the device such as:
- Text typed in address bar and search box
- Text selected for Ask Cortana search
- Service response time
- Auto-completed text if there was an auto-complete
- Navigation suggestions provided based on local history and favorites
- Browser ID
- URLs (which may include search terms)
- Page title
On-Device Search — Information about local search activity on the device such as:
- Kind of query issued and index type (ConstraintIndex, SystemIndex)
- Number of items requested and retrieved
- File extension of search result user interacted with
- Launched item kind, file extension, index of origin, and the App ID of the opening app.
- Name of process calling the indexer and time to service the query.
- A hash of the search scope (file, Outlook, OneNote, IE history)
- The state of the indices (fully optimized, partially optimized, being built)
Coming to the Content Consumption Data, this section appears to be collecting more than it should, including things like the language of a book you are reading. Here’s a screenshot taken from the summary.

Microsoft has come a long way since the early days of Windows 10 release when the company wouldn’t even bother to respond to even the most critical of reports, such as forced update installations and telemetry stories. Whether it’s the growing number of lawsuits or the troubles it is facing in Europe, the Windows maker is definitely trying to do better, and more importantly become more transparent about its Windows 10 data collection and privacy controls.
«We will also share more information about how we will ensure Windows 10 is compliant with the European Union’s General Data Protection Regulation,» Marisa Rogers, Microsoft’s Windows and devices privacy officer said.
It will be interesting to see if these latest details and improved privacy controls that Microsoft is launching with Windows 10 Creators Update are going to ease concerns among the privacy-conscious crowd, including foreign governments. Users who don’t want Microsoft to collect their browsing or file data can opt out of Full (tailored experiences) and toggle it back to Basic level.
— For those interested, details about Basic level data collection can be found here; summary of Full level Windows 10 data collection (version 1703) is also available at TechNet.
Collect data using Network Monitor
In this topic, you will learn how to use Microsoft Network Monitor 3.4, which is a tool for capturing network traffic.
Network Monitor is the archived protocol analyzer and is no longer under development. Microsoft Message Analyzer is the replacement for Network Monitor. For more details, see Microsoft Message Analyzer Operating Guide.
To get started, download Network Monitor tool. When you install Network Monitor, it installs its driver and hooks it to all the network adapters installed on the device. You can see the same on the adapter properties, as shown in the following image:

When the driver gets hooked to the network interface card (NIC) during installation, the NIC is reinitialized, which might cause a brief network glitch.
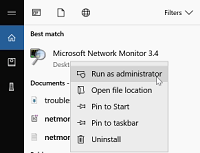
To capture traffic
Run netmon in an elevated status by choosing Run as Administrator.
Network Monitor opens with all network adapters displayed. Select the network adapters where you want to capture traffic, click New Capture, and then click Start.

Reproduce the issue, and you will see that Network Monitor grabs the packets on the wire.

Select Stop, and go to File > Save as to save the results. By default, the file will be saved as a «.cap» file.
The saved file has captured all the traffic that is flowing to and from the selected network adapters on the local computer. However, your interest is only to look into the traffic/packets that are related to the specific connectivity problem you are facing. So you will need to filter the network capture to see only the related traffic.
Commonly used filters
- Ipv4.address==»client ip» and ipv4.address==»server ip»
- Tcp.port==
- Udp.port==
- Icmp
- Arp
- Property.tcpretranmits
- Property.tcprequestfastretransmits
- Tcp.flags.syn==1
If you want to filter the capture for a specific field and do not know the syntax for that filter, just right-click that field and select Add the selected value to Display Filter.
Network traces which are collected using the netsh commands built in to Windows are of the extension «ETL». However, these ETL files can be opened using Network Monitor for further analysis.
Collect data using Enterprise Site Discovery
Microsoft 365 apps and services will not support Internet Explorer 11 starting August 17, 2021 (Microsoft Teams will not support Internet Explorer 11 earlier, starting November 30, 2020). Learn more. Please note that Internet Explorer 11 will remain a supported browser. Internet Explorer 11 is a component of the Windows operating system and follows the Lifecycle Policy for the product on which it is installed.
Applies to:
- WindowsВ 10
- WindowsВ 8.1
- WindowsВ 7 with Service PackВ 1 (SP1)
Use Internet Explorer to collect data on computers running Windows Internet Explorer 8 through Internet Explorer 11 on Windows 10, Windows 8.1, or Windows 7. This inventory information helps you build a list of websites used by your company so you can make more informed decisions about your IE deployments, including figuring out which sites might be at risk or require overhauls during future upgrades.
Upgrade Readiness and Windows upgrades
You can use Upgrade Readiness to help manage your Windows 10 upgrades on devices running Windows 8.1 and Windows 7 (SP1). You can also use Upgrade Readiness to review several site discovery reports. For more information, see Manage Windows upgrades with Upgrade Readiness.
Before you begin
Before you start, you need to make sure you have the following:
Latest cumulative security update (for all supported versions of Internet Explorer):
Go to the Microsoft Security Bulletin page, and change the filter to Windows Internet Explorer 11.

Click the title of the latest cumulative security update, and then scroll down to the Affected software table.

Click the link that represents both your operating system version and Internet Explorer 11, and then follow the instructions in the How to get this update section.
Configuration-related PowerShell scripts
Sample System Center 2012 report templates
You must use System CenterВ 2012В R2 Configuration Manager or later for these samples to work.
Both the PowerShell script and the Managed Object Format (.MOF) file need to be copied to the same location on the client device, before you run the scripts.
What data is collected?
Data is collected on the configuration characteristics of IE and the sites it browses, as shown here.
| Data point | IE11 | IE10 | IE9 | IE8 | Description |
|---|---|---|---|---|---|
| URL | X | X | X | X | URL of the browsed site, including any parameters included in the URL. |
| Domain | X | X | X | X | Top-level domain of the browsed site. |
| ActiveX GUID | X | X | X | X | GUID of the ActiveX controls loaded by the site. |
| Document mode | X | X | X | X | Document mode used by IE for a site, based on page characteristics. |
| Document mode reason | X | X | The reason why a document mode was set by IE. | ||
| Browser state reason | X | X | Additional information about why the browser is in its current state. Also called, browser mode. | ||
| Hang count | X | X | X | X | Number of visits to the URL when the browser hung. |
| Crash count | X | X | X | X | Number of visits to the URL when the browser crashed. |
| Most recent navigation failure (and count) | X | X | X | X | Description of the most recent navigation failure (like, a 404 bad request or 500 internal server error) and the number of times it happened. |
| Number of visits | X | X | X | X | Number of times a site has been visited. |
| Zone | X | X | X | X | Zone used by IE to browse sites, based on browser settings. |
Important
By default, IE doesn’t collect this data; you have to turn this feature on if you want to use it. After you turn on this feature, data is collected on all sites visited by IE, except during InPrivate sessions. Additionally, the data collection process is silent, so there’s no notification to the employee. Therefore, you must get consent from the employee before you start collecting info. You must also make sure that using this feature complies with all applicable local laws and regulatory requirements.
Understanding the returned reason codes
The following tables provide more info about the Document mode reason, Browser state reason, and the Zone codes that are returned as part of your data collection.
DocMode reason
The codes in this table can tell you what document mode was set by IE for a webpage.
These codes only apply to Internet Explorer 10 and Internet Explorer 11.
| Code | Description |
|---|---|
| 3 | Page state is set by the FEATURE_DOCUMENT_COMPATIBLE_MODE feature control key. |
| 4 | Page is using an X-UA-compatible meta tag. |
| 5 | Page is using an X-UA-compatible HTTP header. |
| 6 | Page appears on an active Compatibility View list. |
| 7 | Page is using native XML parsing. |
| 8 | Page is using a special Quirks Mode Emulation (QME) mode that uses the modern layout engine, but the quirks behavior of Internet Explorer 5. |
| 9 | Page state is set by the browser mode and the page’s DOCTYPE. |
Browser state reason
The codes in this table can tell you why the browser is in its current state. Also called “browser mode”.
These codes only apply to Internet Explorer 10 and Internet Explorer 11.
| Code | Description |
|---|---|
| 1 | Site is on the intranet, with the Display intranet sites in Compatibility View box checked. |
| 2 | Site appears on an active Compatibility View list, created in Group Policy. |
| 3 | Site appears on an active Compatibility View list, created by the user. |
| 4 | Page is using an X-UA-compatible tag. |
| 5 | Page state is set by the Developer toolbar. |
| 6 | Page state is set by the FEATURE_BROWSER_EMULATION feature control key. |
| 7 | Site appears on the Microsoft Compatibility View (CV) list. |
| 8 | Site appears on the Quirks list, created in Group Policy. |
| 11 | Site is using the default browser. |
The codes in this table can tell you what zone is being used by IE to browse sites, based on browser settings.
These codes apply to Internet Explorer 8, Internet Explorer 9, Internet Explorer 10, and Internet Explorer 11.
| Code | Description |
|---|---|
| -1 | Internet Explorer is using an invalid zone. |
| 0 | Internet Explorer is using the Local machine zone. |
| 1 | Internet Explorer is using the Local intranet zone. |
| 2 | Internet Explorer is using the Trusted sites zone. |
| 3 | Internet Explorer is using the Internet zone. |
| 4 | Internet Explorer is using the Restricted sites zone. |
Where is the data stored and how do I collect it?
The data is stored locally, in an industry-standard WMI class, .MOF file or in an XML file, depending on your configuration. This file remains on the client computer until it’s collected. To collect the files, we recommend:
WMI file. Use Microsoft Configuration Manager or any agent that can read the contents of a WMI class on your computer.
XML file. Any agent that works with XML can be used.
WMI Site Discovery suggestions
We recommend that you collect your data for at most a month at a time, to capture a user’s typical workflow. We don’t recommend collecting data longer than that because the data is stored in a WMI provider and can fill up your computer’s hard drive. You may also want to collect data only for pilot users or a representative sample of people, instead of turning this feature on for everyone in your company.
On average, a website generates about 250bytes of data for each visit, causing only a minor impact to Internet Explorer’s performance. Over the course of a month, collecting data from 20 sites per day from 1,000 users, you’ll get about 150MB of data:
250 bytes (per site visit) X 20 sites/day X 30 days = (approximately) 150KB X 1000 users = (approximately) 150MB
Important
The data collection process is silent, so there’s no notification to the employee. Therefore, you must get consent from the employee before you start collecting info. You must also make sure that using this feature complies with all applicable local laws and regulatory requirements.
Getting ready to use Enterprise Site Discovery
Before you can start to collect your data, you must run the provided PowerShell script (IETelemetrySetUp.ps1) on your client devices to start generating the site discovery data and to set up a place to store this data locally. Then, you must start collecting the site discovery data from the client devices, using one of these three options:
- Collect your hardware inventory using the MOF Editor, while connecting to a client device.
-OR-
Collect your hardware inventory using the MOF Editor with a .MOF import file.
-OR-
WMI only: Running the PowerShell script to compile the .MOF file and to update security privileges
You need to set up your computers for data collection by running the provided PowerShell script (IETelemetrySetUp.ps1) to compile the .mof file and to update security privileges for the new WMI classes.
Important
You must run this script if you’re using WMI as your data output. It’s not necessary if you’re using XML as your data output.
To set up Enterprise Site Discovery
- Start PowerShell in elevated mode (using admin privileges) and run IETelemetrySetUp.ps1 by by-passing the PowerShell execution policy, using this command: powershell -ExecutionPolicy Bypass .\IETelemetrySetUp.ps1 . For more info, see about Execution Policies.
WMI only: Set up your firewall for WMI data
If you choose to use WMI as your data output, you need to make sure that your WMI data can travel through your firewall for the domain. If you’re sure, you can skip this section; otherwise, follow these steps:
To set up your firewall
In Control Panel, click System and Security, and then click Windows Firewall.
In the left pane, click Allow an app or feature through Windows Firewall and scroll down to check the box for Windows Management Instrumentation (WMI).
Restart your computer to start collecting your WMI data.
Use PowerShell to finish setting up Enterprise Site Discovery
You can determine which zones or domains are used for data collection, using PowerShell. If you don’t want to use PowerShell, you can do this using Group Policy. For more info, see Use Group Policy to finish setting up Enterprise Site Discovery.
Important
The .ps1 file updates turn on Enterprise Site Discovery and WMI collection for all users on a device.
Domain allow list. If you have a domain allow list, a comma-separated list of domains that should have this feature turned on, you should use this process.
Zone allow list. If you have a zone allow list, a comma-separated list of zones that should have this feature turned on, you should use this process.
To set up data collection using a domain allow list
Start PowerShell in elevated mode (using admin privileges) and run IETelemetrySetUp.ps1, using this command: .\IETelemetrySetUp.ps1 [other args] -SiteAllowList sharepoint.com,outlook.com,onedrive.com .
Important
Wildcards, like *.microsoft.com, aren’t supported.
To set up data collection using a zone allow list
Start PowerShell in elevated mode (using admin privileges) and run IETelemetrySetUp.ps1, using this command: .\IETelemetrySetUp.ps1 [other args] -ZoneAllowList Computer,Intranet,TrustedSites,Internet,RestrictedSites .
Important
Only Computer, Intranet, TrustedSites, Internet, and RestrictedSites are supported.
Use Group Policy to finish setting up Enterprise Site Discovery
You can use Group Policy to finish setting up Enterprise Site Discovery. If you don’t want to use Group Policy, you can do this using PowerShell. For more info, see Use Powershell to finish setting up Enterprise Site Discovery.
Note
В All of the Group Policy settings can be used individually or as a group.
To set up Enterprise Site Discovery using Group Policy
Open your Group Policy editor, and go to these new settings:
| Setting name and location | Description | Options |
|---|---|---|
| Administrative Templates\Windows Components\Internet Explorer\Turn on Site Discovery WMI output | Writes collected data to a WMI class, which can be aggregated using a client-management solution like Configuration Manager. |
|
| Administrative Templates\Windows Components\Internet Explorer\Turn on Site Discovery XML output | Writes collected data to an XML file, which is stored in your specified location. |
|
| Administrative Templates\Windows Components\Internet Explorer\Limit Site Discovery output by Zone | Manages which zone can collect data. | To specify which zones can collect data, you must include a binary number that represents your selected zones, based on this order: 0 – Restricted Sites zone Example 1: Include only the Local Intranet zone Binary representation: 00010, based on: 0 – Restricted Sites zone Example 2: Include only the Restricted Sites, Trusted Sites, and Local Intranet zones Binary representation: 10110, based on: 1 – Restricted Sites zone |
| Administrative Templates\Windows Components\Internet Explorer\Limit Site Discovery output by domain | Manages which domains can collect data | To specify which domains can collect data, you must include your selected domains, one domain per line, in the provided box. It should look like: microsoft.sharepoint.com |
Combining WMI and XML Group Policy settings
You can use both the WMI and XML settings individually or together:
To turn off Enterprise Site Discovery
| Setting name | Option |
|---|---|
| Turn on Site Discovery WMI output | Off |
| Turn on Site Discovery XML output | Blank |
Turn on WMI recording only
| Setting name | Option |
|---|---|
| Turn on Site Discovery WMI output | On |
| Turn on Site Discovery XML output | Blank |
To turn on XML recording only
| Setting name | Option |
|---|---|
| Turn on Site Discovery WMI output | Off |
| Turn on Site Discovery XML output | XML file path |
To turn on both WMI and XML recording
| Setting name | Option |
|---|---|
| Turn on Site Discovery WMI output | On |
| Turn on Site Discovery XML output | XML file path |
Use Configuration Manager to collect your data
After you’ve collected your data, you’ll need to get the local files off of your employee’s computers. To do this, use the hardware inventory process in Configuration Manager, using one of these options:
- Collect your hardware inventory using the MOF Editor, while connecting to a client device.
-OR-
Collect your hardware inventory using the MOF Editor with a .MOF import file.
-OR-
Collect your hardware inventory using the MOF Editor while connected to a client device
You can collect your hardware inventory using the MOF Editor, while you’re connected to your client devices.
To collect your inventory
From the Configuration Manager, click Administration, click Client Settings, double-click Default Client Settings, click Hardware Inventory, and then click Set Classes.

Click Add, click Connect, and connect to a computer that has completed the setup process and has already existing classes.
Change the WMI Namespace to root\cimv2\IETelemetry , and click Connect.

Select the check boxes next to the following classes, and then click OK:
Click OK to close the default windows.
Your environment is now ready to collect your hardware inventory and review the sample reports.
Collect your hardware inventory using the MOF Editor with a .MOF import file
You can collect your hardware inventory using the MOF Editor and a .MOF import file.
To collect your inventory
From the Configuration Manager, click Administration, click Client Settings, double-click Default Client Settings, click Hardware Inventory, and then click Set Classes.
Click Import, choose the MOF file from the downloaded package we provided, and click Open.
Pick the inventory items to install, and then click Import.
Click OK to close the default windows.
Your environment is now ready to collect your hardware inventory and review the sample reports.
Collect your hardware inventory using the SMS\DEF.MOF file (System Center Configuration Manager 2007 only)
You can collect your hardware inventory using the using the Systems Management Server (SMS\DEF.MOF) file. Editing this file lets you collect your data for System Center Configuration Manager 2007. If you aren’t using this version of Configuration Manager, you won’t want to use this option.
To collect your inventory
Using a text editor like Notepad, open the SMS\DEF.MOF file, located in your \inboxes\clifiles.src\hinv directory.
Add this text to the end of the file:
Save the file and close it to the same location. Your environment is now ready to collect your hardware inventory and review the sample reports.
View the sample reports with your collected data
The sample reports, SCCM Report Sample – ActiveX.rdl and SCCM Report Sample – Site Discovery.rdl, work with System Center 2012, so you can review your collected data.
SCCM Report Sample – ActiveX.rdl
Gives you a list of all of the ActiveX-related sites visited by the client computer.

SCCM Report Sample – Site Discovery.rdl
Gives you a list of all of the sites visited by the client computer.

View the collected XML data
After the XML files are created, you can use your own solutions to extract and parse the data. The data will look like:
You can import this XML data into the correct version of the Enterprise Mode Site List Manager, automatically adding the included sites to your Enterprise Mode site list.
To add your XML data to your Enterprise Mode site list
Open the Enterprise Mode Site List Manager, click File, and then click Bulk add from file.

Go to your XML file to add the included sites to the tool, and then click Open.
Each site is validated and if successful, added to the global site list when you click OK to close the menu. If a site doesn’t pass validation, you can try to fix the issues or pick the site and click Add to list to ignore the validation problem. For more information about fixing validation problems, see Fix validation problems using the Enterprise Mode Site List Manager.
Click OK to close the Bulk add sites to the list menu.
Turn off data collection on your client devices
After you’ve collected your data, you’ll need to turn Enterprise Site Discovery off.
To stop collecting data, using PowerShell
On your client computer, start Windows PowerShell in elevated mode (using admin privileges) and run IETelemetrySetUp.ps1 , using this command: powershell -ExecutionPolicy Bypass .\IETelemetrySetUp.ps1 –IEFeatureOff .
Note
Turning off data collection only disables the Enterprise Site Discovery feature – all data already written to WMI stays on your employee’s computer.
To stop collecting data, using Group Policy
Open your Group Policy editor, go to Administrative Templates\Windows Components\Internet Explorer\Turn on Site Discovery WMI output , and click Off.
Go to Administrative Templates\Windows Components\Internet Explorer\Turn on Site Discovery XML output , and clear the file path location.
Delete already stored data from client computers
You can completely remove the data stored on your employee’s computers.
To delete all existing data
On the client computer, start PowerShell in elevated mode (using admin privileges) and run these four commands:
Remove-WmiObject -Namespace root/cimv2/IETelemetry IEURLInfo
Remove-WmiObject -Namespace root/cimv2/IETelemetry IESystemInfo
Remove-WmiObject -Namespace root/cimv2/IETelemetry IECountInfo
Remove-Item -Path ‘HKCU:\Software\Microsoft\Internet Explorer\WMITelemetry’


