- Help protect my PC with Microsoft Defender Offline
- When should I use Microsoft Defender Offline?
- Where can I find scan results?
- Using Windows Defender Offline on Windows 7 and Windows 8.1
- What is windows defender offline
- Защита компьютера с помощью автономного Microsoft Defender
- В каких случаях следует использовать автономный Microsoft Defender?
- Где найти результаты проверки?
- Использование автономного Защитника Windows в Windows 7 и Windows 8.1
Help protect my PC with Microsoft Defender Offline
Microsoft Defender Offline is a powerful offline scanning tool that runs from a trusted environment, without starting your operating system. This topic describes how to use Microsoft Defender Offline in Windows 10, Windows 8.1, and Windows 7.
When should I use Microsoft Defender Offline?
Run Microsoft Defender Offline if:
Windows Security (named Windows Defender Security Center in previous versions of Windows) detects rootkits or other highly persistent malware on your PC and alerts you to use Microsoft Defender Offline. You might see a message stating that malware was found on your device, or receive a message in Windows Security notifying you that additional cleaning is required.
You suspect your PC might have malware that’s hiding on it, but your security software doesn’t detect anything. In this situation, you can start a Microsoft Defender Offline scan from Windows Security settings. Here’s how:
Select Start , and then select Settings > Update & Security > Windows Security > Virus & threat protection .
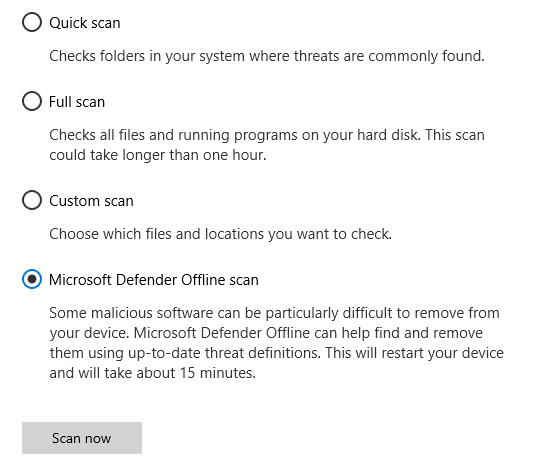
On the Virus & threat protection screen, do one of the following:
In an up-to-date version of Windows 10: Under Current threats, select Scan options.
In previous versions of Windows: Under T hreat history, select Run a new advanced scan.
Select Microsoft Defender Offline scan, and then select Scan now.
You’ll be prompted that you’re about to be signed out of Windows. After you are, your PC should restart. Microsoft Defender Offline will load and perform a quick scan of your PC in the recovery environment. When the scan has finished (usually takes about 15 minutes), your PC will automatically restart.
Before you use Microsoft Defender Offline, make sure you save any open files and close all apps and programs.
You typically need administrator rights on the PC on which you plan to run Microsoft Defender Offline.
If you experience a Stop error on a blue screen when you run the offline scan, force a restart and try running a Microsoft Defender Offline scan again. If the blue-screen error happens again, contact Microsoft Support.
Where can I find scan results?
To see the Microsoft Defender Offline scan results:
Select Start , and then select Settings > Update & Security > Windows Security > Virus & threat protection .
On the Virus & threat protection screen in Windows 10, under Current threats, select Scan options, and then select Protection history (In previous versions of Windows it may say Threat history).
Using Windows Defender Offline on Windows 7 and Windows 8.1
Note: On older versions of Windows, Microsoft Defender Offline is still called by its old name: Windows Defender Offline
If you’re running Windows Defender Offline on Windows 7 or Windows 8.1, follow these four basic steps:
Download Windows Defender Offline and install it to a CD, DVD, or USB flash drive.

Restart your PC using the Windows Defender Offline media. This means having the CD, DVD, or flash drive you created in step 1 inserted in the PC when you restart it. Follow the prompts to boot from the drive containing this media.
Scan your PC for viruses and other malware.
Remove any malware that’s found from your PC.
Windows Defender Offline will walk you through these four steps when you’re using the tool. If you’ve been prompted in Microsoft Security Essentials or Windows Defender Security Center to download and run Windows Defender Offline, it’s important to do so. Doing this helps make sure that your data and PC aren’t compromised.
To get started, find a blank CD, DVD, or USB flash drive with at least 250 MB of free space, and then download and run the tool. You’ll be guided through the steps to create the removable media.
Note: We recommend that you download Windows Defender Offline and create the CD, DVD, or USB flash drive on a PC that isn’t infected with malware—the malware can interfere with the media creation.
What is windows defender offline
Microsoft’s anti-virus, Microsoft Security Essentials, could be manually installed on computers running Windows 7 and earlier. Windows Defender was an anti-spyware application that could be installed as well. Since Windows 8 both of those have been combined into «Defender» and pre-installed as a component of Windows 8/8.1 and 10 operating systems. Thus, if you have Windows 8/8.1 or Windows 10 running on your computer, you already have anti-virus/anti-spyware protection running by default.
A few questions from our community:
1. I thought that it is not good to run two anti-virus applications. I have Windows 8 (or 10) on my new computer, but McAfee was also preinstalled. Can I keep McAfee? Can I install an anti-virus application from another vendor?
Yes, you can install another anti-virus. Defender should automatically disable itself when another AV comes onboard and is activated. You can always check via Windows Control Panel or by searching for Defender . Go to Defender’s Settings Tab. Click Real-time protection on the left. Make sure «Turn on real-time protection» is unchecked. Open your new AV and confirm that its protection is running.
*NOTE: If you are installing an anti-virus (ESET, Avast!, Kaspersky, etc.) other than the one pre-installed by Lenovo, make sure you have removed all components of McAfee, Norton, etc.. before installing a new one. It is advisable to use the vendor’s instructions and removal tool for doing that. If there is a question please post on Lenovo’s Security & Malware forum. The helpers there can provide instructions and/or a link to the vendor’s detailed instructions.
2. How does Defender update?
Defender will update daily if you have selected for Windows to provide automatic updates. If you do not enable automatic updating in Windows, you can manually update Defender. Simply open Defender and click the Update button on the Updates Tab. The Windows 10 Anniversary Update added a new feature in the event that signatures are delayed for some reason: Cloud protection still is updated and running.
3. How do I exclude specific files from Defender Scans?
Again, by searching for Defender you can access its settings. You may want to create a shortcut on your Taskbar if you change settings often or manually update each day. Files to exclude, as well as which drives to scan, can be found on the left of the Settings tab.
4. I see various options at Settings, but how do I schedule scans, other than Defender’s default? I don’t want Defender to scan regularly. I would rather run scans on demand. How can I change this?
Defender’s default Quick Scans are short so they do not inconvenience the user. Currently, there isn’t a setting in Defender to use on-demand scanning in Windows 7/8/8.1. However, there is a way to turn automatic scanning off.
* Open Task Schedule (Search Schedule Tasks. It will be under Settings.)
* Double-click to open the Task Scheduler Library on the left side pane, it is located under Microsoft -> Windows Defender. Look for MP Scheduled Scan. Click on that. At the bottom of the right side bar it can be disabled.
[For Windows 10 users, on-demand scanning became possible with the Windows 10 Anniversary Update in August 2016.]
5. What Is Windows Defender Offline Scan?
This new component that arrived in the Windows 10 Anniversary Update is actually an anti-virus boot feature included for Windows 10.
To run this in Windows 10:
1. Go to Settings > Update & Security > Windows Defender.
2. Scroll down to “Scan Offline”. Click the button under Windows Defender Offline.
3. The scan for malware will begin. It may take 15-20 minutes, so be patient. When the scan is finished if any malware is found, you will see a prompt to clean it using Windows Defender Offline. If no malware is found, your computer will automatically boot back into Windows 10.
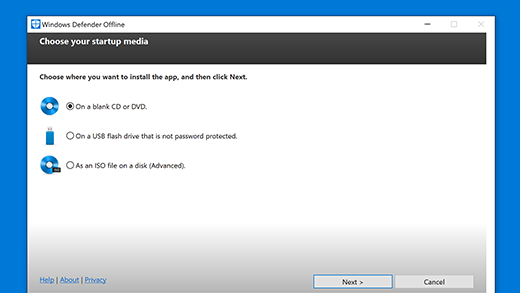
For Windows 7/8/8.1 Defender Offline can be downloaded. It is recommended to use a different (clean) computer for the download so that it can be transferred to the infected one. Running the downloaded msstool64.exe (for 64-bit Windows) or msstool32.exe (for 32-bit) file will create installation media on a USB drive, or burn it to a CD or DVD. It is also possible to create an ISO file, which you can burn to a disc yourself using your preferred disc-burning program.
2. Scroll down to download either the 32-bit or 64-bit version depending on whether your PC is running a 32-bit or 64-bit version of Windows. ( How to tell) The tool will create Windows Defender Offline media containing the latest virus definitions. * Note: If you have any important files on the USB drive back them up. The drive will be reformatted and all data on it will be erased!
3. Following the download, remove the USB drive or CD. Insert it into the infected computer, and boot the computer. If it does not boot from the media after you restart it, you may have to press a key to enter a “boot devices” menu or change boot order in the computer’s UEFI firmware or BIOS. See: https://support.lenovo.com/us/en/solutions/ht117661.
4. After the scan and cleaning are complete, remove the Windows Defender Offline media, and reboot your computer.
[Update 8/14/2016: With the Windows 10 Anniversary Update, Defender has been revamped. Along with other enhancements, there is a new Defender icon, on-demand scanning, release of Windows Defender Offline (for running offline scans see #5 above), Block at First Sight, enhanced notifications, and potentially unwanted application (PUA) detection. One great new feature is that if signatures are delayed, cloud protection still is updated and running.
If you have questions or comments about Windows 10’s 2016 changes to Defender’s core UI, feel free to post HERE in the Security & Malware Discussion Forum.]
Защита компьютера с помощью автономного Microsoft Defender
Автономный Microsoft Defender — это мощный автономный инструмент проверки, который можно запустить из доверенной среды без загрузки ОС. В этом разделе описываются способы использования автономного Microsoft Defender в Windows 10, Windows 8.1 и Windows 7.
В каких случаях следует использовать автономный Microsoft Defender?
Запустите автономный Microsoft Defender, если:
Безопасность Windows (в предыдущих версиях Windows — «Центр безопасности Защитника Windows») обнаруживает на вашем компьютере пакеты программ rootkit или сложно удаляемые вредоносные программы и оповещает вас о необходимости запуска автономного Microsoft Defender. Возможно, появится сообщение о том, что на вашем устройстве обнаружена вредоносная программа, или в системе безопасности Windows появляется сообщение о том, что требуется дополнительная очистка.
Вы подозреваете, что на вашем компьютере есть вредоносные программы, которые скрываются, но программа для обеспечения безопасности не обнаруживает ничего. В этом случае можно запустить проверку компьютера автономным Microsoft Defender, перейдя в раздел «Параметры» меню «Безопасность Windows». Для этого выполните следующие действия.
Нажмите кнопку Пуск и выберите Параметры > Обновление и безопасность > Безопасность Windows > Защита от вирусов и угроз .
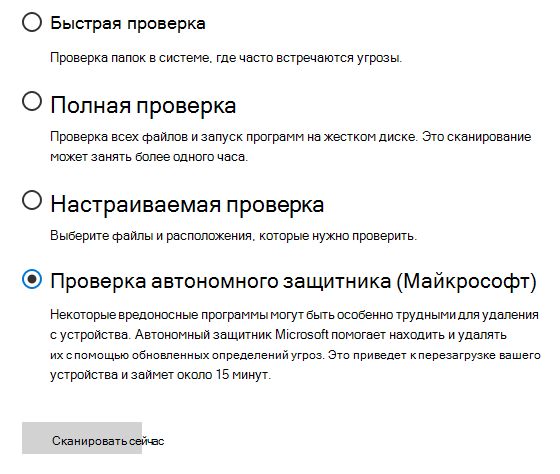
На экране «Защита от вирусов и угроз» выполните одно из следующих действий:
В последней версии Windows 10: в разделе текущие угрозывыберите Параметры сканирования.
В предыдущих версиях Windows: в области Ж урнал угроз выберите Запустить новое расширенное сканирование.
Выберите Проверка автономного Microsoft Defender, а затем — Проверить сейчас.
Вам будет предложено выйти из Windows. После этого компьютер должен выполнить перезапуск. Загрузится автономный Microsoft Defender, и он выполнит быструю проверку компьютера в среде восстановления. После завершения проверки (как правило, она занимает около 15 минут) компьютер автоматически выполнит перезапуск.
Перед использованием автономного Microsoft Defender сохраните все открытые файлы и закройте все приложения и программы.
Обычно требуются права администратора на компьютере, на котором планируется запустить автономный Microsoft Defender.
При возникновении неустранимой системной ошибки на синем экране во время автономной проверки выполните принудительный перезапуск и попробуйте еще раз запустить проверку автономного Microsoft Defender. Если ошибка на синем экране снова исчезнет, обратитесь в службу поддержки Майкрософт.
Где найти результаты проверки?
Чтобы просмотреть результаты проверки автономного Microsoft Defender:
Нажмите кнопку Пуск и выберите параметры > Обновление & безопасность > Безопасность Windows > вирус & защита от угроз .
На экране Защита от вирусов & угроз в Windows 10 в разделе текущие угрозывыберите Параметры сканирования, а затем выберите Журнал защиты (в предыдущих версиях Windows это может сказать История угроз).
Использование автономного Защитника Windows в Windows 7 и Windows 8.1
Примечание: В более ранних версиях Windows автономный защитник Майкрософт по-прежнему вызывается старым именем: автономный защитник Windows
Если вы используете автономный Защитник Windows в Windows 7 или Windows 8.1, выполните эти четыре простых действия.
Скачайте автономный Защитник Windows и установите его на компакт-диск, DVD-диск или USB-устройство флэш-памяти.
Перезагрузите компьютер, используя носитель, содержащий автономный Защитник Windows. Это означает, что компакт-диск, DVD-диск или устройство флэш-памяти, созданное на шаге 1, должно быть установлено в компьютер во время перезапуска. Следуйте указаниям для загрузки с диска, содержащего данный носитель.
Проверьте компьютер на предмет наличия вирусов и других вредоносных программ.
Удалите все вредоносные программы, обнаруженные на компьютере.
Автономный Защитник Windows предоставит пошаговые указания по выполнению этих четырех действий. Если Microsoft Security Essentials или Центр безопасности Защитника Windows предлагает скачать и запустить автономный Защитник Windows, важно это сделать. Это поможет обеспечить сохранность данных и компьютера.
Для начала найдите пустой компакт-диск или DVD-диск либо USB-устройство флэш-памяти, на котором свободно не менее 250 МБ, а затем скачайте и запустите средство по созданию съемного носителя. Вам будут предложены подробные указания для создания съемного носителя.
Примечание: Рекомендуется скачивать автономный Защитник Windows и создавать компакт-диск, DVD-диск или USB-устройство флэш-памяти на компьютере, который не заражен вредоносными программами, поскольку они могут препятствовать созданию носителя.


