Malwarebytes приобрела Windows Firewall Control и сделала его бесплатным
Последнее обновление Windows Firewall Control разблокировало все возможности программы для всех пользователей, хотя ранее для использования полного функционала приложения нужно было вносить пожертвования.
Windows Firewall Control — программа безопасности для Windows, которая расширяет контроль пользователя над встроенным брандмауэром. Среди множества функциональных возможностей приложения: настройка правил фаервола Windows, улучшенная защита от несанкционированного вмешательства и режим обучения, который сводит взаимодействие с пользователем до минимума.
Ранее Windows Firewall Control был доступен в виде бесплатной версии с функциональными ограничениями. В частности, в бесплатной версии была исключена поддержка уведомлений. Оповещения — важная функция программы для многих пользователей. Программа показывает уведомления каждый раз, когда какое-либо приложение или процесс пытается установить исходящее соединение.
Пользователь может самостоятельно принимать решение: заблокировать и разрешить подключение временно или на постоянной основе, а может воспользоваться встроенными функциями для поиска дополнительной информации по процессу, используемому порту для того, чтобы принять взвешенное решение.
Malwarebytes приобрела Windows Firewall Control
Компания Malwarebytes, разработчик популярных решений безопасности Malwarebytes Premium и Malwarebytes Free, приобрела Windows Firewall Control в июне 2018 года. Это не первая покупка компании. В 2016 Malwarebytes купила популярную утилиту для удаления ПНП AdwCleaner, а годом ранее, в 2015 году была выкуплена другая утилита для очистки нежелательного ПО Junkware Removal Tool.
Malwarebytes выпустила официальный пресс-релиз в июне, в котором обозначила план дальнейшего развития программы — компания займется интеграцией Windows Firewall Control в собственные решения защиты. Вендор заверил пользователей, что программа останется доступна в качестве автономного приложения, но получит ребрендинг от Malwarebytes.
Похоже, что одно из положительных последствий сделки Malwarebytes — отказ от требования пожертвования для использования всех функций Windows Firewall Control.
В заметках к релизу версии 5.4.0.0 сообщается:
Система уведомлений теперь доступна бесплатно, для ее использования больше не требуется активация.
Для пользователей, которые отправляли пожертвования ранее, ситуация не изменится. Остальные пользователи получат полные возможности бесплатно. Чтобы включить функцию уведомлений, выберите меню Оповещения > Показывать уведомления (Notifications > Display notifications). Функция разблокирована и доступна для использования сразу после установки продукта.
В новой версии файлы и установщик Windows Firewall Control стали поставляться с цифровой подписью, что должно улучшить совместимость приложения с другими программами безопасности и встроенными механизмами защиты Windows.
Заключение
Windows Firewall Control — отличная программа для расширенного управления Брандмауэром Windows. Снятие функциональных ограничений является очень желанным изменением, которое должно улучшить популярность программы.
Являются ли данные изменения первым признаком завершения жизненного цикла Windows Firewall Control в качестве отдельного приложения? Узнаем в ближайшем будущем.
Firewall Rules for Malwarebytes on Windows devices
The following table lists URLs and ports that should be opened on your firewall for Malwarebytes on Windows devices to communicate properly with these servers. By default, these ports are open, but if you have customized your firewall verify the following rules are in place.
URL
Purpose
www.malwarebytes.com:443
Used to verify connectivity to the Malwarebytes servers.
cleo.mb-internal.com:443
Used by the in-app purchase flow to simplify the process of upgrading or renewing your Malwarebytes Premium subscription.
links.malwarebytes.com:443
Used by the in-app purchase flow to simplify the process of upgrading or renewing your Malwarebytes Premium subscription.
iris.mwbsys.com:443
Used for serving in-app messaging, such as news about the latest threats, personalized reports, renewal reminders or other offers.
my-device.malwarebytes.com:443
Used to register your installation with Malwarebytes My Account portal, my.malwarebytes.com.
cdn.mwbsys.com:443
Used to deliver new updates and downloads to the Malwarebytes product.
sirius.mwbsys.com:443
Used to check for updates for both the product version and the protection database.
keystone.mwbsys.com:443
Used to validate your Malwarebytes Premium subscription.
Communicates telemetry and threat information to Malwarebytes servers. More information on our telemetry can be found on our Privacy Policy.
Used to validate threats against Malwarebytes Nebula servers for better protection and to reduce potential for detection of legitimate applications.
Windows Malware Firewall Removal Guide
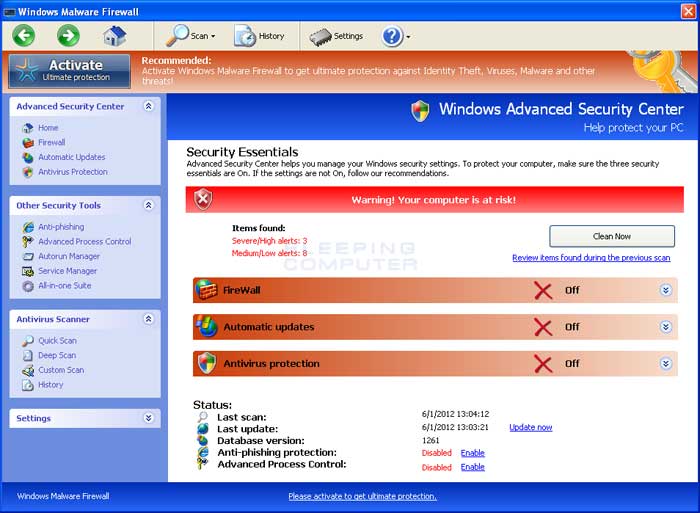
What is Windows Malware Firewall?
Windows Malware Firewall is a computer infection from the Rogue.FakeVimes family of rogue anti-spyware program. This program is classified as a rogue because it purposely displays false scan results, misleading security alerts, and hostages your computer so that you are unable to start certain programs. This family of rogues are installed via hacked web sites that exploit vulnerable programs on your computer or via fake online anti-malware scanners that prompt you to download the infection.
Once the rogue is downloaded and installed, it will be configured to start automatically when you login to Windows. Once running it will perform a fake scan of your computer and then state that there are numerous infections present. If you attempt to remove any of these supposed infections, though, it will first state that you need to purchase the program before being able to do so. Windows Malware Firewall will also change various Windows Registry keys so that you are unable to launch many programs. Instead when you attempt to start a program like the Windows Task Manager or your anti-virus software, it will launch the rogue program instead. This allows the rogue to protect itself from being removed by Windows utilities or your installed security software.
While the rogue is running it will also display fake security alerts that are designed to make you think that there is a serious security program with your computer. An example of one of these alerts is:
Error Trojan activity detected. System data security is at risk. It is recommended to activate protection and run a full system scan.
Just like the scan results, all of these security alerts are fake and should be ignored.
Without a doubt, Windows Malware Firewall is a scam that was created to scare you into purchasing the program. For no reason should you purchase this program, and if you have, you should contact your credit card company to dispute the charges stating that the program is a scam and a computer virus. To remove Windows Malware Firewall and related malware, please follow the steps in the removal guide below.
Windows Malware Firewall Removal Options
Self Help Guide
This guide contains advanced information, but has been written in such a way so that anyone can follow it. Please ensure your data is backed up before proceeding.
If you are uncomfortable making changes to your computer or following these steps, do not worry! Instead you can get free one-on-one help by asking in the forums.
To remove Windows Malware Firewall, follow these steps:
This removal guide may appear overwhelming due to the amount of the steps and numerous programs that will be used. It was only written this way to provide clear, detailed, and easy to understand instructions that anyone can use to remove this infection for free. Before using this guide, we suggest that you read it once and download all necessary tools to your desktop. After doing so, please print this page as you may need to close your browser window or reboot your computer.
Reboot your computer into Safe Mode with Networking using the instructions for your version of Windows found in the following tutorial:
When following the steps in the above tutorial, select Safe Mode with Networking rather than just Safe Mode. When the computer reboots into Safe Mode with Networking make sure you login with the username you normally use. When you are at your Windows desktop, please continue with the rest of the steps.
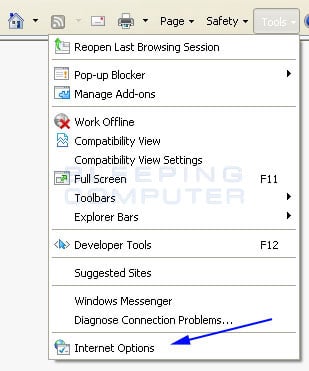
This infection changes your Windows settings to use a proxy server that will not allow you to browse any pages on the Internet with Internet Explorer or update security software. Regardless of the web browser you use, for these instructions we will first need need to fix this problem so that we can download the utilities we need to remove this infection.
Please start Internet Explorer, and when the program is open, click on the Tools menu and then select Internet Options as shown in the image below.
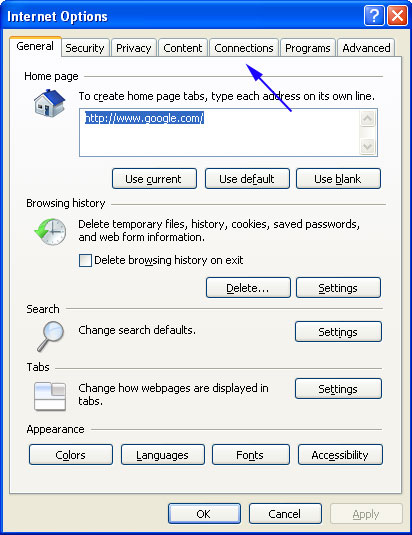
You should now be in the Internet Options screen as shown in the image below.
Now click on the Connections tab as designated by the blue arrow above.
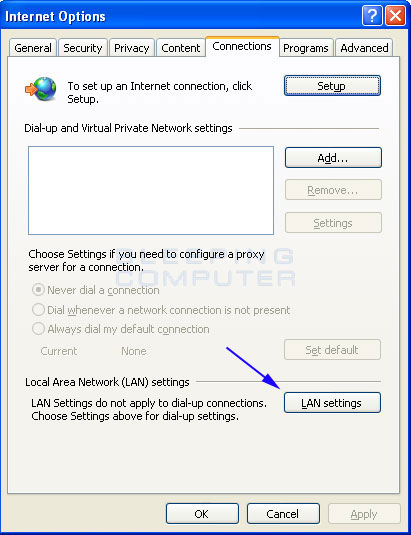
You will now be at the Connections tab as shown by the image below.
Now click on the Lan Settings button as designated by the blue arrow above.
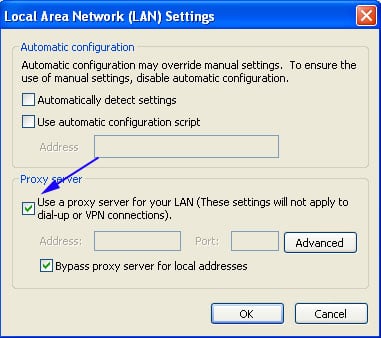
You will now be at the Local Area Network (LAN) settings screen as shown by the image below.
Under the Proxy Server section, please uncheck the checkbox labeled Use a proxy server for your LAN. Then press the OK button to close this screen. Then press the OK button to close the Internet Options screen. Now that you have disabled the proxy server you will be able to browse the web again with Internet Explorer.
To terminate any programs that may interfere with the removal process we must first download the Rkill program. Rkill will search your computer for active malware infections and attempt to terminate them so that they wont interfere with the removal process. To do this, please download RKill to your desktop from the following link.
Rkill
When at the download page, click on the Download Now button labeled iExplore.exe. When you are prompted where to save it, please save it on your desktop.
Once it is downloaded, double-click on the iExplore.exe icon in order to automatically attempt to stop any processes associated with Windows Malware Firewall and other malware. Please be patient while the program looks for various malware programs and ends them. When it has finished, the black window will automatically close and a log file will open. Please review the log file and then close so you can continue with the next step. If you have problems running RKill, you can download the other renamed versions of RKill from the rkill download page. All of the files are renamed copies of RKill, which you can try instead. Please note that the download page will open in a new browser window or tab.
Do not reboot your computer after running RKill as the malware programs will start again.
At this point you should download Malwarebytes Anti-Malware, or MBAM, to scan your computer for any infections, adware, or potentially unwanted programs that may be present. Please download Malwarebytes from the following location and save it to your desktop:
Malwarebytes Anti-Malware
Once downloaded, close all programs and Windows on your computer, including this one.
Double-click on the icon on your desktop named MBSetup-1878.1878-4.0.exe. This will start the installation of MBAM onto your computer.
When the installation begins, keep following the prompts in order to continue with the installation process. Do not make any changes to default settings and when the program has finished installing, a welcome screen will be displayed.
At this screen, click on the Get Started button where you will be prompted to buy and activate a license. To continue using it for free, click on the ‘Maybe Later’ option and then select ‘Use Malwarebytes Free’.
It should be noted that the free version will scan for and remove malware, but not provide real-time protection from threats that occur when not performing a scan.
Finally, you will be shown a screen asking you to sign up for their newsletter. Just click on the ‘Open Malwarebytes Free’ option to start the program.
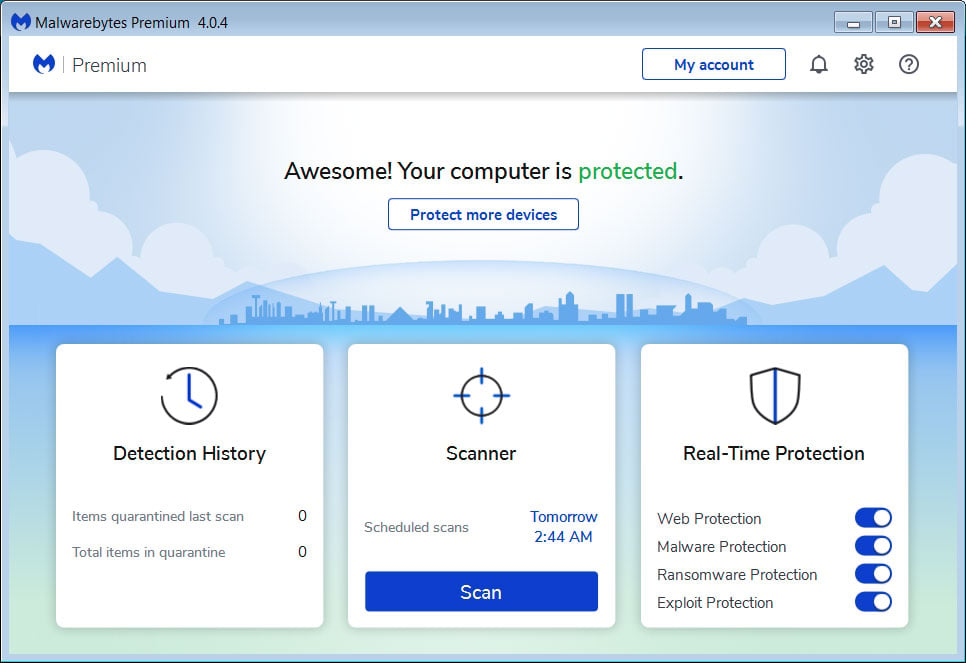
MBAM will now start and you will be at the main screen as shown below.
We now need to enable rootkit scanning to detect the largest amount of malware and unwanted programs that is possible with MalwareBytes. To do this, click on the Settings gear on the top left side of the screen and you will be brought to the general settings section.
Now click on the Security option at the top of the screen. You will now be shown the settings MalwareBytes will use when scanning your computer.
Scroll down until you see Scan option as shown below.
At this screen, please enable the Scan for rootkits setting by clicking on the toggle switch so it turns blue.
Now that you have enabled rootkit scanning, click on the X button to close the settings to get back to the main screen.
You should now click on the Scan button to begin scanning your computer for malware.
This process can take quite a while, so we suggest you do something else and periodically check on the status of the scan to see when it is finished.
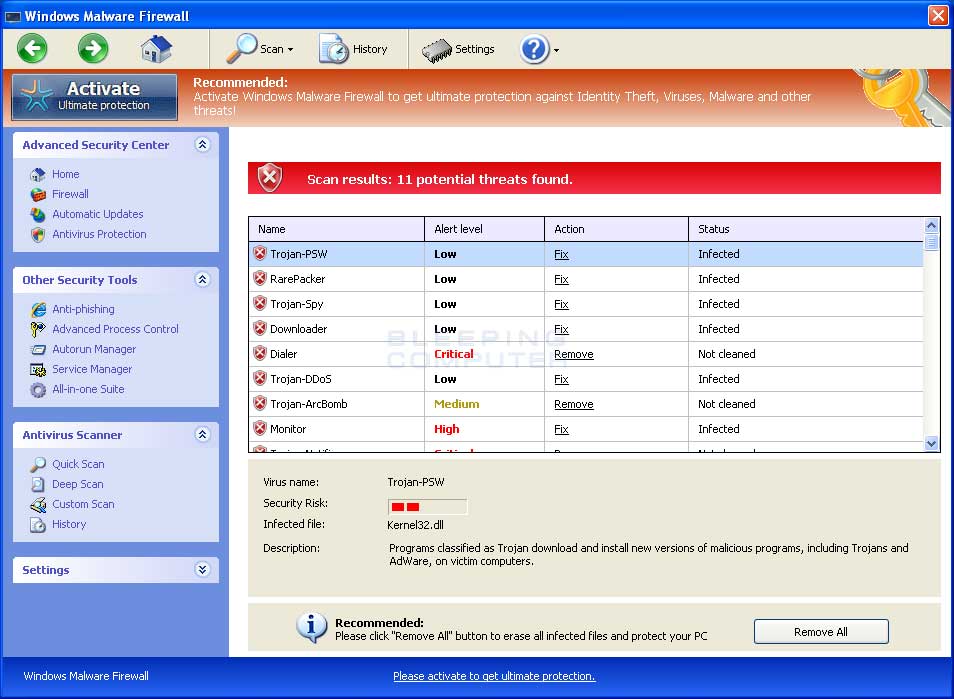
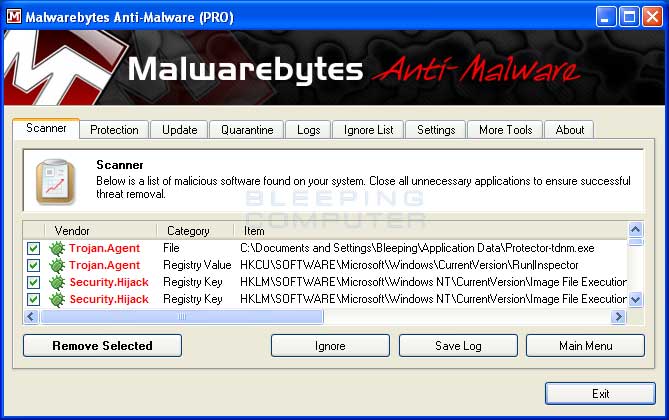
When MBAM is finished scanning it will display a screen that displays any malware, adware, or potentially unwanted programs that it has detected. Please note that our guide’s scan results image may look different than the one you are shown in this version of Malwarebytes as it was created with an older version.
You should now click on the Quarantine button to remove all the selected items. MBAM will now delete all of the files and registry keys and add them to the program’s quarantine.
When removing the files, MBAM may require a reboot in order to remove some of them. If it displays a message stating that it needs to reboot, please allow it to do so. Once your computer has rebooted, and you are logged in, please continue with the rest of the steps.
You can now exit the MBAM program.
If your computer is still in Safe Mode with Networking, you can reboot your computer back to normal mode. Once your computer is rebooted and you are back at the desktop, you can proceed with the rest of the instructions.
Now you should download HitmanPro from the following location and save it to your desktop:
HitmanPro
When you visit the above page, please download the version that corresponds to the bit-type of the Windows version you are using.
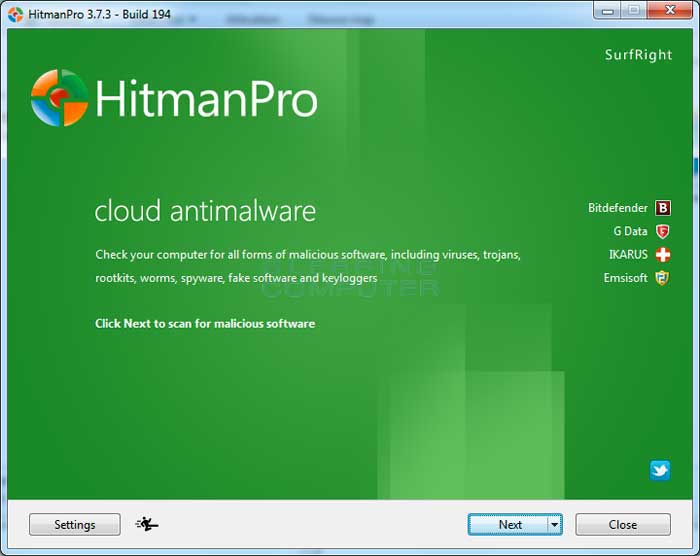
Once downloaded, double-click on the file named HitmanPro.exe (for 32-bit versions of Windows) or HitmanPro_x64.exe (for 64-bit versions of Windows). When the program starts you will be presented with the start screen as shown below.
Now click on the Next button to continue with the scan process.
You will now be at the HitmanPro setup screen. If you would like to install the 30 day trial for HitmanPro, select the Yes, create a copy of HitmanPro so I can regularly scan this computer (recommended) option. Otherwise, if you just want to scan the computer this one time, please select the No, I only want to perform a one-time scan to check this computer option.
Once you have selected one of the options, please click on the Next button.
HitmanPro will now begin to scan your computer for infections, adware, and potentially unwanted programs. When it has finished it will display a list of all the items that Hitman has found as shown in the image below. Please note that the items found may be different than what is shown in the image.
You should now click on the Next button to have HitmanPro remove the detected items. When it is done you will be shown a Removal Results screen that shows the status of the various programs that were removed. At this screen you should click on the Next button and then if prompted you should click on the Reboot button. If HitmanPro does not prompt you to reboot, please just click on the Close button.
Once your computer has has restarted or you pressed the Close button, you should now be at your Windows desktop.
As many malware and unwanted programs are installed through vulnerabilities found in out-dated and insecure programs, it is strongly suggested that you use Secunia PSI to scan for vulnerable programs on your computer. A tutorial on how to use Secunia PSI to scan for vulnerable programs can be found here:
Your computer should now be free of the Windows Malware Firewall program. If your current security solution allowed this program on your computer, you may want to consider purchasing the full-featured version of Malwarebytes Anti-Malware to protect against these types of threats in the future.
If you are still having problems with your computer after completing these instructions, then please follow the steps outlined in the topic linked below:
Are Your Protected?
While Malwarebytes Anti-Malware & HitmanPro will scan and clean a computer for free, the free versions do not offer real-time protection. If you want to be fully protected at all times then it is recommended that you purchase a premium version.
Malwarebytes Anti-Malware
Purchase the full-featured version of Malwarebytes Anti-Malware, which includes real-time protection, scheduled scanning, and website filtering, to protect yourself against these types of threats in the future!
HitmanPro
Purchase the full-featured version of HitmanPro, which includes discover viruses, trojans, rootkits, spyware and other malware on up-to-date and fully protected computers using cloud protection and behavioral detections, to protect yourself against these types of threats in the future!
Disclaimer: While we do earn a commission from the sale of the above products, rest assured we only recommend them due to their effectiveness.
%Desktop% means that the file is located directly on your desktop. This is C:\DOCUMENTS AND SETTINGS\ \Desktop\ for Windows 2000/XP, and C:\Users\ \Desktop\ for Windows Vista, Windows 7, and Windows 8.
%AppData% refers to the current users Application Data folder. By default, this is C:\Documents and Settings\ \Application Data for Windows 2000/XP. For Windows Vista and Windows 7 it is C:\Users\ \AppData\Roaming.
%CommonStartMenu% refers to the Windows Start Menu for All Users. Any programs or files located in the All Users Start menu will appear in the Start Menu for all user accounts on the computer. For Windows XP, Vista, NT, 2000 and 2003 it refers to C:\Documents and Settings\All Users\Start Menu\, and for Windows Vista, Windows 7, and Windows 8 it is C:\ProgramData\Microsoft\Windows\Start Menu\.
BleepingComputer.com can not be held responsible for problems that may occur by using this information. If you would like help with any of these fixes, you can ask for malware removal assistance in our Virus,Trojan,Spyware, and Malware Removal Logs forum.
If you have any questions about this self-help guide then please post those questions in our Am I infected? What do I do? and someone will help you.

 Показывать уведомления» style=»width:750px;height:auto;»/>