Software » Media Center » Windows Media Center Windows 8
Search or Browse all software by sections
Description
Windows Media Center is a Media Center software. Watch, pause, and record live TV. Listen to your tunes. Show off your photo collection. Enjoy online entertainment. And do it all from your living-room couch. In Windows 7, we’ve made it even better�adding great new features and visual touch-ups. Windows Media Center is available in the Home Premium, Professional, and Ultimate editions of Windows 7.
Payware $200 OS:
Windows 8 (October 1, 2012)
Supported operating systems
Windows
More information and other downloads
Download Media Control here, it is a Control is a plugin for Microsoft Media Center that adds lacking features such as : fast forward/rewind for any video format, resume video, switch between audio/subtitles streams, sets brightness/contrast, improves picture quality.
Download MediaCenter Jukebox here, it is a plug-in for Windows 7 Media Center enabling to play ISO disc images from DVDs or Blurays, DVD ripped folders, Matroska and AVI containers.
Download My Movies here, the ultimate movie collection management for Media center.
Download Mount Image Media Center Addin here, it is a simple add-in for Windows 7 Media Center for displaying and mounting disc image files (ISOs) from the native interface, either Movie Library or Video Library.
Version history / Release notes / Changelog
Sections/Browse similar tools
Media Center/HTPC
Guides and How to’s
Windows Media Center video tutorials
Acronyms / Also Known As
Windows Media Center, MCE, WMC, Windows XP Media Center, Windows Vista Media Center, MediaCenter Jukebox, Media Center Jukebox, MyMovies, Media Control
Notify me when software updated or report software
0 reviews, Showing 0 to 0 reviews
0 reviews, Showing 0 to 0 reviews
1 tool hits, Showing 1 to 1 tools
Explanation: NEW SOFTWARE = New tool since your last visit NEW VERSION = New version since your last visit NEW REVIEW = New review since your last visit NEW VERSION = New version
Latest version Version number / Beta version number / Update version number and when it whas released.
Type and download NO MORE UPDATES? = The software hasn’t been updated in over 2 years. NO LONGER DEVELOPED = The software hasn’t been updated in over 5 years. RECENTLY UPDATED = The software has been updated the last 31 days. Freeware = Download Free software. Freeware Trialware = Download Free software but some parts are trial/shareware. Free software = Download Free software and also open source code also known as FOSS (Free and Open Source Software). Free software Trialware = Download Free software and also open source code but some parts are trial/shareware. Freeware Ads = Download Free software but supported by advertising, usually with a included browser toolbar. It may be disabled when installing or after installation. Free software Ads = Free Download software and open source code but supported by advertising, usually with a included browser toolbar. It may be disabled when installing or after installation. Trialware = Also called shareware or demo. Free Trial version available for download and testing with usually a time limit or limited functions. Payware = No demo or trial available. Portable version = A portable/standalone version is available. No installation is required. v1.0.1 = Latest version available. Download beta = It could be a Beta, RC(Release Candidate) or an Alpha / Nightly / Unstable version of the software. Download 15MB = A direct link to the software download. Win = Windows download version. It works on 32-bit and 64-bit Windows. Win64 = Windows 64-bit download version. It works only on 64-bit Windows. Mac = Mac download version. It works on 32-bit and 64-bit Mac OS. Mac64 = Mac OS download version. It works only on 64-bit Mac OS. Linux = Linux download version. Portable = Portable version. No installation is required. Ad-Supported = The software is bundled with advertising. Be careful when you install the software and disable addons that you don’t want! Visit developers site = A link to the software developer site. Download (mirror link) = A mirror link to the software download. It may not contain the latest versions. Download old versions = Free downloads of previous versions of the program. Download 64-bit version = If you have a 64bit operating system you can download this version. Download portable version = Portable/Standalone version meaning that no installation is required, just extract the files to a folder and run directly. Portable version available = Download the portable version and you can just extract the files and run the program without installation. Old versions available = Download old versions of the program. Version history available = Complete changelog on our site. = Windows version available. = Mac OS version available. = Linux version available. Our hosted tools are virus and malware scanned with several antivirus programs using www.virustotal.com.
Rating Rating from 0-10.
Getting started with Windows Media Center
Windows Media Center is included in some editions of Windows 7.
When used to its fullest, Media Center can turn your computer into a powerful home entertainment hub. You can unleash the full power of Media Center by connecting your computer to an HDTV and using a Media Center remote to control all the action from your couch.
A PC connected to a TV and a Media Center remote
Another option is to connect your computer to a standard computer monitor, keyboard, and mouse. You can even stream your media over a home network to an Extender device.
No matter which way you choose, Media Center keeps you entertained by letting you:
Watch, pause, and record live TV.
See slide shows of your photos.
Play any song in your music library, or play CDs or DVDs.
Setting up Windows Media Center
The first time you start Media Center, you’ll see an informational setup page and two setup options. The quickest method is, not surprisingly, Express. You can choose this option now if you want to jump right in. However, let’s walk through the Custom setup options to give you a better idea of what you can do with Media Center.
Using a Media Center remote, press the green Start button .
The first time you start Media Center, on the setup page, select Continue, and then select Custom.
When you reach the page titled Get the Most from Windows Media Center, select Yes to allow Media Center to download album cover art, DVD cover art, current TV guide listings, information from online media services, and other useful information.
You can also use a mouse to open Media Center. Select the Start button , select All Programs, and then select Windows Media Center.
If you choose the Express setup option now, you can return to the Custom setup process later by following these steps from the Windows Media Center start screen: scroll to Tasks, select Settings, select General, select Windows Media Center Setup, then select Run Setup Again.
That’s it for the required setup options. The rest of the setup process is optional, but there are a few items on the Optional Setup page that might be of interest to you.
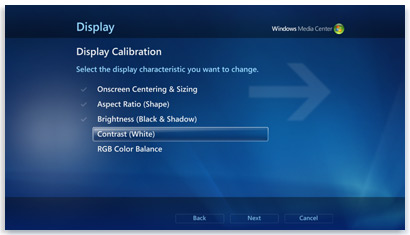
Optimize how Windows Media Center looks on your display
Display Calibration is helpful for getting the best image quality possible on your TV screen or computer monitor.
Display Calibration takes you through the main part of the process with a series of questions. If you’re unsure about the details of your hardware setup, such as the name of a cable or the type of display you have, look at the illustrations in Display Calibration—they can help you figure out what type of connection you’re using. When you’ve finished answering the questions, and you’re happy with the way your display looks, close Display Calibration. If you’re not satisfied, you can use the additional display options under Adjust display controls.
Display Calibration in Media Center offers tips for calibrating your TV or monitor
You can return to Display Calibration any time:
Using a Media Center remote, press the green Start button .
On the Windows Media Center start screen, scroll to Tasks, select Settings, select General, select Windows Media Center Setup, and then select Configure Your TV or Monitor.
Set up your speakers
If your computer is connected to a surround sound system, you can use Speaker Setup. Choose your speaker configuration, then use the test to play a chime sound. Listen closely to each individual speaker to make sure it’s receiving a signal.
Tip: If you’re not getting any sound at all, double-check that all the cables are plugged in correctly and that the volume on both your speakers and your computer is turned up. (Even the most savvy computer expert can accidentally leave the Windows Mute option on once in a while.)
If your computer is connected to a TV, note that many video cards and cable types don’t support audio signals. You might need to connect the sound card in your computer directly to your speakers.
You can return to Speaker Setup any time:
Using a Media Center remote, press the green Start button .
On the Windows Media Center start screen, scroll to Tasks, select Settings, select General, select Windows Media Center Setup, and then select Set Up Your Speakers.
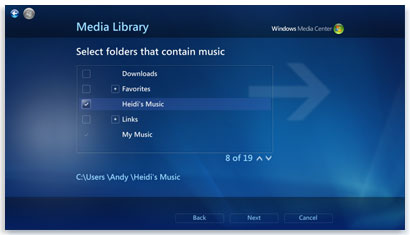
Set up your media libraries
Each time you start Media Center, it automatically scans the Music, Pictures, and Videos libraries on your computer. But what if your music files are on an external hard drive, or your pictures are on a different computer in your homegroup? Don’t worry—Media Center has solutions.
In Media Library, select the type of media you want to add (for example, Music), and then select Next.
Select Add folders to the library, and then select Next.
Select On this computer (includes mapped network drives), and then select Next.
Browse to the folder where your files are stored, select the check box next to the folder, and then select Next.
Media Center will search the folder for digital media. It will also save your folder selections for the next time you start the program.
Media Center automatically scans selected folders for compatible media files
If you want to import files from a shared folder on another computer, the process is similar: select On another computer and Media Center will search for shared folders rather than local ones.
You can return to Media Library any time:
Using a Media Center remote, press the green Start button .
On the Windows Media Center start screen, scroll to Tasks, select Settings, and then select Media Libraries.
Configure tuners, TV signal, and Guide
This option only appears in the Optional Setup menu if Media Center detects a TV tuner. A TV tuner is a hardware device that you can connect to your computer through an internal expansion slot or an external expansion port, such as a USB port. With a compatible TV tuner, you can connect a TV signal to your computer to watch and record TV.
TV Setup will guide you through the process of setting up a TV signal to watch and record in Media Center. When you reach the TV Signal Detection Result page, select Yes, configure TV with these results, and then Media Center will do most of the work for you.
You can return to TV Setup any time:
Using a Media Center remote, press the green Start button .
On the Windows Media Center start screen, scroll to Tasks, select Settings, select General, select Windows Media Center Setup, and then select Set Up TV Signal.
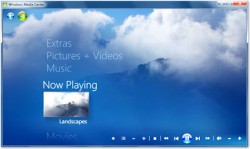
Sit back, relax, and enjoy
When you’ve finished setting up Media Center, select I have finished, select Next, and then select Finish to open Media Center and start exploring. All of your digital music, photos, and home movies—as well as a variety of online media—will be only a few clicks away.


 = Mac OS version available.
  = Linux version available.
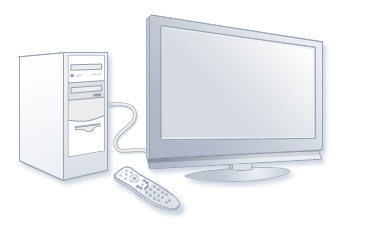
 .
.