- Windows Syscall Shellcode
- Введение
- Некоторая информация перед началом
- От вызовов NT API до системных вызовов (syscalls)
- Различия в операционных системах
- Преимущества Syscall Shellcode
- Недостатки Syscall Shellcode
- Замысел
- В заключение
- Security Café
- Security Research and Services
- Introduction to Windows shellcode development – Part 1
- Introduction
- How is the shellcode used inside an exploit?
- Shellcode specific aspects
- Linux vs Windows shellcodes
- Conclusion
- Basics of Windows shellcode writing
- Introduction
- Find the DLL base address
- Find the function address
Windows Syscall Shellcode
Это статья написана в качестве демонстрации возможности написания шеллкода для операционных систем Windows без использования каких-либо API-вызовов. В этой статье мы рассмотрим создание подобного шеллкода, а также пример его применения.

Автор Пётр Бания (Piotr Bania), Securityfocus.com, перевод SecurityLab.
Введение
Рассмотренный шеллкод тестировался в операционной системе Windows XP SP1. Следует заметить, что у способа написания шеллкода есть несколько подходов в зависимости от операционной системы и уровня сервис-пака. Это будет обсуждаться по ходу статьи.
Некоторая информация перед началом
От вызовов NT API до системных вызовов (syscalls)
Верна ли наша теория, что шеллкод можно написать без стандартных вызовов API? Ну, для некоторых API она верна, а для некоторых нет. Существует много API, которые делают свою работу, не обращаясь за помощью к NT API. Чтобы это доказать, рассмотрим API GetCommandLineA, взятый из KERNEL32.DLL: Эта API процедура не использует никаких внешних вызовов. Единственное что она делает – возвращает указатель на командную строку программы. Теперь рассмотрим пример, относящийся к нашей теории. Далее следует часть дизассемблированного API TerminateProcess: Как видно, API TerminateProcess передает аргументы, а затем выполняет NtTerminateProcess, экспортированную из NTDLL.DLL. NTDLL.DLL является NT API. Другими словами, функция, начинающаяся с «Nt» называется NT API (некоторые из них являются также ZwAPI – посмотрите, что экспортируется из NTDLL.DLL). Теперь рассмотрим NtTerminateProcess: Этот NT API помещает номер системного вызова (syscall) в EAX и вызывает память по адресу 7FFE0300h: И это раскрывает суть нашей теории – EDX теперь содержит указатель стека, EAX содержит системный вызов (syscall), который требуется выполнить. Инструкция SYSENTER выполняет быстрый вызов системной процедуры нулевого уровня, которая выполняет оставшуюся задачу.
Различия в операционных системах
Преимущества Syscall Shellcode
Недостатки Syscall Shellcode
У этого способа есть и недостатки:
- Размер – главный недостаток. Так как мы «перепрыгиваем» оболочки подсистем, нам придется писать свои, что увеличивает объем шеллкода.
- Совместимость – как было сказано выше, существует различные варианты написания шеллкода, от «int 2eh» до SYSENTER, в зависимости от версии ОС. Также номера системных вызовов меняются.
Замысел
Шеллкод в конце этой статьи делает дамп файла, а затем делает запись в реестр. Записанный в реестр ключ запускает наш файл после перезагрузки системы. Вы можете спросить, почему бы не запустить файл сразу, не делая записей в реестр? Выполнение приложений Win32 посредством системных вызовов не простая задача – не думайте, что NtCreateProcess сделает это. Посмотрим, что требуется сделать API CreateProcess, чтобы выполнить приложение:
- Открыть файл (*.exe), который будет выполняться внутри процесса.
- Создать объект исполнительного процесса.
- Создать нить (thread).
- Сообщить подсистеме Win32 о новом процессе, чтобы она приготовилась.
- Начать выполнение нити.
- В контексте нового процесса и нити, завершить инициализацию адресного пространства (например, загрузить необходимые DLL) и начать выполнение программы.
Следовательно, проще использовать способ с записью в реестр. Следующий шеллкод делает дамп приложения с обычным MessageBox. Атакующий может сделать дамп скрипта (bat,vbs и др.) и скачать «троянского коня» или backdoor c ftp-сервера, или же выполнить команды вроде «net user /add piotr test123» и «net localgroup /add Administrators piotr». Эти идеи должны помочь читателю с оптимизацией, далее следует Proof of Concept шеллкод, который также можно скачать отсюда:
В заключение
Дальнейшее чтение
- «Inside the Native API» Mark Russinovich
- «MSDN» Microsoft
- Interactive Win32 syscall page Metasploit
Об авторе Пётр Бания (Piotr Bania) независимый IT Security/Anti-Virus исследователь из Польши с опытом работы более пяти лет. Он нашел несколько чрезвычайно опасных уязвимостей в популярных приложениях, таких как Real Player. На его сайте вы можете найти дополнительную информацию.
Security Café
Security Research and Services
Introduction to Windows shellcode development – Part 1
 This article contains an overview of shellcode development techniques and their specific aspects. Understanding these concepts allows you to write your own shellcode. Furthermore, you could modify existing exploits that contain already made shellcode to perform custom functionality that you need.
Introduction
Let’s say you have a working exploit in Internet Explorer or Flash Player that opens calc.exe. This isn’t really useful, is it? What you really want is to execute some remote commands or to do other useful functionality.
In this situation you may want to use standard existing shellcode as the ones from Shell Storm database or generated by from Metasploit’s msfvenom tool. However, you must first understand the basic principles of shellcoding so you can use them effectively in your exploits.
For those who are not familiar with this term, as Wikipedia says:
“In computer security, a shellcode is a small piece of code used as the payload in the exploitation of a software vulnerability. It is called “shellcode” because it typically starts a command shell from which the attacker can control the compromised machine, but any piece of code that performs a similar task can be called shellcode… Shellcode is commonly written in machine code.”
A shellcode is a piece of machine code that we can use as the payload for an exploit. What is this “machine code”? Let’s take as an example the following C code:
This is translated into ASM as the following code:
The important thing here is to notice that there is a main procedure and a call to a printf function.
This code is assembled into machine code, as you can see highlighted in the debugger:

So “55 8B EC 68 00 B0 33 01 … ” is the machine code for our C code.
How is the shellcode used inside an exploit?
Let’s take as an example a simple exploit, a stack based buffer overflow vulnerability.
The main idea to exploit this vulnerability is the following (please note that it is not the purpose of this article to detail how buffer overflow exploits work):
- Send the application a string larger than 20 bytes which also contains your shellcode
- The stack gets corrupted by overwriting past the boundaries of the statically allocated buffer. Your shellcode will be placed on the stack
- Your string will overwrite a piece of important data on the stack (for instance the saved EIP or a function pointer) with a custom memory address
- The application will jump to your shellcode from the stack and start executing the machine code instructions inside
If you are able to successfully exploit this vulnerability you will be able to run your shellcode and you will actually do something useful with the vulnerability, not only crash the program. The shellcode could open a shell, download and execute a file, reboot the computer, enable RDP or any other action.
Shellcode specific aspects
But a shellcode is not any machine code. There are some specific aspects that we must take into account when writing our own shellcode:
- We can’t use direct offsets to strings
- We don’t know the addresses of functions (ex. printf)
- We must avoid some specific bytes (ex. NULL bytes)
Let’s have a short discussion about each of the above issues.
- Direct offsets to strings
Even if in a C/C++ code you can define a global variable, a string with the value “Hello, world!”, or you can directly place the string as a parameter to a function like in our “Hello, world” example, the compiler will place that string in a specific section of the file:
Since we need position independent code, we want to have strings as a part of our code, so must store the string on the stack as you will see in the future parts of this article.
- Addresses of functions
In C/C++ it’s easy to call a function. We specify #include <> to use a specific header and call a function by its name. In the background, the compiler and the linker takes care of the problem: they resolve the addresses of functions (for example, MessageBox from user32.dll) and we can easily call these functions by their names.

In a shellcode, we cannot do this. We don’t know if the DLL containing our required function is loaded into memory and we don’t know the address of the required function. The DLL, because of the ASLR (Address space layout randomization), will not be loaded every time at the same address. Also, the DLL may be changed with each new Windows update so we cannot rely on a specific offset in the DLL.
We must load the DLL into memory and find the required functions directly from the shellcode. Fortunately, the Windows API offers two useful functions: LoadLibrary and GetProcAddress, that we can use to find the addresses of our functions.
- Avoiding NULL bytes
The NULL bytes have the value 0x00. In C/C++ code a NULL byte is considered the terminator of a string. Because of this, the presence of these bytes in the shellcode might disturb the functionality of the target application and our shellcode might not be correctly copied into memory.
Even this situation is not mandatory, there are common cases like buffer overflows where the strcpy() function is used. This function, will copy a string byte by byte and it will stop when it will encounter a NULL byte. So if the shellcode contains a NULL byte, strcpy function will stop at that byte and the shellcode will not be complete and as you can guess, it will not work correctly.

The two instructions from the picture above are equivalent as functionality, but as you can see, the first one contains NULL bytes, while the second one does not. Even if NULL bytes are common in compiled code, it is not that difficult to avoid them.
Also, there are specific cases when the shellcode must avoid characters, such as \r or \n, or even to use only alpha-numeric characters.
Linux vs Windows shellcodes
It is simpler to write a shellcode for Linux, at least a basic one. This is because on Linux, it is possible to use system calls (system “functions”), such us write, execve or send, very easily with the 0x80 interrupt (take it as a “function call”). You can find a list of syscalls here.
As an example, a “Hello, world” shellcode on Linux requires the following steps:
- Specify syscall number (such as “write”)
- Specify syscall parameters (such as stdout, “Hello, world”, length)
- Interrupt 0x80 to execute the syscall
This will result in a call to: write(stdout, “Hello, world”, length).
On Windows this is more complicated. There are more required steps in order to create a reliable shellcode.
- Obtain the kernel32.dll base address
- Find the address of GetProcAddress function
- Use GetProcAddress to find the address of LoadLibrary function
- Use LoadLibrary to load a DLL (such as user32.dll)
- Use GetProcAddress to find the address of a function (such as MessageBox)
- Specify the function parameters
- Call the function
Conclusion
This is the first part from a series of articles on how to write a Windows shellcode for beginners. This is the introduction required in order to understand what is a shellcode, which are the limitations and which are the differences between Windows and Linux shellcode.
The second part will cover a short introduction into assembly language, the format of the PE (Portable Executable) files and the PEB (Process Environment Block). You will later see how this will help you to write a custom shellcode.
Basics of Windows shellcode writing

Apr 11, 2020 · 19 min read
Introduction
This tutorial is for x86 32bit shellcode. Windows shellcode is a lot harder to write than the shellcode for Linux and you’ll see why. First we need a basic understanding of the Windows architecture, which is shown below. Take a good look at it. Everything above the dividing line is in User mode and everything below is in Kernel mode.

Unlike Linux, in Windows, application s can’t directly accesss system calls. Instead they use functions from the Windows API ( WinAPI), which internally call functions from the Native API ( NtAPI), which in turn use system calls. The Native API functions are undocumented, implemented in ntdll.dll and also, as can be seen from the picture above, the lowest level of abstraction for User mode code.
The documented functions from the Windows API are stored in kernel32.dll, advapi32.dll, gdi32.dll and others. The base services (like working with file systems, processes, devices, etc.) are provided by kernel32.dll.
So to write shellcode for Windows, we’ll need to use functions from WinAPI or NtAPI. But how do we do that?
ntdll.dll and kernel32.dll are so important that they are imported by every process.
To demonstrate this I used the tool ListDlls from the sysinternals suite.
The first four DLLs that are loaded by explorer.exe:

The first four DLLs that are loaded by notepad.exe:

I also wrote a little assembly program that does nothing and it has 3 loaded DLLs:

Notice the base addresses of the DLLs. They are the same across processes, because they are loaded only once in memory and then referenced with pointer/handle by another process if it needs them. This is done to preserve memory. But those addresses will differ across machines and across reboots.
This means that the shellcode must find where in memory the DLL we’re looking for is located. Then the shellcode must find the address of the exported function, that we’re going to use.
The shellcode I’m going to write is going to be simple and its only function will be to execute calc.exe. To accomplish this I’ll make use of the WinExec function, which has only two arguments and is exported by kernel32.dll.
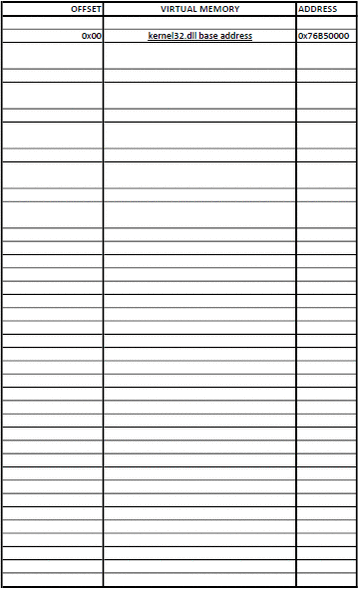
Find the DLL base address
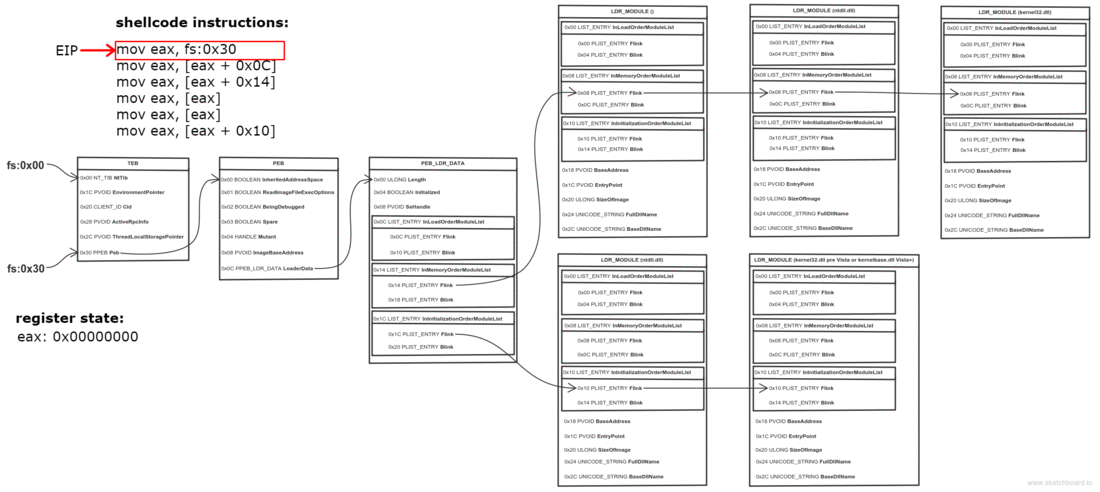
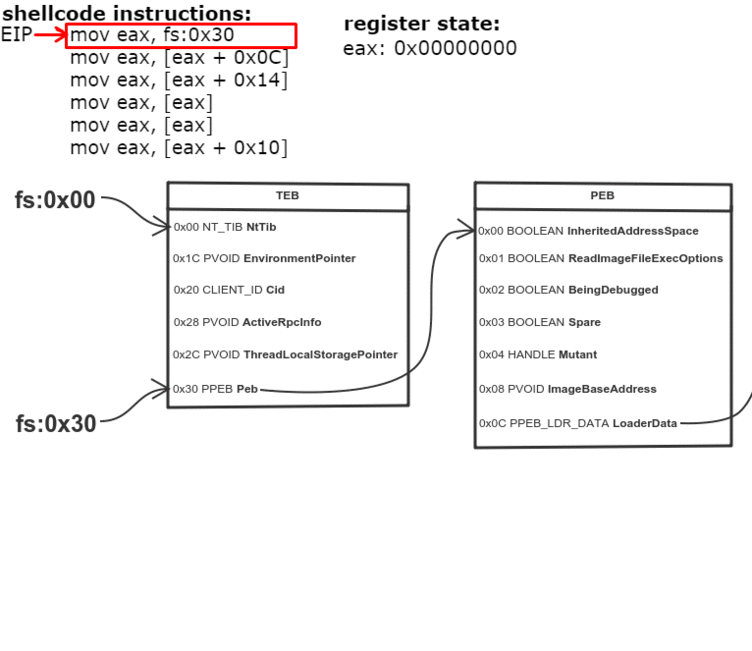
Thread Environment Block (TEB) is a structure which is unique for every thread, resides in memory and holds information about the thread. The address of TEB is held in the FS segment register.
One of the fields of TEB is a pointer to Process Environment Block (PEB) structure, which holds information about the process. The pointer to PEB is 0x30 bytes after the start of TEB.
0x0C bytes from the start, the PEB contains a pointer to PEB_LDR_DATA structure, which provides information about the loaded DLLs. It has pointers to three doubly linked lists, two of which are particularly interesting for our purposes. One of the lists is InInitializationOrderModuleList which holds the DLLs in order of their initialization, and the other is InMemoryOrderModuleList which holds the DLLs in the order they appear in memory. A pointer to the latter is stored at 0x14 bytes from the start of PEB_LDR_DATA structure. The base address of the DLL is stored 0x10 bytes below its list entry connection.
In the pre-Vista Windows versions the first two DLLs in InInitializationOrderModuleList were ntdll.dll and kernel32.dll, but for Vista and onwards the second DLL is changed to kernelbase.dll.
The second and the third DLLs in InMemoryOrderModuleList are ntdll.dll and kernel32.dll. This is valid for all Windows versions (at the time of writing) and is the preferred method, because it’s more portable.
So to find the address of kernel32.dll we must traverse several in-memory structures. The steps to do so are:
- Get address of PEB with fs:0x30
- Get address of PEB_LDR_DATA (offset 0x0C)
- Get address of the first list entry in the InMemoryOrderModuleList (offset 0x14)
- Get address of the second ( ntdll.dll) list entry in the InMemoryOrderModuleList (offset 0x00)
- Get address of the third ( kernel32.dll) list entry in the InMemoryOrderModuleList (offset 0x00)
- Get the base address of kernel32.dll (offset 0x10)
The assembly to do this is:
They say a picture is worth a thousand words, so I made one to illustrate the process. Open it in a new tab, zoom and take a good look.

If a picture is worth a thousand words, then an animation is worth (Number_of_frames * 1000) words.
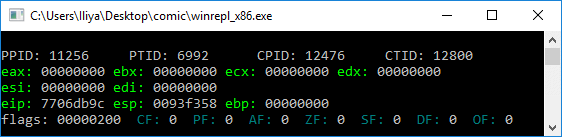
When learning about Windows shellcode (and assembly in general), WinREPL is really useful to see the result after every assembly instruction.
Find the function address
Now that we have the base address of kernel32.dll, it’s time to find the address of the WinExec function. To do this we need to traverse several headers of the DLL. You should get familiar with the format of a PE executable file. Play around with PEView and check out some great illustrations of file formats.
Relative Virtual Address (RVA) is an address relative to the base address of the PE executable, when its loaded in memory (RVAs are not equal to the file offsets when the executable is on disk!).
In the PE format, at a constant RVA of 0x3C bytes is stored the RVA of the PE signature which is equal to 0x5045.
0x78 bytes after the PE signature is the RVA for the Export Table.
0x14 bytes from the start of the Export Table is stored the number of functions that the DLL exports. 0x1C bytes from the start of the Export Table is stored the RVA of the Address Table, which holds the function addresses.
0x20 bytes from the start of the Export Table is stored the RVA of the Name Pointer Table, which holds pointers to the names (strings) of the functions.
0x24 bytes from the start of the Export Table is stored the RVA of the Ordinal Table, which holds the position of the function in the Address Table.
So to find WinExec we must:
- Find the RVA of the PE signature (base address + 0x3C bytes)
- Find the address of the PE signature (base address + RVA of PE signature)
- Find the RVA of Export Table (address of PE signature + 0x78 bytes)
- Find the address of Export Table (base address + RVA of Export Table)
- Find the number of exported functions (address of Export Table + 0x14 bytes)
- Find the RVA of the Address Table (address of Export Table + 0x1C)
- Find the address of the Address Table (base address + RVA of Address Table)
- Find the RVA of the Name Pointer Table (address of Export Table + 0x20 bytes)
- Find the address of the Name Pointer Table (base address + RVA of Name Pointer Table)
- Find the RVA of the Ordinal Table (address of Export Table + 0x24 bytes)
- Find the address of the Ordinal Table (base address + RVA of Ordinal Table)
- Loop through the Name Pointer Table, comparing each string (name) with “ WinExec” and keeping count of the position.
- Find WinExec ordinal number from the Ordinal Table (address of Ordinal Table + (position * 2) bytes). Each entry in the Ordinal Table is 2 bytes.
- Find the function RVA from the Address Table (address of Address Table + (ordinal_number * 4) bytes). Each entry in the Address Table is 4 bytes.
- Find the function address (base address + function RVA)
I doubt anyone understood this, so I again made some animations.
And from PEView to make it even more clear.


