- Для чего нужна рабочая группа Windows или WORKGROUP
- Разница между рабочей группой и доменом
- Как понять, принадлежит ли компьютер рабочей группе или домену?
- Функции рабочей группы Windows
- Рабочая группа WORKGROUP
- Как создать рабочую группу Windows
- Добавить компьютер в рабочую группу Windows
- Изменить имя рабочей группы Windows
- Using Workgroups in Computer Networking
- Understand the difference between domains, homegroups, and workgroups
- Workgroups in Microsoft Windows
- Windows Workgroups vs HomeGroups and Domains
- Windows Domains
- Microsoft HomeGroup
- Other Computer Workgroup Technologies
- The Windows 10 workgroup and how to change it
- What is a workgroup? How is it different from a network domain?
- How to view the Windows 10 workgroup
- How to change workgroup in Windows 10 from System Properties
- How to change the workgroup in Windows 10 from Command Prompt
- How to change workgroup in Windows 10 from PowerShell
- Did you succeed in changing the workgroup in Windows 10?
Для чего нужна рабочая группа Windows или WORKGROUP

Рабочая группа Windows (на английском языке Workgroup) является функцией операционных систем Microsoft. На практике это набор компьютеров, подключенных к сети, и его функция заключается в том, чтобы заложить основы, необходимые для обмена файлами и принтерами между ПК.
Компьютер, являющийся членом рабочей группы, может разрешить другому компьютеру, являющемуся членом той же группы, доступ к своим общим ресурсам. Компьютеры, которые являются членами разных рабочих групп, но принадлежащих к одной локальной сети, могут напрямую получать доступ к общим ресурсам в группе, к которой они принадлежат.
Рабочая группа присутствует на всех компьютерах с Windows 10, Windows 8.1/8, Windows 7 и Windows Vista.
Разница между рабочей группой и доменом
По умолчанию каждый компьютер с операционной системой Microsoft, присутствующей в сети, должен обязательно принадлежать либо к рабочей группе, либо к домену.
Разница между рабочей группой и доменом заключается в способе управления компьютерами и сетевыми ресурсами. Обычно компьютеры корпоративной или большой сети являются частью домена, в то время как компьютеры домашней сети являются частью рабочей группы, а часто и домашней группы (→ что такое домашняя группа).
Как понять, принадлежит ли компьютер рабочей группе или домену?
Давайте сначала посмотрим, как понять, принадлежит ли ПК рабочей группе или домену.
- Нажмите на клавиатуре компьютера клавиши Win (клавиша с логотипом Windows) и R . Откроется окно «Выполнить».
- В поле Открыть: введите control и нажмите кнопку ОК .
- Откроется панель управления Windows.
- В поле поиска панели управления (вверху справа) введите система.
- В списке полученных результатов нажмите «Система».
- В окне «Система» найдите раздел «Имя компьютера, имя домена и параметры рабочей группы».

- Если компьютер принадлежит к рабочей группе, будет отображаться рабочая группа: WORKGROUP (или другое имя).
- Если компьютер принадлежит к домену появится домен.
Функции рабочей группы Windows
Теперь посмотрим, каковы характеристики рабочей группы Windows:
- в рабочей группе все компьютеры являются пирами. Это означает, что ни один компьютер не может контролировать других. С другой стороны, в Домене только один или несколько компьютеров являются серверами, которые используются для управления безопасностью и авторизацией всех компьютеров, принадлежащих домену.
- Рабочая группа, как правило, состоит максимум из 20 ПК.
- Все ПК рабочей группы должны находиться в одной локальной сети.
- Рабочая группа не защищена паролем доступа.
Для доступа к общим элементам на компьютере рабочей группы Windows у вас должна быть учетная запись на том же компьютере.
Предположим, что пользователь Boris с White PC (принадлежащего Рабочей группе: WORKGROUP) хочет получить доступ к файлу с именем Person на Black PC (также принадлежащему Рабочей группе: WORKGROUP). Чтобы получить доступ к личному файлу, как на белом ПК, так и на черном ПК, должна присутствовать учетная запись пользователя Boris.
Рабочая группа WORKGROUP
Рабочая группа всегда идентифицируется по имени.
По умолчанию на этапе установки операционной системы Windows автоматически создает рабочую группу с именем WORKGROUP.
Как создать рабочую группу Windows
Давайте посмотрим, как создать рабочую группу Windows или как изменить членство ПК с члена домена на члена рабочей группы.
Важно: если компьютер является членом домена, перед добавлением в рабочую группу он будет удален из домена и соответствующая учетная запись будет деактивирована.
- Нажмите на клавиатуре компьютера клавиши Win (клавиша с логотипом Windows) и R . Откроется окно «Выполнить».
- В поле Открыть: введите sysdm.cpl и нажмите OK . Это откроет Свойства системы.
- На вкладке Имя компьютера нажмите на Изменить.
- В разделе «Является членом» с выбором рабочей группы введите имя для рабочей группы, которую мы хотим создать.
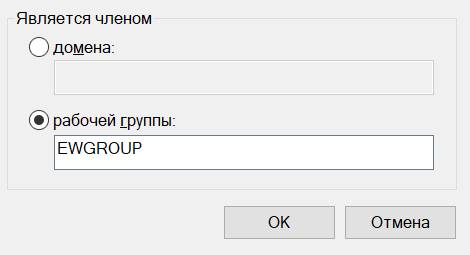
Добавить компьютер в рабочую группу Windows
Процедура добавления компьютера в существующую рабочую группу идентична описанной созданию новой рабочей группы.
- На вкладке Имя компьютера в окне «Свойства системы» нажмите Изменить.
- В поле «Рабочая группа»: введите имя рабочей группы, к которой вы хотите добавить ПК.
- Наконец, перезапистите Windows, чтобы изменения вступили в силу.
Изменить имя рабочей группы Windows
В заключение давайте посмотрим, как изменить название рабочей группы Windows.
- Открываем окно Свойства системы.
- На вкладке Имя компьютера нажимаем Изменить.
- В поле Рабочая группа: мы вводим имя, которое мы хотим использовать.
Важно: имя Рабочей группы может быть длиной до 15 символов и не должно содержать символов * () = + _ [] <> \ | /; : ‘», <>?
Using Workgroups in Computer Networking
Understand the difference between domains, homegroups, and workgroups
In computer networking, a workgroup is a collection of computers on a local area network (LAN) that share common resources and responsibilities. The term is most commonly associated with Microsoft Windows workgroups but also applies to other environments. Windows workgroups can be found in homes, schools, and small businesses. However, while all three are similar, they don’t function in the exact same way as domains and HomeGroups.
Workgroups in Microsoft Windows
Microsoft Windows workgroups organize PCs as peer-to-peer local networks that facilitate easier sharing of files, internet access, printers, and other local network resources.
Each computer that’s a member of the group can access the same resources being shared by the others, and in turn, can share its own resources if configured to do so.
:max_bytes(150000):strip_icc()/definition-of-workgroup-816285-1-b2907142fb0041349a2efc4802819ce0.png)
Joining a workgroup requires all participants to use a matching name. All Windows 10 computers are automatically assigned to a default group named WORKGROUP (or MSHOME in Windows XP).
Admin users can change the workgroup name from the Control Panel. Use the System applet to find the Change button in the Computer Name tab. Workgroup names are managed separately from computer names.
To access shared resources on other PCs within its group, use the name of the workgroup that computer belongs to plus the username and password of an account on the remote computer.
Windows workgroups can contain many computers but work best with 15 computers or less. As the number of computers increases, a workgroup LAN becomes difficult to administer and should be re-organized into multiple networks or set up as a client-server network.
Windows Workgroups vs HomeGroups and Domains
Windows domains support client-server local networks. A specially configured computer called the Domain Controller running a Windows Server operating system serves as a central server for all clients.
Windows Domains
Windows domains can handle more computers than workgroups due to the ability to maintain centralized resource sharing and access control. A client PC can belong either to a workgroup or to a Windows domain, but not both. Assigning a computer to the domain automatically removes it from the workgroup.
Corporate domains may include switches that network devices are plugged into in order to connect to the larger company domain.
:max_bytes(150000):strip_icc()/jordan-harrison-1208586-unsplash-090fe83ac2e548f7aac9a20d7851636d.jpg)
Microsoft HomeGroup
Microsoft introduced the HomeGroup concept in Windows 7. HomeGroups are designed to simplify the management of workgroups for administrators, particularly homeowners. Instead of requiring an administrator to manually set up shared user accounts on every PC, HomeGroup security settings can be managed through one shared login.
Additionally, HomeGroup communication is encrypted and makes it simple to share single files with other HomeGroup users.
Joining a HomeGroup does not remove a PC from its Windows workgroup; the two sharing methods co-exist. Computers running versions of Windows older than Windows 7, however, cannot be members of HomeGroups.
To find HomeGroup settings, go to Control Panel > Network and Internet > HomeGroup. Join Windows to a domain through the same process used to join a workgroup; choose the Domain option instead.
Other Computer Workgroup Technologies
The open-source software package Samba (which uses SMB technologies) allows Apple macOS, Linux, and other Unix-based systems to join existing Windows workgroups.
Apple originally developed AppleTalk to support workgroups on Macintosh computers but phased out this technology in the late 2000s in favor of newer standards like SMB.
The Windows 10 workgroup and how to change it
The Windows 10 workgroup is a simple way to link together a small number of computers and devices, which makes it ideal for home networks, as well as small offices and businesses. If you want to facilitate sharing resources (files, printers, etc.) with other devices on the same network, make sure they are part of the same workgroup in Windows 10. Continue reading to get answers to questions like “What is a workgroup?” and learn more about the workgroup name or how to change workgroup in Windows 10:
What is a workgroup? How is it different from a network domain?
Computers on a network can be part of either a workgroup or a domain, and that changes how resources are managed on the network. Workgroups are small peer-to-peer local area networks, where each computer has its own set of rules and settings, managed by the administrator of that device, and a unique computer name in that workgroup. To easily access another computer from the same network and share resources with it, both computers must be part of the same workgroup. Since every computer in a workgroup handles security separately, one option is to have a user account defined on the computer you want to access. Alternatively, users can set their devices to share resources with everyone in their workgroup. If you need some help with that, read How to share folders, files, and libraries with the network in Windows.
In contrast, domains are used in big networks, which include servers alongside desktop computers, laptops, network printers, and many other devices. In network domains, everything is managed and configured by the network administrator(s). The domain has a standard set of rules and settings that apply to all network computers and devices. To access a computer from a domain, you don’t need a user account defined on that specific computer. You need a user account created for that domain, assigned to you by the network administrator. Therefore, you can log to any computer from the domain, using the same domain user account. Domains are a better fit for enterprise networks, while home, school, and small business networks can work very well using a workgroup.
When you install Windows 10, the workgroup is created by default, and it is named WORKGROUP.
The workgroup name cannot use the following characters: / [ ] ” : ; | >
How to view the Windows 10 workgroup
To view your existing Windows 10 workgroup, search for “workgroup” in your taskbar’s Search field, and then click or tap on “Show which workgroup this computer is on.”
An alternative is to use the old-school way and open the Control Panel. Then, click or tap on “System and Security,“ and go to System.
Next, you can “View basic information about your computer.“ In the “Computer name, domain, and workgroup settings” section, the Windows 10 workgroup of your device is displayed next to the Workgroup entry.
How to change workgroup in Windows 10 from System Properties
To change workgroup in Windows 10, you must first access its settings. The fastest way is to type “workgroup” in the taskbar’s Search bar, and then click or tap on “Change workgroup name.“
An alternative is to use the “View basic information about your computer” window from the Control Panel. Where you see the existing workgroup, press on Change settings on the right.
The System Properties window opens, where you see your current Windows 10 workgroup in the appropriate section of the Computer Name tab. To modify the workgroup you’re in, all you have to do is change the workgroup name. Click or tap on Change.
This opens the “Computer Name/Domain Changes” window. You can see the Workgroup field at the bottom – in our case, the name is the default WORKGROUP.
Type the name of the workgroup you want to join instead, and click or tap OK.
It might take a few seconds, and a pop-up welcomes you to the new workgroup. Click or tap OK.
Another pop-up window lets you know that your device requires a restart in order for the changes to be applied. Press OK again.
You are returned to the System Properties window. At the bottom, you can see a note, reminding you that the computer must be restarted in order for the workgroup change to take effect. Click or tap Close.
Windows 10 asks if you want to restart your computer now or later. Before you click or tap Restart Now, save your work and close any open apps or files.
After the restart, your computer joins the new workgroup. It is now able to interact with other computers and devices that are part of the same workgroup.
How to change the workgroup in Windows 10 from Command Prompt
Some users prefer using a command-line environment to change the Windows 10 workgroup. If you’re one of them, open CMD as administrator and run the following command:
wmic computersystem where name=”%computername%” call joindomainorworkgroup name=”Workgroup_Name”
Replace Workgroup_Name with the name of the workgroup you want to join or create, as seen below.
The new workgroup name replaces the old one. Close Command Prompt, restart your computer, and the change is applied.
NOTE: When you insert a new name, remember the restrictions regarding workgroup names discussed in the first section of this tutorial.
How to change workgroup in Windows 10 from PowerShell
If you’re a fan of PowerShell, you can use this tool as well to change the Windows 10 workgroup. First, launch PowerShell as administrator. Second, enter the following command: Add-Computer -WorkGroupName “Workgroup_Name”
Replace Workgroup_Name with the name of the workgroup you want to join or create, as you can see in the next image.
NOTE: Don’t forget about the restrictions regarding workgroup names, discussed in the first section of this tutorial, when you insert the new name.
Did you succeed in changing the workgroup in Windows 10?
Changing the workgroup in Windows 10 is not complicated. Having a different workgroup on the computers that make up your network is the root cause of many networking issues, so be sure you have the same workgroup on your macOS devices also. With a simple change, most problems can be solved, and you can easily share files, internet access, printers, libraries, and any connected resource. Before you close this tutorial, let us know if everything worked well when changing the workgroup. Comment below and let’s discuss.


