- Free up storage space on your Mac
- Find out how much storage is available on your Mac
- Manage storage on your Mac
- Store in iCloud
- Optimize Storage
- Empty Trash Automatically
- Reduce Clutter
- Where to find the settings for each feature
- Other ways that macOS helps automatically save space
- How to free up storage space manually
- Installing macOS on a separate APFS volume
- What you need
- Back up your Mac
- Add an APFS volume
- Install macOS on the volume
- Switch between macOS versions
- Keep the macOS on each volume up to date
- Learn more
- Mac OS
Free up storage space on your Mac
Save space by storing your content in iCloud or using built-in tools to find and remove large or unneeded files.
The Optimized Storage features of your Mac help you save storage space by storing your content in iCloud and making it available on demand:
- When storage space is needed, files, photos, movies, email attachments, and other files that you seldom use are stored in iCloud automatically.
- Each file stays right where you last saved it, and downloads when you open it.
- Files that you’ve used recently remain on your Mac, along with optimized versions of your photos.
If you haven’t yet upgraded to macOS Sierra or later, learn about other ways to free up storage space.
Find out how much storage is available on your Mac
Choose Apple menu > About This Mac, then click Storage. Each segment of the bar is an estimate of the storage space used by a category of files. Move your pointer over each segment for more detail.
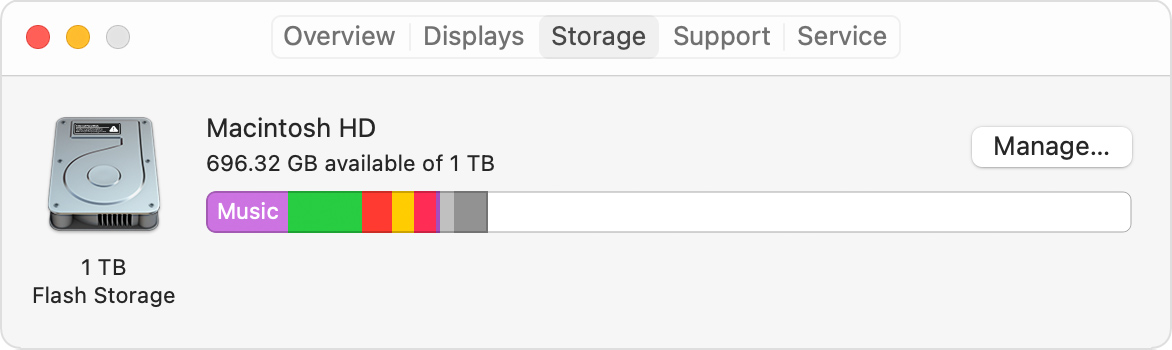
Click the Manage button to open the Storage Management window, pictured below.
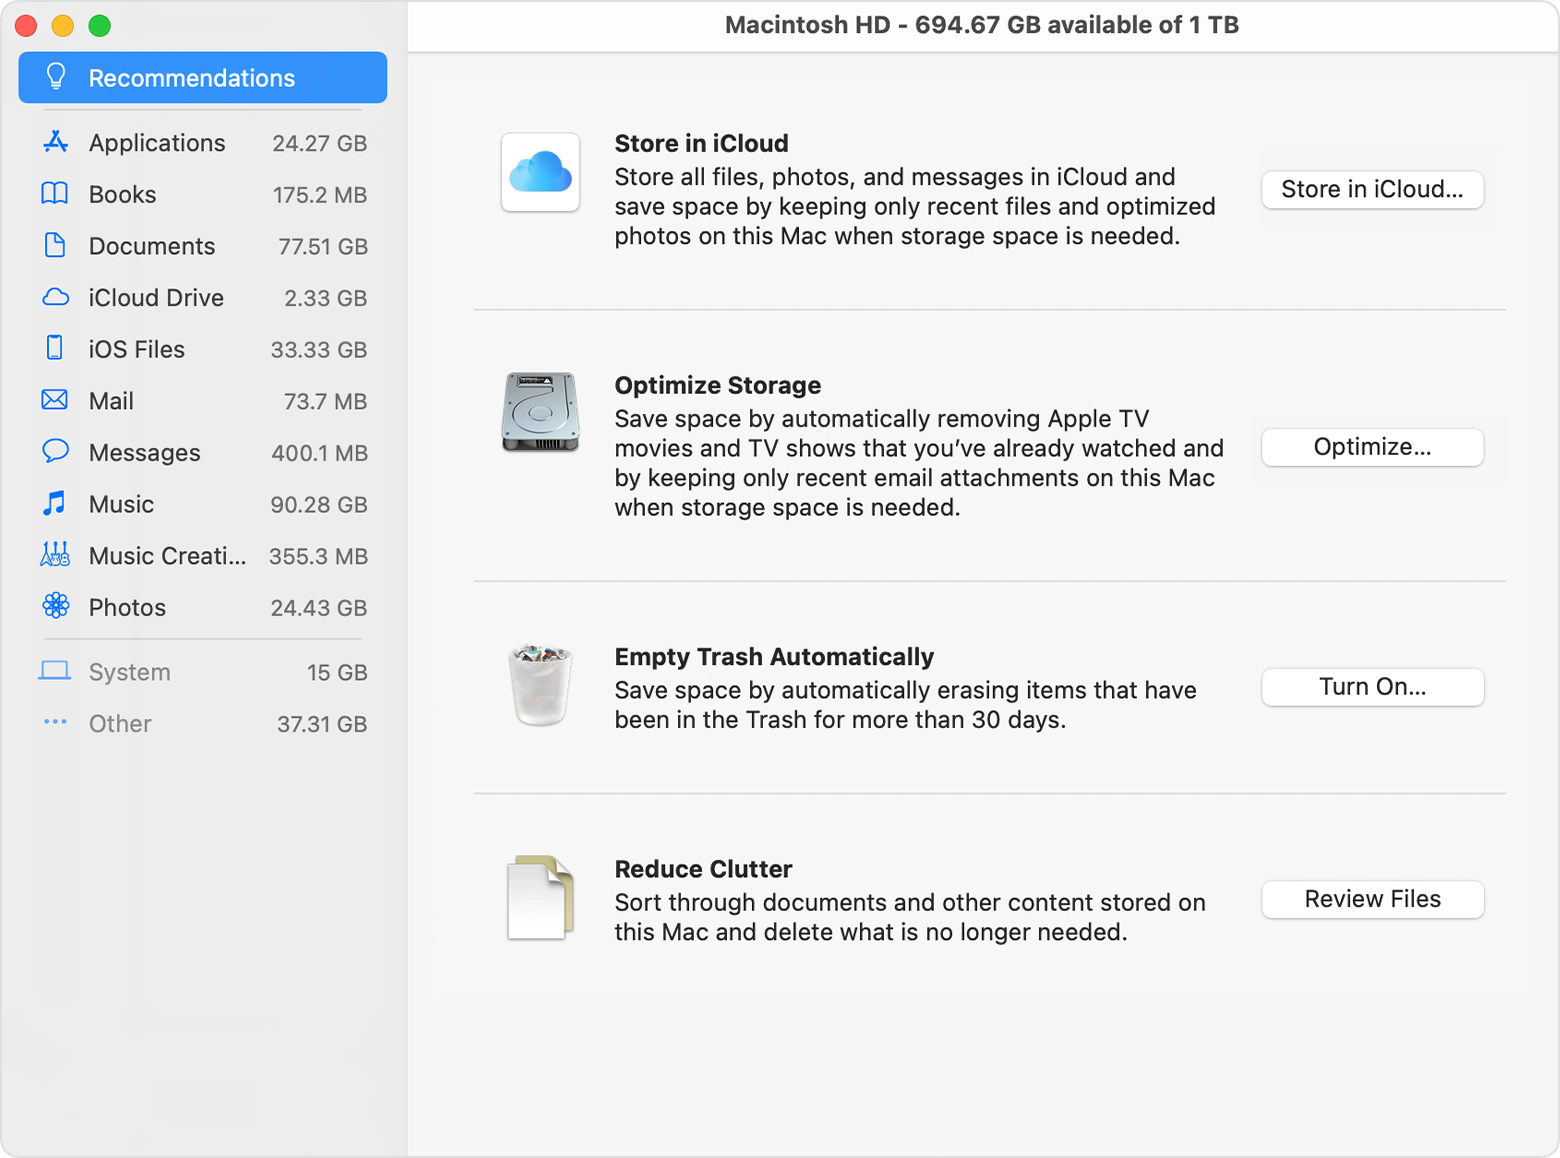
Manage storage on your Mac
The Storage Management window offers recommendations for optimizing your storage. If some recommendations are already turned on, you will see fewer recommendations.
Store in iCloud
Click the Store in iCloud button, then choose from these options:
- Desktop and Documents. Store all files from these two locations in iCloud Drive. When storage space is needed, only the files you recently opened are kept on your Mac, so that you can easily work offline. Files stored only in iCloud show a download icon , which you can double-click to download the original file. Learn more about this feature.
- Photos. Store all original, full-resolution photos and videos in iCloud Photos. When storage space is needed, only space-saving (optimized) versions of photos are kept on your Mac. To download the original photo or video, just open it.
- Messages. Store all messages and attachments in iCloud. When storage space is needed, only the messages and attachments you recently opened are kept on your Mac. Learn more about Messages in iCloud.
Storing files in iCloud uses the storage space in your iCloud storage plan. If you reach or exceed your iCloud storage limit, you can either buy more iCloud storage or make more iCloud storage available. iCloud storage starts at 50GB for $0.99 (USD) a month, and you can purchase additional storage directly from your Apple device. Learn more about prices in your region.
Optimize Storage
Click the Optimize button to save space by automatically removing watched movies and TV shows. When storage space is needed, movies or TV shows that you purchased from Apple and already watched are removed from your Mac. Click the download icon next to a movie or TV show to download it again.
Your Mac will also save space by keeping only recent email attachments on this Mac when storage space is needed. You can manually download any attachments at any time by opening the email or attachment, or saving the attachment to your Mac.
Optimizing storage for movies, TV shows, and email attachments doesn’t require iCloud storage space.
Empty Trash Automatically
Empty Trash Automatically permanently deletes files that have been in the Trash for more than 30 days.
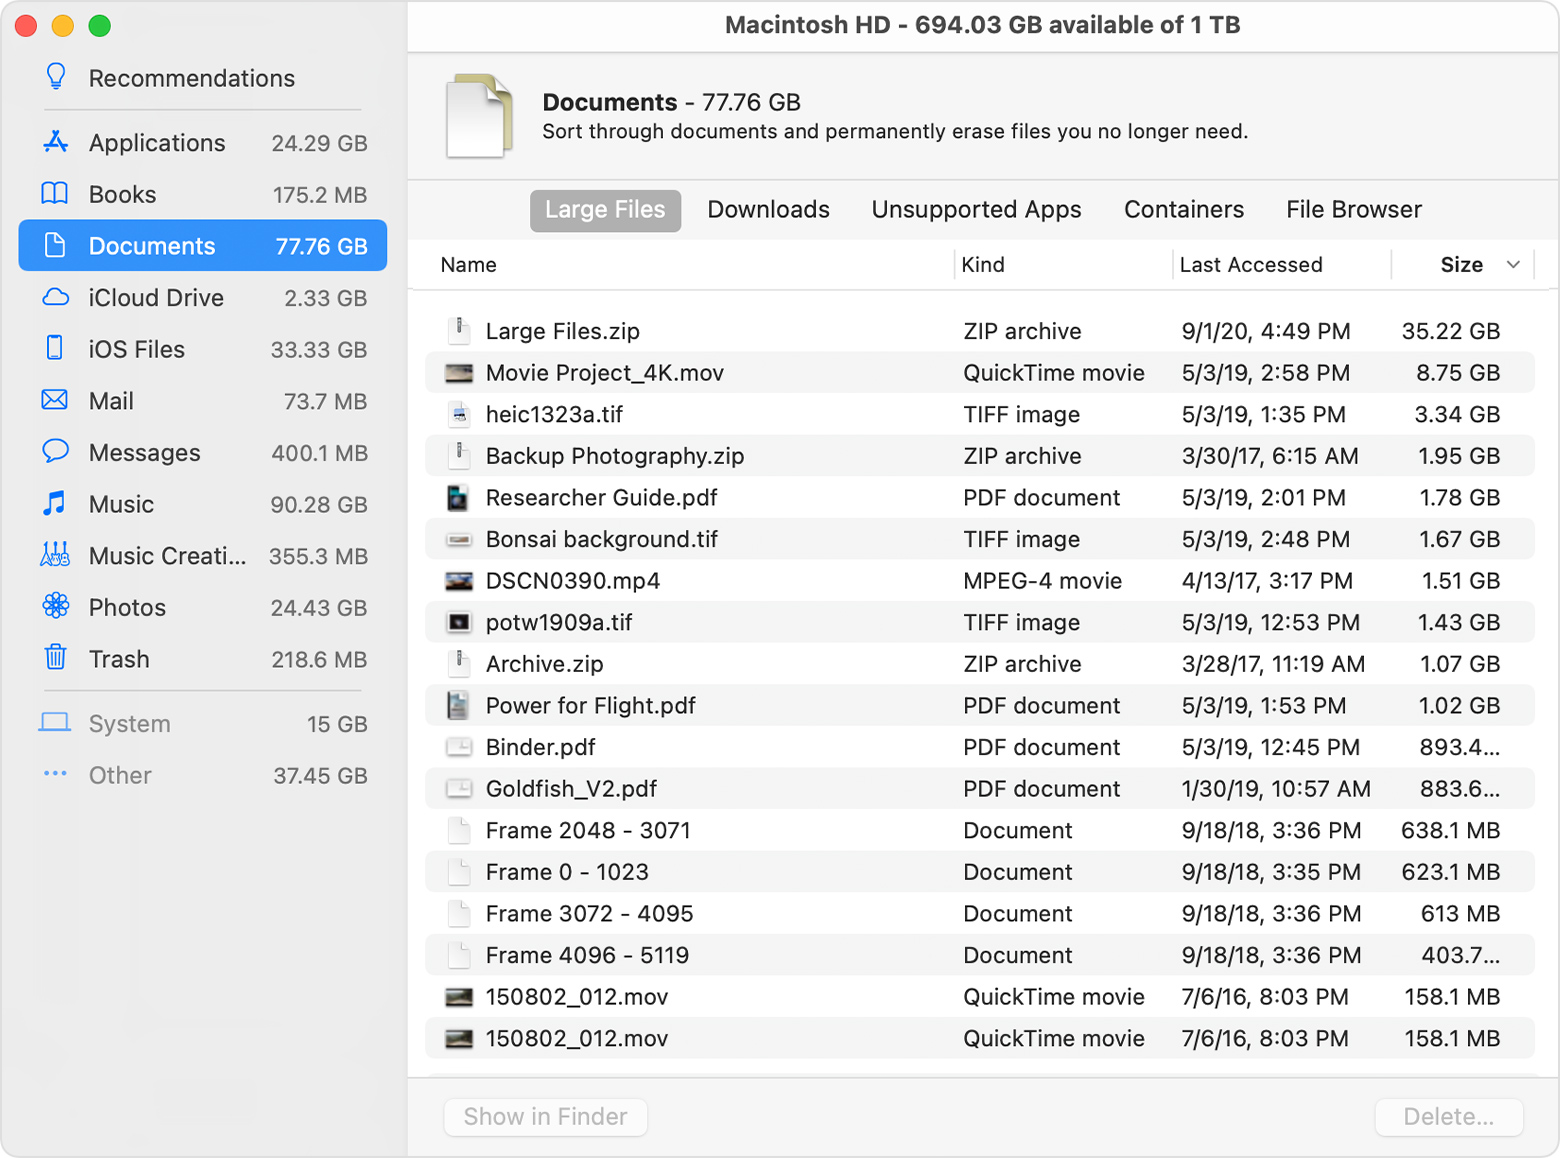
Reduce Clutter
Reduce Clutter helps you identify large files and files you might no longer need. Click the Review Files button, then choose any of the file categories in the sidebar, such as Applications, Documents, Music Creation, or Trash.
You can delete the files in some categories directly from this window. Other categories show the total storage space used by the files in each app. You can then open the app and decide whether to delete files from within it.
Where to find the settings for each feature
The button for each recommendation in the Storage Management window affects one or more settings in other apps. You can also control those settings directly within each app.
- If you’re using macOS Catalina or later, choose Apple menu > System Preferences, click Apple ID, then select iCloud in the sidebar: Store in iCloud turns on the Optimize Mac Storage setting on the right. To turn off iCloud Drive entirely, deselect iCloud Drive.
- If you’re using macOS Mojave or earlier, choose Apple menu > System Preferences, click iCloud, then click Options next to iCloud Drive. Store in iCloud turns on the Desktop & Documents Folders and Optimize Mac Storage settings.
- In Photos, choose Photos > Preferences, then click iCloud. Store in iCloud selects iCloud Photos and Optimize Mac Storage.
- In Messages, choose Messages > Preferences, then click iMessage. Store in iCloud selects Enable Messages in iCloud.
- If you’re using macOS Catalina or later, open the Apple TV app, choose TV > Preferences from the menu bar, then click Files. Optimize Storage selects “Automatically delete watched movies and TV shows.”
- In you’re using macOS Mojave or earlier, open iTunes, choose iTunes > Preferences from the menu bar, then click Advanced. Optimize Storage selects “Automatically delete watched movies and TV shows.”
- In Mail, choose Mail > Preferences from the menu bar, then click Accounts. In the Account Information section on the right, Optimize Storage sets the Download Attachments menu to either Recent or None.
Empty Trash Automatically: From the Finder, choose Finder > Preferences, then click Advanced. Empty Trash Automatically selects “Remove items from the Trash after 30 days.”
Other ways that macOS helps automatically save space
With macOS Sierra or later, your Mac automatically takes these additional steps to save storage space:
- Detects duplicate downloads in Safari, keeping only the most recent version of the download
- Reminds you to delete used app installers
- Removes old fonts, languages, and dictionaries that aren’t being used
- Clears caches, logs, and other unnecessary data when storage space is needed
How to free up storage space manually
Even without using the Optimized Storage features described in this article, you can take other steps to make more storage space available:
- Music, movies, and other media can use a lot of storage space. Learn how to delete music, movies, and TV shows from your device.
- Delete other files that you no longer need by moving them to the Trash, then emptying the Trash. The Downloads folder is good place to look for files that you might no longer need.
- Move files to an external storage device.
- Compress files.
- Delete unneeded email: In the Mail app, choose Mailbox > Erase Junk Mail. If you no longer need the email in your Trash mailbox, choose Mailbox > Erase Deleted Items.
Источник
Installing macOS on a separate APFS volume
APFS makes it easier than ever to switch between versions of macOS, including a beta (prerelease) version of macOS.
If you install macOS on an additional volume of your startup disk, you can switch between that macOS and the macOS on your other volume, as if each were on a separate disk. And because storage space is shared across APFS volumes, you don’t need to reserve space for the new volume. Its size automatically adjusts to fit your content.
What you need
Your Mac must already be using macOS High Sierra or later on an APFS-formatted startup disk. Find out which format your startup disk is using.
You don’t need to reserve storage space for the new volume, but macOS needs as much as 20GB of available space to install, depending on the version of macOS. If you don’t have enough space, the installer will let you know.
About This Mac includes a storage overview: Choose Apple () menu > About This Mac, then click Storage.

Back up your Mac
It’s a good idea to back up your Mac first, especially if you’re installing a beta version of macOS. Beta software is software that is still in development, so some apps and services might not work as expected.
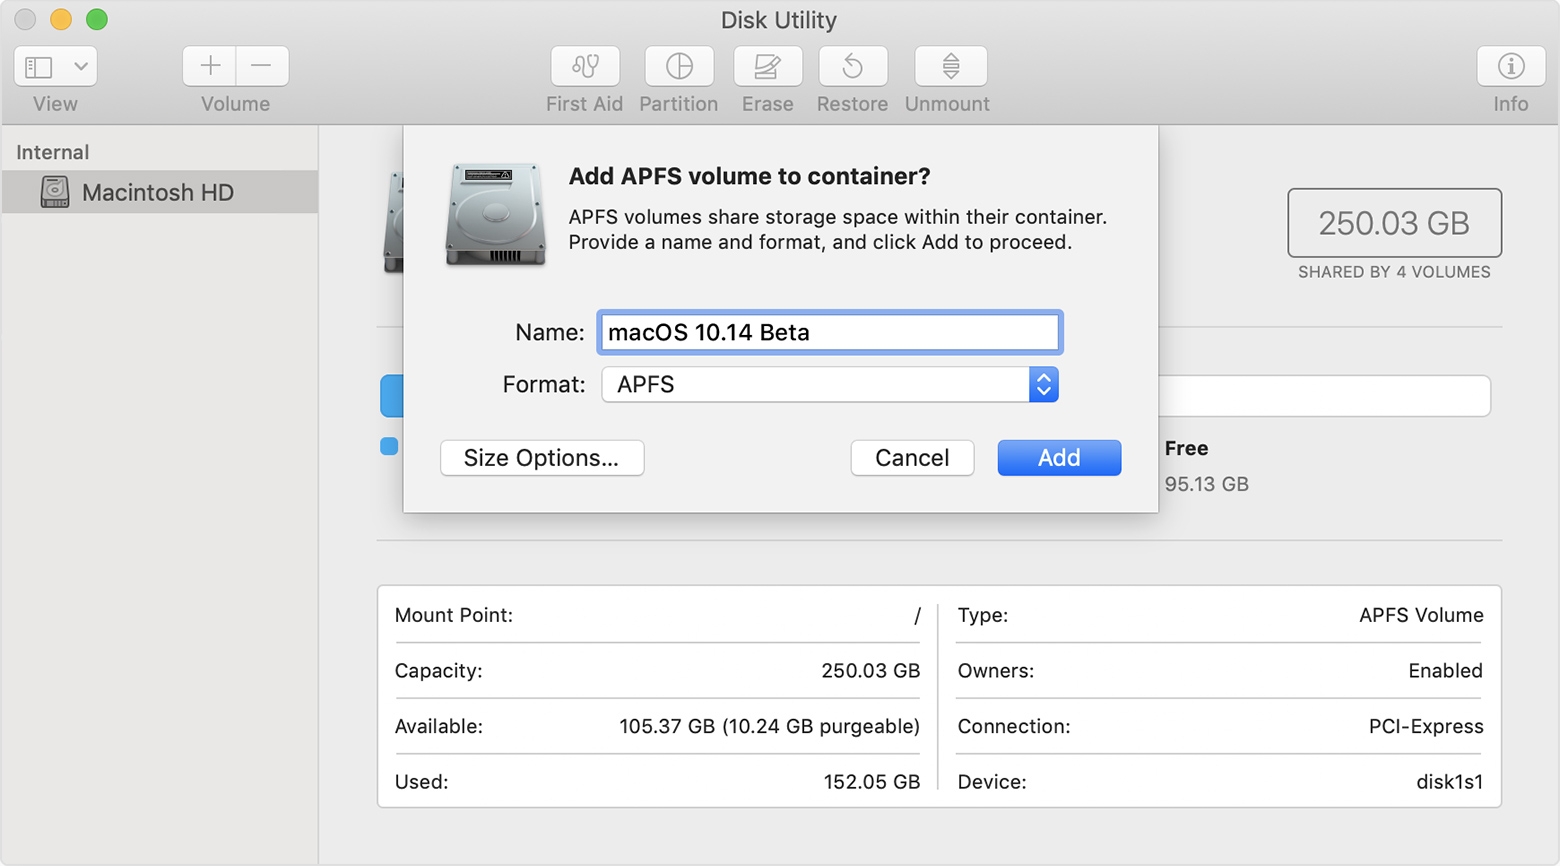
Add an APFS volume
- Open Disk Utility, which is in the Utilities folder of your Applications folder.
- In the sidebar, select your existing APFS volume.
- Choose Edit > Add APFS Volume from the menu bar, or click in the Disk Utility toolbar. These options are available only when an APFS volume is selected.
- Type any name for the new APFS volume, then click Add:

- Disk Utility should now show the new volume in the sidebar. The new volume will also appear in the Finder, as if it were a separate disk. You can now quit Disk Utility.
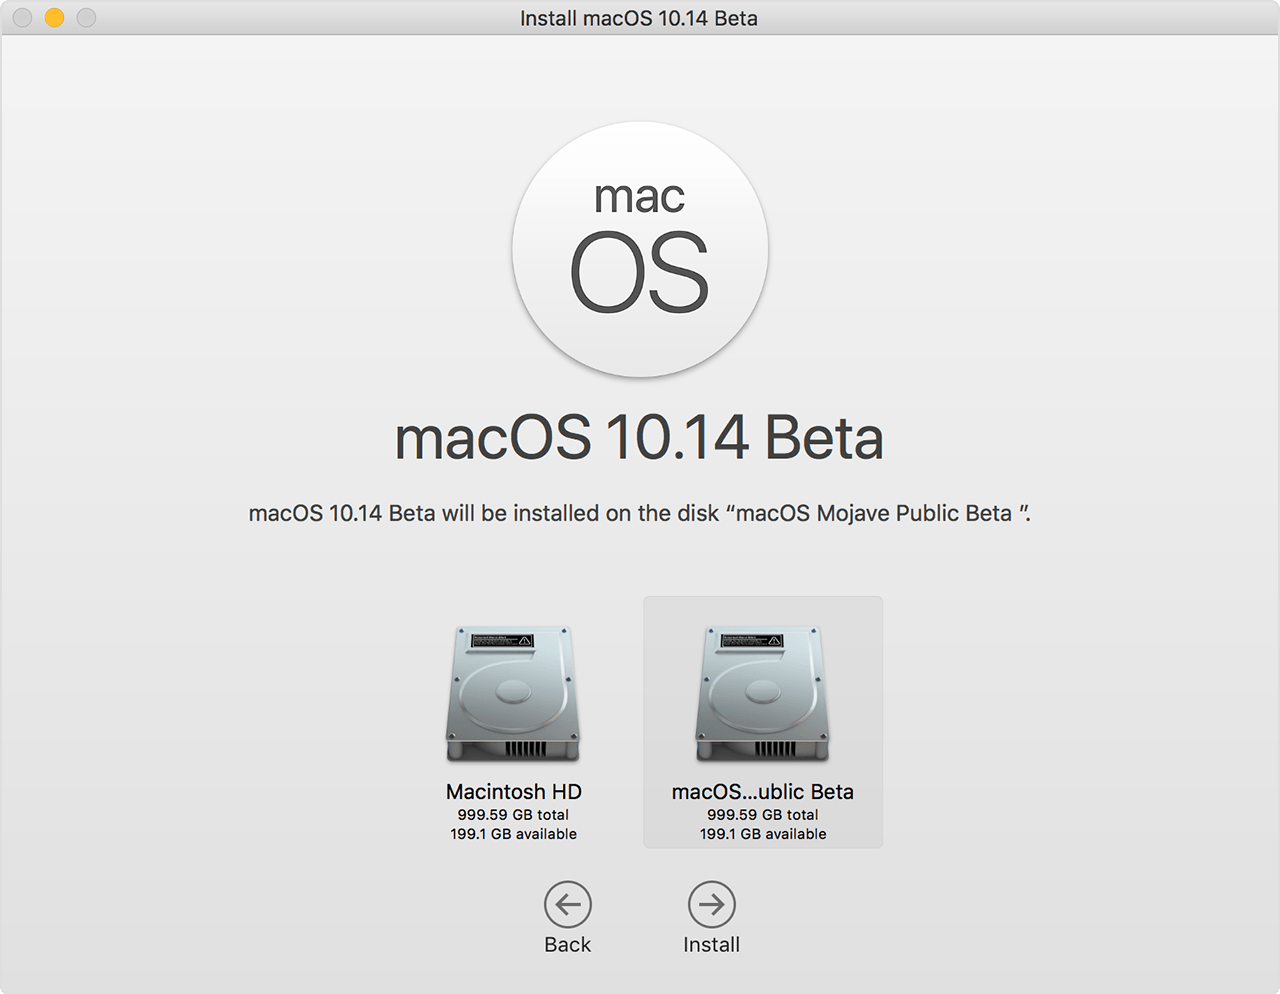
Install macOS on the volume
Choose an installation method:
- To install a beta (prerelease) version of macOS, enroll in the Apple Beta Software Program and follow the installation instructions on the program website.
- To install a release version of macOS, you can use macOS Recovery. The keys you press at startup determine which macOS is installed.
When the installer opens and you’re asked to choose where to install, click Show All Disks, then select the new volume.
Switch between macOS versions
After installation is complete, you can use Startup Disk preferences or Startup Manager to quickly switch between each macOS:
- Choose Apple () menu > Startup Disk, then click and enter your administrator password. Select the volume that you want to use, then click Restart.
- Or press and hold the Option key during startup. When prompted, choose the volume that you want to start up from.
 and enter your administrator password. Select the volume that you want to use, then click Restart.
Keep the macOS on each volume up to date
To find the latest updates for each version of macOS, check for software updates, then start up from the other volume and check for software updates again.
Learn more
If your Mac is using macOS Sierra or earlier, or the startup disk is formatted as Mac OS Extended instead of APFS, you can create a new partition instead. The space it occupies doesn’t automatically adjust to fit your content, so you must manually size the partition. Learn how to add a volume to a device formatted as Mac OS Extended.
Источник
Mac OS
Our editors will review what you’ve submitted and determine whether to revise the article.
Mac OS, operating system (OS) developed by the American computer company Apple Inc. The OS was introduced in 1984 to run the company’s Macintosh line of personal computers (PCs). The Macintosh heralded the era of graphical user interface (GUI) systems, and it inspired Microsoft Corporation to develop its own GUI, the Windows OS.
Apple’s marketing for the introduction of the Macintosh focused heavily on its operating system’s intuitive ease of use. Unlike virtually all other contemporary PCs, the Mac OS (initially designated simply System Software, with a version number appended) was graphically based. Rather than typing commands and directory paths at text prompts, users moved a mouse pointer to visually navigate the Finder—a series of virtual folders and files, represented by icons. Most computer operating systems eventually adopted the GUI model. In the 1980s Apple made an agreement allowing Microsoft to use certain aspects of the Mac interface in early versions of Windows. However, except for a brief period in the 1990s, Mac OS has never been licensed for use with computers made by manufacturers other than Apple.

Later Mac OS releases introduced features such as Internet file sharing, network browsing, and multiple user accounts. In 1996 Apple acquired rival NeXT Computers, which was founded by Steven Jobs after his departure from Apple, and in 2001 the company rolled out Mac OS X, a major redesign based on both the NextStep system and Apple’s most recent OS release. OS X ran on a UNIX kernel (core software code) and offered technical advances such as memory protection and preemptive multitasking, along with a more versatile Finder, an elegant-looking interface called Aqua, and a convenient graphical “Dock” bar for launching frequently used applications. Updates to OS X added features such as automated backups and a “Dashboard” manager for small, handy applications called widgets.
From 2007 Apple unveiled a number of mobile devices that could access the Internet, including the iPhone smartphone and the iPad tablet computer. Apple soon emphasized the ability of OS X to connect with these devices. In 2011 Apple introduced iCloud, a cloud computing service that allowed users to share data among all of their Apple devices, for both OS X and the mobile operating system iOS. Apple added more features allowing connectivity between devices to successive updates of OS X, iOS, and later watchOS (the operating system for the Apple Watch smartwatch). These features included the ability to receive phone calls (made to the iPhone) and the means of quickly sharing data (such as photos and text) among devices.
Источник


