- The Windows Security app
- Open the Windows Security app
- How the Windows Security app works with Windows security features
- Stay protected with Windows Security
- Important security info
- Understand and customize Windows Security features
- Status icons indicate your level of safety:
- Run a malware scan manually
- Run a quick scan in Windows Security
- Run an advanced scan in Windows Security
- Schedule your own scan
- Schedule a scan
- Turn Microsoft Defender Antivirus real-time protection on or off
- Turn real-time protection off temporarily
- «The Security Center service can’t be started» error message in Windows 7 or in Windows Vista
- Symptoms
- Cause
- Resolution
- Method 1: Make sure that Security Center is configured correctly
- Method 2: Start computer in safe mode
- Send us feedback
The Windows Security app
Applies to
- Windows 10, version 1703 and later
This library describes the Windows Security app, and provides information on configuring certain features, including:
In Windows 10, version 1709 and later, the app also shows information from third-party antivirus and firewall apps.
In Windows 10, version 1803, the app has two new areas, Account protection and Device security.
The Windows Security app is a client interface on Windows 10, version 1703 and later. It is not the Microsoft Defender Security Center web portal console that is used to review and manage Microsoft Defender for Endpoint.
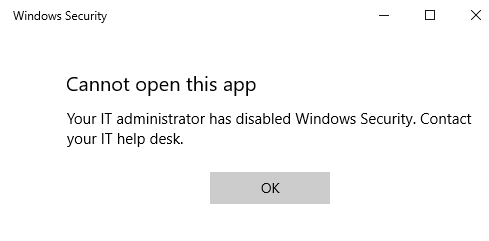
You can’t uninstall the Windows Security app, but you can do one of the following:
- Disable the interface on Windows Server 2016. See Microsoft Defender Antivirus on Windows Server.
- Hide all of the sections on client computers (see below).
- Disable Microsoft Defender Antivirus, if needed. See Enable and configure Microsoft Defender AV always-on protection and monitoring.
You can find more information about each section, including options for configuring the sections — such as hiding each of the sections — at the following topics:
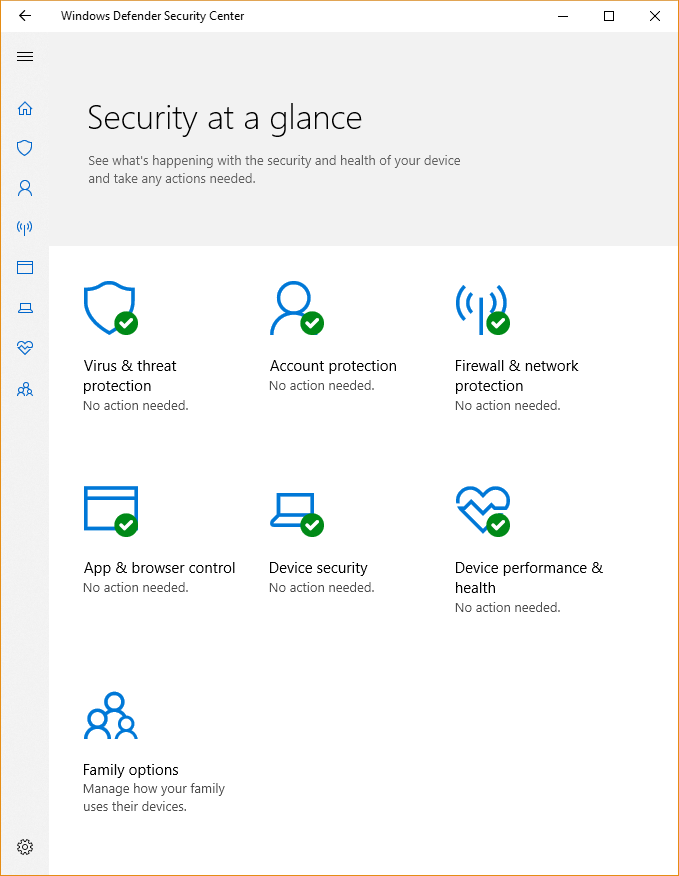
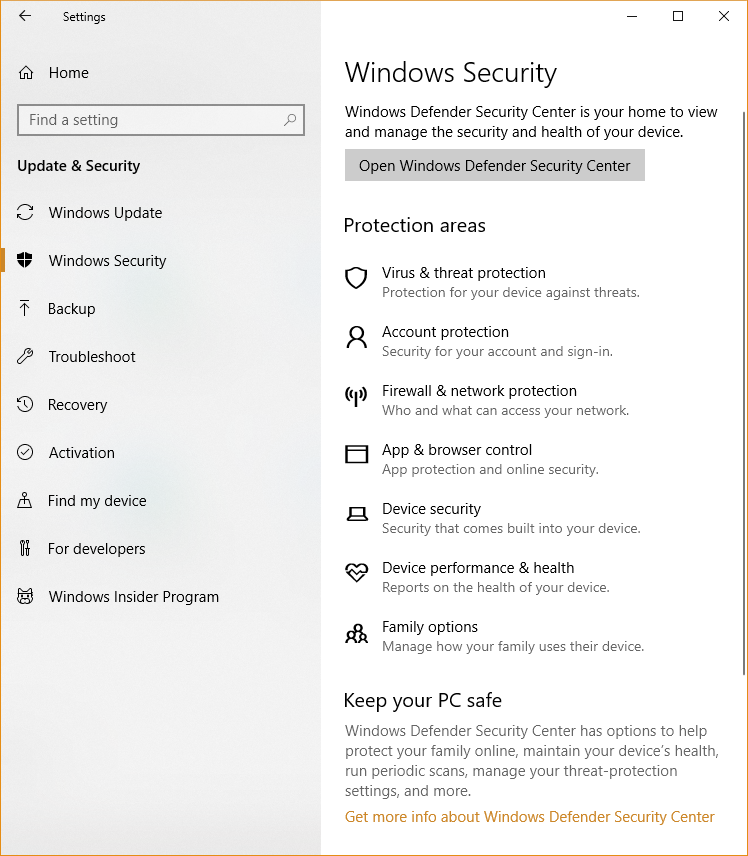
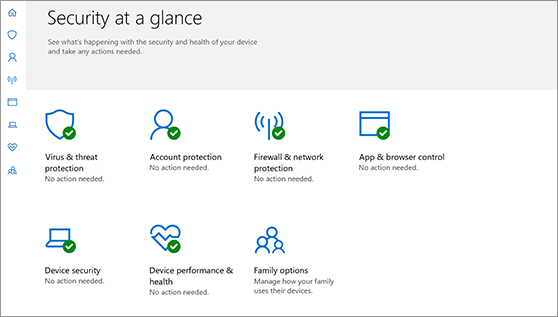
- Virus & threat protection, which has information and access to antivirus ransomware protection settings and notifications, including Controlled folder access, and sign-in to Microsoft OneDrive.
- Account protection, which has information and access to sign-in and account protection settings.
- Firewall & network protection, which has information and access to firewall settings, including Windows Defender Firewall.
- App & browser control, covering Windows Defender SmartScreen settings and Exploit protection mitigations.
- Device security, which provides access to built-in device security settings.
- Device performance & health, which has information about drivers, storage space, and general Windows Update issues.
- Family options, which includes access to parental controls along with tips and information for keeping kids safe online.
If you hide all sections then the app will show a restricted interface, as in the following screenshot:
Open the Windows Security app
Click the icon in the notification area on the taskbar.

Search the Start menu for Windows Security.

Open an area from Windows Settings.
Settings configured with management tools, such as Group Policy, Microsoft Intune, or Microsoft Endpoint Configuration Manager, will generally take precedence over the settings in the Windows Security. See the topics for each of the sections for links to configuring the associated features or products.
How the Windows Security app works with Windows security features
Microsoft Defender AV and the Windows Security app use similarly named services for specific purposes.
The Windows Security app uses the Windows Security Service (SecurityHealthService or Windows Security Health Servce), which in turn utilizes the Security Center service (wscsvc) to ensure the app provides the most up-to-date information about the protection status on the endpoint, including protection offered by third-party antivirus products, Windows Defender Firewall, third-party firewalls, and other security protection.
These services do not affect the state of Microsoft Defender AV. Disabling or modifying these services will not disable Microsoft Defender AV, and will lead to a lowered protection state on the endpoint, even if you are using a third-party antivirus product.
Microsoft Defender AV will be [disabled automatically when a third-party antivirus product is installed and kept up to date]/microsoft-365/security/defender-endpoint/microsoft-defender-antivirus-compatibility).
Disabling the Windows Security Center service will not disable Microsoft Defender AV or Windows Defender Firewall.
If you disable the Security Center service, or configure its associated Group Policy settings to prevent it from starting or running, the Windows Security app may display stale or inaccurate information about any antivirus or firewall products you have installed on the device.
It may also prevent Microsoft Defender AV from enabling itself if you have an old or outdated third-party antivirus, or if you uninstall any third-party antivirus products you may have previously installed.
This will significantly lower the protection of your device and could lead to malware infection.
The Windows Security app operates as a separate app or process from each of the individual features, and will display notifications through the Action Center.
It acts as a collector or single place to see the status and perform some configuration for each of the features.
Disabling any of the individual features (through Group Policy or other management tools, such as Microsoft Endpoint Configuration Manager) will prevent that feature from reporting its status in the Windows Security app. The Windows Security app itself will still run and show status for the other security features.
Individually disabling any of the services will not disable the other services or the Windows Security app.
For example, using a third-party antivirus will disable Microsoft Defender Antivirus. However, the Windows Security app will still run, show its icon in the taskbar, and display information about the other features, such as Windows Defender SmartScreen and Windows Defender Firewall.
Stay protected with Windows Security
Windows 10 includes Windows Security, which provides the latest antivirus protection. Your device will be actively protected from the moment you start Windows 10. Windows Security continually scans for malware (malicious software), viruses, and security threats. In addition to this real-time protection, updates are downloaded automatically to help keep your device safe and protect it from threats.
Windows 10 in S mode
Some features will be a little different if you’re running Windows 10 in S mode. Because this mode is streamlined for tighter security, the Virus & threat protection area has fewer options. But don’t worry—the built-in security of this mode automatically prevents viruses and other threats from running on your device, and you’ll receive security updates automatically. For more info, see Windows 10 in S mode FAQ.
Important security info
Windows Security is built-in to Windows 10 and includes an antirvirus program called Microsoft Defender Antivirus. (In previous versions of Windows 10, Windows Security is called Windows Defender Security Center).
If you have another antivirus app installed and turned on, Microsoft Defender Antivirus will turn off automatically. If you uninstall the other app, Microsoft Defender Antivirus will turn back on automatically.
If you’re having problems receiving Windows Security updates, see Fix Windows Update errors and the Windows Update FAQ.
For info on how to uninstall an app, see Repair or remove an app in Windows 10.
To change your user account to an admin account, see Create a local user or administrator account in Windows 10.
Understand and customize Windows Security features
Windows Security is your home to manage the tools that protect your device and your data:
Virus & threat protection. Monitor threats to your device, run scans, and get updates to help detect the latest threats. (Some of these options are unavailable if you’re running Windows 10 in S mode.)
Account protection. Access sign-in options and account settings, including Windows Hello and dynamic lock.
Firewall & network protection. Manage firewall settings and monitor what’s happening with your networks and internet connections.
App & browser control. Update settings for Microsoft Defender SmartScreen to help protect your device against potentially dangerous apps, files, sites, and downloads. You’ll have exploit protection and you can customize protection settings for your devices.
Device security. Review built-in security options to help protect your device from attacks by malicious software.
Device performance & health. View status info about your device’s performance health, and keep your device clean and up to date with the latest version of Windows 10.
Family options. Keep track of your kids’ online activity and the devices in your household.
You can customize how your device is protected with these Windows Security features. To access them, select Start > Settings > Update & Security > Windows Security . Then select the feature you want to explore.
Open Windows Security settings
Status icons indicate your level of safety:
Green means your device is sufficiently protected and there aren’t any recommended actions.
Yellow means there is a safety recommendation for you.
Red is a warning that something needs your immediate attention.
Run a malware scan manually
When you’re concerned about risks to a specific file or folder, you can right-click the file or folder in File Explorer, then select Scan with Microsoft Defender.
If you suspect there’s malware or a virus on your device, you should immediately run a quick scan. This is much faster than running a full scan on all your files and folders.
Run a quick scan in Windows Security
Select Start > Settings > Update & Security > Windows Security and then Virus & threat protection.
Open Windows Security settings
Under Current threats, select Quick scan (or in previous versions of Windows 10, under Threat history, select Scan now).
If the scan doesn’t find any issues, but you’re still concerned, you may want to check your device more thoroughly.
Run an advanced scan in Windows Security
Select Start > Settings > Update & Security > Windows Security and then Virus & threat protection.
Under Current threats, select Scan options (or in previous versions of Windows 10, under Threat history, select Run a new advanced scan).
Select one of the scan options:
Full scan (check files and programs currently running on your device)
Custom scan (scan specific files or folders)
Microsoft Defender Offline scan (run this scan if your device has been, or could potentially be, infected by a virus or malware). Learn more about Microsoft Defender Offline
Select Scan now.
Note: Because of streamlined security, this process isn’t available if you’re running Windows 10 in S mode.
Schedule your own scan
Even though Windows Security is regularly scanning your device to keep it safe, you can also set when and how often the scans occur.
Schedule a scan
Select the Start button, type schedule tasks in the Search box, and in the list of results, select Task Scheduler.
In the left pane, select the arrow (>) next to Task Scheduler Library to expand it, do the same with Microsoft > Windows, and then scroll down and select the Windows Defender folder.
In the top-center pane, select Windows Defender Scheduled Scan. (Point to the choices to see the full names.)
In the Actions pane on the right, scroll down and then select Properties.
In the window that opens, select the Triggers tab, and then select New.
Set your preferred time and frequency, and then select OK.
Review the schedule and select OK.
Note: Because of streamlined security, this process isn’t available if you’re running Windows 10 in S mode.
Turn Microsoft Defender Antivirus real-time protection on or off
Sometimes you may need to briefly stop running real-time protection. While real-time protection is off, files you open or download won’t be scanned for threats. However, real-time protection will soon turn on automatically again to protect your device.
Turn real-time protection off temporarily
Select Start > Settings > Update & Security > Windows Security and then Virus & threat protection > Manage settings. (In previous versions of Windows 10, select Virus & threat protection > Virus & threat protection settings.)
Open Windows Security settings
Switch the Real-time protection setting to Off and choose Yes to verify.
Note: Because of streamlined security, this process isn’t available if you’re running Windows 10 in S mode.
«The Security Center service can’t be started» error message in Windows 7 or in Windows Vista
Symptoms
You receive the following error message in Windows 7 or in Windows Vista.
The Security Center service can’t be started.
Cause
This issue can occur for the following reasons:
Security Center is not configured to start correctly.
The «log on user» for Security Center is configured incorrectly.
A malware infection is preventing the service from starting or is disabling the service after it has started.
Resolution
To resolve this problem, use one of the following methods in the order listed:
Method 1: Make sure that Security Center is configured correctly
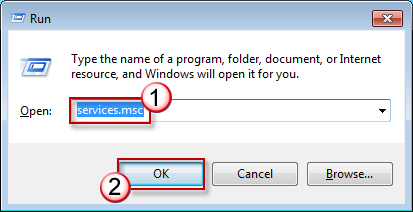
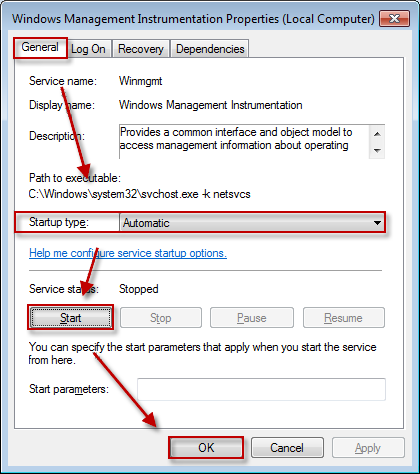
Press Win + R keyboard shortcut, type services.msc, and then press ENTER.
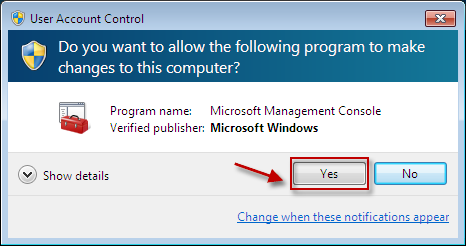
If you are prompted for confirmation, click Yes.
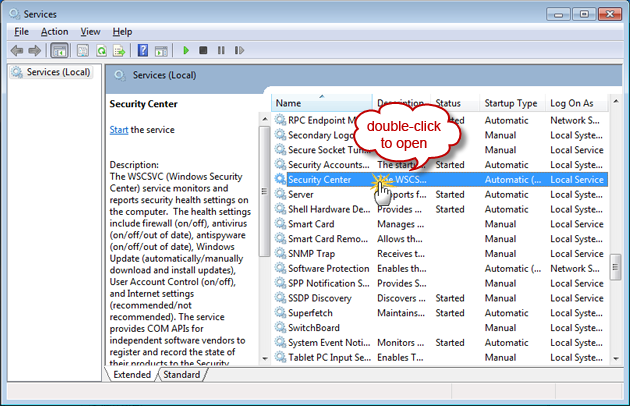
Double-click Security Center.
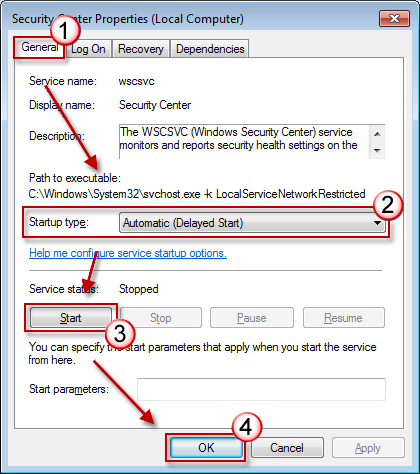
Click the General tab, select Automatic (delayed start) from the Startup type list, click Start, and then click OK.
Now check whether Security Center can be started. If not, start the Remote Procedure Call(RPC) and Windows Management Instrumentation services by using the steps provided above.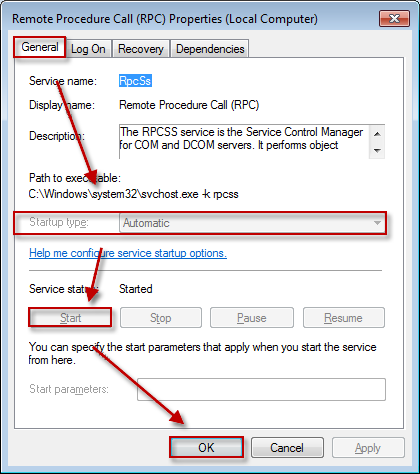
Method 2: Start computer in safe mode
Restart your computer, press F8 before the Windows logo appears.
For more information about how to start a computer in safe mode, visit the following Mirosoft website:
Use the steps in Method 1 to start the Security Center service. If the service can be started, perform a clean startup to troubleshoot the conflicting program services. For more information about how to do this, see the following Microsoft Knowledge Base article:
929135 How to troubleshoot a problem by performing a clean boot in Windows Vista or in Windows 7
Send us feedback
We value your feedback! Do not hesitate to tell us what you think of this article using the comment field located at the bottom of the document. This will allow us to improve the content. Thank you in advance !


