- What can I do if Windows 10 time keeps changing?
- How to fix Windows 10 time keeps changing.
- 1. Wrong time zone selected
- 2. Malware attack
- Windows 10 Clock Time wrong? Here is the working fix!
- Windows 10 Clock Time wrong
- 1] Change Date & Time settings
- 2] Check Windows Time Service status
- 3] Change Internet Time Server
- 4] Re-register the Windows Time DLL file
- 5] Re-register the Windows Time process
- 6] Force Windows to sync Time using CMD
- 7] Check your BIOS Battery
- How to force Windows 10 time to synch with a time server?
- Replies (31)
- Windows 10 Time ALWAYS wrong
- Replies (298)
- 4 Ways to Synchronize Windows 10 Time With Microsoft Server
- Olanrewaju Sodiq
- From Windows Settings
- Restart the Windows Time Service
- Re-Register Windows Time DLL file
- Replace CMOS battery
- Stay in Sync
- Read Next
- How To Synchronize Windows Clock With Internet Time Server
- How to Fix MSN Weather Not Working in Windows 10 Error
- How to Add and Configure Gmail in Windows 8 Mail App
- 7 Best Ways to Fix Kindle for PC Desktop App Won’t Open on Windows
- What Is Microsoft Power Automate Desktop and Why Do You Need It
- 6 Best Ways to Fix Action Center Greyed Out on Windows 10
- 8 Best Ways to Fix Google Chrome Security Certification Error
- How to Use Paint 3D to Edit Photos
- Did You Know
What can I do if Windows 10 time keeps changing?

- The PC’s clock is a tool that has been with the Windows OS since the very beginning, and has received numerous tweaks and updates over time.
- Unfortunately, system errors can lead to your PC’s clock to change randomly. If that happens, follow the steps written in the guide below.
- Our dedicated hub for troubleshooting Windows 10 errors is full of similar articles, so make sure to check it out and even bookmark it in case you need it again.
- If you need any more great articles visit our dedicated Windows 10 fix page.

- Download Restoro PC Repair Tool that comes with Patented Technologies (patent available here).
- Click Start Scan to find Windows issues that could be causing PC problems.
- Click Repair All to fix issues affecting your computer’s security and performance
- Restoro has been downloaded by 0 readers this month.
The bottom right corner is often the most neglected portion of your computer’s display, one where the time and date gets displayed.
However, while it might be hard to believe the computer with all its computing prowess getting something as simple as the time wrong, it indeed is something that does happen with fair regularity.
Also, there can be a variety of reasons for the Windows 10 time to keep changing. Mentioned here are the ways to remedy the situation.
How to fix Windows 10 time keeps changing.
1. Wrong time zone selected
Often your system might be showing the time of a different time zone than where you are located. To rule out such a scenario, you will have to set the time zone manually. Here are the steps.
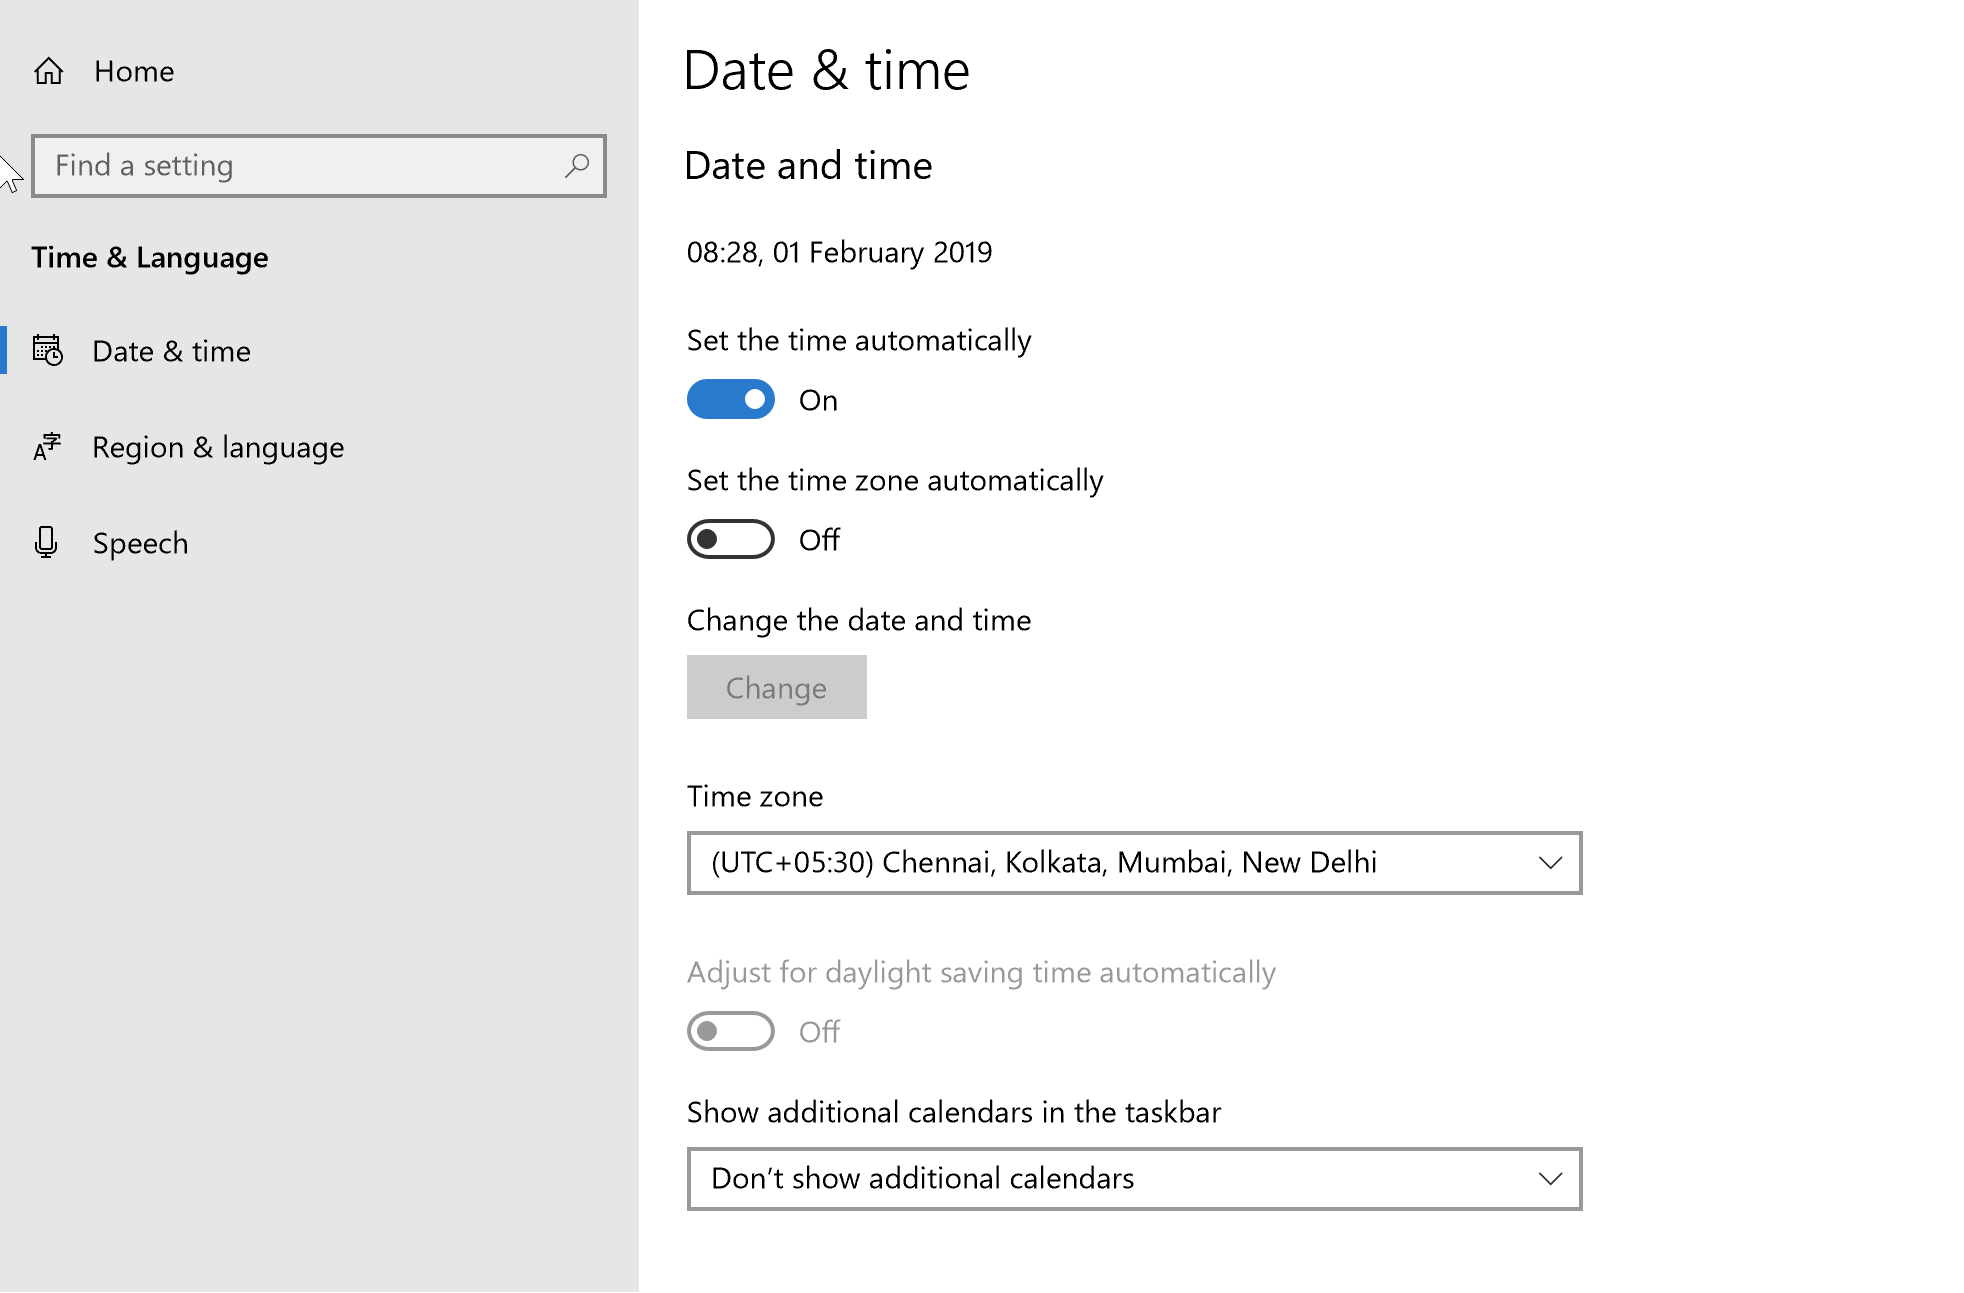
- Right click on the system clock on your taskbar and select Adjust date/time. You will be taken to the date & time section under Settings. (Start >Settings >Time & Language >Date & time).
- Under Time zone, check if the correct time zone pertaining to your region is selected. If not, make the necessary amendments.
Also, check if your PC is set to automatically synchronise with time.windows.com internet time server.

- For this, click on Additional date, time & regional setting on the right side of the window under Related settings.
- This will take you to the Clock and Region section under the classic Control Panel window.
- There, under Date and Time, click on Set the time and date.
- In the Date and Time window that opens, click on Internet Time tab.
- Under Internet Time tab, you should get to see This computer is set to automatically synchronise with ‘time.windows.com’ message.
- If otherwise, click on Change settings… to launch Internet Time Settings window.
- Select time.windows.com as the Server and click on Update Now.
- Click on OK and then on Apply >OK to close the Date and Time windows.
If the above steps didn’t work for you, you may want to review our other specific guide on this.
Check if the time remains consistent. If not, try out the other methods.
2. Malware attack
This happens to be another common reason that makes Windows 10 time to change frequently. A malware attack is also the most notorious given its stealthy nature as those can creep in and remain undetected for long before visible changes start becoming evident.
Windows 10 Clock Time wrong? Here is the working fix!
Is your Windows 10/8/7 computer displaying the wrong Time in the Taskbar? If it is this, then this post gives you some tips on how to fix the problem and make Windows 10 display the correct system time in the Taskbar.

Windows 10 Clock Time wrong
If your Windows 10 Time is wrong, to fix the issue you will have to see which of the following helps you:
- Change Date & Time settings
- Ensure that the Windows Time Service is started and set to run automatically on startup
- Change Internet Time Server & see if it helps
- Re-register Windows Time DLL file
- Re-register Windows Time process
- Force Windows to sync Time using CMD
- Replace your CMOS battery if it is drained.
Before we start troubleshooting this issue, it would be a good idea to run the System File Checker. To do so, you have to type sfc /scannow in an elevated CMD and hit Enter. Wait for a while and when the job is completed, restart your Windows computer. Once you have done this, we can move forward to try to troubleshoot the issue.
1] Change Date & Time settings
From the WinX Menu, open Settings > Time & Language > Date & Time.
Here you have to ensure that Set time automatically and Set time zone automatically are ‘On’. See if this works for you.
If it does no help, change Set time automatically to ‘Off’ and then click on the Change button to set the time manually. The following panel will open where you can make the necessary changes.
If this does not help, change Set time zone automatically to ‘Off’ and then from the drop-down menu, set your time zone manually.
So you will have to see if playing around with any of these changes is able to help you.
If this does not help, read on.
2] Check Windows Time Service status
To do so, type services.msc in Start Search and hit Enter. In Services Manager, navigate to Windows Time service and double-click on it.
Check and see if the Service Status is Started and Startup type set on Automatic. You may click on the Start button to start the service.Do the needful, click on Apply/OK and exit.
3] Change Internet Time Server
To manually sync and update your system time with an Internet Time server like time.windows,com, you have to right-click on the Time in the taskbar > Adjust Time & date > Internet Time tab > Change Settings > Update now.
If you wish, you may change the Time Server from time.windows.com from any other time server of your choice.
You can also configure the Windows Time service to use an internal hardware clock or an external time source. Microsoft Support offer a to Fix It downloads that let you do this automatically with a click.
4] Re-register the Windows Time DLL file
You may want to re-register a dll file. The concerned dll file here is w3time.dll. To do so, open a command prompt as an Administrator, type the following and hit Enter:
If this does not help, you should try and re-register the Windows Time exe process.
5] Re-register the Windows Time process
The Windows Time Service or W32Time.exe maintains date and time synchronization on all clients and servers in the network. If this service is stopped, date and time synchronization will be unavailable. If this service is disabled, any services that explicitly depend on it will fail to start.
The Windows Time file or W32tm.exe, located in the System32 folder, is used to configure Windows Time service settings. It can also be used to diagnose problems with the time service. W32tm.exe is the preferred command line tool for configuring, monitoring, or troubleshooting the Windows Time service.
You will have to use the /register parameter. This parameter, when run for W32tm.exe, registers the time service to run as a service and adds the default configuration to the registry.
To do so, in an elevated command prompt, type these commands one after the other and hit Enter:
6] Force Windows to sync Time using CMD
You can also force Windows to sync Time using W32tm.exe. W32tm.exe is a command prompt line used to configure, monitor or troubleshoot the Windows Time Service in Windows 10 PC.
To do this, open an elevated command prompt and type the following commands one after the other:
Reboot your computer and see if it has helped.
7] Check your BIOS Battery
If nothing helps, check and replace your CMOS battery if it has been drained.
I am sure that something here will help you. If nothing works, make use of some free Time synchronization software.
Once the time is being displayed correctly, you may want to check the accuracy of your System Clock.
Bonus Tip: See how you can change the Internet Time Update interval in Windows 10.
How to force Windows 10 time to synch with a time server?
The time displayed by WIndows 10 is over 30 seconds slow even though I shut it down and restarted my computer less than 15 hours ago. I can’t find a way to force W10 to synch the clock with a time server.
I had a program (SocketWatch) I had used for years to update the clock with the NIST time server, but it no longer works in W10.
Replies (31)
* Please try a lower page number.
* Please enter only numbers.
* Please try a lower page number.
* Please enter only numbers.
![]()
Thank you for posting in Microsoft Community.
Method 1:
Follow the steps mentioned below.
- Press Windows key + r and type services.msc and press enter.
- Right click on Windows Time and select properties to check the status of the service.
- Restart the Windows Time service.
- Click on OK.
- Restart the computer
Method 2:
a. Click on clock and select “Change date and time settings”.
b. Click on the “Internet Time” tab.
c. Check if it is set to “synchronize the time with time.windows.com”
d. If the option is selected, click on change settings to check the option “Synchronize with an Internet Time server”
Method 3:
Follow the steps mentioned below.
Press Windows key + X and select Command prompt(Admin).
Type each one of the command below and press enter.
net stop w32time
net start w32time
Restart the computer to test the issue again.
Windows 10 Time ALWAYS wrong
My date is always correct, but my time is always wrong. Example: Right now it is 8:50 am, but my clock in Windows says 1:50 pm. Here is the situation:
My system is dual bootable, Ubuntu or Windows 10. Ubuntu shows the correct time. I think this rules out a bad cmos battery.
Windows 10 always shows the wrong time. Location settings are correct, time zone settings are correct.
When I select to keep time manually, (turning off the autosync) It is fine. When I reboot, it is wrong again. When I select to automatically have windows set my time, it is fine. When I reboot, it is wrong again.
I’ve gotten to where I keep a clock next to my computer, and fix the time each time I boot into windows. but there has to be an actual solution.
Replies (298)
* Please try a lower page number.
* Please enter only numbers.
* Please try a lower page number.
* Please enter only numbers.
![]()
Welcome to Microsoft Community and thank you for your interest in Windows 10.
I suggest you to follow the below steps to change the settings of time and time zone:
- Press “Windows+X” and click on “control panel”.
- On the left hand side click on “clock, language and region”.
- Click on “change time zone”.
- And then click on the tab “internet time” and click on “change settings”.
- Check the box “synchronize with an internet time server” and also select the option “time.windows.com” from the drop down and click on “ok” and check if the issue persists.
Hope this information was helpful and do let us know if you need further assistance. We will be glad to assist.
1884 people found this reply helpful
Was this reply helpful?
Sorry this didn’t help.
Great! Thanks for your feedback.
How satisfied are you with this reply?
Thanks for your feedback, it helps us improve the site.
4 Ways to Synchronize Windows 10 Time With Microsoft Server
Olanrewaju Sodiq
24 Feb 2020
The benefits of your Windows computer clock transcend way beyond just telling the time. It needs to be accurate at all times else some apps and programs might not work properly. To ensure that your computer’s clock is always accurate, Windows has a dedicated ‘Time Service’ that syncs your PC’s time to Microsoft’s internet server. Although this synchronization process happens automatically, we’ll show you how to get it done manually and fix issues with syncing system time.

If your computer’s time is incorrect, it most likely isn’t synced with the Windows or Microsoft Time server. In this post, we will show you how to synchronize your Windows PC time with the Microsoft server. Also, how to fix some time synchronization issues. Let’s go.
Also on Guiding Tech

5 Best Time Management Apps for Windows 10
From Windows Settings
One of the easiest ways to sync Windows PC’s time with the Microsoft server is syncing it manually from the Windows Settings menu. Follow the steps below to get it done.
Step 1: Tap the Windows key + I button simultaneously on the keyboard to launch the Windows Settings menu.
Step 2: Select ‘Time & Language’.

Step 3: In the ‘Date & Time’ section, navigate to scroll down to the ‘Synchronize your clock’ sub-section and tap the ‘Sync now’ button.

That will immediately sync your computer’s clock with the Microsoft time server (usually takes 2 — 5 seconds).
Note: According to Microsoft, it is impossible to guarantee time accuracy on computers that have intermittent or no network connections. Therefore, you should have an active internet connection to effectively sync your computer’s time to the Microsoft Time Server.
It is also important to state that Windows automatically synchronizes your PC’s time with the Microsoft server daily. In the case where you need to manually sync the time, perhaps because your computer’s time configuration is incorrect, you can use the Sync now button in Step 3 above.
Also on Guiding Tech
# How-to/Guides
Restart the Windows Time Service
Restarting the Windows Time Service from the Windows Services Manager is an another effective way to sync your PC’s clock with the Windows server. For context, the Windows Time Server helps Windows users to maintain the most accurate time on their devices by syncronizing date and time information with the Microsoft Time server actively.
If your computer faces issues with incorrect timing or is always going out of sync with the official Microsoft server, then there might be a problem with the Windows Time service and restarting it could help. Here’s how to get it done.
Step 1: Tap the Windows key + R key simultaneously on your keyboard to launch the Run command dialog box.
Step 2: Type services.msc into the provided box and tap the OK button.

That will launch the Windows Services Manager in a new window. Scroll to the bottom of the page and locate Windows Time services on the page are arranged alphabetically so you shouldn’t have a problem locating it.

Next, enable this service or confirm that it is enabled and functioning properly. Because as Windows warns, date and time synchronization will be unavailable if the Windows Time service is stopped or disabled.
Step 3: Right-click on the Windows Time service and select Start.

If the Windows Time service was enabled and functioning but your PC’s time is still incorrect or not synced to the Microsoft time server, then you should restart the service. Right-click on Windows Time and select Restart.

Step 4: Restart your computer.
Upon restart, you want to also ensure your device is connected to an active internet (Wi-Fi or Ethernet cable) connection.
Re-Register Windows Time DLL file
Some apps and services on Windows make use of Dynamic Link Library (DLL) files to effectively execute their functions and activities. The DLL file responsible for the Windows Time service (W32Time) is the w32time.dll file. If this file goes missing, gets deleted, or corrupted, you might have issues synchronizing your computer’s time with the Windows server.
Re-registering the w32time.dll would help ensure your PC is regularly synced. Here’s how to register it on your PC.
Step 1: Tap the Windows key + X button simultaneously on your keyboard to launch the Windows Quick Access menu.
Step 2: Select ‘Command Prompt (Admin)’.

Step 3: Type in the command below into the Command Prompt console and hit the Enter button.

In less than a minute, you should see a notification that the w32time.dll was successfully registered on your PC.

Step 4: Restart your computer and check to see if your PC’s time is now accurate and syncs correctly with the Microsoft server.
Note: Make sure your computer is connected to an active internet connection.
Replace CMOS battery
If you are sure everything is good with your computer’s Windows Time services and syncing configuration but the time and date remain inaccurate or often go out of sync particularly after a system reboot, there’s a high chance that your PC’s CMOS (Complementary Metal Oxide Semiconductor) battery is faulty.

The CMOS chip is located on the motherboard. It keeps your PC’s time and date, as well as other configurations, up-to-date every time you turn off your computer. For that, the CMOS chip has its dedicated battery. If that battery is faulty or damaged, your PC’s time and date will always be messed up, so will its syncing with the Microsoft server.
Replacing the CMOS battery requires some technical know-how and expertise. Thatis why we recommend taking your PC to a skilled technician or the manufacturer’s official repair center.
Also on Guiding Tech

How to Show Missing Date and Time in Taskbar on Windows
Stay in Sync
Having incorrect system time on your PC could result in network and connectivity issues, file management problems, and difficulties using some apps and programs. The Microsoft time server is always accurate hence you should ensure that your PC is synced with it.
Next up: Can’t keep up with the time differences between several countries? Adding multiple clocks to your Windows PC could help. Check out two ways to get it done in the article below.
Last updated on 24 Feb, 2020
The above article may contain affiliate links which help support Guiding Tech. However, it does not affect our editorial integrity. The content remains unbiased and authentic.
Read Next

How To Synchronize Windows Clock With Internet Time Server
Wondering how to synchronize your # Windows # Clock with the Internet # Time Server? This article will show you the easiest way to do it.

How to Fix MSN Weather Not Working in Windows 10 Error
MSN # Weather app not working on # Windows 10 computer? Here are 9 ways to solve that problem. If not, there are a few other ways to get # weather reports too.

How to Add and Configure Gmail in Windows 8 Mail App
Learn How to Add and Configure # Gmail in # Windows 8 Mail App.

7 Best Ways to Fix Kindle for PC Desktop App Won’t Open on Windows
Can’t open the Amazon # Kindle app on your # desktop PC? Here are some solutions to fix that issue so you can get back to reading your books in peace in your free time.

What Is Microsoft Power Automate Desktop and Why Do You Need It
Everything you need to know about # Microsoft # Power Automate Desktop. Where to get it, how to use it, how to create your first workflow, and who should use it. Complete guide.

6 Best Ways to Fix Action Center Greyed Out on Windows 10
Is the Action Center greyed out on your # Windows 10 computer? Here is an in-depth look at all the solutions that can help you fix this issue promptly.

8 Best Ways to Fix Google Chrome Security Certification Error
Learn how to fix the # Google # Chrome # Security certification error by following the post below.

How to Use Paint 3D to Edit Photos
Wondering how to edit pictures using Paint 3D in # Windows 10? Check our detailed guide on how to use various tools in Paint 3D to edit images.
Did You Know
Microsoft Edge was initially code-named Project Spartan.


