- 10 вещей, которые нужно сделать после установки Kali Linux
- 1. Установите Git
- 2. Назначьте Bash-алиасы
- 3. Создайте непривилегированного пользователя
- 4. Установите терминальный мультиплексор
- 5. Установите любимые инструменты
- 6. Установите свежий Tor
- 7. Установите Syncthing для хранения данных
- 8. Установите редактор кода
- 9. Установите OpenVAS
- 10. Поменяйте ключи и пароль SSH
- How To : Top 10 Things to Do After Installing Kali Linux
- 1. Install Git
- 2. Configure Bash Aliases
- 3. Create a New Low Privileged User
- 4. Install a Terminal Multiplexer
- 5. Install Your Favorite Hacking Tools
- 6. Install the Latest Version of Tor
- 7. Configure File Sharing with Syncthing
- 8. Install a Code Editor
- 9. Clone Rubber Ducky Encoder
- 10. Change SSH Keys & Default Password
- What’s the First Thing You Do After Installing Kali?
- Join the Next Reality AR Community
- Get the latest in AR — delivered straight to your inbox.
- Related
- How To : Build and Install Kali Nethunter (The New Version) On a Supported Android Device Running Android 6.0.1
- How To : Run Kali Linux as a Windows Subsystem
- How To : KALI Linux 6 Things You Should Do After Installing
- News : 20 Things to Do with Kali Linux After Installation
- 28 Comments
10 вещей, которые нужно сделать после установки Kali Linux
Десять первых шагов, которые помогут использовать свежую Kali Linux для профессиональной оценки безопасности компьютерных систем.
Дистрибутивы Linux предоставляют широкие возможности кастомизации, и Kali Linux – не исключение. Всего несколькими командами можно автоматизировать задачи, установить любимый софт, создать дополнительных пользователей и оптимизировать взаимодействие с терминалом. Как сделать самое важное? Рассказываем.
1. Установите Git
Git – это open-source система контроля версий программного обеспечения для совместного использования и редактирования кода. Она позволит вам «клонировать» репозитории и не ограничивать свои пентестерские нужды встроенным функционалом Kali Linux.
Переносимся в терминал для установки git :
После установки всех зависимостей вы получите возможность скачивать репозитории командой git clone . Для этого скопируйте url нужного репозитория из адресной строки браузера или из интерфейса Github:
Теперь ссылка в буфере, вставьте её в терминал после команды:
Вы получите локальную копию репозитория и вывод со статистикой.
2. Назначьте Bash-алиасы
Используйте алиасы для часто вводимых команд. Для примера сократим команду besside-ng – сканера безопасности WEP сетей. Алиасы Bash хранятся в файле, их можно дополнить и обновить:
Файл пустой? Значит вы не пользовались алиасами до этого. Самое время! Введите строчку в открытый nano файл:
Закрывайте (Ctrl+x) и сохраняйте (y, Enter). Рассмотрим синтаксис: alias объявляет псевдоним hackwifi и указывает на команду в одинарных кавычках. Проверим в новом окне терминала:
Тем, кто выбрал Kali для знакомства с Linux, не помешают:
3. Создайте непривилегированного пользователя
Вы ведь не собираетесь работать под рутом? Не подвергайте систему опасности – создайте обычного пользователя. Баги в пользовательских программах под рутом потенциально опасны для файловой системы, а в серверных программах они могут давать атакующему доступ к оболочке суперпользователя.
Поэтому создайте непривилегированного пользователя в новой Kali Linux и будьте спокойны:
Первая команда создаёт пользователя proglib , домашний каталог /home/proglib и одноимённую группу. Затем добавляет нового пользователя в группу sudo с доступом к руту. Вторая команда задаёт пароль пользователя.
4. Установите терминальный мультиплексор
Мультиплексор в данном случае – это плиточный эмулятор терминала, в котором можно открыть несколько сессий в одном окне. Главное преимущество – возможность видеть все ваши сессии одновременно, не перекрывающими друг друга.
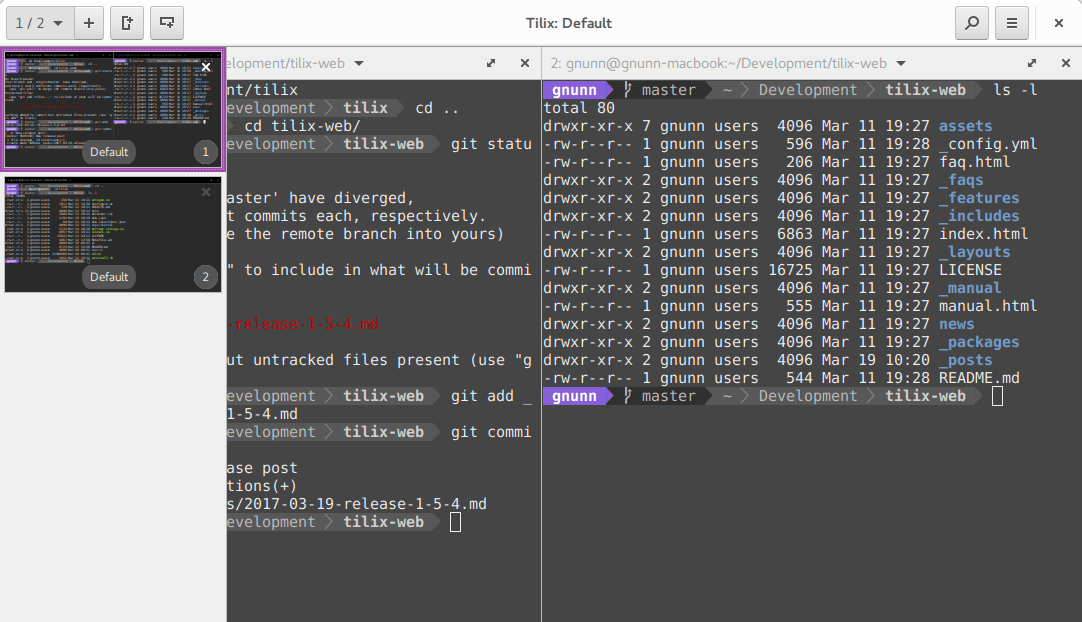
На скриншоте представлен Tilix – надёжный open-source эмулятор терминала. В качестве альтернатив можете попробовать tmux и screen.
Tilix доступен в репозиториях Kali Linux и устанавливается командой:
5. Установите любимые инструменты
Некоторые версии Kali Linux ориентированы на минималистичных пентестеров, которые предпочитают обходиться без тысячи предустановленных инструментов. В этом случае придётся устанавливать любимые инструменты вручную. Типы инструментов каждого пентестера зависят от его умений и области знаний.
Kali Metapackages дают возможность устанавливать отдельные категории инструментов Kali Linux и смотреть состав метапакетов.
Описание и размер желаемого метапакета перед установкой. Вот как установить все инструменты Kali Linux, которых нет даже в полных образах:
Внимание! Это займёт 15 Гб, устанавливайте метапакеты исходя из ваших нужд.
6. Установите свежий Tor
Качайте софт для анонимности из оригинальных источников. Версия Tor в репозиториях Kali Linux не всегда вовремя обслуживается и обновляется. Это означает, что у вас не будет критических обновлений стабильности и безопасности.
Поэтому добавьте репозитории Tor Project из источников самого проекта:
Затем скачайте ключ подписи пакета Tor Project и импортируйте в систему:
OK в выводе свидетельствует об удачном добавлении ключа в систему. После чего следует обновиться:
И установить Tor:
7. Установите Syncthing для хранения данных
Syncthing – это кроссплатформенная, приватная, лёгкая альтернатива проприетарным облачным хранилищам. Передача кейлогов, скриншотов, записей веб-камер и другой «добычи» между виртуальными серверами и локальными машинами Kali может оказаться, в лучшем случае, разочарованием для пентестера. Syncthing делает безопасную передачу файлов абсолютно безболезненной.
Начните с установки зависимостей:
Затем скачайте и установите ключи:
Ключи gpg нужны системе для проверки подписи источника при установке пакетов. Благодаря подписям обеспечивается целостность пакетов, которая может быть нарушена вследствие изменения оригинального пакета или перехвата трафика.
Осталось добавить репозиторий проекта в список источников уже знакомым вам способом:
Запускайте командой syncthing .
8. Установите редактор кода
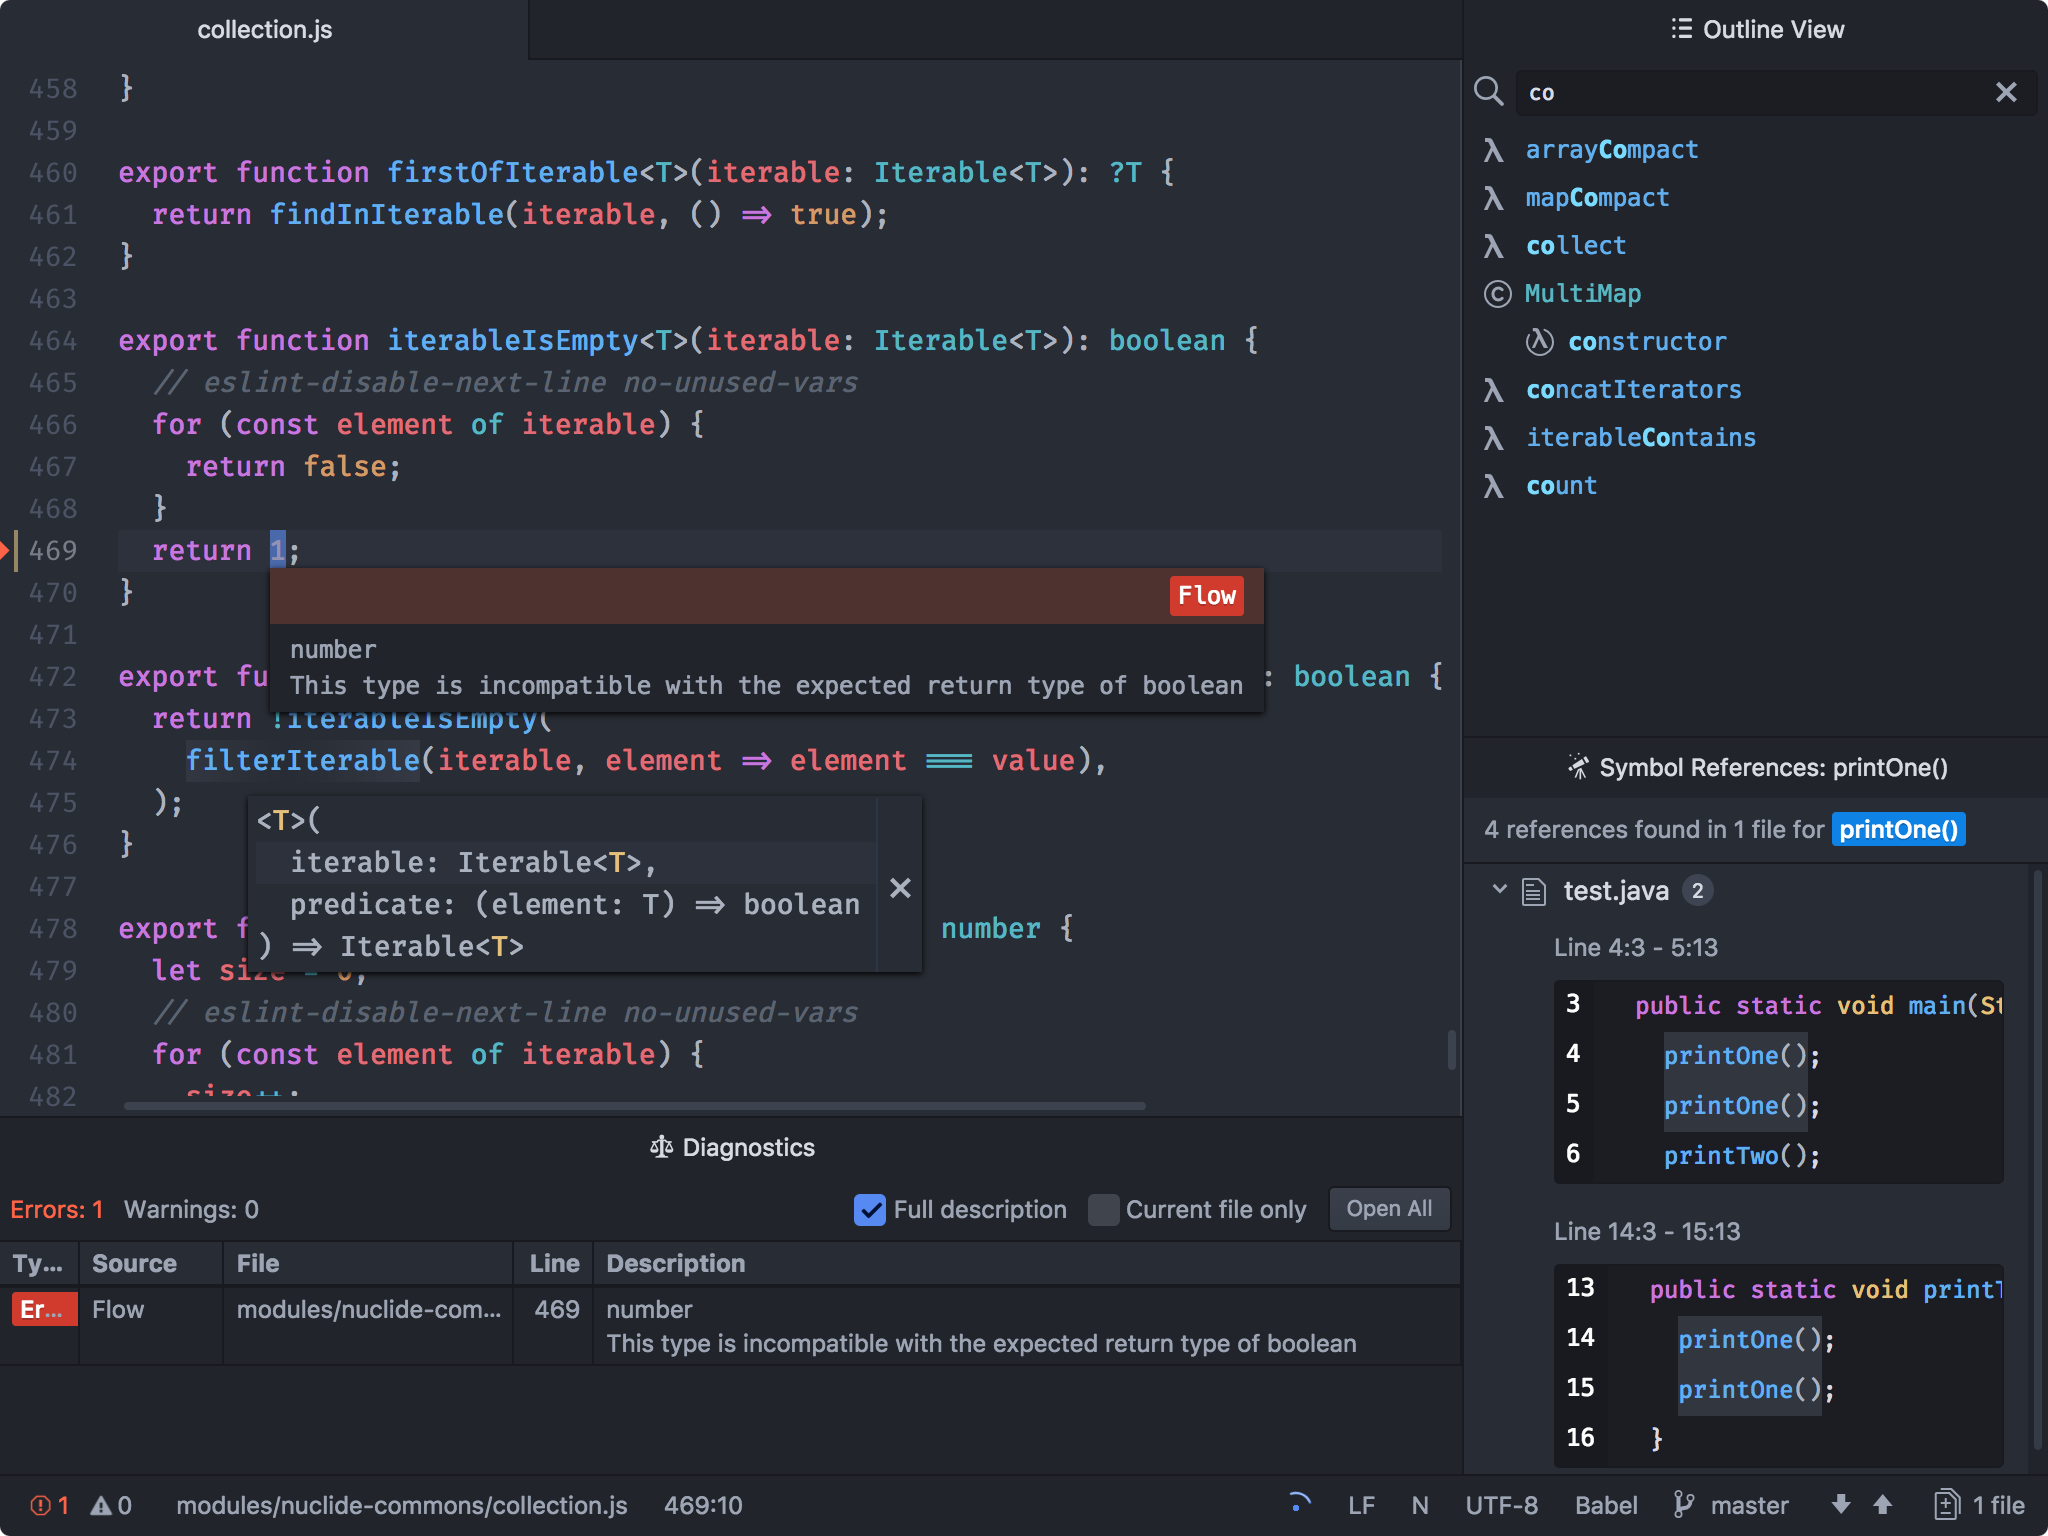
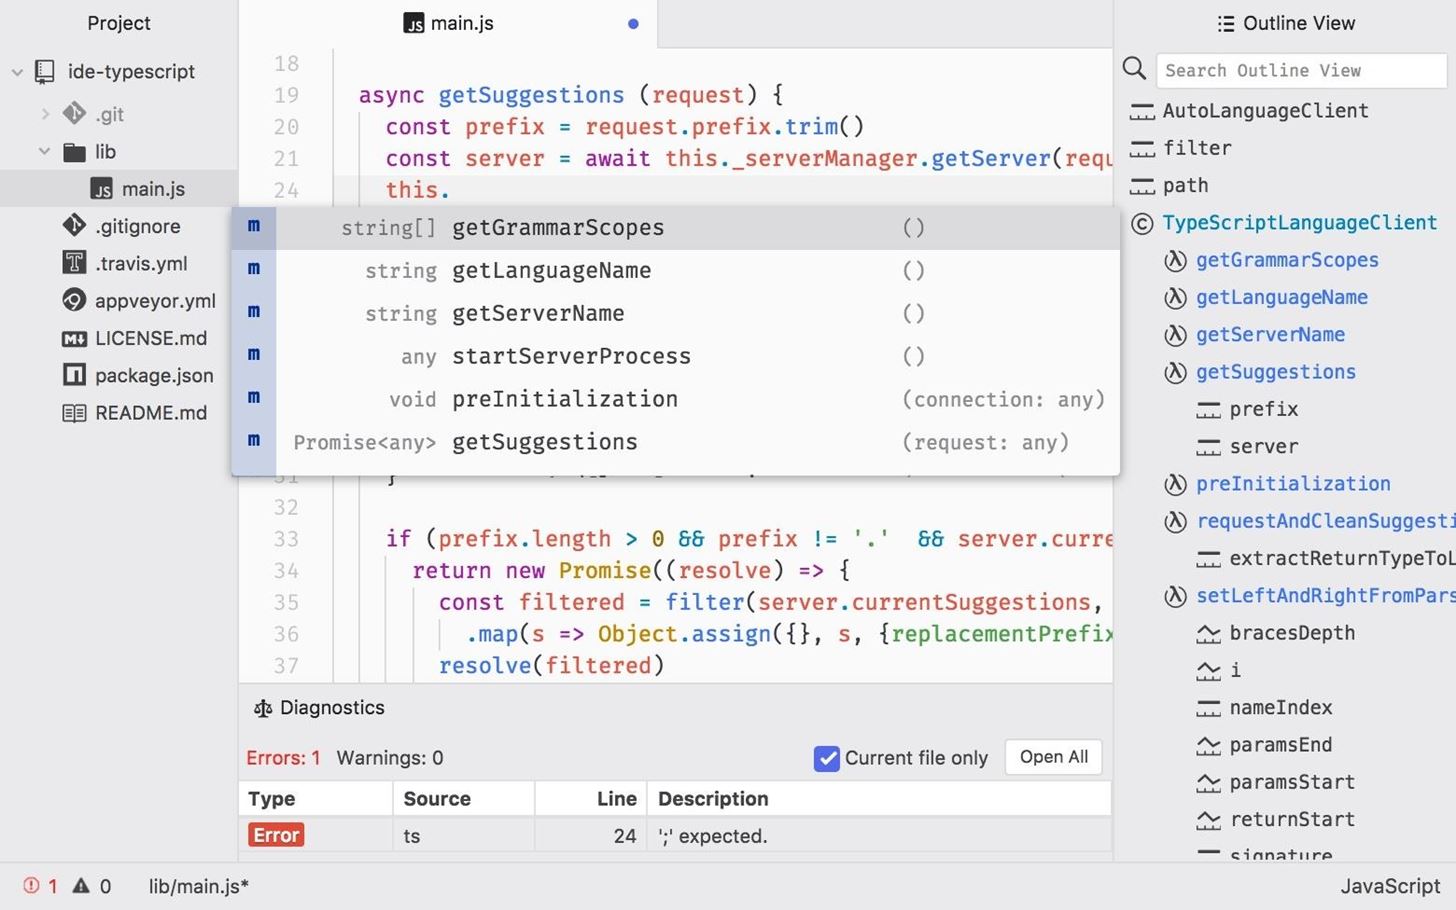
Atom – это бесплатный, навороченный и кастомизируемый текстовый редактор с возможностями совместного использования кода в реальном времени, интуитивного автозавершения и установки пакетов для расширения функциональности. В качестве альтернатив можете попробовать Geany и Gedit.
Для установки Atom в Kali Linux скачайте deb-пакет. Затем установите зависимости:
Наконец, используйте dpkg , пакетный менеджер командной строки, с флагом установки -i :
После этого Atom будет доступен из меню приложений.
9. Установите OpenVAS
OpenVAS – это свободный сканер уязвимостей, который расширит ваш инструментарий. Фреймворк запускался под именем GNessUs, бесплатного форка Nessus, который сейчас стоит денег 🙂
Для бесплатной утилиты, OpenVAS хорошо справляется с оценкой безопасности узлов сети. Конечно, платный софт типа Nessus и NeXpose более функционален, и стоит он от $2,190.00 в год в случае с Nessus.
OpenVAS дает начинающим отличные возможности для понимания работы сканеров уязвимостей.
10. Поменяйте ключи и пароль SSH
Kali Linux устанавливается с одинаковым паролем (toor), что упрощает автоматизацию атак. Кроме того, стандартные ключи SSH могут позволить злоумышленнику перехватить ваши сообщения. Для смены ключей перейдите в каталог, а затем сбросьте конфигурацию сервера:
Источник
How To : Top 10 Things to Do After Installing Kali Linux
Kali Linux, by default, probably doesn’t have everything you need to get you through day-to-day penetration testing with ease. With a few tips, tricks, and applications, we can quickly get started using Kali like a professional white hat.
Most Linux distributions are highly customizable. This makes personalizing your penetration testing distribution a bit daunting. With just a few commands, we can automate tasks, install our favorite software, create additional user accounts, properly configure anonymity software, and optimize our interactions with terminals. There are just a few things we can do to improve our interactions with the operating system.
1. Install Git
Git is an open-source software version control application. It can be used for collaboratively sharing and editing code but is commonly referenced here on Null Byte as the primary tool for copying (or «cloning») code repositories found on GitHub. Git is a must have tool for penetration testers looking to expand their toolset beyond what’s available in the default Kali repositories.
Git can be installed using the below apt-get command.
2. Configure Bash Aliases
Bash aliases are fantastic for creating customized command line shortcuts. For example, we can reassign the ls command to automatically use our favorite arguments. Below is an example of a normal ls output.
Here it is again after creating an ls alias.
We’re getting a much more verbose output. The ls command is now using the -l, -a, -t, -h, and -r arguments automatically. All of these arguments will instruct ls to use the listing (-l) format, list all (-a) files — including hidden files — and print the file sizes in human-readable (-h) formats (e.g., 1K, 234M, 5G).
My alias will also sort the output by modification time (-t), and reverse (-r) the order of the list so recently modified files appear at the bottom of the terminal. This collection of arguments is my personal ls preference, but yours may be different.
To create aliases, open the /root/.bash_aliases using nano or your favorite text editor. Add the following line to create an alias.
We can also go a bit further and add more complex functions to the .bash_aliases file. Below is a simple example of a function designed to keep Kali fully up to date.
After saving changes made to the .bash_aliases file, open a new terminal for the changes to take effect. Running the newly created apt-updater function will invoke a series of apt-get commands that will automatically update and maintain your system. The ampersands (&&) ensure that the function doesn’t continue to the following command if a prior command fails.
For more on Bash aliases, check out Kody’s «Set Up a MacOS System for Wi-Fi Packet Capturing» article.
3. Create a New Low Privileged User
Many applications like the Chromium Browser and the Tor Browser should never be opened or used as a root user. Such applications rely heavily upon low-level permissions to deliver some degree of security. It might be beneficial to some users to create a low privileged user account for such activities.
This concept is covered in greater detail in Takhion’s «Lock Down Kali Linux for Safe Desktop Use» article, so make sure to check that out for help.
4. Install a Terminal Multiplexer
A multiplexer is a tiling terminal emulator that allows us to open several terminal sessions inside one single window. The major benefit to this is being able to see all of our open terminal sessions at once and not layer the windows on top of each other. Below is a multiplexer example.
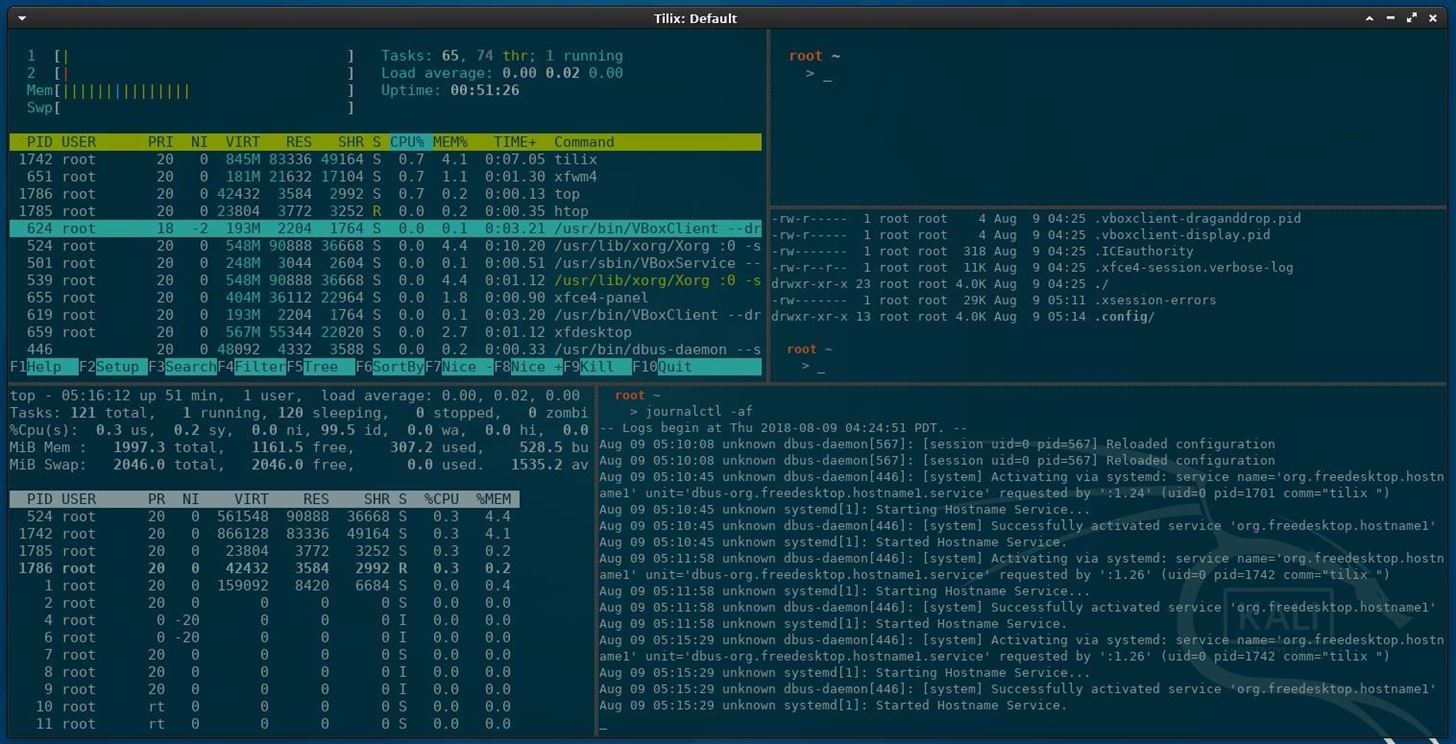
There are many noteworthy multiplexers. Tilix, as seen in the above screenshot, is an open-source and reliable option. Alternatives include tmux and screen.
Tilix is available in Kali’s APT repositories and can be installed using the below command.
5. Install Your Favorite Hacking Tools
Some versions of Kali are geared toward minimalist pentester’s who prefer not to have hundreds of hacking tools preinstalled. This means we’ll have to install our favorite tools manually. The types of tools we use vary based on our skill set and areas of expertise, but below are some popular hackings tools.
These tools can be installed using the below command.
6. Install the Latest Version of Tor
Tor is available in Kali’s repositories, but anonymity software should be acquired directly from the source (torproject.org). Furthermore, Kali’s version of Tor is not reliably maintained or updated. This means we could be missing critical stability and security updates.
Add the Tor Project repositories to your APT repository list.
Then, download the Tor Project package signing key and import it into your APT keyring.
You’ll see the «OK» output when the signing key has been added to your keyring. Next, update APT using the below apt-get command.
Install Tor using the below command, and you’re done.
7. Configure File Sharing with Syncthing
Syncthing, created by Jakob Borg, is a cross-platform, private, lightweight file-syncing (Dropbox) alternative. As a penetration tester, transferring keystroke logs, screenshots, webcam recordings, and sensitive loot files between virtual private servers and local Kali machines can be a frustrating task. Syncthing makes secure file-sharing totally painless.
I’ve covered the Syncthing installation and configuration in a previous article. Readers should reference that for a detailed step-by-step guide.
8. Install a Code Editor
Atom is a free, open-source, feature-rich, and highly customizable text editor. Its features include the ability to collaboratively share code in real time, intuitive coding autocompletion, and the ability to install packages which further enhance Atom’s versatility. Other noteworthy text editors include Geany and Gedit.
To install Atom, head over to their website and download the latest Debian installer. Next, open a terminal and install the required dependencies using the below apt-get command.
Finally, use dpkg, a command line package manager, with the install (-i) argument.
When that’s done, Atom will be available in your Applications menu.
9. Clone Rubber Ducky Encoder
The USB Rubber Ducky is the notorious keystroke injection tool. Creating ducky payloads is easy using the DuckToolKit website, but as a penetration tester, it’s unsafe to share client information with random websites. Uploading payload contents to a third-party website can be dangerous.
Instead, we can use Git to clone the USB Rubber Ducky repository and encode payloads locally.
Then, change (cd) into the USB-Rubber-Ducky/Encoder/ directory and use the following java command to start encoding ducky payloads without third-party websites.
10. Change SSH Keys & Default Password
The default password for every Kali Linux installation is the same (toor) which makes it very easy to automate attacks. Also, the default SSH keys can allow an attacker to intercept your communications when you’re controlling something like a Raspberry Pi via SSH.
To change the SSH keys, first, change into the directory. Doing the below two commands will reset the SSH keys from the default ones.
Now, for your Kali system’s password, enter passwd root, then enter in your new password. Afterward, retype it to confirm. If you’re not logged in as root, you may be asked for your current password before doing this.
What’s the First Thing You Do After Installing Kali?
We all have varying degrees of interests, skill sets, and levels of experience. Which makes compiling a well-rounded list of post-installation steps tricky. Did I miss any critical steps? How do you personalize and customize new Kali installations? Be sure to leave a comment below.
Want to start making money as a white hat hacker? Jump-start your hacking career with our 2020 Premium Ethical Hacking Certification Training Bundle from the new Null Byte Shop and get over 60 hours of training from cybersecurity professionals.
Other worthwhile deals to check out:
Join the Next Reality AR Community
Get the latest in AR — delivered straight to your inbox.
Related
 How To : Build and Install Kali Nethunter (The New Version) On a Supported Android Device Running Android 6.0.1
 How To : Build and Install Kali Nethunter (The New Version) On a Supported Android Device Running Android 6.0.1
 How To : Run Kali Linux as a Windows Subsystem
 How To : Run Kali Linux as a Windows Subsystem
 How To : KALI Linux 6 Things You Should Do After Installing
News : 20 Things to Do with Kali Linux After Installation
 News : 20 Things to Do with Kali Linux After Installation
 28 Comments
It had to do with a legal issue: Firefox is too closely associated with commercial code to satisfy Debian’s administrators–they hesitated to incorporate undesired changes to Firefox, Debian thus was forced by Mozilla to change the names of Firefox, Thunderbird, and Seamonkey. (See Wikipedia: «Mozilla Corporation software rebranded by the Debian project.» Debian is more slow and deliberate concerning changes to the distro.)
For one thing, changing the name to Iceweasel prohibits users from querying Debian developers concerning changes to Firefox. Upon running Iceweasel, «Firefox» and «mozilla» do turn up in error messages, etc., nonetheless.
Such an animal actually does exist: It appears to be similar to a small, white fox.
I just change the wallpaper. 😉
Anyways, is there any possibility another post can be done about how to create your own custom Kali OS using the Kali Live Scripts? Just a thought.
Many thanks for this excellent article. I did have some problems which I’ll pass on.
- ‘the repository http:/http.kali.org. No public key
- Syncthing: Sudo sysemctl —user start. Failed to connect to bus. No such file or service.
- Atom: Package gconf2 is not configured yet.
- Rubber-Ducky: Error with input file. Exception in thread «main» java.lang. Null pointer exception.
I’ll proceed with your other ‘How tos’ and see how I go. I’m using Linux Mint 18.3 as my base as I don’t want to install Kali on my laptop.
You’re attempting to follow along with these Kali tutorials using Linux Mint? Kali is based on Debian, which isn’t Mint/Ubuntu. You will continue to experience many issue as you follow along. I recommend installing Kali in Virtualbox, on a USB, or on a Raspberry Pi. There are guides for all of these on Null Byte.
Please give me the json for the tilix colors u are using.
I would add that after installing with full encryption, to set up the nuke option and make an encrypted header backup (put in a safe place or 2).
Hey so quick question ,
on 6.Install the Latest Version of Tor
on the part when you paste the «signing key»
and it gets to
«HTTP request sent ,awaiting response. (i get) 408 request timeout.»
I’m not sure what I’m doing wrong if you could please help me out that would be great. thx
Looks like MIT’s PGP server is behaving unusually. The key can be acquired directly from the torproject now:
This article isn’t strictly for Kali Linux on RPi3B+, correct? I like using Atom on my mac, however, Atom doesn’t support ARM systems, or to my knowledge. That is unless you have a work-around.
You do realize Mac is merely a fancy window manager running on top of a special version of FreeBSD right?
according to stage 2 about configure bash alias. i have a problem attempt to write the command hackwifi as shown at the explain video of null byte. the output that i get after write (at a new terminal window) is:
# hackwifi
nl80211 not found.
Interface wlan0:
ioctl(SIOCGIFINDEX) failed: No such device
besside-ng: wi_open(): No such device
root@kali:
someone can help me please?
You have to have an RF (WiFi card or dongle) device
When creating new sshd keys ensure they are actually recreated, if they do not have current date then most likely they did not. I took a look here forums.kali.org/showthread.php?5723-Change-your-Kali-default-ssh-keys and basically one step that was done extra was move old keys to different folder, then it recreated keys.
root@kali:/etc/ssh# dpkg-reconfigure openssh-server
Creating SSH2 RSA key; this may take some time .
3072 SHA256:xxxxxxxxxxxxxxxxllaouarere root@kali (RSA)
Creating SSH2 ECDSA key; this may take some time .
256 SHA256:xdaalalfjlaflafjalfjalf root@kali (ECDSA)
Creating SSH2 ED25519 key; this may take some time .
256 SHA256:lajlfajflajflajflajflafjalfjalfjaljlaf root@kali (ED25519)
rescue-ssh.target is a disabled or a static unit, not starting it.
# apt-get install tor-geoipdb
Reading package lists. Done
Building dependency tree
Reading state information. Done
Some packages could not be installed. This may mean that you have
requested an impossible situation or if you are using the unstable
distribution that some required packages have not yet been created
or been moved out of Incoming.
The following information may help to resolve the situation:
The following packages have unmet dependencies:
tor-geoipdb : Depends: tor (>= 0.4.1.6-1
d9.stretch+1) but it is not going to be installed
E: Unable to correct problems, you have held broken packages.
I walked through this tutorial but had some issues with some installations. Could someone help me figure out what I need to do to get these messages resolved?
- Couldn’t install Tilix, got the message «E: Unable to locate package tilix»
- Downloading Atom resulted in this message
«dpkg: error processing archive /root/Downloads/atom-amd64.deb (—install):
package architecture (amd64) does not match system (arm64)
Errors were encountered while processing:
/root/Downloads/atom-amd64.deb»
Hey there Mitch,
Well the error message of your atom installation is quite clear: This software was created for systems which use the amd64 architecture, but your system is using arm64. So the version of atom you downloaded is not compatible with your system architecture —> it does not run. I heard there are workarounds, but since it did not affect me personally I didn’t dive too deep into the topic and I really doubt there is something reliable out there. There is a visual studio code port for arm64 though so I could recommend that. VS Code is also highly customizable (idk if it has less features on arm64) and could suit your purposes. You can check it out and let me know if it works/ is something for you 🙂
I hope I could help at least a little bit
i need a little bit help
if i close the terminal, is there any way to retrieve it?
and. is it going to close or destroy the processes which was running on it
i swear to christ, i have reinstalled Kali Linux at LEAST 15 times, and ive tried EVERY DAMN tutorial i have found on google on how to fix the «update» issue. i just cant make any headway here. Have any of you had this problem? after flashing kali to SD, and running it, try to «update & Upgrade» then screen goes blank, curser flashes and its not really functional . can somebody please helppppp meeee.
First off. Uninstall Kali. Problem 1. Solved. It is a garbage distro. Use Debian base. Put it together yourself. I know, its alot of work. So is installing a bunch of times. Kali is nice in concept but really its not very good. Even Kali devs recommend you don’t use it. Unless I am greatly mistaken, Every piece of software on kali is found in other debian repos. I know that most are. Also a big theme of this article is getting software not from kali as its usually poorly maintained. They, kali, have a great website full of things to install on a better distro. Just don’t get it from them. If you got Debian your good, I am sure. You could probably find similar for others like arch, and perhaps better maintained. Kali is a fad because its a good idea. But I have even tried it and its junkware. Make life easy on yourself and install MX and start hunting the packages. Or base Debian if you want to work a little for it.
you should use gparted to re-partition you sd card before you do apt-get upgrade since this will cause issues because of insufficient space for the updates.
Step 1: Install Gparted
apt-get install gparted
Step 2: Run Gparted
gparted
Step 3: Resize Partition
select your ext4 partition and click «Resize/Move» button move slider all the way to the right your «free space following (MiB):» should be 0. Then you click the «Resize» button and the «Apply» button.
For anyone with a slower-than-desired network connection, you may want to disable the auto-sleep/shutdown timers in Kali, cause the apt-get upgrade can take a long time over a crappy wi-fi connection, and mine crashed the first time cause Kali is set to turn itself off after 15 minutes of no-contact.
This is super easy to do from the GUI in Kali, go to:
Applications (Top left) > Settings > Power Manager > System (tab — set the «When inactive for» slider to «Never») > Display (tab — Set all sliders to «Never») > Security (tab — Set it to Never automatically lock the session).
I’m unable to install ‘tor’as you directed in the article.
I installed rubberducky in my kalilinux android
But after opening it is saying bash:java:command not found
Help me anyone plzzzzzzzzzzzzzzz
Java isn’t installed. Might be a problem with using it on android. Is it trying to run a script?
Please help i tried to install tor as shown on the video.
Now i whana launch it but when i type tor on the terminal this comes up.
I can’t open tor.
I am facing the same problem!
=> Just tell me what is this error and how to solve it ?
Hello everybody! I’m trying to setup my Kali distro on VMware Workstation 16 Pro but i’ve an error occuring while the installation of USB Rubber Ducky.
I’ve an issue occuring while i’m trying to encode my payload locally. I’ve this traceback so if someone can help me out with this problem please? The message appearing in the STDout is:
root@kali:/home/naga/USB-Rubber-Ducky/Encoder# java -jar encoder.jar -i input_payload.txt -o inject.bin
Hak5 Duck Encoder 2.6.4
Error with input file!
Exception in thread «main» java.lang.NullPointerException
at Encoder.main(Encoder.java:127
PS: Thank you very much by advance for your help guyz/girlz! I’ll highly appreciate your help. Maybe another time i’ll be able to help ya in return. Who knows lol! Thanks! ^_*
Quick question if anybody can shed some light. Using VirtualBox — installed iso from kali site verified. Tried the Live, The ova, and finally the full distro. Upon firing up I get the Kali screen choose Kali and then get screen black — flashing cursor — no CMD Line? Any Ideas
Sorry, forgot Linux MInt 19.3 Tricia
VirtualBox Graphical User Interface Version 5.2.42_Ubuntu r137960
Источник


