- How to erase an Intel-based Mac
- Before erasing your Mac
- Use Disk Utility to erase your Mac
- If you don’t see Macintosh HD in Disk Utility
- Move your content to a new Mac
- Get ready
- Use Migration Assistant
- On your new Mac
- On your old Mac
- On your new Mac
- On your old Mac
- bzerangue / _verify-repair-permissions-disk.md
- 4 Simple Mac Maintenance Tips
- 1) Run Disk Utility
- 2) Keep your Mac Software Updated
- 3) Clean Off the Desktop
- 4) Regularly Back Up the Mac
How to erase an Intel-based Mac
Erase (format) built-in startup disk of an Intel-based Mac.
These steps do not apply to Mac computers with Apple silicon. The steps to erase a Mac with Apple silicon are different.
Before erasing your Mac
- Make a backup of any files that you want to keep. Erasing your Mac permanently deletes its files.
- If you want to restore your Mac to factory settings, such as to prepare it for a new owner, first learn what to do before you sell, give away, or trade in your Mac. Then erase your Mac as the final step.
Use Disk Utility to erase your Mac
- Start up from macOS Recovery: Turn on your Mac, then immediately press and hold these two keys until you see an Apple logo or other image: Command (⌘) and R.
- If asked, select a user you know the password for, then enter their administrator password.
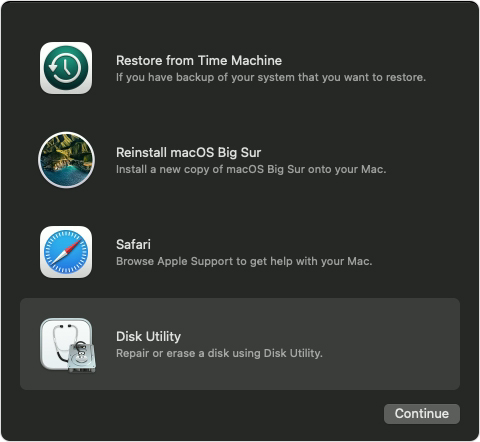
- From the utilities window, select Disk Utility and click Continue.

- Select Macintosh HD in the sidebar of Disk Utility. Don’t see Macintosh HD?
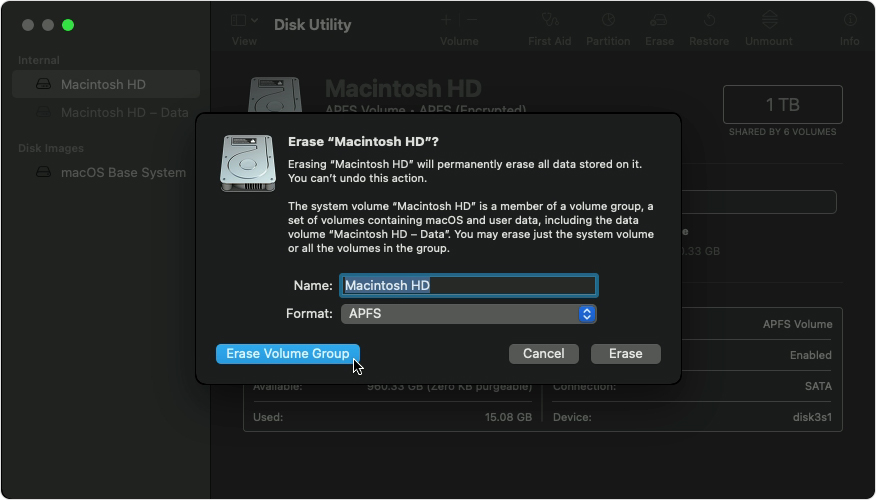
- Click the Erase button in the toolbar, then enter the requested details:
- Name: Macintosh HD
- Format: APFS or Mac OS Extended (Journaled), as recommended by Disk Utility
- Click Erase Volume Group. If you don’t see this button, click Erase instead.
- If asked, enter your Apple ID. Forgot your Apple ID?
- After the erase is done, select any other internal volumes in the sidebar, then click the delete volume (–) button in the toolbar to delete that volume.
During this step, disregard any internal volume named Macintosh HD or Macintosh HD — Data, as well as any volumes in the External and Disk Images sections of the sidebar. - Quit Disk Utility to return to the utilities window.
- If you want to start up again from the disk you erased, select Reinstall macOS in the utilities window, then click Continue and follow the onscreen instructions to reinstall macOS.
If you don’t see Macintosh HD in Disk Utility
Your built-in startup disk should be the first item listed in the Disk Utility sidebar. It’s named Macintosh HD, unless you changed its name. If you don’t see it there, choose Apple menu > Shut Down, then unplug all nonessential devices from your Mac and try again.
If your disk still doesn’t appear in Disk Utility, or Disk Utility reports that the erase process failed, your Mac might need service. If you need help, please contact Apple Support.
Источник
Move your content to a new Mac
Use Migration Assistant to copy all of your documents, apps, user accounts, and settings to a new Mac from another computer.
Migration Assistant copies all of your files from your old Mac to your new Mac so that you don’t have to copy them manually.
- If your files are currently on a PC, follow the PC migration steps instead.
- If you’re moving content from a Time Machine backup, follow the steps to restore your Mac from a backup instead.
Get ready
- Install all available software updates on both computers. If your old Mac isn’t using OS X Lion or later, and your new Mac isn’t using OS X Mavericks or later, follow the Mountain Lion migration steps instead.
- If both computers are using macOS Sierra or later, place them near each other with Wi-Fi turned on. If either one is using OS X El Capitan or earlier, make sure that both are on the same network.
- On your old Mac, choose Apple menu > System Preferences, then click Sharing. Make sure that a name appears in the Computer Name field.
Use Migration Assistant
You’re now ready to use Migration Assistant to move your files from the old Mac to the new one.
On your new Mac
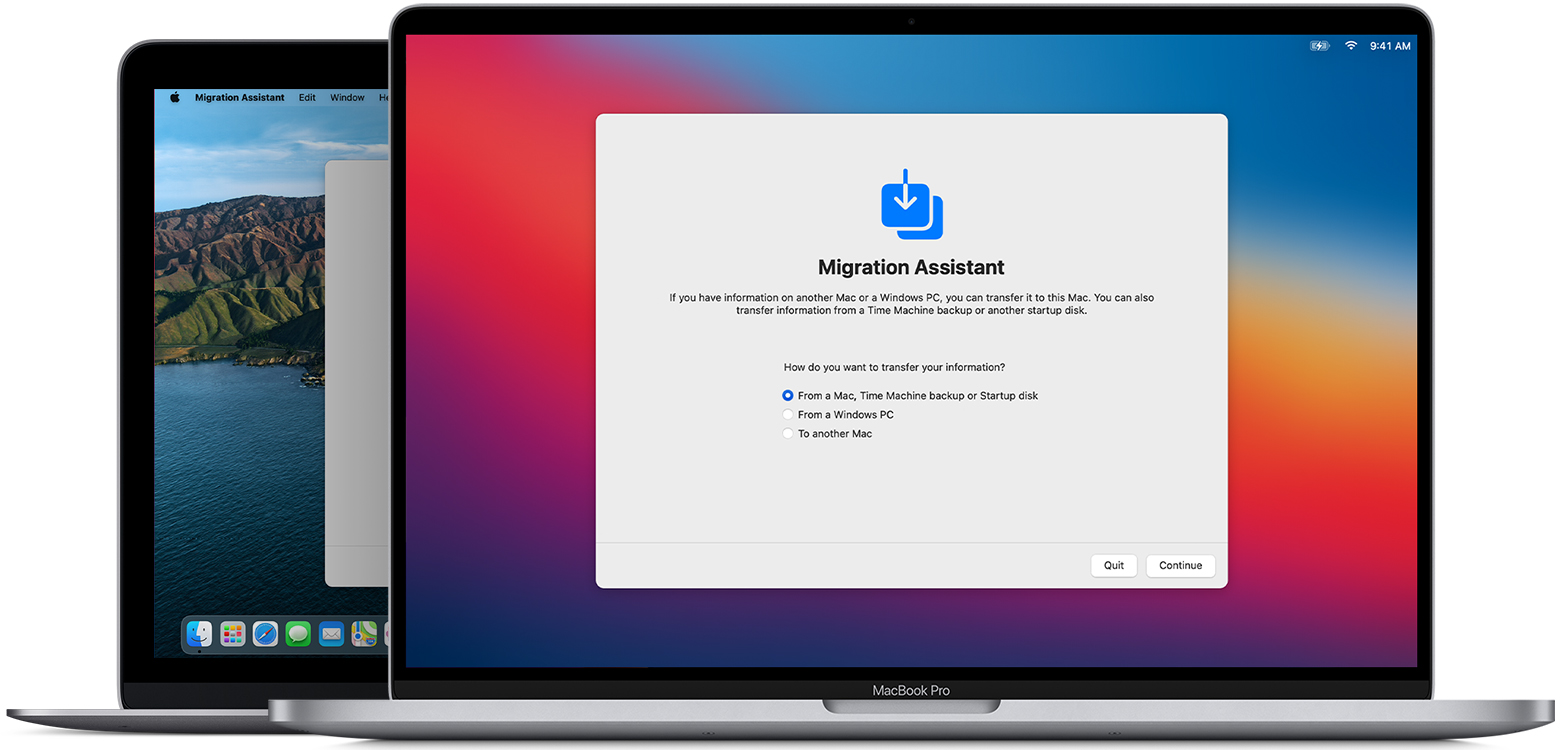
- Open Migration Assistant, which is in the Utilities folder of your Applications folder. Then click Continue.
- When asked how you want to transfer your information, select the option to transfer from a Mac, Time Machine backup, or startup disk. Then click Continue.
On your old Mac
- Open Migration Assistant, then click Continue.
- When asked how you want to transfer your information, select the option to transfer to another Mac. Then click Continue.
On your new Mac
When asked to select a Mac, Time Machine backup, or other startup disk, select the other Mac. Then click Continue.
![]()
On your old Mac
If you see a security code, make sure that it’s the same code shown on your new Mac. Then click Continue.
Источник
bzerangue / _verify-repair-permissions-disk.md
Verify and Repair Disk Permissions via Terminal (Mac OS X)
Verify Permissions
Repair Permissions
Verify and Repair Volume via Terminal (Mac OS X)
Launch Terminal from your Dock, Utilities folder, or via an app launcher like Alfred. Once launched, type or paste in the following command.
diskutil verifyVolume [drive name]
So, for your main hard drive, you could type or paste in something like:
Or, if you have an external drive attached, you can type or paste in the following:
diskutil verifyvolume /Volumes/[drive name]/
So for an external drive named “BackupStuff” you would enter:
diskutil verifyvolume /Volumes/BackupStuff/
If you see no messages, then you can assume that diskutil hasn’t found any errors, and you can move on. If, however, you get an error like “The volume Macintosh HD was found corrupt and needs to be repaired,” then you can repair the drive using diskutil as well.
To repair the drive, you can issue the following command into Terminal:
Or, for that external drive as above:
diskutil repairvolume /Volumes/BackupStuff/
If unable to unmount drive on Mac
You can try booting from OS X recovery by holding CMD + R at the time of startup. Once booted from OS X recovery, select Terminal from the utilities and then at the unix prompt enter:
- diskutil list
- then press return and look for the disk identifier and enter the following command with the disk identifier:
- sudo diskutil unmountDisk /dev/(enter here disk identifier name)
- Press return and enter your admin password if prompted. This should unmount all volumes of the physical drive.
- If still the above method didn’t work, then the last option is to force the entire disk to unmount.
- For that using the terminal application again, enter the following command: sudo diskutil unmount force /dev/(enter here disk identifier name)
- Then press return and enter the admin password if prompted. This will definetely unmount the entire disk and all its related volume.
Mac OS X Software Update via Terminal
To get a list of available software updates, type the following command:
You will see a list of available updates. You can then install all available software updates with the following command:
sudo softwareupdate -iva
The use of sudo is required to get superuser privileges to actually install the updates. You can also install only the recommended updates with:
sudo softwareupdate -irv
Or you can just install specific software updates by specifying the shorthand package name from the previous list, like so:
sudo softwareupdate -i iPhoneConfigurationUtility-3.2
If there are any updates you want to ignore, you can do so with the -–ignore flag, for example:
sudo softwareupdate —ignore iWeb3.0.2-3.0.2
If you want to see all the available command line shortcuts for Software Update, just type:
This is really useful for remotely updating Macs, setting up automated updates via a bash script, or if you just want to geek out.
Control Time Machine from the command line
Time Machine is a great tool for ensuring that your data is safe, and it’s pretty easy to set up and use. But for some users, the basic Time Machine interface isn’t enough. As with most of OS X’s functions, there is a command-line tool that lets you do many things with Time Machine. Here’s how you can use the tmutil command to control and tweak Time Machine from Apple’s command-line tool, Terminal.

Most people won’t need to use this command for their backups because the Time Machine interface will suffice. Who will need it? People who want to manage remote Macs or who want to run scripts containing commands for Time Machine.
The basics of the tmutil command can be found by typing man tmutil in Terminal. (You’ll find the Terminal app in your /Applications/Utilities folder.) The man page tells you what you can do with this command.
For example, to turn Time Machine on or off, you can run these commands:
sudo tmutil enable
sudo tmutil disable
The sudo command is required for many of the commands you issue with tmutil because you need administrative privileges; you’ll have to enter your password after running the above commands.
If you want to run a Time Machine backup right away, on a Mac that either has Time Machine disabled, or, say, just before updating to a new version of OS X, you can run this command:
This is the same as choosing Back Up Now from the Time Machine menu in the menu bar at the top of your screen.
And if you ever want to stop a backup, just run this:
Save disk space on your laptop
Since your laptop isn’t always connected to its backup disk, Time Machine retains «local snapshots,» or files that it will copy to your backup disk the next time it is available. However, these local snapshots take up space, and you may want to turn this feature off if you don’t have much room on your hard disk. You can do so with the following command:
sudo tmutil disablelocal
Running this command will also delete any local snapshots. You can turn local snapshots back on by running:
sudo tmutil enablelocal
If you love delving into the nitty-gritty, and especially if you manage remote Macs, you’ll find this to be a very useful tool.
Exclude files and folders
You can exclude certain files and folders from your Time Machine backups from the Time Machine pane in System Preferences. Naturally, you can also do this from the command line, too. Run this command:
sudo tmutil addexclusion
The part stands for the path to a file or folder. For example, if I want to exclude my Downloads folder from Time Machine backups, I would run the following:
sudo tmutil addexclusion
The tmutil addexclusion command has an interesting property: it’s sticky. When you use this command, the item you exclude remains in the Time Machine exclusion list even if you move it, which is not the case when you exclude items from the Time Machine preference pane. If you use the above command with the -p flag, then it will not be sticky, and will be the same as an exclusion you add from the Time Machine preference pane.
Manage remote backups
If you’re managing a remote Mac, such as a server, you may want to change Time Machine settings for that computer. You can start by finding where Time Machine backups are stored. Run this command:
You’ll see something like this in Terminal:
Name : TM Backup
Mount Point : /Volumes/TM Backup
To change the destination, you can use two commands. First, remove the current destination like this:
In place of , type in the text string returned by the destinationinfo command. Then run this command to set up a new destination disk:
tmutil setdestination _volume_name_
Replace _volume_name_ with the name of the disk or volume you want to use. You can add multiple destinations as well, since Time Machine can rotate its backups on several disks or volumes. See man tmutil for more on setting up multiple backup destinations. (You can now do this without the command line too, see «How to create redundant Time Machine backups.»)
Get Time Machine stats
Time Machine saves a lot of backups: one per hour for the past 24 hours; one a day for the past week; and one a week before that. You can get a list of all the backups on your Time Machine disk with this command:
This will show the full path of each backup.
If you’re curious about how much has changed in your Time Machine backups, there’s a command that will let you find out how much of each backup is new. Run this command to see the delta between each of the Time Machine backups on your backup disk or volume:
tmutil calculatedrift _backup_folder_
Replace _backup_folder_ with the path of the folder containing your backups. This is not the Backups.backupdb folder at the top level of your Time Machine volume, but rather the next folder down; this is generally labeled with your Mac’s name.
For example, when I ran this command on my backups, I saw data like this:
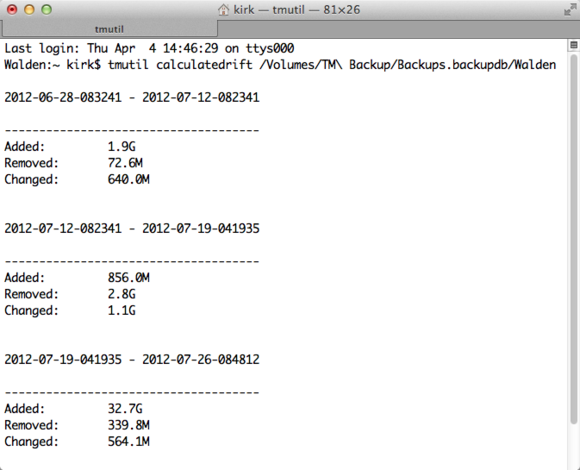
Here’s what I saw when I ran the tmutil calculatedrift backup_folder command on my Mac.
Note that this command takes a long time to run, as your Mac has to calculate a lot of information.
The tmutil command offers many other options, such as the ability to inherit destinations, perform detailed comparisons of backups, restore items and much more. See man tmutil to find out all that you can do.
If you love delving into the nitty-gritty, and especially if you manage remote Macs, you’ll find this to be a very useful tool.
Источник
4 Simple Mac Maintenance Tips
Macs are notoriously trouble-free and easy to maintain, but that doesn’t mean you should ignore system maintenance entirely. Here are four simple Mac maintenance tips that will help you keep your Mac in tip-top shape, running at its best.

1) Run Disk Utility
Running Disk Utility every month or two is a good idea for two reasons: repairing permissions, and more importantly, verifying and repairing the hard drive. Disk Utility is included on all Macs and found in the /Applications/Utilities folder, the two necessary procedures will be under the “First Aid” tab and can be run one after another.
1a) Repairing Disk Permissions
Repairing permissions is good practice, though it’s never the cure-all that so many claim it to be. Nonetheless, it’s still a good procedure to periodically run, especially after installing or uninstalling a bunch of applications.
1b) Repair Disk
This is probably the most important thing to do with Disk Utility. While you can verify the boot volume at any time, the best way to repair the boot disk is to boot from the recovery partition by holding down Command+R and running Disk Utility from there. This will be necessary if bad blocks are found or if the drive is corrupt. Be sure to run Verify Disk not only on the drive itself (physical drive name), but also the boot partition (Macintosh HD). If any errors are found, they’ll appear in red, and thankfully Disk Utility is usually more than capable of handling such repairs on it’s own.
2) Keep your Mac Software Updated
Keeping your Mac software up to date is vital. Periodically run Software Update from the Apple menu, and periodically check the Mac App Store for updates of your apps there too. Updates can come in the form of general bug fixes, feature enhancements, and security fixes, and it’s so easy to do there is no excuse not to.
Software Update will check for updates once a week by default, but the Mac App Store has to be manually checked for updates in OS X Lion. With OS X Mountain Lion and newer Software Update moves to the Mac App Store so this whole process will be automated for modern OS X users, including El Capitan, Yosemite, Mavericks.
3) Clean Off the Desktop
Believe it or not, having a lot of files on the desktop will actually slow down a Mac. The slowdown is less noticeable on the newest and beefiest Macs, but nonetheless it still happens. This is because each file and its icon preview take up RAM and resources, and the less RAM you have the more you’ll notice the sluggishness resulting from a cluttered desktop. The best solution is to get in the habit of filing things off the desktop and into appropriate folders, but if you can’t be bothered to do that than just grab all files and move them into a single directory and deal with it later.
If you can’t remember to do it yourself, there are apps that will automatically clean it for you by moving files and folders to a designated place at a regular interval.
4) Regularly Back Up the Mac
Performing regular backups is essential Mac maintenance. Not only will you be able to quickly recover from potential disasters, but keeping your files backed up is just good practice. By far the simplest back up solution for Macs is Time Machine. You’ll need an external hard drive, but once you set up Time Machine the rest is very simple and automatic backups occur without any effort.
If you haven’t set up Time Machine yet you really need to do so. Get a large and cheap external hard drive and then configure Time Machine through System Preferences, it’s extremely easy and in the event you ever need to recover from a backup, you’ll be very thankful you have one.
You should also get in the habit of backing up manually right before performing system software updates, it’s rare but things can go wrong, and it’s bes to be prepared.
Do you have any other maintenance tricks that you use for your Mac? Anything we missed that you consider a mandatory step for maintaining your Mac and OS X install? Let us know in the comments.
Источник


