- Reactivating Windows 10 after a hardware change
- Prepare your Windows 10 device for a hardware change
- Reactivate Windows 10 after a hardware change
- If you don’t have a digital license or product key
- Need more help?
- Replacing Hard Drive on Windows 10 without Reinstalling Windows
- Main purposes of replacing hard drive in Windows 10
- How to replace hard drive without reinstalling Windows 10?
- Method 1. Using Windows 10 native backup application
- Method 2. Using third-party partition manager software
- Conclusion
Reactivating Windows 10 after a hardware change
Activation helps verify that your copy of Windows is genuine and hasn’t been used on more devices than the Microsoft Software License Terms allow.
When installing Windows 10, the digital license associates itself with your device’s hardware. If you make significant hardware changes on your device, such as replacing your motherboard, Windows will no longer find a license that matches your device, and you’ll need to reactivate Windows to get it up and running.
To activate Windows, you’ll need either a digital license or a product key. To find out which you need, see «What activation method do I use, product key or digital license?» in Activate Windows 10. Then, use the following info to help you successfully prepare for a hardware change and reactivate Windows 10.
Prepare your Windows 10 device for a hardware change
First, follow these steps to find out if Windows 10 is already activated.
Select the Start button, then select Settings > Update & Security > Activation .
If you’re not activated, complete the activation process with the steps you see on the Activation page. If you experience an error while activating, see Get help with Windows activation errors.
Once you’ve confirmed that Windows 10 is activated, follow these steps:
In Windows 10 (version 1607 or later), it is essential that you link your Microsoft account with the Windows 10 digital license on your device. Linking your Microsoft account with your digital license allows you to reactivate Windows using the Activation troubleshooter whenever you make a significant hardware change.
First, you’ll need to find out if your Microsoft account (What is a Microsoft account?) is linked to your Windows 10 digital license. To find out, select the Start button, then select Settings > Update & Security and then select Activation . The activation status message will tell you if your account is linked.
Windows is activated with a digital license
This means that your Microsoft account is not linked to your digital license.
Follow instructions for Add an account.
Windows is activated with a digital license linked to your Microsoft account
This means that your Microsoft account is already linked to your digital license.
No further action is required. You are ready to use the activation troubleshooter.
If your Microsoft account is not linked to your digital license, follow these steps to Add an account:
Sign in as an administrator to add your Microsoft account. To confirm that you’re using an administrator account, select the Start button, then select Settings > Accounts > Your info . Under your name, you’ll see Administrator. If you’re not an administrator, see Create a local user or administrator account.
Go to Your info in Settings
Confirm that the administrator account is also your Microsoft account by checking to see if an email address is displayed above Administrator. If an email address is displayed, this is a Microsoft account. If not, you’re logged in using a local account. If you don’t yet have a Microsoft account, see How to create a new Microsoft account.
Once you confirm that you’re an administrator and using your Microsoft account, go back to the Activation page, select Add an account, enter your Microsoft account and password, then select Sign in.
After your Microsoft account has been added, the message on the Activation page will change to: Windows is activated with a digital license linked to your Microsoft account.
Make sure that the edition, Windows 10 Home or Windows 10 Pro, is the same before and after your hardware change. Your digital license and product key will reactivate only if the edition remains the same.
You can see your edition on the same Activation page where you checked your activation status. To see which edition you have, select the Start button, then select Settings > Update & Security > Activation .
If you used a product key to get to Windows 10, then you’ll need that key again after the hardware change. To find out how to locate your key, see Find your Windows product key.
For more info about product keys and digital licenses, see Activate Windows 10.
Reactivate Windows 10 after a hardware change
When you’re ready to reactivate, make sure that your device is connected to the internet and then follow the steps for either a digital license or product key.
You’ll need to first add your Microsoft account and link your account to the digital license on your device. After linking your Microsoft account, run the Activation troubleshooter to reactivate Windows 10.
This troubleshooter will only be available if your copy of Windows 10 (version 1607 or later) isn’t activated.
To use the Activation troubleshooter:
Select the Start button, then select Settings > Update & Security > Activation > Troubleshoot . The troubleshooter will show Windows can’t be activated on your device.
Select I changed hardware on this device recently, then select Next.
Enter your connected Microsoft account and password, then select Sign in. The troubleshooter will only work with the connected Microsoft account.
From the list of devices that are linked to your Microsoft account, select the check box next to This is the device I’m using right now.
If you don’t see the device you’re using in the list of results, make sure that you signed in using the same Microsoft account you associated with the Windows 10 digital license on your device.
If you continue to experience errors while activating, see Get help with Windows activation errors and locate the error you’re getting.
If you didn’t link your Microsoft account to the digital license before the hardware change AND you used a product key to upgrade to Windows 10, then continue to next section.
If Windows 10 wasn’t pre-installed on your device when purchased and you used a product key to upgrade to Windows 10, then you’ll need that same product key after the hardware change.
Select the Start button, then select Settings > Update & Security > Activation > Change Product Key, then enter the product key.
If you installed a retail copy of Windows 10 on your device using a Windows 10 product key and then made hardware changes, follow this same process using your Windows 10 product key.
If you continue to experience errors while activating, see Get help with Windows activation errors and locate the error you’re getting.
If you don’t have a digital license or product key
If you don’t have a product key or digital license, you can purchase a Windows 10 digital license after installation finishes. Follow these steps to make a purchase:
Select the Start button, then select Settings > Update & Security > Activation . Then select Go to Store to go to the Microsoft Store app where you can purchase a Windows 10 digital license.
Need more help?
If you need additional help reactivating Windows on your device, contact customer support.
Replacing Hard Drive on Windows 10 without Reinstalling Windows
In this post, you can learn two effective methods of replacing hard drive on Windows 10 without reinstalling Windows and other programs.

By Cherry  / Last Updated December 16, 2019
Main purposes of replacing hard drive in Windows 10
Actually, there are many users looking to replace the hard drive in Windows 10 computer for one or more reasons such as:
1. Replace bad/broken hard drive in Windows 10
Your current hard drive may have experienced a hardware failure and need to be replaced with a new one. Here is a case —
“I have a Dell XPS15 that was running Windows 10 but the hard drive has failed completely and needs replacing. How do I go about installing and activating Windows 10 on a replacement hard drive?”
2. Upgrade hard drive to a larger hard drive for more capacity
As time goes by, you will find that your hard drive is running slower and slower, and the C: drive is full, even the whole hard drive is lack of space. Thus, you need to upgrade hard drive with a larger one for storing more data.
3. Upgrade hard drive to SSD for faster write/read speed
Part of users would like to increase PC or OS running speed by upgrading hard drive to a faster SSD (solid-state drive). That’s because SSD has better properties — it is more stable and more faster than traditional HDD.
How to replace hard drive without reinstalling Windows 10?
To replace hard drive Windows 10, one of the most widely-used methods is to do a fresh clean install of Windows 10 on the new hard drive. But that requires you to reinstall other programs and applications as well. The whole process will be quite complicated and time-consuming.
So in order to replace or upgrade hard drive in Windows 10 without reinstalling Windows and apps, you had better try other different methods. Below are two different ways of replacing main hard drive on Windows 10 without reinstalling everything once again. Check them out and then choose one based on your needs.
Method 1. Using Windows 10 native backup application
Windows 10 users know that Windows 10 does include a legacy backup application. And you can use it to backup and restore system, so that you can replace hard drive Windows 10 without reinstallation.
※Precaution : Insert an empty USB with enough storage to hold Windows .
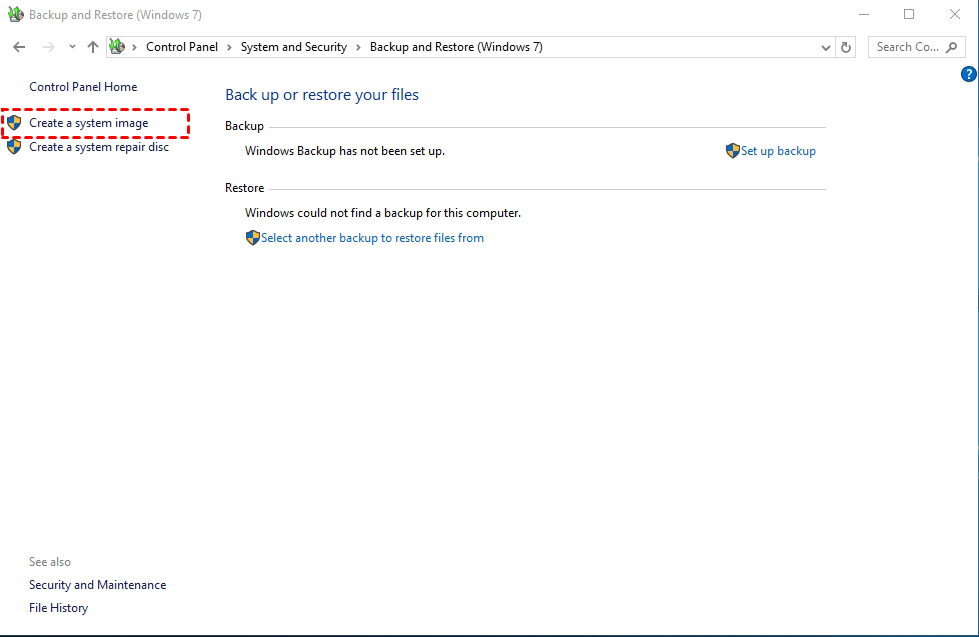
1. Press Windows + R keys simultaneously, type Control Panel. Under System and Security, click Backup and Restore (Windows 7). Then, you will get into Backup and Restore utility. Here you should click on Create a system image.
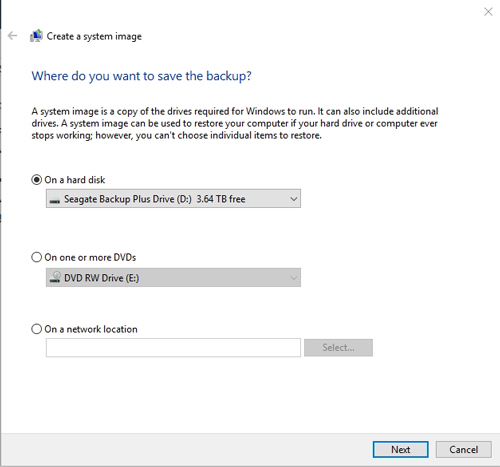
2. Here you can start to create a system image. You will be asked “where do you want to save the backup”. Choose the just inserted USB drive, and click Next.
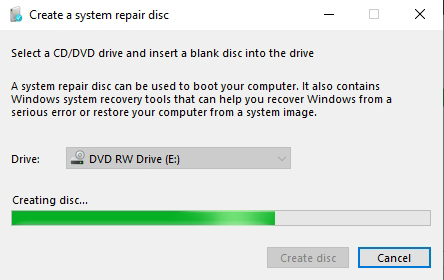
3. Once the backup completes, it will display a message asking if you want to create a system repair disk. And indeed, you will need the system repair disk in order to reimage the computer. Thus, you need to follow the hints to create a system repair disk.
When you finished creating system repair disk, disconnect the power from the PC to complete the new hard drive installation. After you correctly installed your new hard drive, follow the steps below to restore the system backup to the new disk for replacing the old hard drive in Windows 10.
1. Restart your Windows 10 PC and boot from the system repair disk (USB drive).
2. It will launch Windows Setup, click Next -> Repair Your Computer.
3. When you get into a blue screen, choose Troubleshoot>System Image to launch System Image Recovery wizard. Tick Use the latest available system image and then click NextгЂ‚.
4. Choose the option to format and repartition hard disk. Then click Next > Finish > Yes to start to restore the system image to the new hard disk.
After all the operation, your computer will be reimaged. This way is kinda complex for Windows users especially for beginners. But fortunately, here we provide you another solution to replacing hard drive on Windows 10 more easily and conveniently.
Method 2. Using third-party partition manager software
It is no doubt that using the third party software can save a lot of trouble sometimes. If you want to replace failing system hard drive, or upgrade hard drive without any data loss or reinstalling everything on the current hard drive, you can use AOMEI Partition Assistant Professional.
This professional software can help you replace hard drive on Windows 10/8/7 without reinstalling OS and inside applications by cloning the hard disk. Moreover, you can boot your computer from the destination hard drive after clone. Here are the detailed steps on how to clone the system hard disk for hard drive replacement.
Preliminary work:
Connect the new hard disk to the computer via USB port and make sure it is recognized successfully.
Ensure the hard disk has enough space to hold all data from the current hard drive. if not, you can delete or remove unnecessary programs or files on the original disk in advance.
Check out the partition style of the old and new hard disk (MBR or GPT). If the partition style of the new disk is different from the old one, you can convert it to GPT or MBR beforehand. Or change boot mode (BIOS or UEFI) after clone.
There is a Demo version for free download and trial.
Step 1. Install AOMEI Partition Assistant Professional and run the p rogram. In the main interface, you’ll see all disks on your computer. For replacing hard drive on Windows 10, you can click All Tools -> Disk Clone Wizard.
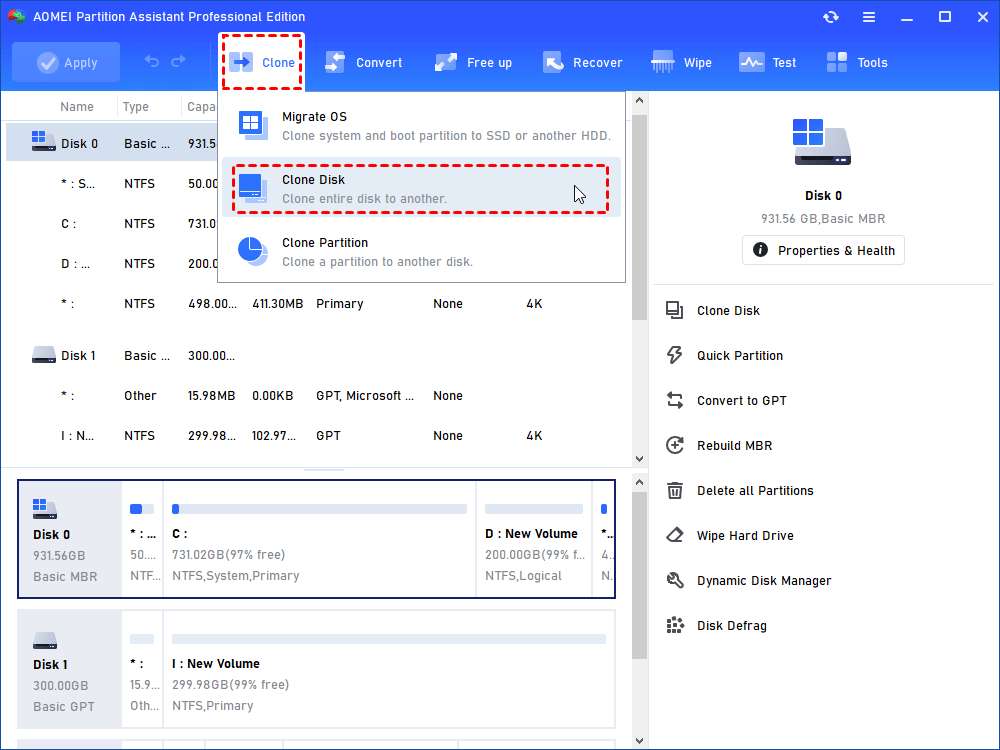
Step 2. When you get into Disk Clone Wizard, you need to select disk copy method. Here we choose Clone Disk Quickly.
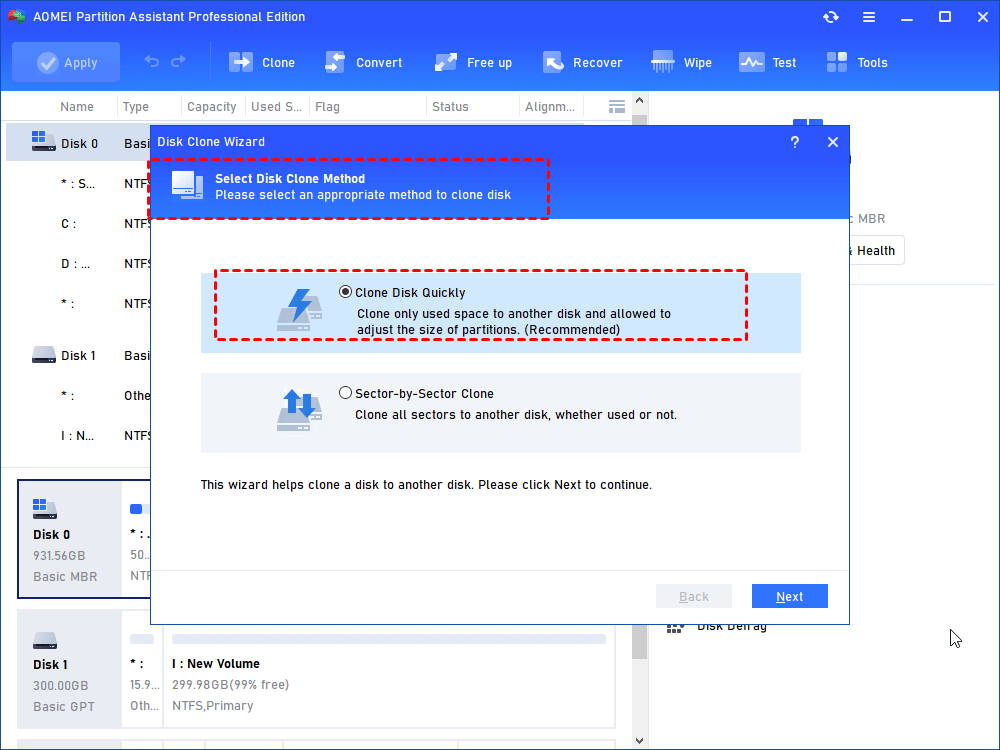
вњЌ AOMEI Partition Assistant provides two disk clone methods:
в—Џ Clone Disk Quickly: only copy the used space of the disk to another disk, and you can clone large hard drive to smaller hard drive, and adjust partition size during the copy progress.
в—Џ Sector-by-Sector Clone: copy all sectors of the disk to a target disk no matter it is used or not. It will make an exactly same disk as the source disk.
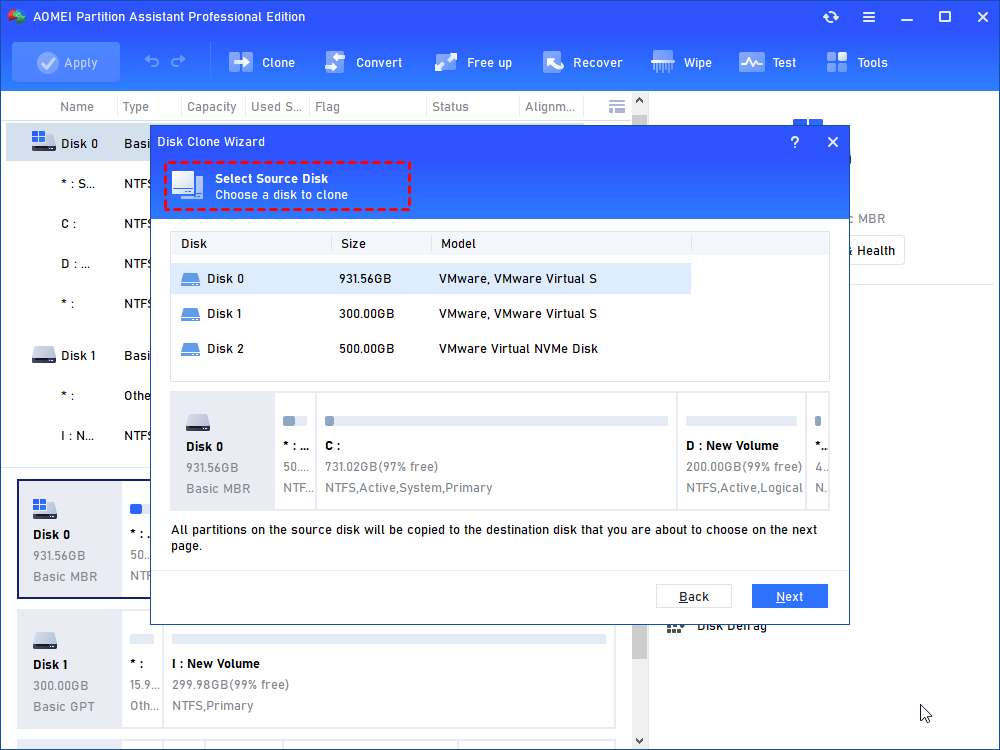
Step 3. Here, select the system disk as the source disk. Click Next.
Step 4. Select the new HDD or SSD as the target disk. Click Next. The operation will delete all data on the target hard drive, so if there is any important data on the disk, click No and backup disk in advanced. If no, click Yes to continue.
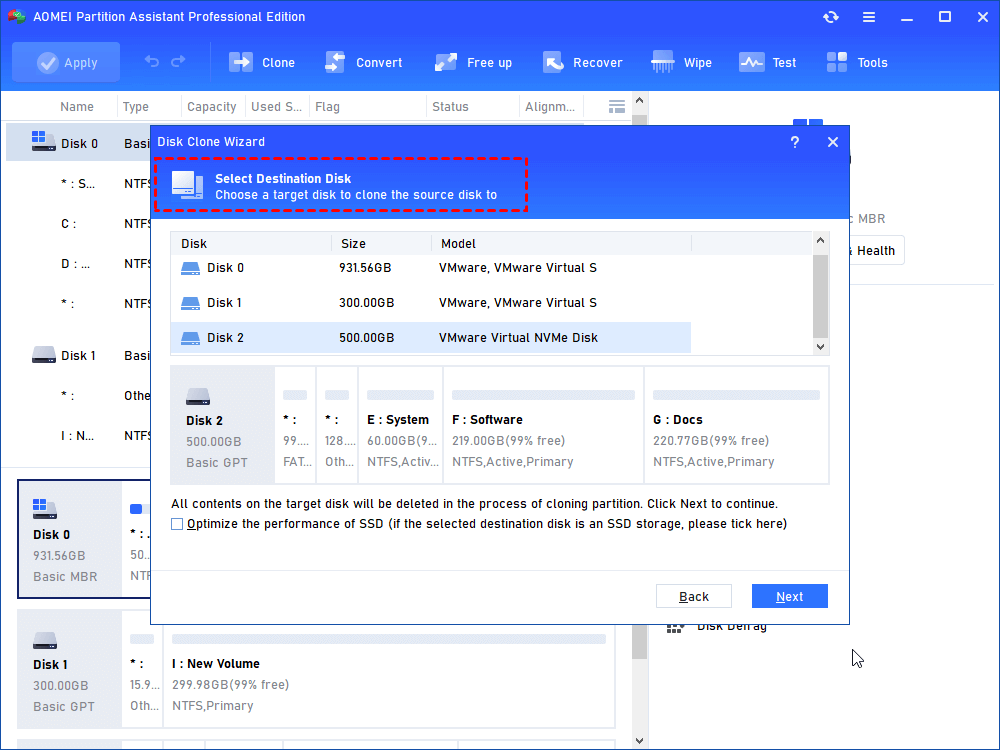
* If the target disk is an SSD, you’d better check the option of “Optimize the performance of SSD”.
Step 5. Here you can edit the partition size on the target disk according to your needs. Or you can repartition hard drive with AOMEI Partition Assistant after coping. Click Next.

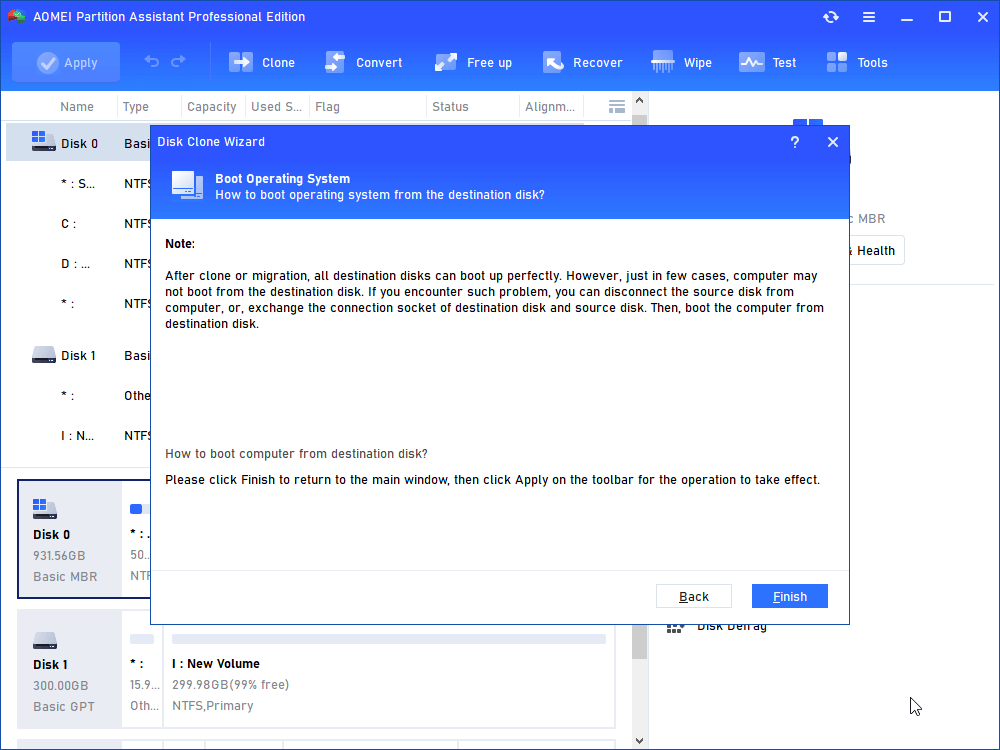
Step 6. It will give you a Note about how to boot computer after clone or migration. Read it and click Finish.
Step 7. Finally, click Apply at the toolbar and click Proceed to execute the task.

After cloning everything from the old hard drive to the new one, you can shut down the computer and install the new disk for replacement.
For desktop, it is easy to install a second hard drive because it is usually equipped with more than one hard drive bay. After installation, you need to enter BIOS to change boot priority, and move the cloned hard disk on the top one of the boot order.
But if you are replacing hard drive in Windows 10 laptop, things might become different as some laptop only one hard drive bay. In this case, you need to: Turn off your PC. Open the case, remove the old disk and put in the new hard drive, attach the cables and secure the drive with screws. Clone the case, turn on the power and it will boot from the cloned hard drive.
Conclusion
Compared with two different ways, you may find that using AOMEI Partition Assistant Professional to replace hard drive on Windows 10 laptop or desktop is much easier than using Windows 10 backup application.
Actually, AOMEI Partition Assistant can not only allow you to copy entire hard drive from one to another, but also allow you to migrate OS only. And it has many other advanced features that can make up the shortages of Windows Disk Management including converting disk between MBR and GPT without deleting volumes, allocating free space from one partition to another, splitting a large partition into two smaller ones.
What’s more, Windows Server users can try AOMEI Partition Assistant Server Edition.


