- JDK Installation for Microsoft Windows
- System Requirements
- Installation Instructions Notation
- Installation Instructions
- Downloading the Installer
- Running the JDK Installer
- Java Start Menu
- Installing the JDK Silently
- Updating the PATH Environment Variable (Optional)
- Starting to Use the JDK
- Uninstalling the JDK
- Uninstalling the JDK in Silent Mode
- Finding the JDK Registry Key and UninstallString Value
- Installed Directory Tree
- Installation Troubleshooting
- Corrupt Cabinet File
- System Error During Decompression
- Program Cannot Be Run in DOS Mode
- Private Versus Public JRE
- Source Files in Notepad
- . как установить Java на Windows?
- 1. Где взять Java?
- 2. Какую версию выбрать?
- 3. Что устанавливать, JRE или JDK?
- 4. Установка Java
- 5. Настройка переменных окружения
- 6. Удаление лишних файлов
- Автор: Алексей Баранцев
JDK Installation for Microsoft Windows
See JDK 7 and JRE 7 Installation Guide for general information about installing JDK 7 and JRE 7.
The following topics are covered:
System Requirements
See Oracle JRE 7 and JDK 7 Certified System Configurations for information about supported platforms, operating systems, and browsers.
See Windows System Requirements for JDK and JRE for minimum processor, disk space, and memory requirements.
Note:
- The JDK and JRE have a version string that enables you to determine the version number. See Java Platform Standard Edition 7, Names and Versions Version Number for information about Java SE 7 version numbers.
- The JDK has the option of installing the public JRE. For more information about JRE installation, see JRE Installation for Microsoft Windows.
- If you have any difficulties, see the Troubleshooting section at the end of this document or submit a bug report for your installation problem.
Installation Instructions Notation
For any text in this document that contains the following notation, you must substitute the appropriate update version number:
For example, if you were downloading the JDK installer for 32-bit systems for update 1.7.0_01, the file name: jdk-7 -windows-i586.exe would become jdk-7u1-windows-i586.exe .
Similarly, if you were downloading the JDK installer for 64-bit systems for update 1.7.0_01, the file name jdk-7 -windows-x64.exe would become jdk-7u1-windows-x64.exe .
Installation Instructions
In this procedure, you will run the self-installing executable file to unpack and install the JDK. As part of the JDK, this installation includes an option to include the public Java Runtime Environment. (The JDK also contains a private JRE for use only by its tools; see Private Versus Public JRE for more information.)
Install the JDK by doing the following:
Downloading the Installer
If you save the self-installing executable file to disk without running it from the download page at the web site, note that its byte size provided on the download page. After the download has completed, verify that you have downloaded the full, uncorrupted software file.
Running the JDK Installer
You must have administrative permissions in order to install the JDK on Microsoft Windows.
The file jdk-7 -windows-i586-i.exe is the JDK installer for 32-bit systems. The file jdk-7 -windows-x64.exe is the JDK installer for 64-bit systems. If you downloaded either file instead of running it directly from the web site, double-click the installer’s icon. Then, follow the instructions the installer provides. The installer may ask you to reboot your computer. When finished with the installation, you can delete the downloaded file to recover disk space.
Note: Installers for JDK 7u6 and later install the JavaFX SDK and integrate it into the JDK installation directory. Installers for JDK 7u2 to 7u5 install the JDK first, then start the JavaFX SDK installer, which installs JavaFX SDK in the default directory C:\Program Files\Oracle\JavaFX 2.0 SDK or C:\Program Files (x86)\Oracle\JavaFX 2.0 SDK on 64-bit operating systems. If you want to install the JavaFX SDK (version 2.0.2) with JDK 7u1 or earlier, see Installing JavaFX for more information.
Java Start Menu
Starting with JDK 7u40 release, Java menu items are added to the Windows Start Menu to provide easy access to Java resources.
During JDK install, a Java Development Kit folder is created in the Windows Start Menu, which contains the following items:
- Reference Documentation: opens the Online API documentation web page.
- Java Mission Control: opens the Java Mission Control profiling and diagnostics tools suite.
During JDK install and uninstall processes, the appropriate start menu items are updated to be associated with the latest JDK version on the system.
Note: Java Mission Control is a commercial feature available to users with a Java SE Advanced license.
Installing the JDK Silently
You can perform a silent, non-interactive, JDK installation by using the command-line arguments. The following table lists example installation scenarios and the commands required to perform them:
| Installation Scenario | Command |
|---|---|
| Install the public JRE in silent mode | |
| Install development tools and source code in silent mode but not the public JRE | |
| Install development tools, source code, and the public JRE in silent mode | |
| Install the public JRE in the specified directory C:\test\ in silent mode |
Updating the PATH Environment Variable (Optional)
You can run the JDK without setting the PATH environment variable, or you can optionally set it so that you can conveniently run the JDK executable files ( javac.exe , java.exe , javadoc.exe , and so forth) from any directory without having to type the full path of the command. If you do not set the PATH variable, you need to specify the full path to the executable file every time you run it, such as:
It is useful to set the PATH variable permanently so it will persist after rebooting.
To set the PATH variable permanently, add the full path of the jdk1.7.0\bin directory to the PATH variable. Typically, this full path looks something like C:\Program Files\Java\jdk1.7.0\bin . Set the PATH variable as follows on Microsoft Windows:
Click Start, then Control Panel, then System.
Click Advanced, then Environment Variables.
Add the location of the bin folder of the JDK installation for the PATH variable in System Variables. The following is a typical value for the PATH variable:
Note:
- The PATH environment variable is a series of directories separated by semicolons ( ; ) and is not case-sensitive. Microsoft Windows looks for programs in the PATH directories in order, from left to right.
- You should only have one bin directory for a JDK in the path at a time. Those following the first instance are ignored.
- If you are not sure where to add the path, add it to the right of the value of the PATH variable.
- The new path takes effect in each new command window you open after setting the PATH variable.
Starting to Use the JDK
If you are new to developing and running programs in the Java programming language, see The Java Tutorial online for some guidance. Note especially the tutorial trails under the heading Trails Covering the Basics.
You can also download the JDK documentation from the Java SE Downloads page.
Uninstalling the JDK
If you should ever want to uninstall the JDK, use the «Add/Remove Programs» utility in the Microsoft Windows Control Panel.
Uninstalling the JDK in Silent Mode
You can use the command line for uninstalling the JDK.
For example, to uninstall Java 7 update 271, run the command:
This command can be run from anywhere.
The msiexec.exe executable is located in the windows system directory.
A reboot is required only if some files are in use during uninstallation; it is not necessary everytime. However, to manually suppress reboot while uninstalling, append REBOOT=R option to the command.
setup.log» option to the command if you want to create a log file describing the uninstallation status.
Windows Installer dialog appears prompting you for confirmation. Click Yes to uninstall JDK.
Finding the JDK Registry Key and UninstallString Value
Go to Start and type regedit.
In the Registry Editor, go to HKEY_LOCAL_MACHINE/Software/Microsoft/Windows/CurrentVersion/Uninstall .
Under the Uninstall folder, you will find many registry entries within curly brackets.
Click Edit and then Find.
Highlight Uninstall folder before performing search for a particular registry.
Enter version string as value to find corresponding registry key. For JDK registry key, enter 1.7.0.271.
The registry key is highlighted on the right-hand side of the pane and values of various uninstall strings are displayed on the left-hand pane.
Note the value of the UninstallString.
Installed Directory Tree
See JDK and JRE File Structure for a description of the directory structure of the JDK. (Note that the file structure of the JRE is identical to that of the JDK’s jre directory.)
Installation Troubleshooting
Below are some tips for working around problems that are sometimes seen during or following an installation. For more troubleshooting information, see Troubleshooting Java SE:
Corrupt Cabinet File
If you see the error message «corrupt cabinet file,» then the file you have downloaded is corrupted. Check the file size against the expected file size listed in these instructions. If sizes do not match, try downloading the bundle again. (A cabinet file contains compressed application, data, resource, and DLL files.)
System Error During Decompression
If you see the error message «system error during decompression,» then you might not have enough space on the disk that contains your TEMP directory.
Program Cannot Be Run in DOS Mode
If you see the error message «This program cannot be run in DOS mode,» then do the following:
- Open the MS-DOS shell or Command Prompt window.
- Right-click the title bar.
- Select Properties.
- Choose the Program tab.
- Click the Advanced button.
- Ensure that the item «Prevent MS-DOS-based programs from detecting Windows» is not selected.
- Select OK.
- Select OK again.
- Exit the MS-DOS shell.
- Restart your computer.
Private Versus Public JRE
Installing the JDK also installs a private JRE and optionally a public copy. The private JRE is required to run the tools included with the JDK. It has no registry settings and is contained entirely in a jre directory (typically at C:\Program Files\jdk1.7.0\jre ) whose location is known only to the JDK. On the other hand, the public JRE can be used by other Java applications, is contained outside the JDK (typically at C:\Program Files\Java\jre1.7.0 ), is registered with the Windows registry (at HKEY_LOCAL_MACHINE\SOFTWARE\JavaSoft ), can be removed using Add/Remove Programs, might be registered with browsers, and might have the java.exe file copied to the Windows system directory (which would make it the default system Java platform).
Source Files in Notepad
In Microsoft Windows, when you create a new file in Microsoft Notepad and then save it for the first time, Notepad usually adds the .txt extension to the file name. Therefore, a file you name Test.java is saved as Test.java.txt . It is important to note that you cannot see the .txt extension unless you turn on the viewing of file extensions (in Microsoft Windows Explorer, unselect «Hide file extensions for known file types» under Folder Options). To prevent the .txt extension, enclose the file name in quotation marks, such as «Test.java» , when typing it into the Save As dialog box.
On the other hand, Microsoft WordPad does not add the .txt extension if you specify another extension. However, you must save the file as «Text Document».
. как установить Java на Windows?
Эта инструкция устарела, используйте вместо неё более новую
Во многих моих тренингах так или иначе используется Java, либо как язык программирования для разработки автотестов, либо как виртуальная машина для запуска приложений, написанных на Java — инструментов тестирования, сред разработки, и даже клиент системы видеоконференций GotoWebinar требует наличия Java.
Поэтому я решил описать процедуру установки Java для операционной системы Windows и последующей настройки системы, потому что, к сожалению, недостаточно просто “запустить инсталлятор и всегда нажимать кнопку Next”.
1. Где взять Java?
2. Какую версию выбрать?
Разумеется, последнюю доступную (на момент написания инструкции это Java 8).
Выбирая из 32-битной и 64-битной версий, берите 64-битную, если ваша операционная система это позволяет, потому что у неё менее строгие ограничения по памяти, доступной исполняемым Java-приложениям.
3. Что устанавливать, JRE или JDK?
Java Runtime Environment, или JRE — это виртуальная машина, позволяющая запускать приложения, написанные на языке программирования Java.
Java Development Kit, или JDK — это набор инструментов, для разработки программ на языке программирования Java (компилятор, архиватор, генератор документации и прочие). JRE разумеется тоже входит в дистрибутив JDK.
Правило очень простое: если вы собираетесь что-нибудь писать на языке программирования Java, значит вам потребуется JDK. А если только запускать готовые программы — тогда достаточно JRE.
4. Установка Java
Вот тут, действительно, всё просто — нужно запустить инсталлятор и следовать указаниям визарда. Можно просто всё время нажимать кнопку Next.
5. Настройка переменных окружения
К сожалению, инсталлятор Java не выполняет настройку переменных окружения, поэтому придётся сделать это вручную после установки.
Во-первых, необходимо установить переменную JAVA_HOME , которая должна указывать на директорию, в которую установлена Java. Многие программы используют эту переменную, чтобы определить, где находится Java.
Во-вторых, надо в переменную PATH добавить путь к директории %JAVA_HOME%\bin . Эта переменная указывает операционной системе список директорий, в которых нужно искать исполняемые файлы, и чтобы можно было запускать Java из консоли, переменная PATH должна быть правильно настроена.
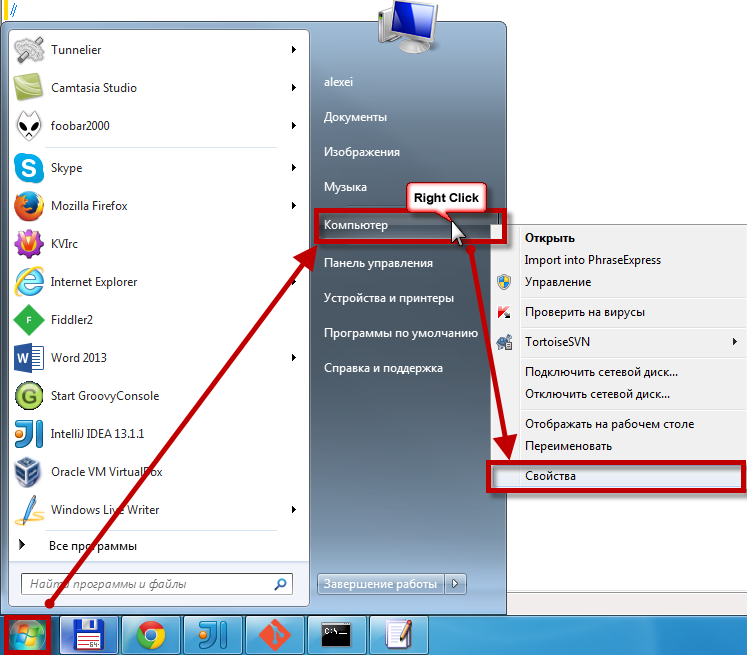
Для установки переменных окружения сначала нужно открыть свойства компьютера, либо использовав сочетание клавиш Win-Pause, либо через меню “Пуск”:
Затем нужно выбрать “Дополнительные параметры системы”, в открывшемся диалоге перейти на вкладку “Дополнительно” и нажать кнопку “Переменные среды”, после чего появится диалог настройки переменных окружения.
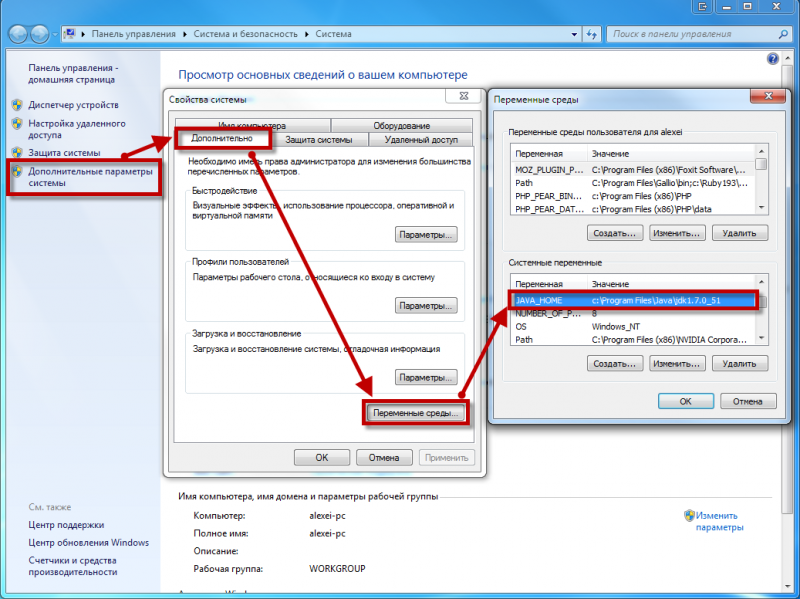
Если у вас уже есть переменная окружения JAVA_HOME — надо её отредактировать, если нет — создать новую. В качестве значения нужно указать путь к директории, куда установлена Java, то есть, например c:\Program Files\Java\jdk1.8.0_25\ , если вы установили JDK, либо c:\Program Files\Java\jre1.8.0_25\ , если вы установили только JRE.
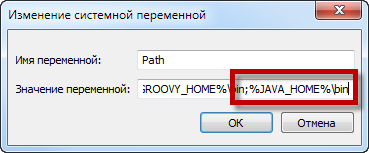
После того, как вы установили значение переменной JAVA_HOME , необходимо отредактировать значение переменной PATH, добавив туда путь к директории, где находятся исполняемые файлы Java, то есть %JAVA_HOME%\bin
И сохранить всё это, закрыв все открытые диалоги в обратном порядке кнопками OK.
Обратите внимание, что если вы устанавливаете JDK, то в названии директории указывается номер версии, поэтому впоследствии, когда вы решите установить более новую версию, не забудьте поменять значение переменной окружения JAVA_HOME .
После того, как вы изменили переменные окружения, новые значения будут действительны только для новых запускаемых программ, уже запущенные программы не узнают о том, что переменные окружения поменялись. Поэтому если вы, например, пытались запустить Java из консоли и у вас не получилось из-за неправильных настроек переменной PATH , вам придётся перезапустить консоль после того, как вы поменяли значение переменной.
6. Удаление лишних файлов
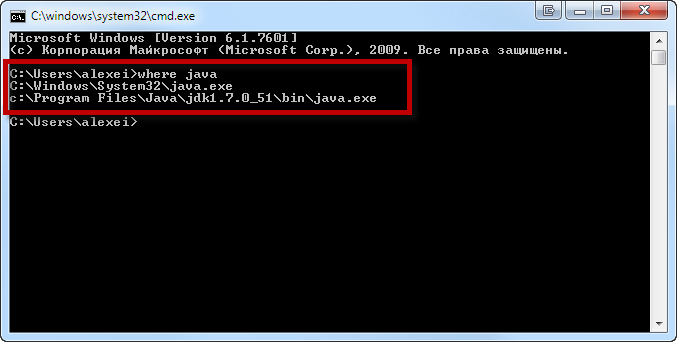
Запустите консоль ( cmd ) и выполните в ней команду where java .
В результате вы должны увидеть путь к исполняемому файлу java.exe , который операционная система должна успешно обнаружить в том месте, куда вы установили Java. Если файл не нашёлся — значит неправильно настроена переменная PATH и нужно вернуться к предыдущему пункту.
Однако иногда бывает и наоборот, находятся «лишние» исполняемые файлы:
Происходит это из-за того, что инсталлятор Java вместо того, чтобы правильно настроить переменные окружения, пытается положить исполняемые файлы в директорию C:\Windows\system32
Это не очень хорошо — засоряется системная директория, может возникнуть рассогласование версий Java (в разных директориях разные версии). Поэтому надо удалить из каталога C:\Windows\system32 исполняемые файлы java.exe , javaw.exe и javaws.exe , если они там обнаружатся.
Вот и всё, теперь можно пользоваться Java. Только не забывайте о том, что после установки новой версии надо будет обновить переменную окружения JAVA_HOME !

Автор: Алексей Баранцев
Если вам понравилась эта статья, вы можете поделиться ею в социальных сетях (кнопочки ниже), а потом вернуться на главную страницу блога и почитать другие мои статьи.
Ну а если вы не согласны с чем-то или хотите что-нибудь дополнить – оставьте комментарий ниже, может быть это послужит поводом для написания новой интересной статьи.


