- What are the system recovery options in Windows?
- What each recovery option does
- To open the System Recovery Options menu on your computer
- To open the System Recovery Options menu using the Windows 7 installation disc or a USB flash drive, or a system repair disc
- Configure a Windows Repair Source
- Choose a Repair Source
- Use WindowsВ Update to restore optional features and repair Windows images
- Use a network location to restore optional features and repair Windows images
- Set Group Policy
- Configure Group Policy for Feature on Demand
- Maintaining a Repair Source
- Servicing updates
- Multilingual images
- How to Repair Windows 10 Using Command Prompt (5 Ways)?
- How do I repair Windows 10 with command prompt?
- Method 1. How to repair Windows 10 using SFC?
- Method 2. How to repair Windows 10 using DISM?
- Method 3. How to reset Windows 10 with command line?
- Method 4. How to run system restore with command prompt?
- Method 5. How to repair Windows 10 with AOMEI.exe?
What are the system recovery options in Windows?
Support for Windows 7 ended on January 14, 2020
We recommend you move to a Windows 10 PC to continue to receive security updates from Microsoft.
The System Recovery Options menu contains several tools, such as Startup Repair, that can help you recover Windows from a serious error. This set of tools is on your computer’s hard disk and on the Windows installation disc.
Note: You can also create a system repair disc that contains the System Recovery Options menu. For more information, see Create a system repair disc. If you use a Tablet PC or other computer with a touchscreen, you might need to connect a keyboard and mouse in order to use Startup Repair and the other tools in the System Recovery Options menu.
What each recovery option does
System recovery option
Fixes certain problems, such as missing or damaged system files, that might prevent Windows from starting correctly.
Restores your computer’s system files to an earlier point in time without affecting your files, such as e‑mail, documents, or photos.
If you use System Restore from the System Recovery Options menu, you cannot undo the restore operation. However, you can run System Restore again and choose a different restore point, if one exists.
System Image Recovery
You need to have created a system image beforehand to use this option. A system image is a personalized backup of the partition that contains Windows, and includes programs and user data, like documents, pictures, and music.
Windows Memory Diagnostic Tool
Scans your computer’s memory for errors.
Advanced users can use Command Prompt to perform recovery-related operations and also run other command line tools for diagnosing and troubleshooting problems.
Note: Some computer manufacturers might customize the menu by adding or removing recovery tools, or including their own tools.
To open the System Recovery Options menu on your computer
Remove all floppy disks, CDs, and DVDs from your computer, and then restart your computer using the computer’s power button.
Do one of the following:
If your computer has a single operating system installed, press and hold the F8 key as your computer restarts. You need to press F8 before the Windows logo appears. If the Windows logo appears, you need to try again by waiting until the Windows logon prompt appears, and then shutting down and restarting your computer.
If your computer has more than one operating system, use the arrow keys to highlight the operating system you want to repair, and then press and hold F8.
On the Advanced Boot Options screen, use the arrow keys to highlight Repair your computer, and then press Enter. (If Repair your computer isn’t listed as an option, then your computer doesn’t include preinstalled recovery options, or your network administrator has turned them off.)
Select a keyboard layout, and then click Next.
On the System Recovery Options menu, click a tool to open it.
To open the System Recovery Options menu using the Windows 7 installation disc or a USB flash drive, or a system repair disc
If your computer’s system is severely damaged and you can’t access the System Recovery Options menu on your computer, you can access it using the Windows 7 installation disc or a USB flash drive, or using a system repair disc if you created one earlier.
To use this method, you need to restart (boot) your computer using the disc or USB flash drive.
Insert the Windows 7 installation disc or USB flash drive, or a system repair disc, and then shut down your computer.
Restart your computer using the computer’s power button.
When prompted, press any key, and then follow the instructions that appear.
On the Install Windows page, or on the System Recovery Options page, choose your language and other preferences, and then click Next.
If neither the Install Windows page nor the System Recovery Options page appear, and you’re not asked to press any key, you might need to change some system settings.
If you’re using the Windows installation disc or USB flash drive, click Repair your computer.
Select the Windows installation you want to repair, and then click Next.
On the System Recovery Options menu, click a tool to open it.
Configure a Windows Repair Source
A repair source is a location that has files that are used to restore or enable Windows optional features or repair a corrupted Windows image. You can use Windows Update or files on your network as a repair source. For more information, see Repair a Windows Image.
Choose a Repair Source
Windows Update is the default repair source, but you can configure Group policy to specify one or more network locations that have the files required to restore a Windows feature or repair a corrupted operating system.
Use WindowsВ Update to restore optional features and repair Windows images
Windows Update is used by default if it’s allowed by the policy settings on the computer.
You can configure Windows Update as a backup repair source. If you’re using Windows Update as a primary or backup repair source, make sure your firewall is configured to allow access to Windows Update.
Use a network location to restore optional features and repair Windows images
You can use a mounted Windows image from a WIM file as a source to restore optional features and repair a corrupted operating system. For example, c:\test\mount\Windows. For more information about capturing a Windows image as a WIM file, see Capture Images of Hard Disk Partitions Using DISM.
You can use a running Windows installation as a source to restore optional features by sharing the c:\Windows folder on your network.
You can use a Windows side-by-side folder from a network share or from a removable media, such as the Windows DVD, as the source of the files. For example, z:\sources\SxS.
You can use a Windows image (.wim) file on a network share as a source to restore optional features. You must specify the index of the Windows image in the .wim file that you want to use and you must use a Wim: prefix in the path to identify this file format. For example, to specify index 3 in a file named contoso.wim, type: Wim:\\network\images\contoso.wim:3.
When specifying a source:
- Only use RTM media regardless of whether the source is a WIM or a mounted Windows image. Refresh media has older file versions excluded from the media and the target operating system may need these files.
- Make sure the source is patched to the latest Cumulative Update. If the target OS is patched to a higher level than the source, adding features or repairing Operating Systems may fail because the target OS needs updated files that are not present in the source.
Set Group Policy
You can use Group Policy to configure your preferred repair souce.
Configure Group Policy for Feature on Demand
Open the group policy editor. For example, on a computer that is running WindowsВ 10, from the Start screen, type Edit Group Policy, and then select Edit Group Policy to open the Group Policy Editor.
Click Computer Configuration, click Administrative Templates, click System, and then double-click the Specify settings for optional component installation and component repair setting.
Select the settings that you want to use for Features on Demand.
Maintaining a Repair Source
If you don’t use Windows Update as the repair source for features and automatic corruption repair, consider the following guidelines for maintaining a repair source.
Servicing updates
Keep any repair source current with the latest servicing updates. If you’re using an image from a WIM file for features, you can use DISM to service the image. For more information, see Mount and Modify a Windows Image Using DISM. If you’re using an online Windows installation shared on your local network as a repair image, make sure that the computer has access to Windows Update.
Multilingual images
You must include all of the relevant language packs with your repair source files for the locales your image supports. If you try to restore a feature without all of the language components that the Windows installation requires for that feature, the installation will fail.
You can install additional language packs after a feature is restored.
How to Repair Windows 10 Using Command Prompt (5 Ways)?
When your computer won’t work properly, you can learn how to repair Windows 10 using command prompt from this article.

By AOMEI  / Last Updated March 9, 2021
How do I repair Windows 10 with command prompt?
When there is some problem happens to Windows, you can repair your windows with some basic repair like Windows directory repair, boot directory repair. When the error is too serious, you can run advanced repair like system restore. For Windows 10, you can also use DISM command line utility to repair Windows 10 image. Next, this article will introduce you how to repair Windows 10 using command prompt with five methods.
Method 1. How to repair Windows 10 using SFC?
SFC (System File Checker) is a command-line utility that can scan for corruption in Windows system files and replace any corrupted or missing protected system files with a known good version. When you feel buggy with your computer or notice problems during boot, you can use SFC to diagnose problems and repair it.В
To repair Windows 10 using SFC with detailed steps:
1. Open «Start», search for the Command Prompt, select it and run as administrator.
2. Then type the command: «sfc /scannow» and press «Enter».
If SFC is unable to fix the problem, probably the utility cannot get the necessary files from the Windows image, which might have become broken. In this situation, you can use DISM to repair the Windows image.
Method 2. How to repair Windows 10 using DISM?
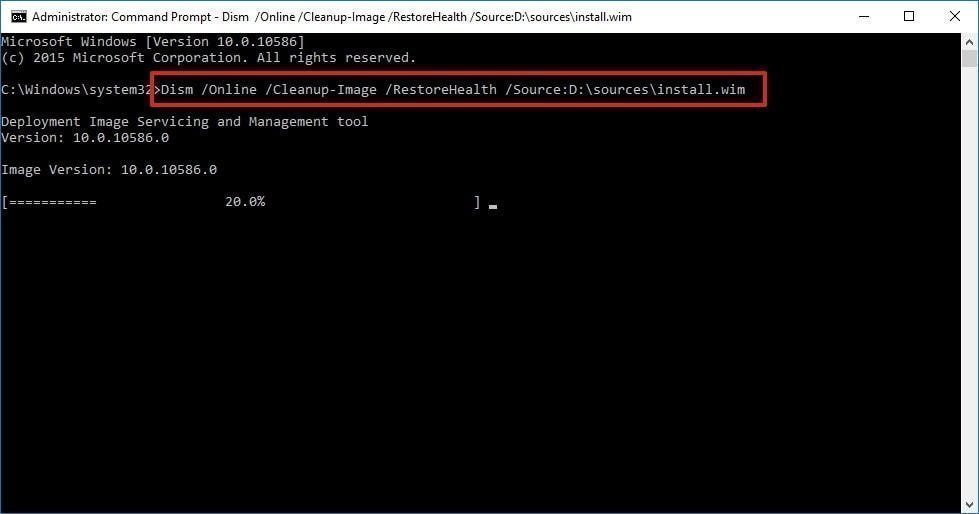
Windows 10 includes a command-line utility known as DISM (Deployment Image Servicing and Management). DISM command Windows 10 can be used to repair and prepare Windows images, including, Windows Setup, Windows Recovery Environment, and Windows PE. Also, DISM can be used to fix the recovery image within an installation of the operating system.
To repair Windows 10 using DISM commands:
To check whether there is any corruption, Run command line as administrator, then type the following syntaxВ and press «Enter».
DISM /Online /Cleanup-Image /CheckHealth
To scan the Windows image for any corruption, type below command and hit «Enter».
DISM /Online /Cleanup-Image /ScanHealth
To fix Windows image, type the following command and hit «Enter».
DISM /Online /Cleanup-Image /RestoreHealth /Source:repairSource\install.wim
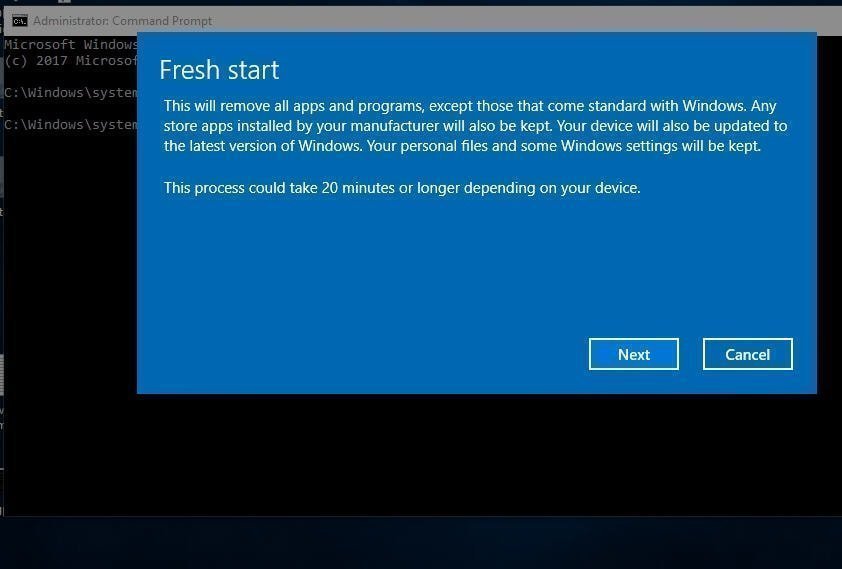
Method 3. How to reset Windows 10 with command line?
To reset Windows 10 with «Reset this PC», follow the instructions below:
Type “systemreset -cleanpc” in an elevated command prompt and press «Enter».В (If your computer cannot boot, you can boot into recovery mode and select «Troubleshoot», and then choose «Reset this PC».)
Method 4. How to run system restore with command prompt?
If the problem is too severe, you can try to restore your Windows 10 to the previous state as long as you have enabled system restore. But, it willВ notВ restoreВ documents, music, emails, or personal files of any kind. If this is what you need, see below.
To run system restore in safe mode, follow the steps below:
1. Start your computer and press «F8» repeatedly until the Windows advanced options menu appears.
2. Click «Safe Mode with command prompt» and press «Enter». If your computer can boot normally, type «cmd» in the search box and click «Command Prompt» to continue.
3. Sign in using an administrator account if needed. Once the command prompt is showing, enterВ «rstrui.exe» at first in the Command Prompt Window andВ press «Enter» to continue.
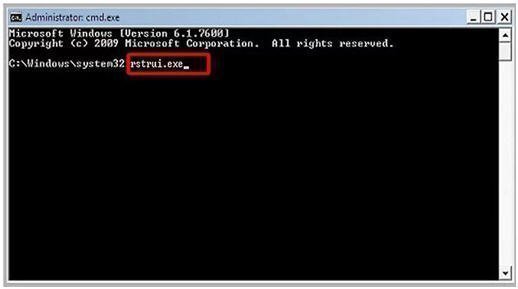
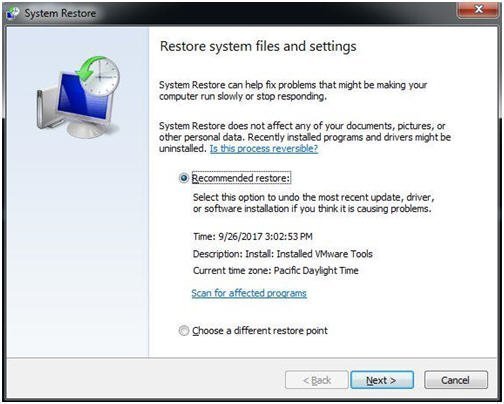
4. This command will bring you to the interface of System Restore. You can either use the recommended restore point or click «Next» to choose an available restore point. Then, follow the instruction to complete system restore.
Method 5. How to repair Windows 10 with AOMEI.exe?
Besides system restore, you can also repair Windows 10 with AOMEI.exe. AOMEI Backupper is a reliable backup and restore software which is designed for Windows 10/8/7/XP/Visa. You can either backup and restore from graphic users interface or command line. It has some features that Windows built-in tool does not have. For example, you can use AOMEI Backupper to create incremental backup, and you can restore to a dissimilar hardware.
Suppose you have created system image backup with AOMEI Backupper. Before restoring system, you can use a utility named Check Image to check if system image backup is intact and without error.В
Then, use the following steps to restore windows 10 with AOMEI.exe:
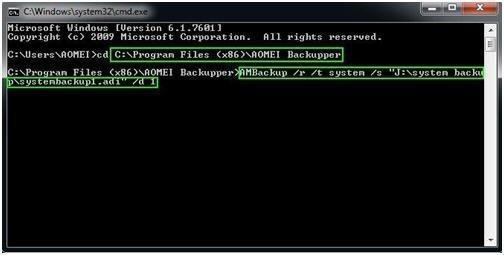
1. Navigate to AOMEI Backupper installation directory by typing the following command in command line and press «Enter». For example: cd C:\Program Files (x86)\AOMEI Backupper.
Note: If you run this command under Windows PE environment, the drive letters might change.
2. Run the following command to start restore: AMBackup /r /t [backup type] /s «[backup location path]» /d [destination location]. For example: To restore the system backup saved in J:\systembackup1 to disk 1. You should type the command: AMBackup /r /t system /s “J:\system backup\systembackup1.adi” /d 1
Tip: If you need to restore to another computer, AOMEI Backupper «Universal Restore» feature can make this very easy. For example: Run system restore in the image named «systembackup1.adi» to the partition 0 on disk 0 and perform a universal restore. AMBackup /r /t system /s «D:\system backup\systembackup1.adi» /d 0:0 /x
Now you have learned how to repair Windows 10 using command line with five methods. You can choose one based on your preference. It is also suggested to keep backup software AOMEI Backupper installed on your computer to provide continuous protection (try 30-day free trial).В
Also, you can find «Recovery Environment» utility in «Tools» toВ enable the boot option of AOMEI Backupper recovery environment. When system crashes, it enables you to perform backup/restore from boot easily.
If you want to protect unlimited computers within your company, you can pick AOMEI Backupper Technician. With the inbuilt AOMEI Image Deploy tool, you are also allowed to deploy/restore system image file on server-side computer to multiple client-side computers over network.


