- How to Check for Ports in Use in Windows 10
- Use Nirsoft CurrPorts
- Command Prompt Method
- TCPView
- Use Netstat to See Listening Ports and PID in Windows
- What Is Netstat?
- Using Netstat To See Listening Ports & PID
- What’s Using That Port?
- How To Get Port, PID, & Process Name In PowerShell
- Go Get Them
- How to Check Which Process Is Using Port 8080 or Any Other Port (and Vice Versa) on Windows
- Learn how to see which process or application is using a particular port, and likewise, which port is being used by a particular process.
- How to Check Which Process/Application Is Using a Particular Port on Windows
- Step 1 — Find the Process id of the Process Using the Given Port
- Syntax
- Explanation
- netstat -aon
- findstr 8080
- Step 2 — Find the Process/Application Name Using the Given Port Using the Process id Found in Step 1
- Syntax
- How to Check Which Port Is Being Used by a Particular Process/Application on Windows
- Step 1 — Find the Process id of the Process Using a Process With the Given Name
- Syntax
- Step 2 — Find the Port Being Used by the Process id Found in Step 1
- Summary
How to Check for Ports in Use in Windows 10

At any one time, there’s a whole bunch of information being sent between your Windows 10 PC and the endless void of the Internet. This is done using a process whereby network-dependent processes seek out TCP and UDP ports, which they use to communicate with the Internet. First, your data gets sent to remote ports at the destination or website your processes are trying to connect to, then it gets received at local ports back on your PC.
Most of the time, Windows 10 knows how to manage ports and ensure that traffic is being directed through the right ports so that those processes can connect with what they need to. But sometimes two processes may be assigned to one port, or maybe you just want to get a better picture of your network traffic and what’s going in and out.
That’s why wrote this guide that shows you how to get an overview of your ports and see which applications are using which ports.
Use Nirsoft CurrPorts
NirSoft is one of the best indie software developers, giving us great utilities, like PassView and WirelessKeyView. While some people will prefer checking their ports without installing third-party software (in which case, scroll down to the CMD method), CurrPorts is easily the fastest and most convenient way to view your ports.

Once you’ve installed CurrPorts, just open it to see a list of all your ports currently in use. If you’re looking for local ports in use, just click the “Local Port” column at the top to order the list by port number (handy if you’re looking for a specific one). You can do the same thing with remote ports, too.
If you want to really find specific ports, click the “Advanced Filters” icon at the top and enter your string in the format they suggest. It should look something like the below image.

Hit OK when you’re ready, and the list will filter down to your queries.
Command Prompt Method
The integrated – though not necessarily the simplest – way to check open ports is to use the trusty command prompt.
Click the Start button, type cmd , then right-click “Command Prompt” when it shows up in the search results. Click “Run as administrator.”
Once you’re in the elevated command prompt, enter the following command:
This will steadily bring up a list of ports that is probably quite long, along with the Windows processes that are using them. (You can press Ctrl + A , then Ctrl + C to copy all information to the clipboard.) On the average PC, there will be two main local IP addresses that contain ports on your PC.

The first, in our case, is “127.0.0.1.” This IP address is otherwise known as “localhost” or a “loopback address,” and any process listening to ports here is communicating internally on your local network without using any network interface. The actual port is the number you see after the colon. (See image below.)

The bulk of your processes will probably be listening to ports prefixed with “192.168.xxx.xxx,” which is your IP address. This means the processes you see listed here are listening for communications from remote Internet locations (such as websites). Again, the port number is the number after the colon.

TCPView
If you don’t mind installing a third-party app and want to have more control over what’s going on with all your ports, you can use a lightweight app called TCPView. This immediately brings up a list of processes and their associated ports.

What make this better than the command prompt is that you can actively see the ports opening, closing and sending packets. Just look for the green, red and yellow highlights. You can also reorder the list by clicking the column headings, making it easier to find the process you want or two separate processes vying for the same port.
If you do find a process or connection you want to close, just right-click that process. You can then select “End process,” which is exactly the same function as the one in Windows task manager. Or you can click “Close Connection” to leave the process open but stop it from listening on a given port.

If you’re having some trouble in Windows 10, then see whether a Windows update may be causing it. We also have a handy guide for managing the health of your hard drive in Windows 10.
Related:
Content Manager at Make Tech Easier. Enjoys Android, Windows, and tinkering with retro console emulation to breaking point.
Use Netstat to See Listening Ports and PID in Windows
You never know when this will come in handy
In another article, we explained computer ports and what they’re used for. Other than that, what can we do with port information? Since all traffic in and out of the computer goes through ports, we can check on them to see what they’re doing. Maybe the port isn’t listening for traffic? Maybe something is using a port that shouldn’t be?
We’re going to use the Windows command netstat to see our listening ports and PID (Process ID). We’re also going to see what we can do with that information.

What Is Netstat?
The netstat command is a combination of the words ‘network’ and ‘statistics’. The netstat command works in all versions of Windows from Windows XP right up to Windows 10. It’s also used in other operating systems (OS) like Unix and Linux, but we’ll stick to Windows here.
Netstat can provide us with:
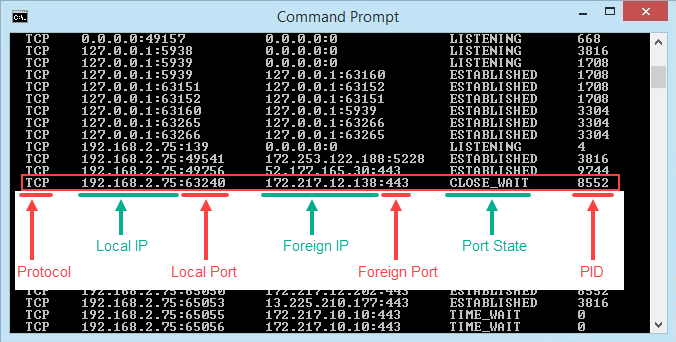
- The name of the protocol the port is using (TCP or UDP).
- The local IP address and name of the computer and the port number being used.
- The IP address and port number to which we’re connecting.
- The state of a TCP connection. For details on what these states are, read the Event Processing section of RFC 793.
Using Netstat To See Listening Ports & PID
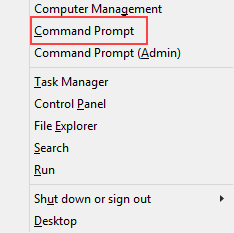
- Use the key combination Win Key + X. In the menu that opens, select Command Prompt.
- Enter the command . The parameters for netstat are preceded with a hyphen, not a forward slash like many other commands. The -a tells it to show us all active connections and the ports on which the computer is listening.
The -n tells netstat to show the IP addresses and ports as numbers only. We’re telling it to not try to resolve the names. This makes for a quicker and neater display. The -o tells netstat to include the PID. We’ll use the PID later to find out what process is using a specific port.

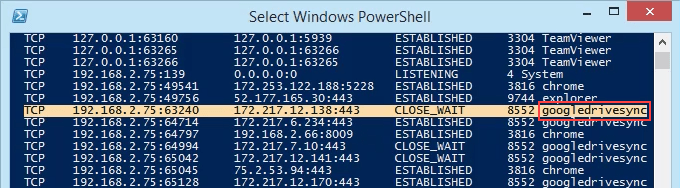
- View the results and take note of the addresses, port numbers, state, and PID. Let’s say we want to know what’s using port 63240. Note that its PID is 8552 and it’s connecting to the IP address 172.217.12.138 on port 443.
What’s Using That Port?
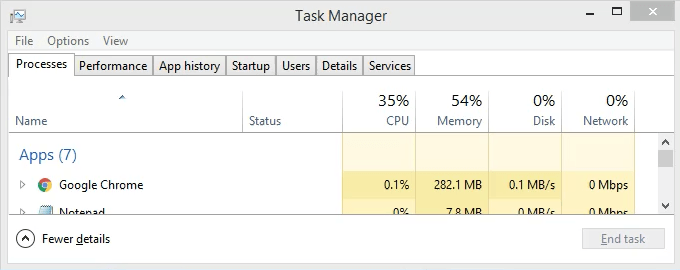
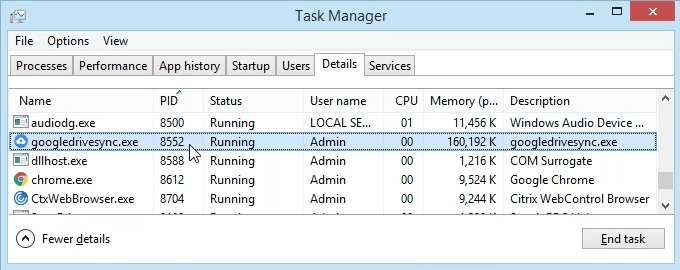
- Open Task Manager. That’s most easily done by using the key combination Ctrl + Shift + Esc.
- Click on the Details tab. To make this easier to find, click on the PID column header to sort the PIDs numerically.
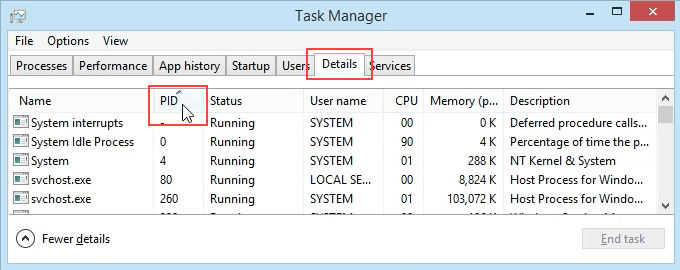
- Scroll down to PID 8552 and see what process it is. In this case, it’s googledrivesync.exe. But is it really? Sometimes viruses can make themselves look like legitimate processes.
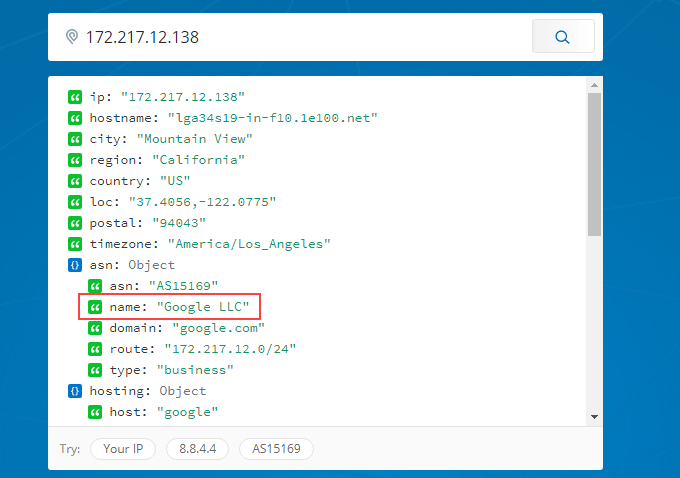
- In a web browser, go to ipinfo.io. Enter the IP address 172.217.12.138. As we can see, the IP address is registered to Google. So this googledrivesync.exe is a legitimate one.
How To Get Port, PID, & Process Name In PowerShell
PowerShell is Microsoft’s newer way to use a command-line interface with Windows. We say newer, but it’s been around for several versions. You should learn PowerShell even if you’re a home user.
Most Windows commands also work in PowerShell, plus we can combine them with PowerShell’s cmdlets – pronounced command-lets. Joe at Winteltools.com provides the script for this method.
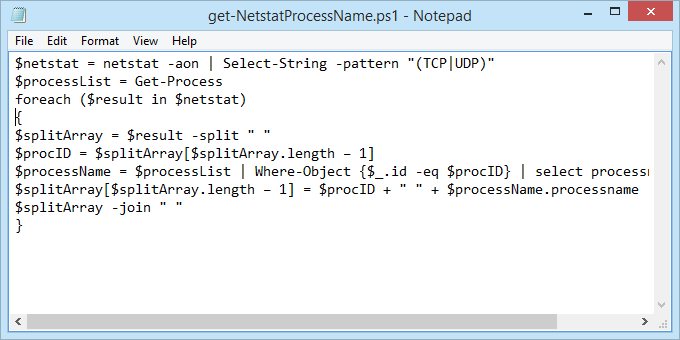
- Open Notepad and enter the following code:
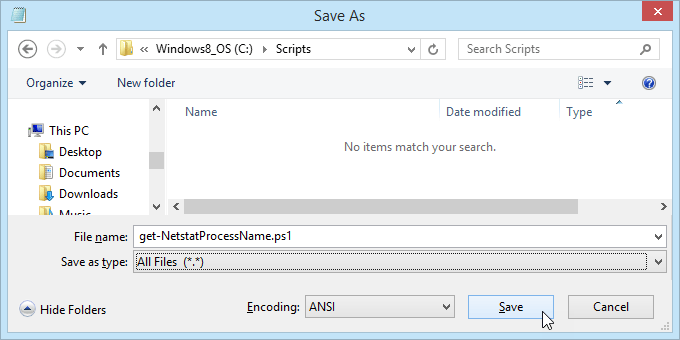
- Save the file as get-NetstatProcessName.ps1. Make sure to note where it’s being saved. It’s important to change the Save as type: to All Files (*.*) or it will get saved as get-NetstatProcessName.ps1.txt and it won’t work for us.
- Open PowerShell and navigate to the location in which the script was saved. In this case, it’s . Hit Enter to run the command.

- Run the script using dot-sourcing to make it work. That means use ./ before the name of the file. The command will be

- Now we can see all the traditional netstat info plus the process name. No need to open Task Manager anymore.
Go Get Them
We’ve covered two ways to use the netstat command to see listening ports. It can be used either in the old Command Prompt or within a PowerShell script. With the information it can give us, we’ve looked at how it can help us figure out what our computer is doing.
If you thought netstat is a great utility, take a look at some other Windows TCP/IP utilities like tracert, ipconfig, and nslookup. Or use Resource Monitor to get a better look into hidden website and Internet connections. There is a lot you can do to see exactly what your computer is doing.
Have you used netstat to solve a problem? Please tell us what you did. Any questions about how to use netstat? Please ask us in the comments below.
Guy has been published online and in print newspapers, nominated for writing awards, and cited in scholarly papers due to his ability to speak tech to anyone, but still prefers analog watches. Read Guy’s Full Bio
How to Check Which Process Is Using Port 8080 or Any Other Port (and Vice Versa) on Windows
Learn how to see which process or application is using a particular port, and likewise, which port is being used by a particular process.
Join the DZone community and get the full member experience.
Hello friends. In this tutorial, you will learn
- How to check which process/application is using a particular port on Windows
- How to check which port is being used by a particular process/application on Windows

How to Check Which Process/Application Is Using a Particular Port on Windows
Step 1 — Find the Process id of the Process Using the Given Port
Syntax
netstat -aon | findstr
-a Displays all connections and listening ports.
-o Displays owning process Id associated with each connection.
-n Displays addresses and port numbers in numerical forms
On my system, it displays the following output. My Tomcat is up and running on port 8080 within Eclipse and I executed the following command.
netstat -aon | findstr 8080

Here the last column is telling the process id of the process which is using port 8080.
Explanation
netstat -aon
Will give you a list of process Ids which are using given port.
findstr 8080
findstr is functionally equivalent to grep command on Linux. From the output of netstat, findstr will give the lines which have word 8080 in it.
Step 2 — Find the Process/Application Name Using the Given Port Using the Process id Found in Step 1
Syntax
This will give you the application name which is using that port.
On my system, I used the following command to check which process belongs to process id 9260.
tasklist | findstr 9260

Here, javaw.exe is the process which is using port 8080.
How to Check Which Port Is Being Used by a Particular Process/Application on Windows
Step 1 — Find the Process id of the Process Using a Process With the Given Name
Syntax
On my system, I executed the following command to find first process id of a process with name javaw.exe
tasklist | findstr javaw.exe

Here, 9260 is the process id of the process javaw.exe.
Step 2 — Find the Port Being Used by the Process id Found in Step 1
On my system, to find which port is being used by a process with process id 9260, I run
netstat -aon | findstr 9260
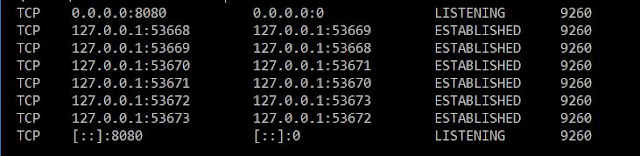
As you can see in the above output, process 9260 is using port 8080.
Summary
In this tutorial, you learned
Use of the netstat command with -aon options together with the findstr command to find out which process is using a particular port, and vice versa.
Thanks for reading. Share it with someone you think it might help.
Published at DZone with permission of Gaurav Bhardwaj . See the original article here.
Opinions expressed by DZone contributors are their own.


