- 6 Methods: Clean up Windows 10 to Improve Windows PC Performance
- Why do we clean up Windows 10?
- 6 Methods for Windows 10 disk space cleanup
- Method 1. Uninstall unused apps
- Method 2. Run Windows inbuilt Disk Cleanup
- Method 3. Set Storage Sense
- Method 4. Delete temporary and downloaded files
- Method 5. Disable hibernate
- Method 6. Extend System Drive
- Conclusion
- The Best Way to Clean Windows, According to Our Cleaning Lab
- 1. Choose a dry, cloudy day.
- 2. Remove dirt and dust first.
- 3. Pick the right cleaner — and spritz generously.
- How to clean boot Windows 10 (and why you might want to)
- What you need to know before a clean boot
- How to perform a Windows 10 clean boot
- Getting back to normal
- More resources
- The Dell XPS 15 is our choice for best 15-inch laptop
- Halo: MCC’s live service elements make it better, not worse
- Microsoft’s Surface Duo is not ‘failing up’
- These are the best PC sticks when you’re on the move
6 Methods: Clean up Windows 10 to Improve Windows PC Performance
How to clean up Windows 10 safely when the low disk space warning appears? In this post, 6 most common but effective ways will be provided to help clean up Windows 10 disk space with ease.

By Michael  / Last Updated March 17, 2021
Question
I have a Windows 10 Dell PC that has been 10-year-old. Recently, I find it runs dramatically more slowly than before and the warning of low disk space pops up on regular basis. I know that means my storage space is running out but I have no idea what I should do. Is there any good way to clean up Windows 10?
— Question from Alfredo
Why do we clean up Windows 10?
As Windows 10 computer owners, one thing that keeps bothering us is that over time, there are more and more junk files clogged up in our system which drastically slow down the running speed and worsen the performance of our PC. In this case, it’s necessary to give our PCs regular maintenance, for example, often cleaning up Windows 10 to delete or remove unnecessary files.
6 Methods for Windows 10 disk space cleanup
How to clean up Windows 10 files? If you still have no idea, luckily, in the following contents, you will find the top 6 methods to get it done.
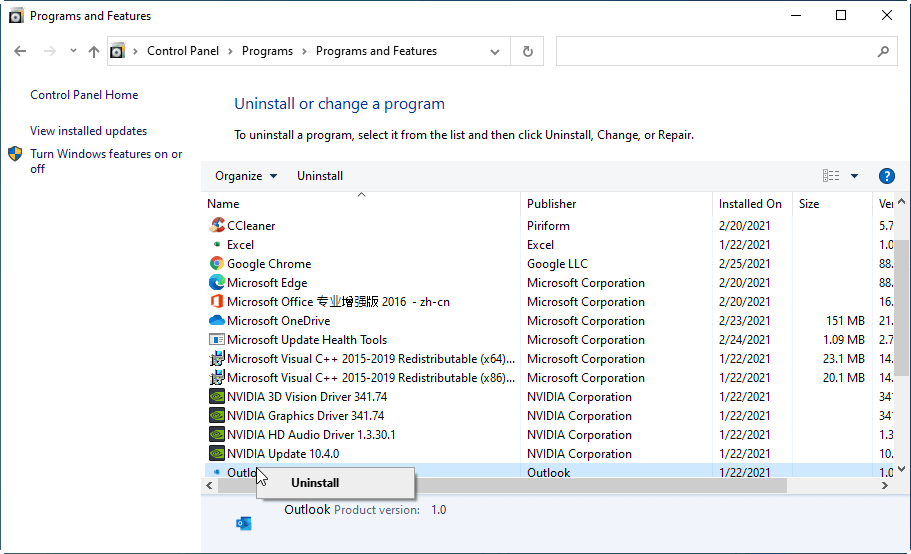
Method 1. Uninstall unused apps
Sometimes, we could somehow install unused apps just like bundleware that comes with third-party software. Also, there can be old apps we’ll no longer use existing on our computers. So, the first thing we should consider when it comes to Windows 10 cleanup is to uninstall unused apps.
в… In the search box on the taskbar, type “control panel” and hit “ENTER” to bring up the window of Control Panel.
в… Hit “Programs” in the popup window.
в… Select «Programs and Features”.
в… Then, all apps and programs on your PC will appear. Right-click on the item that you no longer want and select “Uninstall” to delete it from your computer for good.
Method 2. Run Windows inbuilt Disk Cleanup
Disk Cleanup is a PC maintenance program included in Microsoft Windows that is designed to free up disk space on a computer hard drive. The program first searches and analyzes the hard drive for files no longer of any use, and then remove the unnecessary files.
в… Type “disk cleanup” in the search box and hit “ENTER”.
в… Select the partition you want to clean and hit “OK” to proceed.
в… Tick the files to delete in the popup window and hit “OK” to perform the deletion.
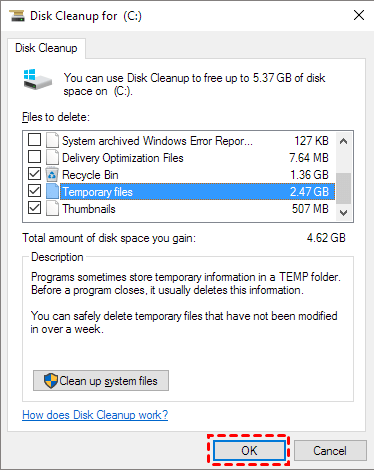
The process will be finished within less than 5 seconds.
Method 3. Set Storage Sense
Another Windows 10 inbuilt program for disk cleanup is called Storage Sense. It’s able to automatically free up storage space by getting rid of files you no longer need, like .tmp and contents in you recycle bin.
в… Open the start menu and go to “Settings” > “System” > “Storage”.
в… Toggle on the storage button.
в… Click on “Configure Storage Sense or run it now”.
In the setup window, you can preset how you want Storage Sense to work, such as running every day, every week, or every month. Also, you can clean up right now by clicking on the button “Clean now”.
.png)
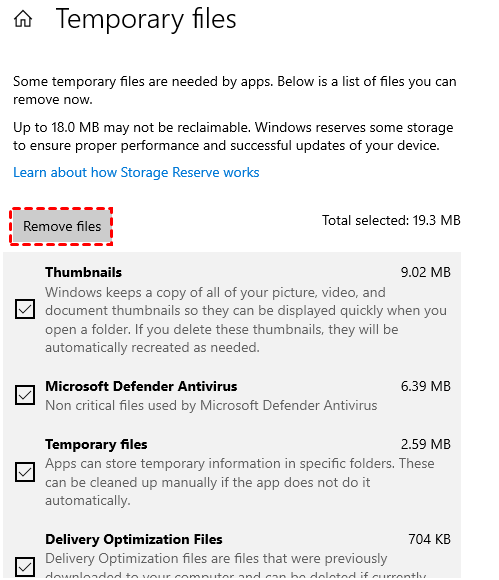
Method 4. Delete temporary and downloaded files
Windows has listed all TMP files in “Storage” and you can directly delete them from there.
в… Open start menu and go to “Settings” > “System” > “Storage” like you did at the beginning of method 3.
в… Select “Temporary files”.
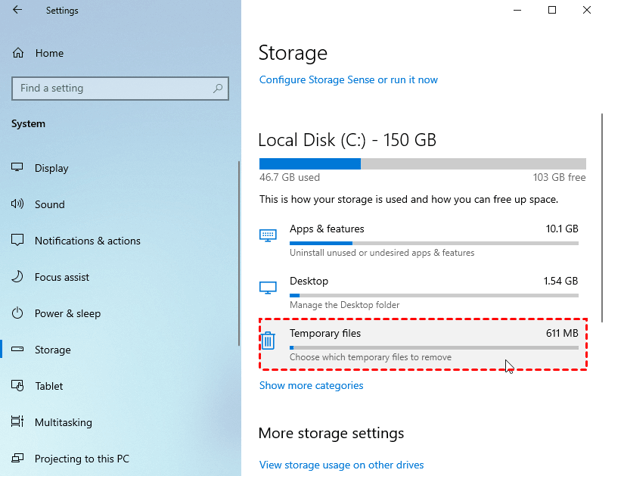
в… In the popup window, all files will be automatically analyzed and listed and you can see the amount of the files you selected.
в… Click on “Remove files” to delete these TMP files.
Method 5. Disable hibernate
Hibernation is a state you can put your PC in instead of shutting it down or putting it to sleep. Hibernation allows your PC to start up faster because it doesn’t need to re-establish those files and settings. When hibernate is enabled, it reserves part of your disk for its data – the hiberfil.sys file – which is allocated at ¾ of your PC’s installed RAM.
So, if you don’t have enough space on your Windows 10 PC, you can consider disabling hibernate to get extra space.
в… Open Start menu on your PC and choose “Command Prompt (Admin)” from the popup menu.
в… In the Command Prompt window, type powercfg.exe /hibernate off and hit “ENTER”.
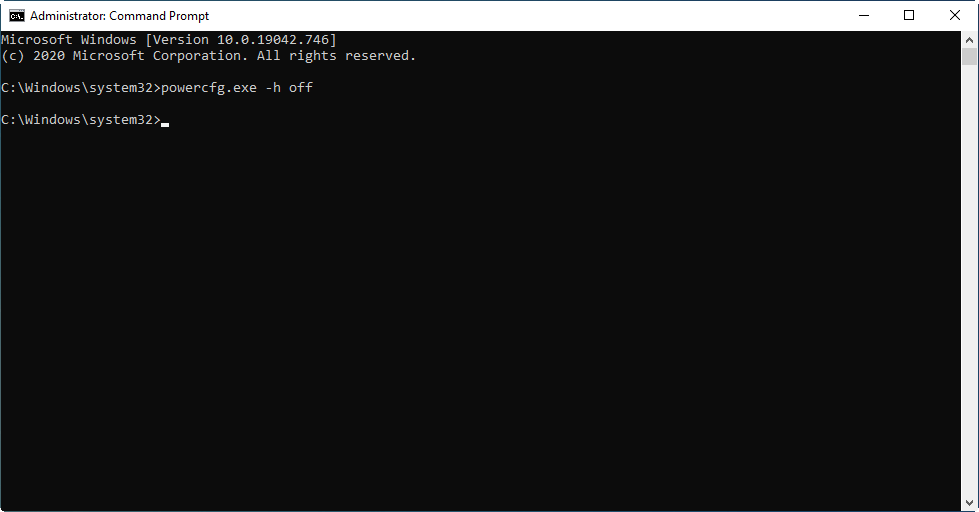
Now, you’ve successfully disabled hibernate and you can find extra space on your PC.
Method 6. Extend System Drive
If your PC runs really slowly even after you perform Windows 10 cleanup, don’t give up for there’s the last method – extending your system drive by shrinking another drive. When it comes to partition resizing, I believe the first thing that comes to your mind should be Disk Management. However, with Disk Management, you can only extend C drive with adjacent unallocated space and it must be on the right side of the C drive too. In this case, you have to delete the entire partition that is next to C drive to get the required unallocated space, which causes data loss. So, it’s necessary to find another alternative.
Luckily, after spending time on the internet, I finally found this powerful disk manager freeware – AOMEI Partition Assistant Standard – that is able to extend system partition by shrinking another drive whether they are contiguous or not. Compared with its other counterparts, this tool is more feature-rich. Besides partition extension, it’s also capable of cloning partition, wiping partition, and formatting partition, and so on. Unlike other third-party software, it’s free from adverse bundleware and provides a cleaner UI that is literally user-friendly.
Free download the most powerful disk manager software to extend system drive to make your PC run more smoothly.
Step 1. Install and launch AOMEI Partition Assistant Standard. Then, all disks and partitions will be listed on the main interface.
Step 2. Right-click on the partition you want to shrink and select “Resize/Move partition”.
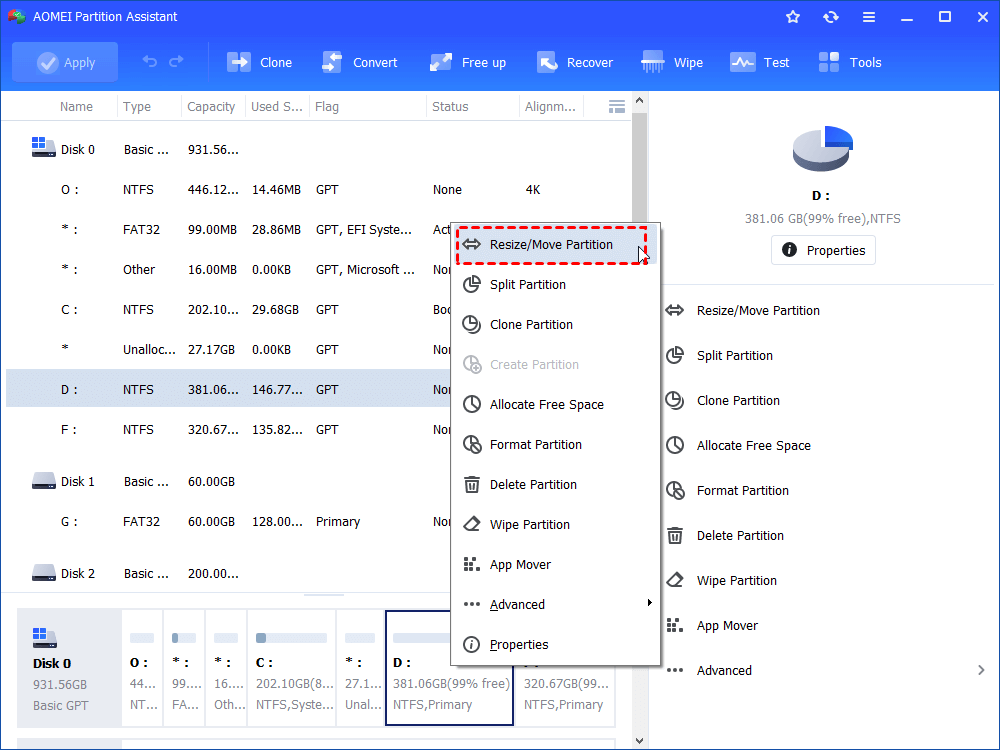
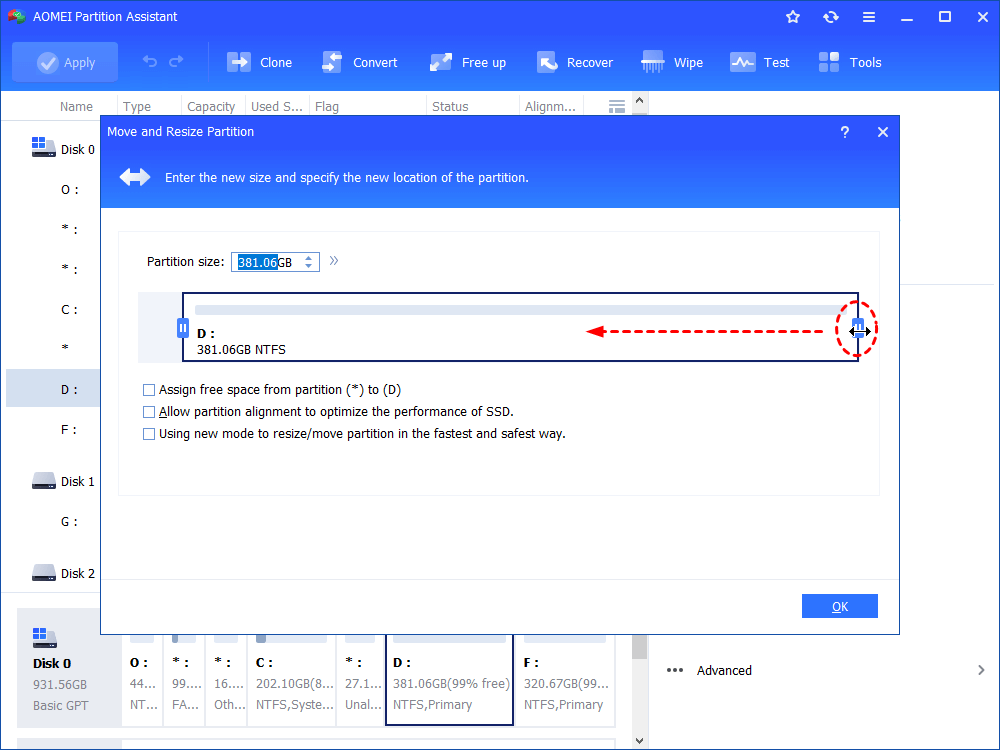
Step 3. Adjust the length of the green bar to determine the size of the unallocated space. After it’s done, hit “OK” to continue.
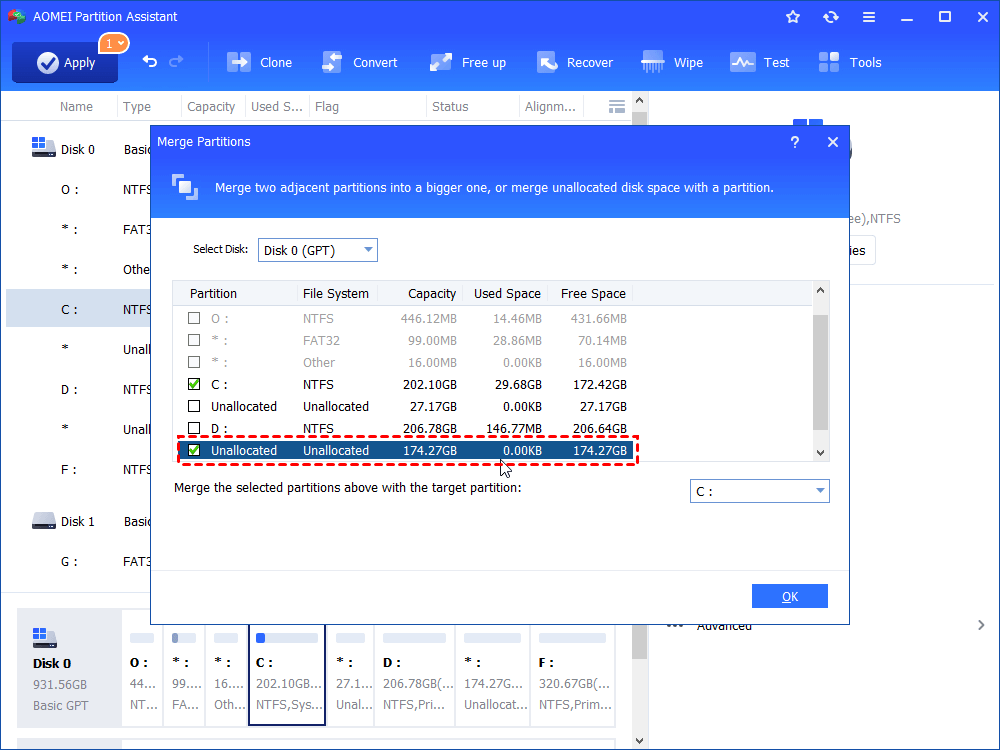
Step 4. Now, you can find a piece of unallocated space is created. Right-click on the C drive and select “Merge Partitions”.
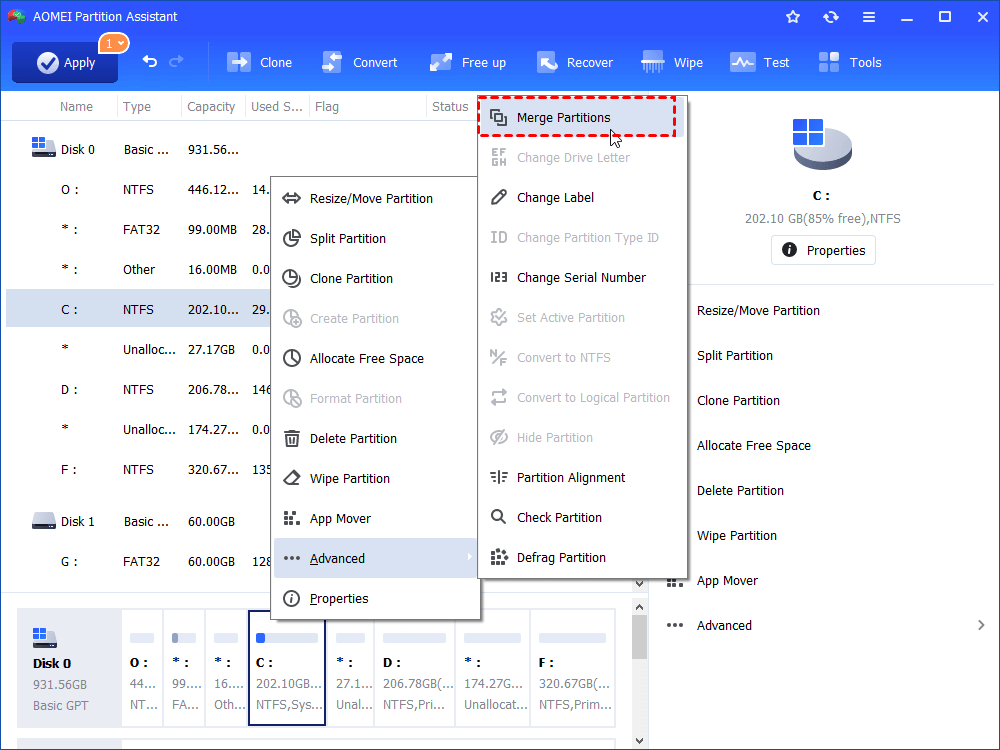
Step 5. Tick off the unallocated space and hit “OK”.
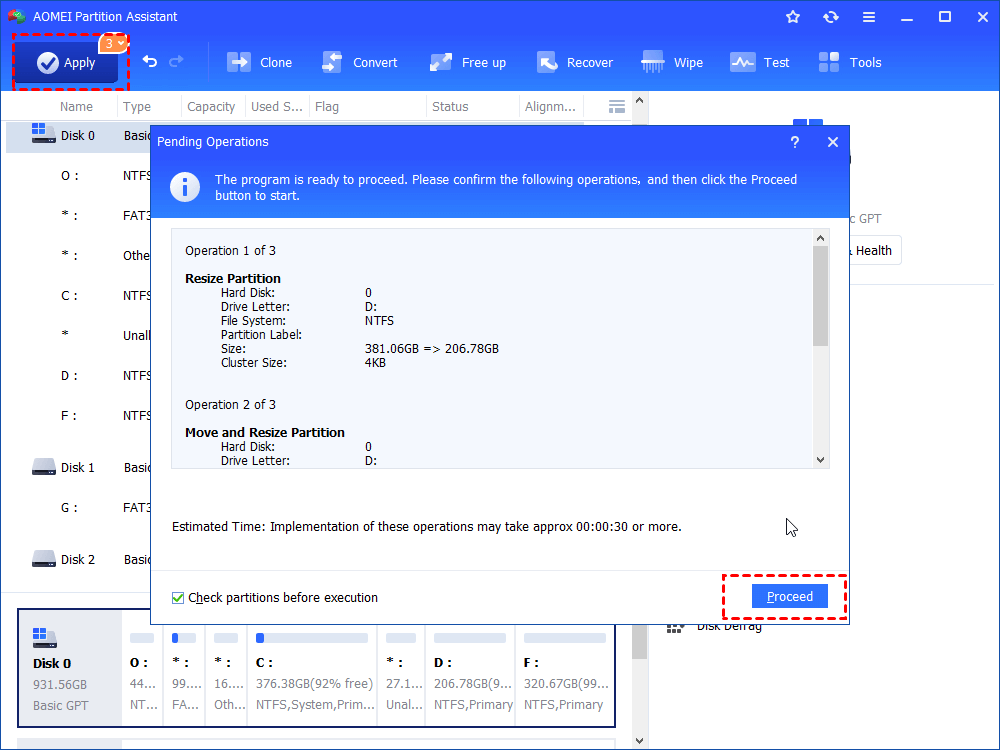
Step 6. After returning to the main interface, click on “Apply” on the upper left to start the system drive extension.
If you’re using a very old computer and there is no enough free storage left on the entire disk, I believe this method won’t help much. In this way, I suggest you try another feature “Disk Clone” of AOMEI Partition Assistant Standard to copy all data on your system disk to another larger new HDD or SSD.
Conclusion
How to clean up Windows 10 files? In the contents above, you’ve learned why you should do this and 6 pragmatic methods to help you get it done. Hopefully, you can find a useful one int terms of your own needs. As for method 6, if you want to try more features of AOMEI Partition Assistant Standard including splitting partition, quick partition, and free space allocation, you must upgrade it to the Pro version.
The Best Way to Clean Windows, According to Our Cleaning Lab
That squeegee just might make a bigger mess.
Over time, pollution and grime accumulate slowly but surely on your windows, obstructing your view and blocking precious sunlight. The only thing worse? Thick streaks left behind by improper cleaning.
To keep your vista clear (and your light-loving houseplants happy), follow this expert advice from Carolyn Forte, Director of the Good Housekeeping Institute Cleaning Lab. With the right spray, cloth, and technique, your windows will have never looked better.
1. Choose a dry, cloudy day.
«Do this job in the blazing sun and the cleaner will dry onto the hot windows before you get to wipe it off, leaving hard-to-remove streaks,» Forte says. If the weather won’t cooperate, start on the shady side of the house.
2. Remove dirt and dust first.
Before you get started, sweep dirt from the window frame with a brush or vacuum it up with your machine’s dusting attachment. This will prevent dirt from turning into a muddy mess when mixed with a cleaner. If your window screen looks especially grimy, pop it out and wash with hot, sudsy water and a soft brush, then rinse and let dry before putting it back.
For quickly dusting shades and blinds, Forte recommends going over both sides with a microfiber duster or opening the slats and going over each one with a damp cloth and followed by a dry one.
LAB TIP: You can also refresh your curtains at the same time by putting them in the dryer for 15 minutes on an «air-only» cycle and rehanging quickly to prevent wrinkles.
3. Pick the right cleaner — and spritz generously.
Don’t hold back on the spray, especially if your windows look extra dirty. «You need plenty of cleaner to dissolve and suspend the dirt so it can be completely wiped away — skimp and you’ll be seeing streaks,» Forte says.
She recommends Invisible Glass Cleaner With EZ Grip. The fine mist from the bottle stays where you spray until you wipe it, meaning less drips and mess. Check out these other top-tested cleaners depending on the job too:
How to clean boot Windows 10 (and why you might want to)

Windows 10 is a big, complicated OS that often has many different drivers, settings, and programs competing for space, and you might sometimes run into software conflicts. In this case — whether you notice that Windows isn’t starting up properly or you’re having problems installing updates — you can potentially root out the offender by performing a clean boot. Let’s take a look at how to perform a clean boot, as well as how it can be used to figure out what is causing problems.
What you need to know before a clean boot

The beauty of a good OS is that you can install as many programs and services as you’d like to make it your own. When you boot Windows 10 normally, it starts up with a bunch of those extra programs and services that you added, and while everything will generally run well, you might eventually come across a software conflict.
If you notice that Windows 10 isn’t operating properly, or if an official Windows 10 update won’t install properly, it’s always a good idea to check for any conflicts. By clean booting Windows, you should be able to root out the offender and make necessary changes.
Before clean booting, there are a few things to know. You must be signed in as an Administrator on your PC to be able to access these settings. This shouldn’t be a problem if you’re using your own device, but if you’re at work, you might have to talk to a system admin.
Once you’ve clean booted your PC, don’t be worried if it doesn’t quite work as you remember. This is a state used to root out problems, and you’ll be returning your PC to its normal state following this process.
How to perform a Windows 10 clean boot
Ready to clean boot Windows 10? Here are the steps involved.
- Right-click the Start button.
Click Search.

Click Services.
Click Disable all.

Click Open Task Manager.
Click Disable. Repeat steps 9 and 10 for all startup programs.

Restart your PC.
Once your PC restarts, only the essentials will boot. If you were having issues with a program or update, try to launch or install while in the clean boot environment. If the problem persists, you’ll know that you don’t have a software conflict and the problem lies elsewhere.
If the problem doesn’t show up while in a clean boot, you can now attempt to find the offending program or service. The best way to do so is to repeat steps 1-5 above, but re-enable half of the services.
Re-enable the top half of all non-Microsoft services (anything crucial to Windows should be hidden by step 5). Once you restart your PC, test to see if the software conflict is back. If it isn’t, repeat steps 1-5 again, but this time try re-enabling the bottom half of all non-Microsoft services instead. Restart your PC, and if the conflict is back, you’ll know that the problem lies with one of the services in the lower half.
Whether the conflict lies in the top half or the bottom half of the services, you can now start to narrow down the search. Keep unchecking services and restarting your PC. Once you find that the issue is gone, you should be able to point directly at the problem.
Getting back to normal
Once you’ve performed your clean boot and have rooted out the problem, you can get your PC back to running normally, albeit without the service causing problems.
- Right-click the Start button.
Click Search.
Click Services.
Click Enable all.
Click Startup.
Click a startup program.
Click the X to close Task Manager.
Click Restart.
Your PC should now restart and function as it should, albeit without the service causing a conflict.
More resources
For far more Windows 10 troubleshooting, be sure to check out our hub of help, tips, and tricks.
![]()
The Dell XPS 15 is our choice for best 15-inch laptop
For a lot of people, a 15-inch laptop is a perfect size that offers enough screen for multitasking, and in a lot of cases, some extra performance from powerful hardware. We’ve rounded up the best of the best at this size.
![]()
Halo: MCC’s live service elements make it better, not worse
Halo: The Master Chief Collection is more popular than ever, but some fans don’t agree with the live service approach 343 Industries has taken with it. Here’s why those elements are, at the end of the day, great for the game and for Halo overall.
![]()
Microsoft’s Surface Duo is not ‘failing up’
Microsoft announced this week that it was expanding Surface Duo availability to nine new commercial markets. While Surface Duo is undoubtedly a work in progress, this is not a sign of a disaster. It’s also doesn’t mean that Surface Duo is selling a ton either. Instead, the reason for the expansion is a lot more straightforward.
![]()
These are the best PC sticks when you’re on the move
Instant computer — just add a screen. That’s the general idea behind the ultra-portable PC, but it can be hard to know which one you want. Relax, we have you covered!


