- Инструменты Kali Linux
- Список инструментов для тестирования на проникновение и их описание
- WiFi-autopwner
- Описание WiFi-autopwner
- Справка по WiFi-autopwner
- Руководство по WiFi-autopwner
- Примеры запуска WiFi-autopwner
- Установка WiFi-autopwner
- Ethical hacking and penetration testing
- InfoSec, IT, Kali Linux, BlackArch
- WiFi-autopwner 2: user manual and overview of new features
- TX-Power increase of Wi-Fi adapter
- Connecting to wireless networks and creating an Access Point
- Bypassing the interception portal (Captive Portal)
- Collecting information about the local network, automatically checking the router for vulnerabilities
- Attack with the most likely PINs
- Automatic capture handshakes of all access points and launch Brut-force
- Show all Access Points and Clients in the District
- Automatic check of all Access Points on the 3WiFi base
- Store cracked passwords in a file
- Conclusion
- WiFi-autopwner (автоматический анализ уязвимых к взлому Wi-Fi сетей)
- Список изменений WiFi-autopwner 20190113
Инструменты Kali Linux
Список инструментов для тестирования на проникновение и их описание
WiFi-autopwner
Описание WiFi-autopwner
WiFi-autopwner — это ассистент выполнения атак на Wi-Fi сети и в сборе информации.
- переводить беспроводной интерфейс в различные режимы и усиливать мощность передачи Wi-Fi адаптера
- выполнять атаки на WPS используя встроенное исправление для ошибки Reaver «Errors: WARNING: Failed to associate with»
- выполнять автоматизированные атаки Pixie Dust на все ТД с WPS
- выполнять атака с наиболее вероятными ПИНами на одну или сразу все ТД
- получать WPA-PSK пароль при известном WPS PIN
- захватывать рукопожатия всех или отдельных ТД с запуском последующего брут-форса
- делать поиск по базе 3WIFI всех точек доступа в диапазоне досягаемости
- показывать все Точки Доступа и Клиенты в округе
- выполнять базовое исследование локальной сети, сканируя хосты с помощью Nmap и автоматически проверяя роутер на уязвимости с помощью RouterSploit
- обходить Captive Portal (используется улучшенный скрипт hack-captive-portals)
- выполнять автоматизированные атаки WEP на все ТД
- искать открытые ТД
- подключаться к Точкам Доступа
- создавать Точку Доступа
- выполнять автоматический аудит Wi-Fi сетей с использованием перечисленных атак
Автор: Alexey Miloserdov
Справка по WiFi-autopwner
Управление программой выполняется из текстового меню. Доступны следующие действия и атаки:
Руководство по WiFi-autopwner
Страница man отсутствует.
Примеры запуска WiFi-autopwner
Запуск атаки с наиболее вероятными ПИНами на все ТД с WPS
Эта атака требует Интернет подключение для загрузки ПИНов. Это интернет подключение может быть доступно по проводу или по второму Wi-Fi адаптеру.
Перейдите в папку с программой и запустите её:
Переходим к выбору сетевых интерфейсов и выбираем один из них:

Переводим интерфейс в режим монитора:

Запускаем атаку:

Дожидаемся завершения атаки:
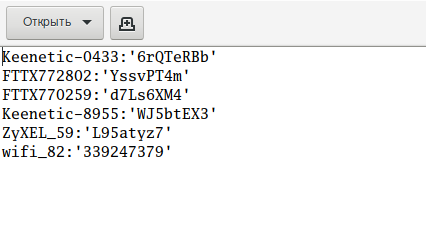
Взломанные пароли выводятся на экран сохраняются в файл all_wifi_passwords.txt:

Установка WiFi-autopwner
Программа представляет собой Bash скрипт, который должен работать в любом дистрибутиве Linux, если установлены необходимые зависимости. Не все зависимости являются строго обязательными — если вы пользуетесь не всеми функциями скрипта, то некоторые из зависимостей вам не понадобятся. Полный список программ, которые использует во время своей работы WiFi-autopwner:
Установка в Kali Linux
Если вы хотите использовать для взлома паролей Hashcat, то вам нужно установить необходимые драйвера. Например, если у вас видеокарта nVidia, то установка драйверов и программы как это показано в статье «Взлом с CUDA GPU в Kali Linux в облаке и на ПК».
Если вам нужна функция создания беспроводной точки доступа, то установите программу create_ap:
Создание ТД нужно для усиления и расшаривания сигнала Wi-Fi другой Точки Доступа, а также для сниффинга и других атак с использованием сетей Wi-Fi.
Установка в BlackArch
Если вы хотите использовать для взлома паролей Hashcat, то вам нужно установить необходимые драйвера. Например, если у вас видеокарта nVidia, то установка драйверов и программы выполняется следующим образом:
Если вам нужна функция автоматического захвата рукопожатий, то необходима программа Besside-ng, которая по умолчанию отсутствует в пакете aircrack-ng из репозиториев BlackArch. Для решения этой проблемы можно установить aircrack-ng из исходного кода следующим образом:
Информация об установке в другие операционные системы будет добавлена позже.
Источник
Ethical hacking and penetration testing
InfoSec, IT, Kali Linux, BlackArch
WiFi-autopwner 2: user manual and overview of new features
A new version of WiFi-autopwner 2 is released in which many new features. Some of them are quite interesting. We will pass on innovations, and also we will learn how to use them.
By the way, thanks to Onefivefournine for the reorganization of text strings in the source code — this allowed to transfer them to separate files and greatly facilitated the work with them. 
The program interface now looks like this:

Now the program uses many different dependencies, a complete list and installation instructions can be found here: https://en.kali.tools/?p=794
TX-Power increase of Wi-Fi adapter
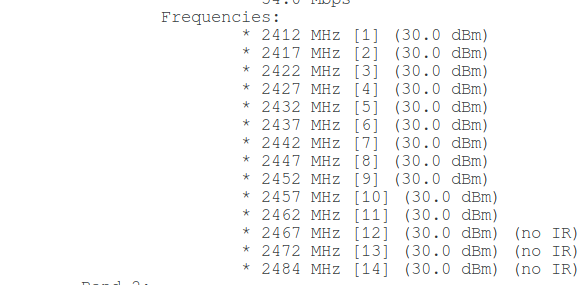
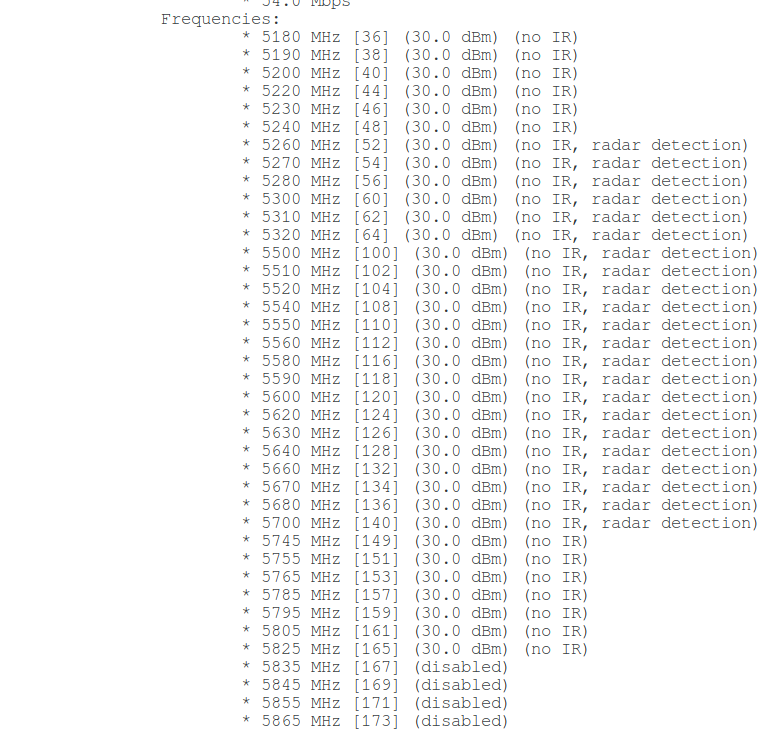
The first section contains a list of actions with a Wi-Fi adapter. As before, it can be switched to monitor mode and returned to the managed mode. Now TX-Power increasing is available. For some Wi-Fi adapters, this can be done by changing the region in which, as the Wi-Fi card ‘thinks’, it works. For some adapters it is necessary to patch the Central Regulatory Domain Database, and for some it is generally impossible to increase TX Power. Detailed explanations why this is so you will find in the article ‘How to increase TX-Power of Wi-Fi adapters in Kali Linux’.
The WiFi-autopwner 2 script as a soft way to increase TX-Power changes the region.

As a way to continuously change the power, the Central Regulatory Domain Database is patched. After patches are applied, reboot is required for the changes to take effect.
TX-Power increase modules are made only for two distributions: Kali Linux and BlackArch. The patch removes all restrictions, up to 14 channels:
Connecting to wireless networks and creating an Access Point
I always recommend that when you do the security audit of Wi-Fi networks, stop NetworkManager, because its constant intervention makes the attacks unstable and leads to incomprehensible and random errors. However, you may need to connect to a Wi-Fi network, for example, to Captive Portal to perform a further attack. Some attacks require Internet access. So now the script helps you to connect to Wi-Fi networks directly from the command line.
Remember that you can select the Wi-Fi adapter for which the action is being performed. For example, we want to check all access points in 3WIFI. To do this, we select the first adapter and connect to the Internet. Then select the second adapter and use it to scan the wireless networks.
The function of creating an Access Point with or without a password has been added. This access point can be used to amplify a signal from a remote Access Point or to make an Internet connection available to other devices.
Bypassing the interception portal (Captive Portal)
The hack-captive-portals script was added as a module, details about its work are in the article: https://miloserdov.org/?p=1088
Collecting information about the local network, automatically checking the router for vulnerabilities
A very simple module scans the local network, looks for what devices are in it and displays their open ports. In addition, it automatically starts RouterSploit to check a router for all vulnerabilities.
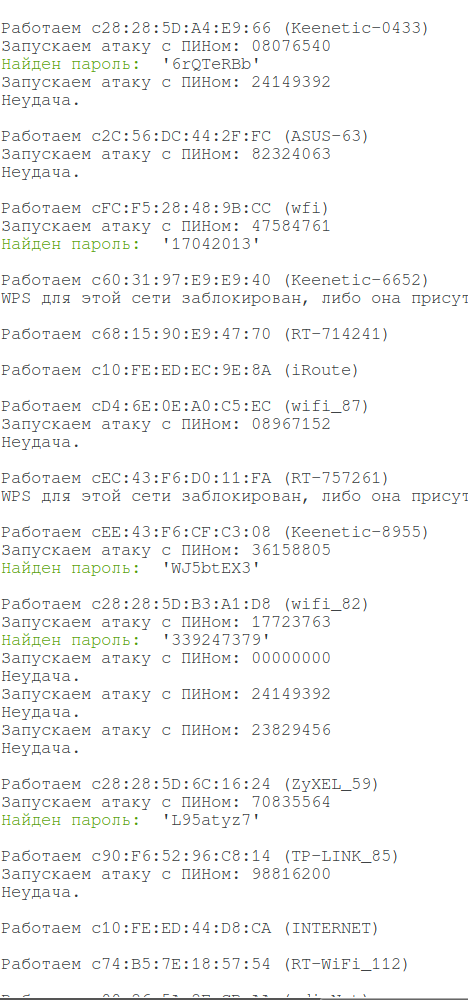
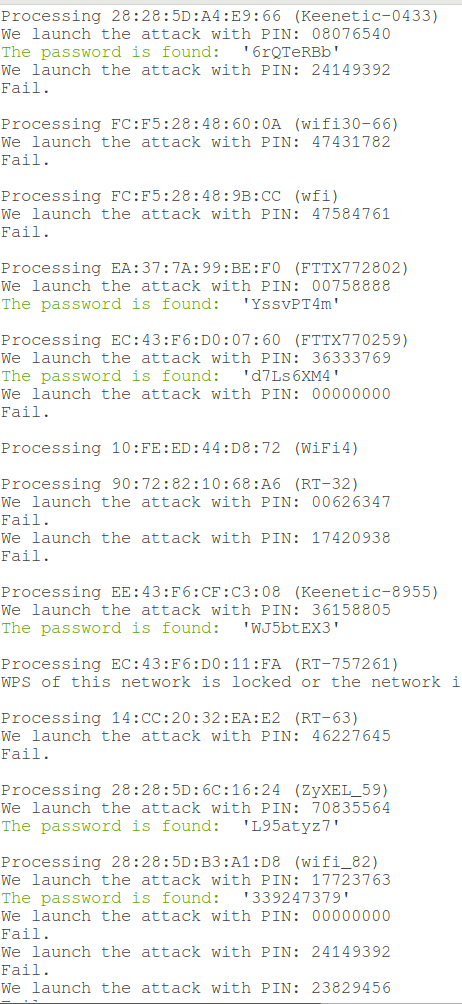
Attack with the most likely PINs
This is my favorite of the new features. The power of this attack is comparable with Pixie Dust or even surpasses it. An explanation of how this works in the article ‘Effective WPS PINs attack based on known PIN and PIN generation algorithms’.
That is, airgeddon can perform this attack. But with WPS attacks, if the Wi-Fi card has a Ralink or Intel chipset, then Reaver will constantly issue an error
A similar attack is implemented in Router Scan by Stas’M, but Wi-Fi attacks in this program work only on Windows.
WiFi-autopwner solves all these problems. Moreover, it is possible to attack both a certain Access Point, and all APs which have WPS enabled in the district.
But there is a nuance — there are no built-in algorithms for generating PINs (so far), so it uses the online service 3WIFI, to which BSSIDs (MAC address of the attacked AP) are sent, and in response we receive the generated and known PINs. For this reason, this attack requires Internet access. By the way, airgeddon works completely offline, but I already wrote about its limitations: there is no automation and adapters with the popular Ralink chipset are not suitable.
An example of an attack (six passwords in a few minutes!):
Automatic capture handshakes of all access points and launch Brut-force
This function I wanted from the very creation of WiFi-autopwner. And at last it is implemented.
Earlier, during the capture of handshakes, the zizzania program was used. Now Besside-ng is used instead. All captured handshakes are split into separate files and stored in the handshakes folder. Then, depending on the option selected, automatic brute-force is started.
Pay attention to the settings.sh file, it contains the following lines:
By default, brute force is performed by hashcat. This is the most preferable option, because it is faster. But for the correct operation hashcat needs installed proprietary drivers and not everyone can configure it. Therefore, if hashcat does not work for you, comment out or delete the line CRACKER=»hashcat», as a result for brut-force will be used aircrack-ng — this program hacks the password using the central processor, so it works on any system, even in a virtual computer.
The RunDictAttack=1 option means a dictionary attack. This attack is enabled by default. In the bundle with the program there is a cleaned dictionary rockyou.
The RunMaskDigitAttack=0 option triggers a mask attack. The mask is configured for passwords composed of numbers in 8 to 10 characters — phone numbers, birthdays and simple digital passwords are here, that is, it is an effective attack. But it requires a fairly powerful hardware and a lot of time. Hashcat on average hardware cracks eight-character passwords composed of numbers in a few minutes, passwords of nine characters in a few hours, and for 10 characters it takes several days. Therefore, by default this attack is disabled.
Handshakes are never deleted and you can use them later. All of them are stored in the handshakes folder and are divided into subfolders depending on the capture date.
In the hccapx folder, hashes for hashcat are stored (if this program is selected for brute force).
Show all Access Points and Clients in the District
Added a script from the article ‘How to detect all Wi-Fi devices in the area?’. Screenshots and how to use the data you find in the same article.
Automatic check of all Access Points on the 3WiFi base
This feature was added earlier, but someone could miss. In the new version, the algorithm of work has been slightly changed — now, when searching by the name of Access Points, it is case-sensitive search. Other details in the article: ‘3WiFi: open database of Wi-Fi Access Points passwords’.
Store cracked passwords in a file
Now the passwords from automated attacks (when attacking several Access Points at once) are stored in the all_wifi_passwords.txt file, and the access points themselves are added to cracked.txt. Note that this happens not in all attacks and the cracked.txt and blacklist.txt file checker function is still raw. This will be fixed in future releases.
Conclusion
There are ideas in the next versions to separate most of the hard-coded settings to the settings file and add the ability to change them through the program interface so that users can set themselves, for example, timeouts.
To speed up the automated Pixie Dust attack against all access points, control over running processes will be added and obviously unpromising attacks will stop immediately to move quickly to the next. By the way, if you sit in front of the monitor and watch the program is working, then when Pixie Dust attack is performing if one of the windows is closed, then the attack will definitely not bring results. Therefore, close the second window, so that the transition to the next AP occurs more quickly.
Algorithms for generating PINs, as well as a database of known PINs, are supposed to be taken from airgeddon.
Источник
WiFi-autopwner (автоматический анализ уязвимых к взлому Wi-Fi сетей)
WiFi-autopwner — это программа (скрипт) для Linux, которая автоматизирует использование других инструментов для проверки, уязвима ли Точка Доступа Wi-Fi к взлому.
Официальная страница программы: https://kali.tools/?p=4116
На официальной странице даны инструкции как установить сам скрипт WiFi-autopwner и его многочисленные зависимости.
Смысл работы WiFi-autopwner в автоматизации использования инструментов. Это означает, что все атаки, которые может делать WiFi-autopwner, вы можете выполнить самостоятельно без этого скрипта, вводя команды в консоль. Но WiFi-autopwner выполняет за вас многие рутинные действия, в результате вы можете проверить больше Wi-Fi сетей, а, следовательно, вероятность, что среди них попадётся уязвимая к взлому, повышается.
В этой теме я буду писать новости о программе. Вы можете писать здесь ваши пожелания (что добавить), а также возникающие ошибки и проблемы.
Список изменений WiFi-autopwner 20190113
Главное изменение: исправлена работа с базой данной 3WIFI. Последнее время 3WIFI находилась под атакой и гостевой аккаунт (который используется в WiFi-autopwner) был отключён. Когда на 3WIFI вновь заработал гостевой аккаунт выяснилось, что имеются некоторые изменения:
- изменился API
- установлен интервал для запросов
В WiFi-autopwner был прописан новый API от 3WIFI, а также сделан интервал между запросами — 1 минута. В результате все функции взаимодействия с 3WIFI (автоматическая проверка всех ТД по базе взломанных Wi-Fi сетей, поиск вероятных ПИНов для WPS) снова работают нормально.
Изменения в показе открытых сетей: теперь показывается мощность их сигнала, MAC адрес, количество передаваемых данных — вся эта информация важна, например, если вы хотите подключиться к этой точке доступа или вас интересует, есть ли у этой точки доступа клиенты (например, если вы хотите захватывать данные у открытой точки доступа).
Убрана опция -i у airodump-ng: в коде несколько раз встречалась конструкция airodump-ng -i $IFACE, которая является ошибочкой. Дело в том, что интерфейс для airodump-ng указывается без каких-либо опций, а опция -i имеет совершенно другое значение. То есть она присутствовала в командах по ошибке.
Исправлена функция подключения к открытым Wi-Fi сетям: теперь не должно возникать ошибок, если имя Wi-Fi сети содержит пробел.
Источник


