- Wifi для mac os big sur
- Wifi для mac os big sur
- Как решить проблемы с Wi-Fi и Bluetooth в macOS Big Sur
- Как решить проблемы с Bluetooth в macOS Big Sur
- Как решить проблемы с Wi-Fi в macOS Big Sur
- Перезагрузка Mac / Роутера
- Сброс настроек Wi-Fi
- Создание новой сети Wi-Fi с пользовательскими настройками
- How to Fix macOS Big Sur Wi-Fi Problems
- Troubleshooting macOS Big Sur Wi-Fi Problems
- 1. Check for Any Software Updates & Restart Your Mac
- 2: Reboot the Mac
- 3. Disconnect All USB Devices from the Mac
- 4. Create A New Wi-Fi Configuration in macOS Big Sur
- 5. Create A New Network Location With Custom Settings
- 6. Reset the NVRAM on your Mac
- 7. Reset the SMC of your Mac
- 8. Reset the Wi-Fi Router / Modem
- 9. Try a Different Wi-Fi Network, or Personal Hotspot
Wifi для mac os big sur
Wireless USB Big Sur Adapter
Welcome to Wireless USB Big Sur Adapter
Support macOS Monterey 12 — macOS Big Sur 11 Only! (DO NOT USE ON OTHER OS’s)
- For Hackintosh with OpenCore its better to using this ➢Wireless-USB-OC-Big-Sur-Adapter
- For Clover ➢WirelessAdapterCloverBigSur
Work SIP disable on any macOS Big Sur version
To using any relase SIP Security must be disable! (Fully disable)
- csrutil disable
- ( 🚫 It does not work on Mediatek adapters)
IMPORTANT SIP SECURITY FOLLOW THIS ➤ SIP Security
It seems that it does not work on Mac M1 Apple chip, working only for Mac Intel.
Latest Update 15 Sept 2021 Release V11 adapt for latest macOS Big Sur 11
- Update 14 august 2021 . Check SIP status
- Update 30 july 2021 . Drivers and Utility
- Update 29 Nov 2020 Using a blue WIFI icon but similar to Big Sur


Drivers for Realtek 802.11n and 802.11ac USB Wi-Fi adapters
Packages for macOS (Real Mac) Working on Hackintosh PC or Laptop
Known Working and testing adapter
- Alfa AWUS036AC
- Alfa AWUS036ACH
- Archer T2U NANO, MINI, AC600
- Archer T3U
- Archer T3U Plus
- Archer T2U MINI V3
- Archer T2U Plus
- ArcherT4U V3
- Archer T9UH V2
- ASUS USB AC68
- ASUS USB-N13
- COMFAST CF-811AC
- COMFAST CF-812AC
- Cudy WU1300S
- Cudy WU700
- EDIMAX EW-7611UCB
- EDIMAX EW-7722UTn V2
- EDIMAX_EW-7822ULC
- EDIMAX EW-7612Uan V2
- EDIMAX EW-7833UAC
- EDIMAX N300
- EDIMAX EW-7811Un (N150)
- EDUP EP-AC1689
- Fenvi AC1300 (RTL8812bu)
- Linksys WUSB6300 V2
- Linksys WUSB6400M
- Netgear A7000
- Sitecom WLA7100
- TL-WN823Nv2/v3
- TL-WN725Nv3
- TL-WN723Nv2/v3
- TL-WN722Nv2/v3
- TL-WN821Nv6
- TL-WN822Nv4/v5
- TENDA W311-MINI
- TRENDnet N150 Micro
- TRENDnet TEW-908UB
- ZAPO W58L (RTL881lAU)
- If you have a non listing working adapter please report it here ☞ Report working adapter
Support Drivers: (Adapter)
EDIMAX- EW-7722UTn V2
TRENDnet N150 Micro
NOTE: this program is not responsible for any damage or machine that does not boot anymore.
- See video on macOS Monterey 12
Follow every steps in the Video ⬇︎
video if SIP is not disable ⬇︎
This driver runs from macOS Big Sur 10.16 The system is required to reboot after the driver is installed, so please close all the other applications before installing this software. After the system boots up and you enter the system, please follow the following steps to configure the network:
- Instructions:
-
- Connect to the WLAN from the status bar Icons.
-
- Select the «System Preference» from the system menu.
-
- Select and launch the «Network» item in the «System Preference» folder.
-
- From the «Configure» list, select the correct adapter and configure it.
-
- Configure the settings.
-
Источник
Wifi для mac os big sur
Welcome to Wireless USB OC Big Sur Adapter
Support macOS Monterey 12 — macOS Big Sur 11 — macOS Catalina 10.15
- For Hackintosh PC and Laptop only
Work SIP disable on any macOS Big Sur version
To using any relase SIP Security must be disable! (Fully disable)
- csrutil disable
- ( 🚫 It does not work on Mediatek adapters)
Important Note: Since some Beta you need to disable the SecureBootModel in / Misc / Security ➤ See image ➤ SecureBootModel
Latest Update 23 Sept 2021 Release V11 correction delete Entry in config if exist
- Update 15 Sept 2021 Release V11 adapt for latest macOS Big Sur 11
- Update 14 august 2021 . Check SIP status
- Update 30 july 2021. Drivers and Utility
- Update 26 july 2021. Check box Auto start
- Update 09 Feb 2021 Remove unecessary OpenCore Configurator
- Update 29 Nov 2020 Using a blue WIFI icon but similar to Big Sur
- You must give a complete detailed information of your system and have the program Log on a .TXT file otherwise your isssue could be deleted.
Drivers for Realtek 802.11n and 802.11ac USB Wi-Fi adapters
Packages for macOS Hackintosh PC or Laptop
Known Working and testing adapter
- Alfa AWUS036AC
- Alfa AWUS036ACH
- Archer T3U
- Archer T3U Plus
- Archer T2U MINI V3
- ArcherT4U V3
- Archer T9UH V2
- ASUS USB AC68
- ASUS USB-N13
- COMFAST CF-811AC
- COMFAST CF-812AC
- Cudy WU1300S
- Cudy WU700
- EDIMAX EW-7611UCB
- EDIMAX EW-7722UTn V2
- EDIMAX_EW-7822ULC
- EDIMAX EW-7833UAC
- EDIMAX EW-7612Uan V2
- EDIMAX N300
- EDIMAX EW-7811Un (N150)
- EDUP EP-AC1689
- Fenvi AC1300 (RTL8812bu)
- Linksys WUSB6300 V2
- Linksys WUSB6400M
- Netgear A7000
- Sitecom WLA7100
- TL-WN823Nv2/v3
- TL-WN725Nv3
- TL-WN723Nv3
- TL-WN722Nv3
- TL-WN821Nv6
- TL-WN822Nv4/v5
- TENDA W311-MINI
- TRENDnet N150 Micro
- TRENDnet TEW-908UB
- ZAPO W58L (RTL881lAU)
- If you have a non listing working adapter please report it here ☞ Report working adapter
Support Drivers: (Adapter)
EDIMAX- EW-7722UTn V2
TRENDnet N150 Micro
NOTE: this program is not responsible for any damage or machine that does not boot anymore.
- See my video on macOS Monterey 12
Follow every steps in the Video ⬇︎
See Video if SIP is not disable ⬇︎
This driver runs from macOS Big Sur 11 The system is required to reboot after the driver is installed, so please close all the other applications before installing this software. After the system boots up and you enter the system, please follow the following steps to configure the network:
- Instructions:
-
- Connect to the WLAN from the status bar Icons.
-
- Select the «System Preference» from the system menu.
-
- Select and launch the «Network» item in the «System Preference» folder.
-
- From the «Configure» list, select the correct adapter and configure it.
-
- Configure the settings.
-
Источник
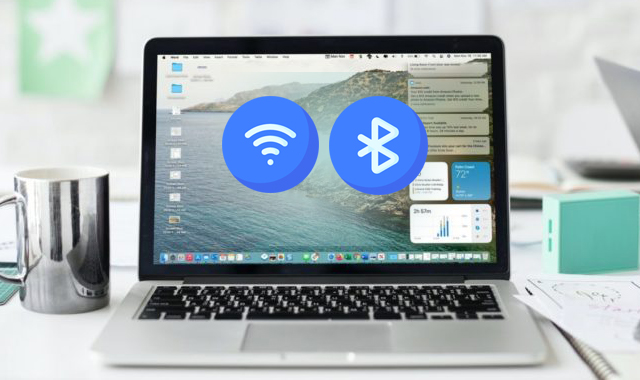
Как решить проблемы с Wi-Fi и Bluetooth в macOS Big Sur
Пользователи продолжают находить различные недочеты в новой яблочной настольной операционной системе. Причем ряд проблем повторяется практически каждый год. В частности, пользователи уже в течение нескольких лет говорят о проблемах с Wi-Fi, которые появляются после релиза очередного крупного аптейта. В этом году ситуация повторилась, но к уже «известным» недочетам добавилась нестабильная работа Bluetooth. В этом материале мы расскажем несколько способов, которые должны помочь восстановить работоспособность Wi-Fi и Bluetooth в macOS Big Sur.

Как решить проблемы с Bluetooth в macOS Big Sur
Стоит отметить, что о проблемах с Bluetooth в macOS Big Sur сообщает достаточно много пользователей. Активнее всего об этом говорят владельцы новых яблочных компьютеров. У большинства пользователей после перехода на macOS Big Sur Bluetooth начал работать нестабильно. Для решения этой проблемы нужно:
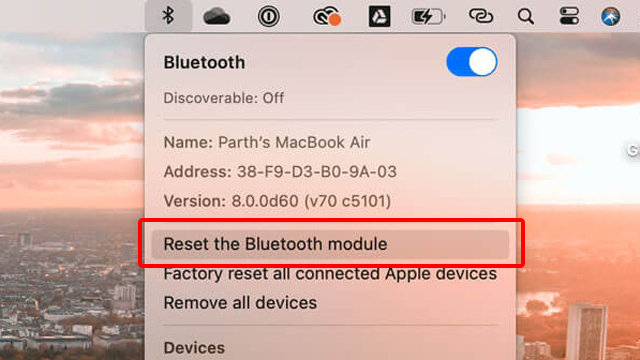
- Зажать комбинацию клавиш Shift + Option.
- В строке меню нажать на иконку Bluetooth.
- Нажать на пункт сбросить модуль Bluetooth.
- Подтвердить свой выбор.
- Перезагрузить компьютер.
В большинстве случаев такие манипуляции позволяют решить проблемы с Bluetooth. Другой вариант решения проблемы – использовать внешний модуль для беспроводного подключения периферийных устройств. Метод не очень «красивый». Однако это решение временное. Скорее всего, в ближайшее время Apple выпустит программную заплатку, которая решит проблему.
Как решить проблемы с Wi-Fi в macOS Big Sur
На протяжении нескольких последних лет пользователи жалуются на проблемы в работе Wi-Fi. «Симптомы» всегда одинаковые:
- Отключение Wi-Fi после выхода компьютера из «Режима сна».
- Спонтанные отключения от Wi-Fi-сети.
- Высокий пинг или просто низкая скорость беспроводного соединения.
macOS Big Sur не стала исключением. После установки обновления на Reddit и в Twitter начали появляться жалобы на нестабильную работу Wi-Fi. Решить эту проблему можно несколькими способами.
Перезагрузка Mac / Роутера
Самым простым решением проблем с Wi-Fi может стать обычная перезагрузка компьютера и роутера. В ряде случаев это позволяет быстро и безболезненно исправить ситуацию и восстановить скорость. Однако помогает этот способ далеко не всем.
Сброс настроек Wi-Fi
Более кардинальным решением является сброс настроек Wi-Fi. Для этого нужно:
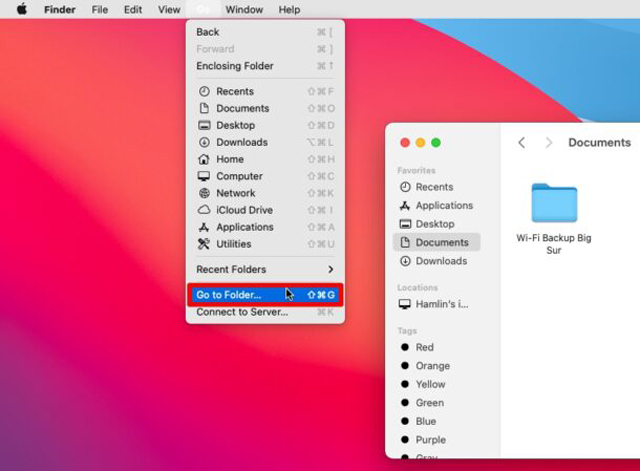
- Открыть Finder и с помощью комбинации клавиш Cmd+Shift+G перейти по адресу:
/ Library / Preferences / SystemConfiguration /
- В открывшейся папке выбрать следующие файлы:
- Переместить выбранные файлы в корзину или отдельно созданную папку. В случае возникновения проблем их можно будет восстановить.
- Перезагрузить Mac.
- После перезагрузки включить Wi-Fi.
В большинстве случаев описанный выше метод позволяет устранить сбои в работе Wi-Fi.
Создание новой сети Wi-Fi с пользовательскими настройками
Если беспроводное подключение все еще работает нестабильно, то решить проблему можно путем создания новой Wi-Fi сети с пользовательскими настройками DNS и MTU. Для этого нужно:
- Перейти в Системные настройки раздел Сеть.
- Открыть выпадающий список Размещение и перейти в пункт Редактировать размещение.
- С помощью кнопки «+» создать новую сеть с произвольным названием.
- Вернуться в общие настройки Сети и нажать на кнопку Дополнительно.
- Во вкладке TCP/IP нажать на кнопку Запросить адрес DHCP.
- Во вкладке DNS в подразделе DNS-серверы добавить новый DNS-сервер. Можно использовать 8.8.8.8 или 8.8.4.4.
- Во вкладке Аппаратура в меню MTU выбрать пункт Вручную.
- В дополнительном поле ввести размер пакета «1492».
- Нажать Oк.
После этих манипуляций можно повторно подключиться к Wi-Fi.
Источник
How to Fix macOS Big Sur Wi-Fi Problems

Are you having trouble connecting to Wi-Fi networks on your Mac after updating it to macOS Big Sur recently? Although connecting to Wi-Fi networks on a Mac is a fairly straightforward procedure for the most part, some users have reported issues with getting the internet to work over Wi-Fi after installing macOS Big Sur.
The most commonly reported macOS Big Sur-related Wi-Fi issues are that the connection drops frequently, won’t reliably connect to wi-fi, or the overall network performance is lacking. This could be due to several reasons ranging from Wi-Fi router issues, to software-related problems that you may be facing on your Mac after the update. Sometimes, improper DNS settings could also prevent you from accessing the internet.
If you’re one of those unlucky users who’re affected by this issue, you’ve come to the right place, run through the steps provided to troubleshoot and resolve Wi-Fi issues in macOS Big Sur.
Troubleshooting macOS Big Sur Wi-Fi Problems
Regardless of whether you own a MacBook, MacBook Pro, MacBook Air, Mac mini, iMac, or Mac Pro, you can follow these basic troubleshooting methods whenever you’re facing any connectivity-related issues on your macOS Big Sur machine. Before you go ahead with the following procedure, make sure to back up your Mac using Time Machine so that you don’t lose your settings and configuration files in case something goes wrong.
Some of the steps we’re about to discuss are simple, whereas the others require slightly more complicated tasks such as setting up a new network profile, moving system files, using custom network configurations, amongst other techniques that may be necessary to fix wireless connectivity.
1. Check for Any Software Updates & Restart Your Mac
Sometimes, buggy software can result in Wi-Fi connectivity issues on a Mac. Apple is usually quick to release a hotfix and address OS-related issues that have been reported by users. So, it’s always good to check for any available software updates from time to time.
You can check if your Mac is running the latest version of macOS by going to System Preferences -> Software Update. If there’s a new macOS update available, choose to download and install it.
2: Reboot the Mac
Whether you have a new update or not, restart your Mac and see if it resolves the Wi-Fi issue you’re facing. You may find this silly, but most minor software-related bugs and glitches can be resolved by simply rebooting your device. There’s more than one way to reboot your Mac. You can click on the Apple logo from the menu bar and choose “Restart” from the dropdown menu. Or, you can hold the power button on your Mac to bring up the shutdown menu where you’ll find the option to restart your device as well.
3. Disconnect All USB Devices from the Mac
If you have any device connected to your Mac’s USB port like external storage devices, USB hubs, dongles, etc. unplug it and see if that fixes the issue. This step is recommended because – although somewhat rare – there’s always a possibility that your Wi-Fi connectivity issues are due to hardware interference with certain connected devices that emit radio frequency.
After disconnection, if you notice that your Wi-Fi connection is working fine, then you know it’s likely hardware interference from one of the USB devices. In such cases, you can try moving the USB device further away from your Mac to minimize interference, provided the cable is long enough. Also, if you’re connected to a 2.4 GHz Wi-Fi network, try switching to a 5 GHz network as it may have less interference than the lower frequency band.
4. Create A New Wi-Fi Configuration in macOS Big Sur
This might be a slightly more complicated method compared to the others, but all we’re going to do is remove existing configuration files to make new ones which usually fixes wireless network issues. So, follow the steps below carefully to avoid any confusion.
- Temporarily disable Wi-Fi on your Mac by clicking on the Control Center icon in the menu bar at the top-right corner of your screen.
- Next, open Finder and head over to an easily accessible location. Make a new folder here and use a suitable name. Once you’re done, click on “Go” from the menu bar and choose “Go to Folder” from the dropdown menu to proceed.
This should bring up a tiny window on your screen where you’ll be able to enter the path. Copy/Paste the following path and click on “Go”.
Try opening Safari and see if you’re able to browse the web without any issues. Wireless connectivity should be working fine by now. If this method didn’t help in your instance, you’ll have to proceed to the next troubleshooting step.
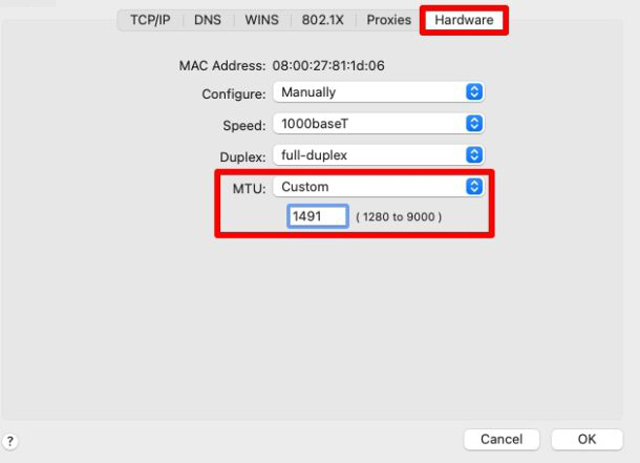
5. Create A New Network Location With Custom Settings
This might be the hardest troubleshooting step for most users. Here, we’ll be creating a new network location in macOS Big Sur using custom configuration settings for DNS and MTU as they can sometimes hinder internet connectivity. Let’s take a look at the necessary steps.
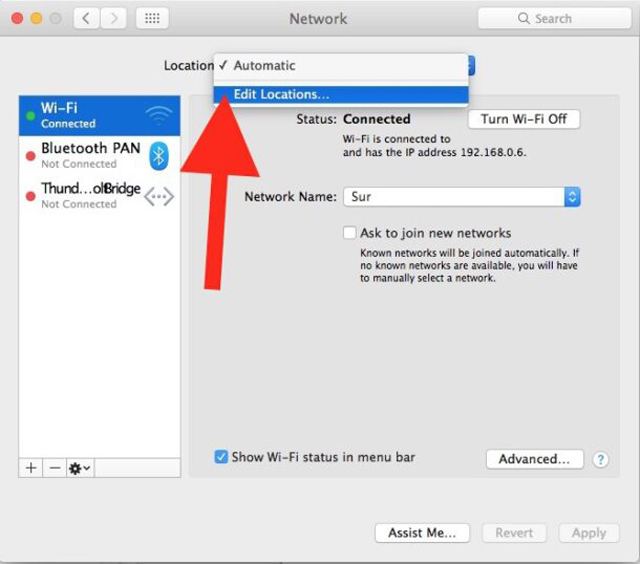
- Head over to “System Preferences” on your Mac from the Dock and click on “Network” to get started. Here, make sure “Wi-Fi” is selected on the left pane and pull down the Location setting. Click on “Edit Locations” from the dropdown menu.
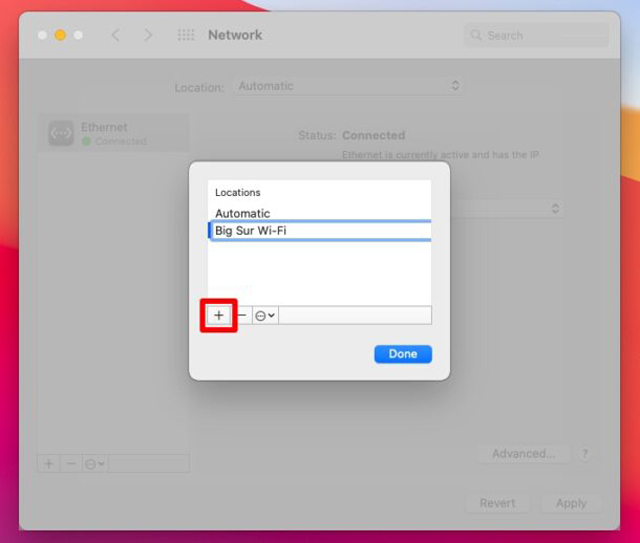
Next, click on the “+” icon to manually create a new network location, and give it a suitable name like “Big Sur Wi-Fi” then click on “Done”.
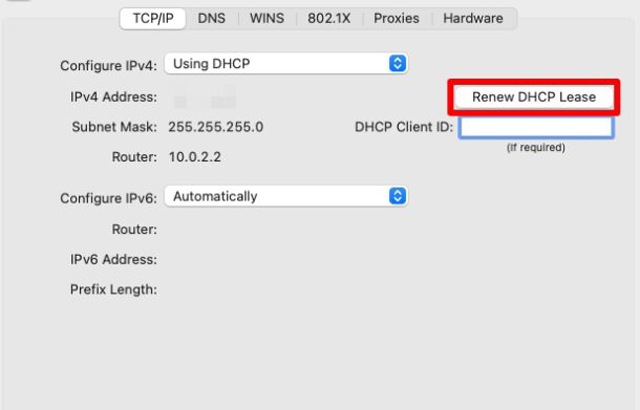
Now, go back to the Network Preferences panel and click on “Advanced” as shown in the screenshot below.
Here, head over to the TCP/IP tab and click on “Renew DHCP Lease”.
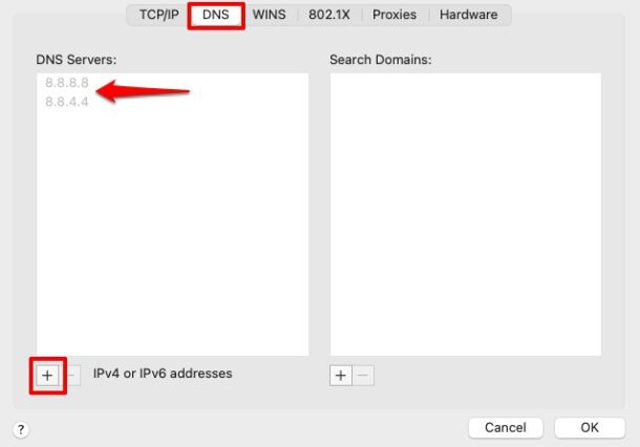
Once you’re done, switch to the DNS tab and click on the “+” icon below the DNS Servers area. Now, manually enter 8.8.8.8 and 8.8.4.4 as the IP addresses for DNS servers as indicated below.
Next, switch to the “Hardware” tab and change the “MTU” setting to “Custom”. Now, type in “1492” as the value for MTU and click “OK”.
Now, when you try to exit the Network Preferences panel, you’ll be prompted to Apply all the changes you’ve made. Choose “Apply” and reconnect to your Wi-Fi network to see if the issue has been resolved.
6. Reset the NVRAM on your Mac
For those who aren’t aware, NVRAM or Non-Volatile Random Access Memory is a small amount of memory utilized by your Mac to store certain settings for quick access. Resetting your Mac’s NVRAM is typically considered an effective troubleshooting method when your system is misbehaving.
Resetting the NVRAM is a lot easier than you think. First, shut down the Mac and immediately after you turn it back on, simply press and hold Option + Command + P + R on your keyboard for about 20 seconds. This will reset both the NVRAM and PRAM. You can confirm this when the Apple logo appears and disappears for the second time while booting up.
7. Reset the SMC of your Mac
Resetting your Mac’s System Management Controller (SMC) can sometimes resolve issues related to Wi-Fi, power, batter, and other features. It may be necessary to restore normal lower-level system functionality to your Mac especially when you’re facing hardware-related problems.
The steps to reset your Mac’s SMC may vary depending on the model you own. To reset the SMC on MacBooks with Apple’s T2 Security Chip, press and hold Control + Option + Shift on your keyboard for 7 seconds and then press and hold the power button as well. If your Mac is on, it will turn off as you hold the keys, but keep pressing all four keys together for another 7 seconds and then release them. Wait for a few seconds before you power on your Mac again.
On the other hand, if you have an older MacBook without the T2 chip, press and hold Control + Option + Shift keys while also pressing the power button for about 10 seconds to reset the SMC.
The procedure is a lot easier on Mac Desktops with or without the T2 chip. Simply shut down your Mac and unplug the power cord. Now, wait 15 seconds and plug the power cord back in. Wait for at least 5 seconds before you turn on your Mac again.
8. Reset the Wi-Fi Router / Modem
If you’re still facing problems, it’s possible that the issue is with your Wi-Fi router or modem and not the Mac itself. Hardware or firmware-related issues with your Wi-Fi router could prevent you from accessing internet over the wireless network. However, you can try resetting your Wi-Fi router to see if it fixes the issue.
Typically, you can do this by pressing the router’s power button for a few seconds and then restarting it, but the exact process of resetting routers and modems can vary per manufacturer. Hence, it’s not realistically possible to cover all the various methods here. For a more normalized procedure, you can unplug the router or modem for about 20 seconds and then plug it back in again.
9. Try a Different Wi-Fi Network, or Personal Hotspot
Another option is to try a different wi-fi network entirely, or use Personal Hotspot from an iPhone or cellular iPad. If the Mac works with a different network, or with a personal hotspot, it’s certainly an indicator the issue is with the other wi-fi router, network, or provider, and you’d want to focus troubleshooting efforts on that side of things rather than the Mac.
You can also try using the same wi-fi network with a different device, like another Mac, a PC, iPhone, iPad, Android device, or something else – if those devices are working with the wi-fi network it suggests something is going on with the Mac, whereas if those devices also are not connecting to the internet successfully, it points to an issue with a particular wi-fi network or ISP.
Hopefully by now you have resolved any Wi-Fi connectivity issue you were facing on your Mac with macOS Big Sur.
If none of the above troubleshooting methods worked in your favor, you might want to contact your internet service provider (ISP) to check for any issues on their end. Server-side issues can also prevent you from accessing the internet over Wi-Fi. One of the best ways to check if it’s actually a Wi-Fi specific issue is by using an ethernet cable and establishing a wired connection with any of your other devices.
Do you use an iPhone or iPad as your primary mobile device? In that case, you may also be interested in taking a look at some of the basic troubleshooting steps you can follow whenever you’re facing Wi-Fi connectivity issues on iPhone and iPad devices.
We hope you were successful in getting your Wi-Fi connection to work properly on your Mac again. Which of the troubleshooting methods that we discussed here worked for you? Did you have another solution for Big Sur related Wi-Fi issues? Share your experiences, thoughts, and opinions in the comments below!
Источник


