- Ubuntu Documentation
- Scan for wifi Network
- Introduction
- Find Network Interface Card
- Release network connections
- Setup Network Interface Card
- Acquire Network Address
- Compatible Chipsets
- How To Show Available WiFi Networks, Their Channels, Signal Strength And More From The Command Line
- Option #1: Scan and list available WiFi networks using nmcli
- Option #2: Get a list of available WiFi networks using wavemon
- Работаем с Wi-Fi сетями из терминала в Linux. Просто и удобно!
- How to check Wireless Network (WiFi) information in Linux
- 1) Checking wireless card chipset information
- 2) Identifying wireless interface name in Linux
- 3) Scan and list available WiFi networks using nmcli command
- 4) Checking wireless network (WiFi) & card information using iwconfig command
- 5) Checking wireless interface information using iwlist command
- 6) Checking wireless interface information using wavemon command?
- 7) Check Wifi information using GNOME NetworkManager command?
- Wrapping Up
Ubuntu Documentation
Scan for wifi Network
Introduction
Scan for and Connect to a Wireless Network from the Command Line
There are a multitude of fine, graphical wireless network configuration programs available to the Ubuntu community. However, there may come a day when you need to acquire a wireless connection from an unknown network on a strange network card from the recovery console. Or perhaps you just want to know how to connect to your home network from the command line. Either way, this HOWTO is for you.
This guide assumes that the drivers for your network card are properly set up. Otherwise, it would be too complicated to cover all vendors and chipsets.
Find Network Interface Card
Figure out the name of the interface for your wireless card
The interface name of cards for different vendors may be different, which is why this step is needed:
This will list the interface names for all NICs on your computer. It will probably include eth0 (hardwired NIC), lo (loopback interface for the localhost), and something for your wireless card (like wifi0, or wlan0).
For these steps let’s call whatever name you find for your wireless NIC [wifi interface].
If you have multiple wireless cards, all of them will be listed. To be sure that the interface that you select is a wireless interface, you can check that its directory contains a «wireless» folder:
Release network connections
Just to be sure it’s not being used, bring your interface down, release your DHCP connection and then put it back up:
Many of these commands require superuser priviledges (i.e. root access), so the sudo command precedes them. Of course, you could always use «sudo -s» or some other method to login to a shell as the root account, but why complicate matters?
Scan for open networks
Note: In tests this command only worked with Atheros cards.
This should return results that look something like this:
The ESSID, Frequency and Address are the most important labels here (quality may also factor into your decision, too. higher is better).
Setup Network Interface Card
Set the wireless NIC so that it will connect to the found wireless network:
Note the «G» after the frequency, to denote «GHz».
Acquire Network Address
Acquire a DHCP address from your wireless router:
Okay. assuming that your DHCP address was acquired properly, you should have a internet connection all set up. Now, this is probably too complicated of a process to do by hand, but there are a number of ways to automate it. That’s outside the scope of this tutorial!
Compatible Chipsets
It has become apparent that not all wireless interface cards work with the scan command. Can you add your results to the table below.
Command to find the manufacture and model of your pci card is:
Источник
How To Show Available WiFi Networks, Their Channels, Signal Strength And More From The Command Line
This article explains how to view available WiFi networks, list their channels, link quality, security, signal strength, and more on Linux using the command line.
This can be useful to scan available WiFi networks to quickly see their signal strength, see their channels to know which WiFi channel to use for less interference, and so on.
There are multiple ways / tools to scan for available WiFi networks and list their details, but in this article I’ll only list 2 which are easy to use and provide enough information for this task.
Option #1: Scan and list available WiFi networks using nmcli
nmcli, a command line tool for controlling and reporting the network status, can scan and list available WiFi networks regardless of the WiFi being connected to a network or not. This should already be installed on your Linux distribution, it doesn’t require specifying the interface name, and can work without super user (sudo) privileges by default or at least that’s the case in my test on both Fedora and Ubuntu.
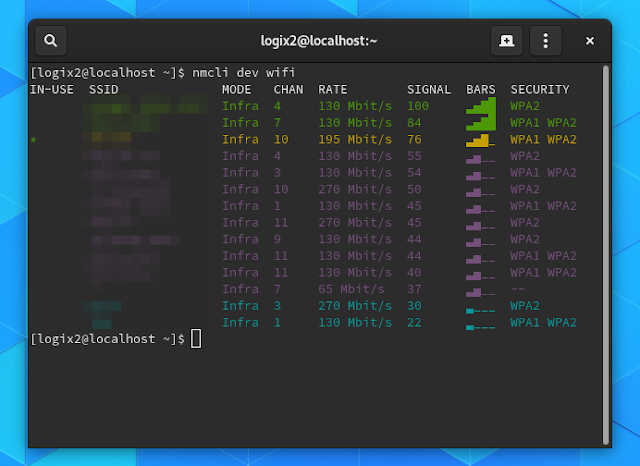
Use nmcli to show the available wireless networks SSID, mode, channel, transfer rate, signal strength, bars and security used using:
This is how the command output looks:
I’ve seen some users saying that they had to run nmcli with sudo to get it to show available wireless networks, but that wasn’t the case when trying this on Fedora 31 and 30, or on Ubuntu 19.10 or 18.04. Still, in case nmcli doesn’t show anything, try running it with sudo:
To get nmcli to show some extra information about the scanned WiFi networks, including the SSID-HEX, BSSID, frequency, and more, run it like this:
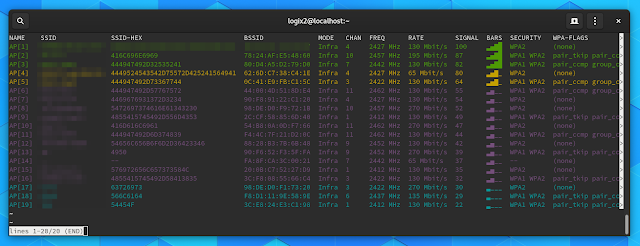
This shows the scanned WiFi details in a tabular view. In case you want to switch to multiline view, so you don’t have to expand the terminal window width to see all the details, use -m multiline , like this:
For usage in scripts, use the terse ( -t ) output mode:
In case you want to force nmcli to rescan the available WiFi networks, use the rescan option:
Option #2: Get a list of available WiFi networks using wavemon
wavemon is terminal user interface (TUI) that uses ncurses, which monitors wireless signal and noise levels, packet statistics, device configuration and network parameters. Use this instead of nmcli, if you’re not using NetworkManager, or if you simply prefer this over nmcli.
Using it you can get a list of available Wifi access points, regardless if you’re connected to a WiFi network or not. The tool requires super user permissions (e.g. run it with sudo) to scan for available Wifi networks by default.
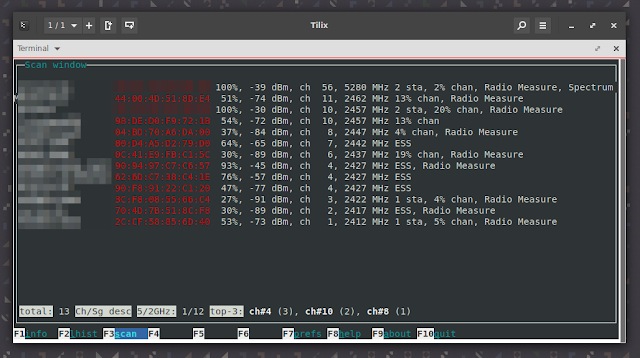
wavemon can show the following information for available (scanned) WiFi networks: SSID, BSSID (access point mac address), signal quality, signal strength, WiFi channel, and frequency.
wavemon is not installed by default, but it’s available in the repositories for many Linux distributions. Install it as follows:
- Fedora:
- Debian, Ubuntu, Linux Mint, Pop!_OS, Elementary OS and other Debian or Ubuntu based Linux distributions:
- openSUSE:
- Arch Linux / Manjaro:
Now launch wavemon:
To scan for available WiFi networks press F3 to switch to the scan tab.
Looking for a more advanced WiFi scanner with extra features? Check out Kismet, a command line tool that got a web UI back in April, 2019.
Источник
Работаем с Wi-Fi сетями из терминала в Linux. Просто и удобно!

Доброго времени суток всем юзерам! 🙂 Я думаю ни для кого не секрет, что при работе с ОС Linux, часто приходится работать в терминале. Терминал вещь очень хорошая если умело работать с ним и сегодня попробуем поработать с сетями Wi-Fi из под терминала 🙂
Итак, что нам нужно? Руки, голова, Wi-Fi-сети и конечно ваш любимый дистрибутив Linux 🙂
Для начала нам нужно определить, какие интерфейсы в компьютере работают с Wi-Fi сетями:
после чего вы увидите что то похожее на это:

Как мы видим по скриншоту выше, интерфейс называется wlan0.
Теперь давайте убедимся, что интерфейс wlan0 поднят и работает:
После того, как интерфейс поднят и работает, давайте просканируем сети Wi-Fi командой:
sudo iw dev wlan0 scan | less
должно выйти похожее на это:

Конечно названия сети (SSID) будет отличаться от той, что на скриншоте. Тут мы можем получить достаточную информацию о сетях Wi-Fi, такую как:
- Название (SSID);
- Тип безопасности (WEP, WPA/WPA2);
- Уровень сигнала и тд.
К примеру, если сеть не имеет пароля и соответственно открыта, то для подключения к ней используйте команду:
sudo iw dev wlan0 connect [SSID]
Если же сеть имеет тип безопасности WEP, то для подключения вводим команду (нужно знать пароль от сети):
sudo iw dev wlan0 connect [SSID] key 0:[Пароль от сети]
Для работы с зашифрованными сетями я рекомендую другой принцип работы, о нем ниже.
В данном случае нам понадобится утилита wpa_supplicant, она установлена не во всех дистрибутивах по-умолчанию. К примеру в openSUSE и Ubuntu она есть + есть к ней и GUI. GUI не установлен, ну и не надо 🙂
Устанавливаем эту утилиту, если ее у вас еще нету в системе и редактируем файл конфига wpa_supplicant:
sudo vi /etc/wpa_supplicant/wpa_supplicant.conf
Рекомендую добавлять это в конец файла, а также закоментируйте другие настройки в файле, которые вы не используете.
После того как файл отредактирован, сохраняем его и перезапускаем его командой в терминале:
sudo wpa_supplicant -i wlan0 -c /etc/wpa_supplicant/wpa_supplicant.conf
Теперь как вы подключены к желаемой сети, вам нужно получить IP-адрес, для этого выполняем команду:
Если вы все правильно сделали, то вы уже online + получили IP-адрес через DHCP, для проверки введите команду:
Будет что то похожее на:
Вот и все 🙂 Конечно, все тоже самое можно проделать и при помощи NetworkManager к примеру, но терминал есть терминал 🙂
Источник
How to check Wireless Network (WiFi) information in Linux
Most people use wireless networks as their primary source to access the internet.
You may need to monitor your wireless internet speed when you experience a slowness in connectivity or when fluctuating between fast and slow network speeds.
Linux operating systems have a variety of tools for manipulating and monitoring the wireless networks.
In this article, we will explain you how to view the available WiFi networks, bit rate, link quality, signal strength, etc, on Linux from the command line.
Multiple tools are used to obtain WiFi information on Linux, but we will show you only the best tools among them.
1) Checking wireless card chipset information
‘lspci’ command is used to display information about PCI buses in the system and devices connected to them.
Run the following command to identify your wireless network card manufacturer name:
To check wireless card driver information, use the following command:
WiFi driver and firmware version information can be found using the ethtool command as shown below:
2) Identifying wireless interface name in Linux
ip command is used to check the network interface name, their associated IP address, MAC address and other information.
Wired & Wireless network interfaces can be identified using the first letter of their name, as shown below:
- e – Wired network interface
- w – Wireless network interface
3) Scan and list available WiFi networks using nmcli command
‘nmcli’ is a command-line tool for controlling NetworkManager and reporting network status. It is used to create, display, edit, delete, activate, and deactivate network connections, as well as control and display network device status.
Run the following command to see the available wireless networks’ SSID, mode, channel, transfer rate, signal strength, bars and security.
- (*) – Indicates that your computer is currently connected to this WiFi network.

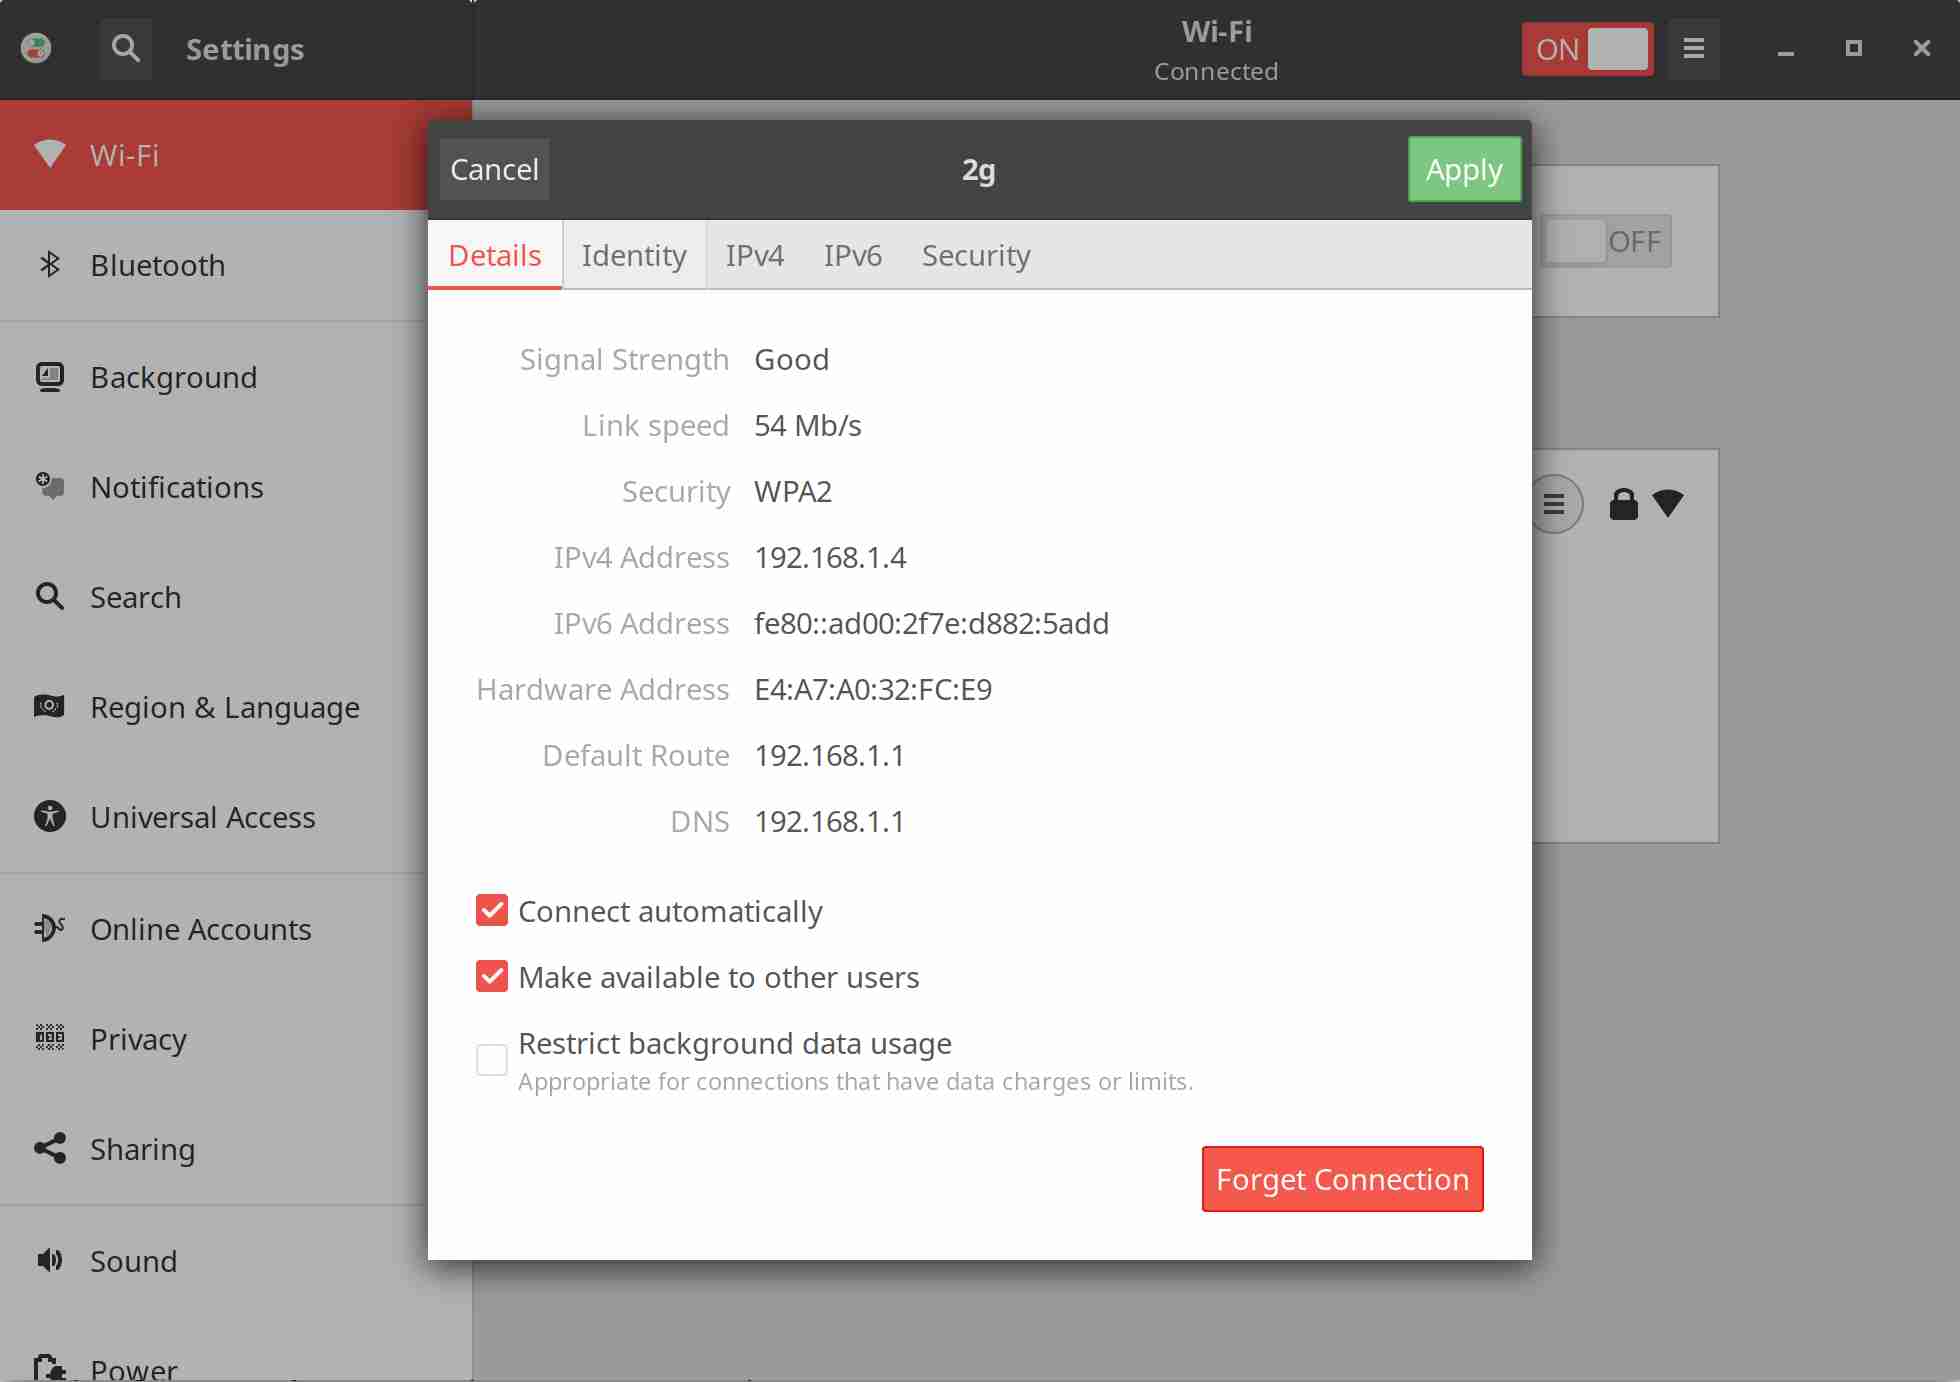
To see detailed information for “2g” WiFi connection, run:
To view detailed information only about ‘general & wifi-properties’ of “vlan0” (WiFi) interface, run:
4) Checking wireless network (WiFi) & card information using iwconfig command
Iwconfig is similar to ifconfig, but is dedicated to the wireless interfaces. It is used to set the parameters of the network interface which are specific to the wireless operation.
Iwconfig may also be used to display those parameters, and the wireless statistics (extracted from /proc/net/wireless).
All these parameters and statistics are device dependent. Each driver will provide only some of them depending on hardware support, and the range of values may change. Please refer to the man page of each device for details.
From the following output, you can find, wireless card supported transfer rate, link quality, signal strenth, etc,.
5) Checking wireless interface information using iwlist command
‘Iwlist’ is used to display some additional information from a wireless network interface compared to iwconfig including wifi quality and wifi signal strength or level.
6) Checking wireless interface information using wavemon command?
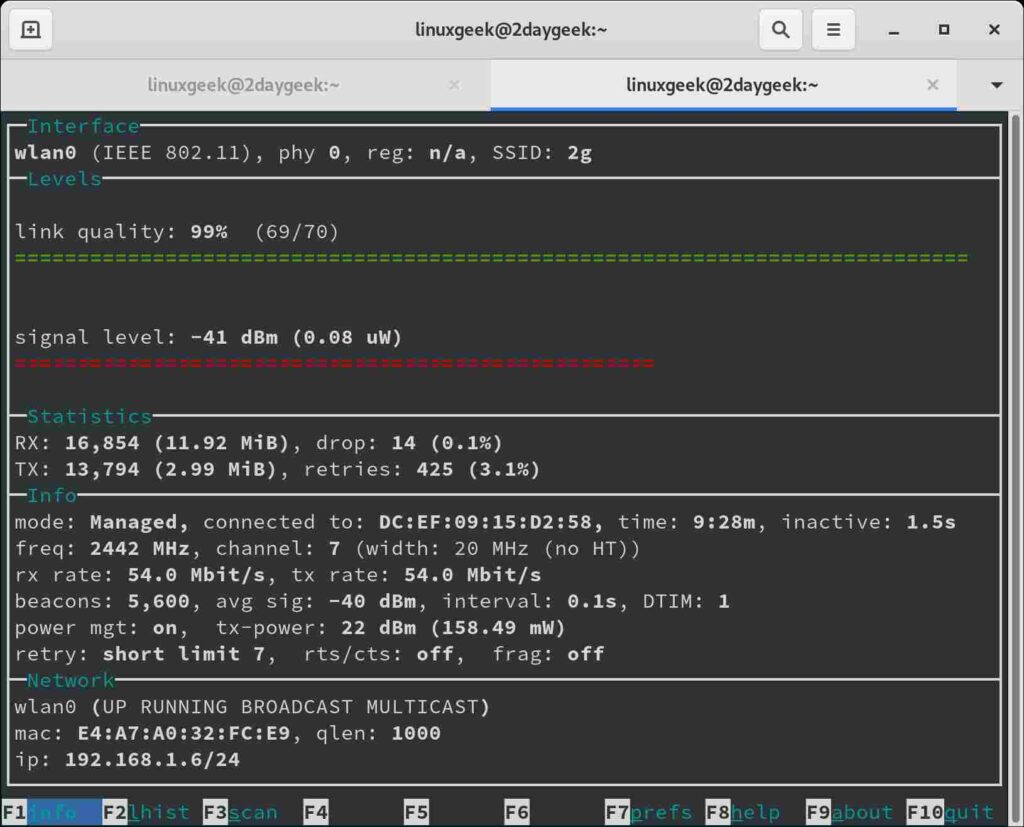
‘wavemon‘ is a ncurses-based monitoring application for wireless network devices. It plots levels in real-time as well as showing wireless and network related device information.
The ‘wavemon’ interface splits into different “screens” and each screen contains different information:
7) Check Wifi information using GNOME NetworkManager command?
The NetworkManager daemon attempts to make networking configuration and operation as painless and automatic as possible by managing the primary network connection and other network interfaces, like Ethernet, WiFi, and Mobile Broadband devices.
NetworkManager will connect any network device when a connection for that device becomes available, unless that behavior is disabled. Information about networking is exported via a D-Bus interface to any interested application, providing a rich API with which to inspect and control network settings and operation.
Wrapping Up
In this tutorial, we have shown you several commands to check wireless network information such as available WiFi networks, bit rate, link quality, signal strength, etc, on Linux from the command line.
If you found this article helpful, please do share with your friends and spread the knowledge. Please feel free to comment below if you have any queries/concerns. We will get back to you as soon as we can. Happy learning!
Источник


