Create A WiFi Hotspot On Linux
An in-depth tutorial on creating a hotspot in Linux

Dec 25, 2018 · 6 min read
AIM: To create a WiFi hotspot on a Linux machine to share a wireless connection on a single wireless card
Moving from a Windows environment on to a Linux the first real challenge I faced was that I need to share the internet on my laptop. But unlike with windows where it was one button to rule them all I found that setting a WiFi hotspot on a Linux system was a bit more tedious affair.
For Starters, I looked a t online solutions and found out the hard way that most of the implementations were either to share an Ethernet network using a wireless card or a set up using two wireless cards.
You got to know a bit about the terminal and basic network to get through this guide follow it to the dot and you should be fine. you can just skip over all the explanation and run the commands it should work. probably…
Overview
To get started to set up a hotspot on a single wireless card requires some basic knowledge about networks and the terminal. The plan is rather simple.
- Check to see if your wireless card supports access point creation.
- Setup a virtual interface on the card as an access point using iw command
- Setup hotspot using Hostapd
- Create a DHCP service to provide IP address and configurations for the clients
- Test everything works properly and that’s it
Requirements
- iw: it is a new nl80211 based CLI configuration utility for wireless devices. It supports all new drivers that have been added to the kernel recently. The old tool iwconfig, which uses Wireless Extensions interface, is deprecated and it’s strongly recommended to switch to iw and nl80211.
- hostapd:hostapd is a user-space daemon-process software to manage, host and implement wireless access points on the fly under the influence of nl80211 driver which still is under development phase and not yet fully supported by many adapters. installation sudo apt install hostapd
- udhcpd: a very small DHCP program installation sudo apt install udhcpd
Setup
I am using a KDE Neon Linux based system running on a hp notebook laptop. along with all the tools mentioned above installed.
Configurations and running
step 1: check to see if the system supports access point supports for this run the command iw list

You should see an output as below


Scroll up to where it says supported interface modes and check to see if AP is listed. If so we are good to go…
step 2: Now we move on the most important step setting up a virtual wireless interface on top of our existing interface. this is also done using the iw command sudo iw phy phy0 interface add new1 type __ap

run the above command and then run ifconfig -a to list all devices. In the above, you may need to replace phy0 to your device’s physical name to see all physical devices use iw phy command.

now we need to set up the IP for our new interface. I am going to use 192.168.28.0 as my network address and for my interface, I am going to use the IP 192.168.28.1. To set the IP use the following command.


So far we have created and configured a virtual interface, now to move on one of the most important steps is, to use hostapd to create the actual hotspot.
Step 3: Setting up the hostapd. We first need to configure the hostapd. I am going to create a hostapd.conf file in my home directory and then open it. I am going to use vi. a sample configuration is shown below.

the final step is to run it using the command : sudo hostapd hostapd.conf

now if you were to scan for the WiFi you will see your hotspot. If you try to connect now with your password you can authorize on to the network but your device will fill fail to obtain any configurations either you can set it manually which is quite troublesome. But in most common networks we have a DHCP server and clients get their configurations from this server so let’s set up one for our local access point network.
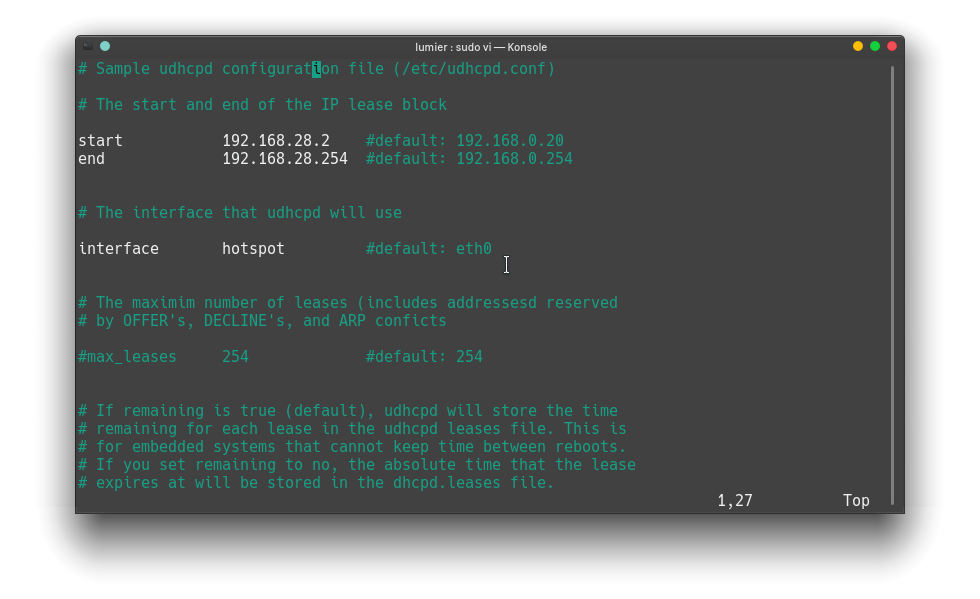
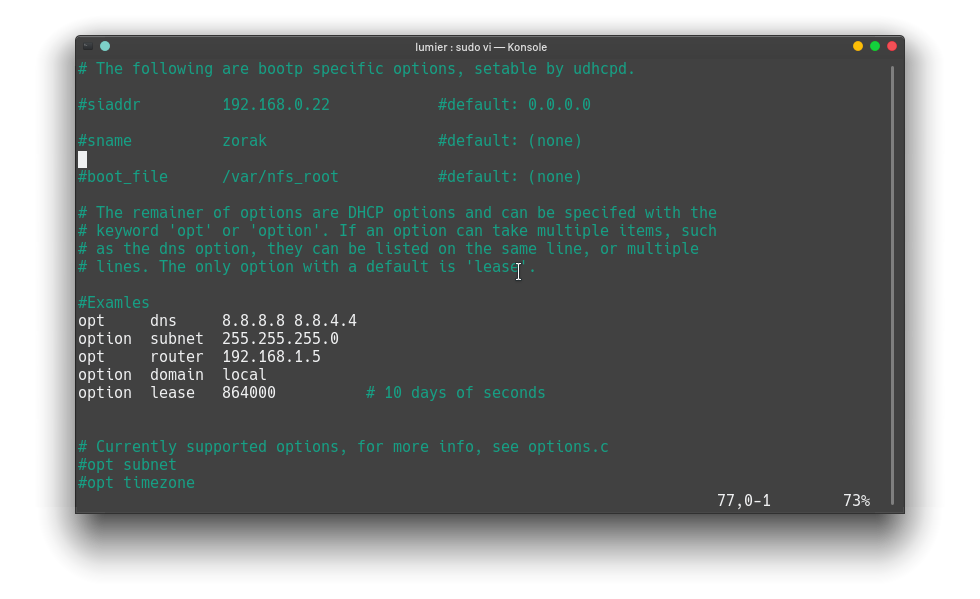
Step 4: Configuring the DHCP server. I am going to the DHCP server configuration to the file /etc/udhcpd.conf file. a sample configuration is shown below. you should already have some sample configuration in the file just edit the file as described below
One thing you have to note is the router address should be the address of your other interface.
to get the address of the other interface use ifconfig -a to list all connections and select the IP address of your specific connection. in my case, it is 192.168.1.5 for interface wlo1

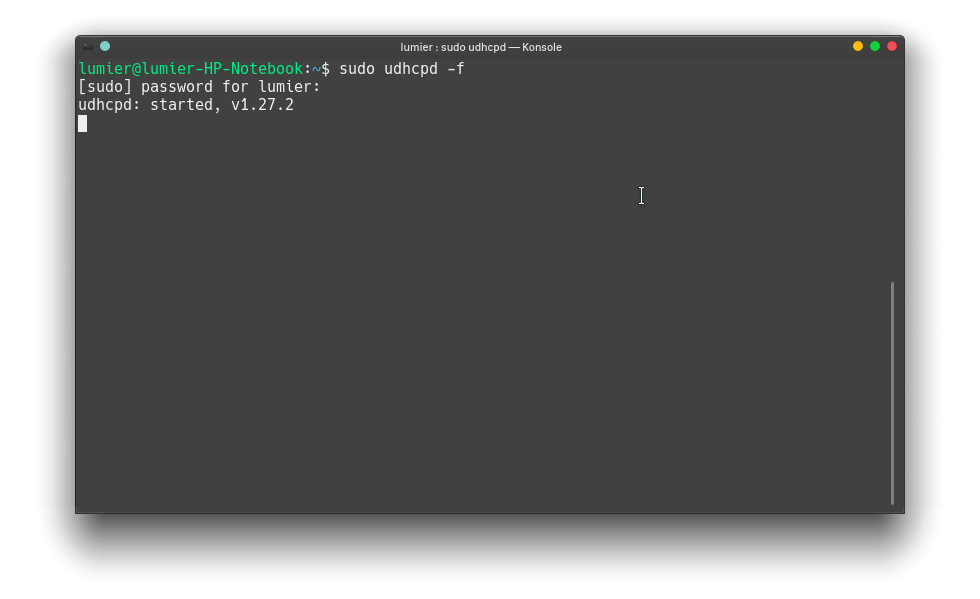
Now that’s it the DHCP is configured you can run as sudo service udhcpd restart but for me, it seems to not work for some strange reason so I just ran it directly from the terminal using the following command sudo udhcpd -f
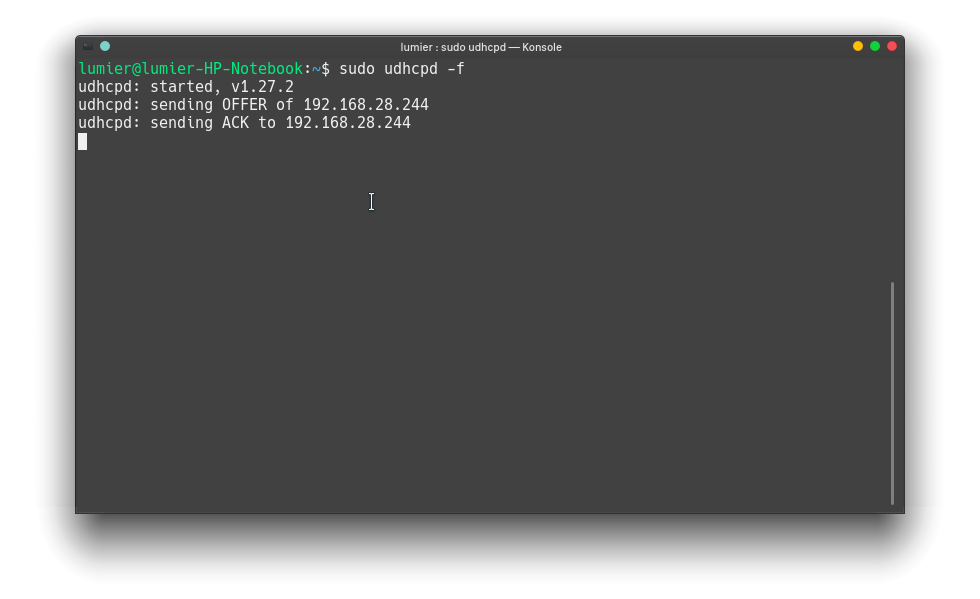
Now try connecting to your hotspot and you should be able to connect and receive the configurations too. and you should see something as shown below

So pretty cool right you just created a hotspot configured the DHCP and it pretty much is over. but if you try to access the internet from your client device now it does not have any actual internet. To solve this we need to do just one more step that is to configure an IP forward. Basically route all our requests on our local network over to our card connected to the internet.
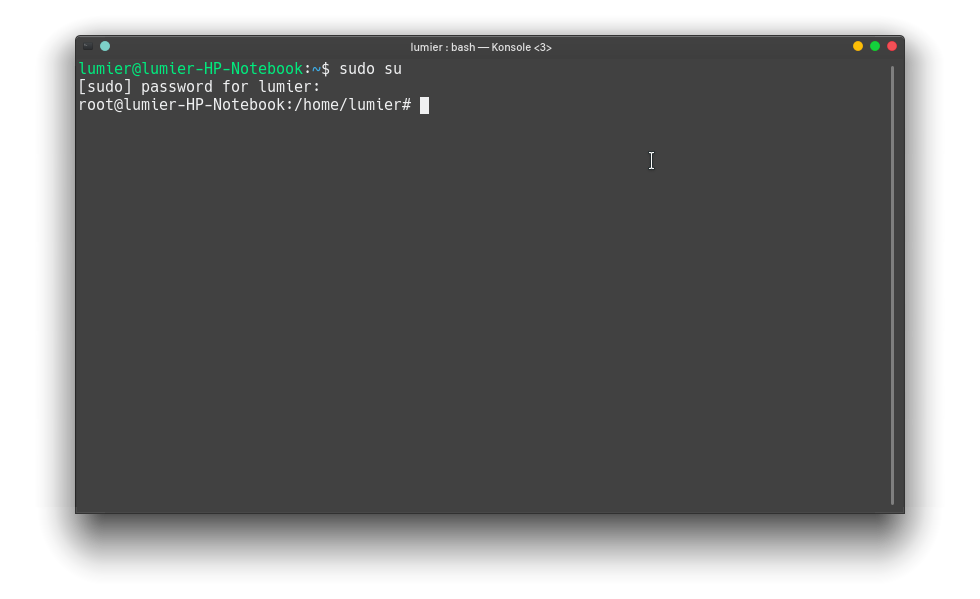
run sudo su to move on to a superuser terminal
now run the following commands. NOTE: replace wlo1 with your interface name, that is the interface that is connected to the internet
all done we now have the internet on the client device.
That’s it all done. if any of you find the time to automate this please let me know or if there is a better way to do the same.
Источник
Беспроводная точка доступа, используя Linux
Самый первый шаг, конечно же:
Мда, в исходниках уже есть 2.0. Такой он, Debian stable. Но на самом деле это нам не особо помешает — версия 1.0 у меня работает достаточно стабильно.
Настройка:
Отредактировать файл /etc/default/hostapd.conf. В нём раскомментировать строку вида Это путь к файлу конфигурации демона hostapd.
Затем идем дальше — редактировать /etc/hostapd/hostapd.conf. Предоставлю содержимое моего файла конфигурации. Предупреждаю, парсер конфигурационных опций у этого демона очень чувствителен и ругается даже на пустые строки с пробелом. На комментарии не ругается.
Сетевой интерфейс беспроводной карты
Драйвер сетевой карты — обычно для hostapd отлично работает nl80211, не вижу смысла менять, да и говорят, что он работает в большинстве случаев.
Название точки доступа, т.н. SSID
Режим работы сетевой карты — 801.11b/g/n. На самом деле — там всегда должно оставаться g, даже если карта способна на n, для настройки режима n придётся кое-что поменять, смотрите дальше:
Беспроводной канал — от 1 до 13. Для лучшей производительности рекомендуются 1, 6 или 11 канал.
Версия WPA
Пароль беспроводной точки
Дополнительные настройки WPA2:
Следующая опция устанавливает блокировку MAC-адресов. Пока не знаю, как это настроить, да и штука довольно бесполезная, но все говорят, что без блокировки эту опцию нужно выставить в ноль — что я и сделал:
Конфиг автоматически проверяется перед запуском, так что — смело пробуйте запустить hostapd. Команды управления:
Напомню — также в Debian можно использовать команды вида service hostapd start, что легче в написании.
Пару шагов для устойчивости:
- Нельзя забывать, что для шифрования WPA/WPA2 пароль должен быть не короче 8 символов. Если поменять пароль на лету, используя SSH сессию через беспроводной канал, можно внезапно отрезать себя от сервера — hostapd не захочет запускаться и единственное средство связи с сервером будет потеряно. Работает — не трогай, ну а если трогаешь — трогай осторожно.
- В случае многопользовательской системы советую поставить права чтения файлов вида 700, чтобы простые пользователи не могли узнать пароль для точки доступа — если вас это волнует, конечно.
Что ещё могу сказать? С мобильными устройствами проблем нет, с ноутбуком под Windows 7 — крайне редко (примерно раз-два в месяц) не получается подключиться к точке. Лечится командой service hostapd restart, велика вероятность, что в новых релизах эта проблема убрана — есть версия hostapd 2.0.0, но компилировать и ставить её я пока что не пытался.
Пока всё. К точке можно попробовать подключиться, но… Для успешного подключения к точке доступа нужен DHCP сервер, без него к точке полноценно не подключишься — те же операционные системы не дадут этого сделать, поскольку без получения адреса само подключение не имеет особого смысла. Вот его и настроим!
Когда я только начинал учиться настраивать сервера под свои нужды, первое, на что я тогда я наткнулся — это пакет isc-dhcp-server, его я и планировал предложить, и статья уже была готова, но… Я нашёл dnsmasq, и моя жизнь изменилась в лучшую сторону. Dnsmasq — это и кэширующий DNS, и DHCP сервер со своим набором различных фич. Как только я заглянул в его конфиг, мое зрение улучшилось, все мысли в мозгу внезапно стали упорядоченными и я достиг просветления. Реально, конфиг очень простой и понятный. Но пока подготавливаем площадку для работы dnsmasq. Что же делать?
1) Придумать, как будут выглядеть адреса в нашей локальной сети. Я выбрал адреса типа 192.168.51.x.
2) Настроить сетевой интерфейс, на котором будет работать dnsmasq. На самом деле — очень важный шаг, который пропускают многие в своих мануалах по настройке DHCP-серверов. Дело в том, что компьютеру, на котором работает DHCP-сервер, необходимо прописать статический адрес — кто выдаст адрес DHCP-серверу, если он сам не может запуститься без адреса, а адрес себе он выдать не может, потому что не запущен?
Итак, открываем для редактирования файл /etc/network/interfaces и добавляем туда абзац вида:
Сохраняем и перезапускаем наш сетевой интерфейс, на котором настроен DHCP:
Проверяем состояние, сверяем настройки с теми, что должны быть:
3) Нужно удалить любые DNS и DHCP серверы, чтобы dnsmasq мог спокойно запуститься — иначе выдаёт ошибку. У меня были установлены bind9 и isc-dhcp-server, пришлось избавиться от них. Если работаем по SSH из сети, в которой раньше адреса раздавал покойный DHCP-сервер, не перезагружаемся — выдавать адреса уже некому.
4) Нужно создать условия для работы сервера — создать пользователя для того, чтобы под ним запускать dnsmasq, прописать в системных настройках DNS-сервера, к которым dnsmasq будет обращаться и ещё пару мелочей.
Прописываем DNS сервера Гугла. Правда, первой строчкой у нас будет localhost. Это сделано для того, чтобы остальные системные приложения на нашем же сервере, когда им надо получить адрес от DNS-сервера, обращались сначала к dnsmasq, а не к Гуглу. Ну а dnsmasq достаточно умён, чтобы игнорировать эту строчку:
Нужно защитить это файл от перезаписи при каждом запуске системы. Перезаписывает его dhclient, если что. Честно говоря, блокировка от записи — лишь один из способов того, как не допустить перезапись =) Есть и другие, но этот самый простой:
Что же, если вы по каким-либо причинам считаете блокирование файла неверным путём или также хотите использовать DNS, которые столь настойчиво предлагает dhclient? Тогда, как советует merlin-vrn, нужно использовать программу resolvconf.
Если пакет resolvconf ещё не установлен, устанавливаем. Единственное, что нужно для того, чтобы прописать статический адрес DNS для системы — отредактировать /etc/resolvconf/resolv.conf.d/base, вписав туда всё, что мы бы вписали в /etc/resolv.conf:
service resolvconf reload — готово!
Добавляем группу и пользователя:
5) Ставим Dnsmasq, он запускается и готов к работе, но мы его отключаем — ещё не настроен, нечего ему тут делать:
6) Чистим оригинальный файл от стандартного конфига:
Ну а теперь мы готовы настраивать. Скажу сразу — у dnsmasq много разных опций, которые я при написании статьи подробно описывал в комментариях… Пока не понял, что топик раздулся до неприличных и нечитаемых размеров, как будто недостаточно того, что статья и так переполнена текстом и отформатирована, как кусок незнамо чего. Поэтому — я оставлю конфиг с самыми важными без длинных комментариев и всяких дополнительных опций, а конфиг с дополнительными опциями будет под спойлером.
Источник
Wifi to wifi hotspot linux
Linux Wifi Hotspot
![]()


- UI improvements
- Fallback to same channel when same wifi interface does not support for multiple channels
- Show the connected devices
- Add MAC filter
- Share your wifi like in Windows — Use wifi and enable hotspot at the same time.
- Share access point from any network interface
- MAC filter
- Includes Both command line and gui.
- Support both 2.4GHz and 5GHz (Need to be compatible with your wifi adapter). Ex: You have connected to the 5GHz network and share a connection with 2.4GHz.
- Select Channel.
- Hide SSID
- Show the connected devices

Command line help and documentation
If you only need the command-line without GUI run make install-cli-only as root user.
Sometimes there are troubles with 5Ghz bands due to some vendor restrictions. If you cannot start hotspot while you are connected to 5Ghz band, Unselect Auto and select 2.4Ghz in frequency selection.
If any problems with RealTeK Wifi Adapters see this
Download the debian package from latest release
Источник


