Wifiphisher kali linux github

Wifiphisher is a security tool that mounts fast automated phishing attacks against WPA networks in order to obtain the secret passphrase. It is a social engineering attack that unlike other methods it does not include any brute forcing. It is an easy way for obtaining WPA credentials.
Wifiphisher works on Kali Linux and is licensed under the MIT license.
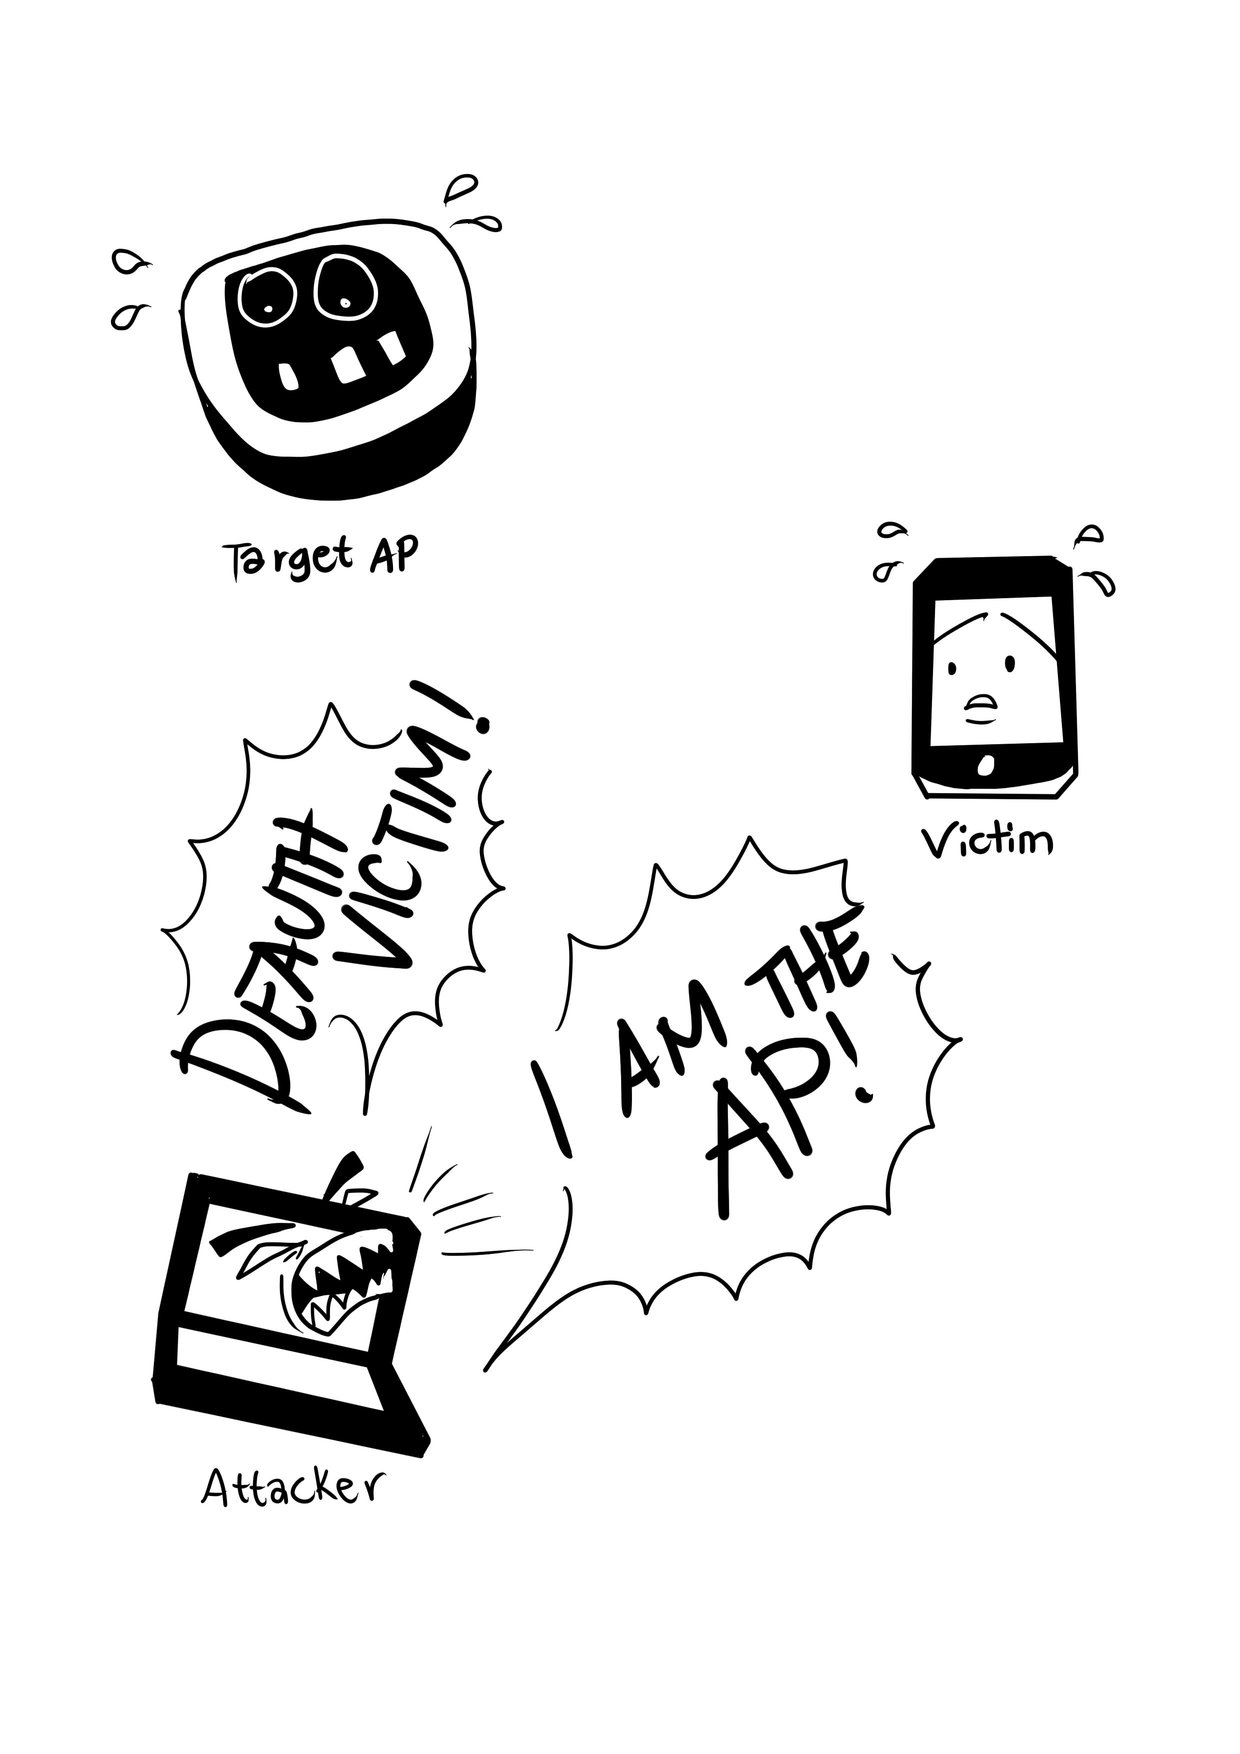
From the victim’s perspective, the attack makes use in three phases:
- Victim is being deauthenticated from her access point. Wifiphisher continuously jams all of the target access point’s wifi devices within range by sending deauth packets to the client from the access point, to the access point from the client, and to the broadcast address as well.
- Victim joins a rogue access point. Wifiphisher sniffs the area and copies the target access point’s settings. It then creates a rogue wireless access point that is modeled on the target. It also sets up a NAT/DHCP server and forwards the right ports. Consequently, because of the jamming, clients will start connecting to the rogue access point. After this phase, the victim is MiTMed.
- Victim is being served a realistic router config-looking page. wifiphisher employs a minimal web server that responds to HTTP & HTTPS requests. As soon as the victim requests a page from the Internet, wifiphisher will respond with a realistic fake page that asks for WPA password confirmation due to a router firmware upgrade.

Performing MiTM attack
| Short form | Long form | Explanation |
|---|---|---|
| -m | maximum | Choose the maximum number of clients to deauth. List of clients will be emptied and repopulated after hitting the limit. Example: -m 5 |
| -n | noupdate | Do not clear the deauth list when the maximum (-m) number of client/AP combos is reached. Must be used in conjunction with -m. Example: -m 10 -n |
| -t | timeinterval | Choose the time interval between packets being sent. Default is as fast as possible. If you see scapy errors like ‘no buffer space’ try: -t .00001 |
| -p | packets | Choose the number of packets to send in each deauth burst. Default value is 1; 1 packet to the client and 1 packet to the AP. Send 2 deauth packets to the client and 2 deauth packets to the AP: -p 2 |
| -d | directedonly | Skip the deauthentication packets to the broadcast address of the access points and only send them to client/AP pairs |
| -a | accesspoint | Enter the MAC address of a specific access point to target |
| -jI | jamminginterface | Choose the interface for jamming. By default script will find the most powerful interface and starts monitor mode on it. |
| -aI | apinterface | Choose the interface for the fake AP. By default script will find the second most powerful interface and starts monitor mode on it. |

Targeting an access point

A successful attack

Fake router configuration page
- Kali Linux.
- Two wireless network interfaces, one capable of injection.
If you are a Python developer or a web designer you can help us improve wifiphisher. Feel free to take a look at the bug tracker for some tasks to do.
The script is based on an idea from Dan McInerney. The parts for the jamming and selecting an AP have also been taken from his scripts wifijammer and fakeAP.
Wifiphisher is licensed under the MIT license. See LICENSE for more information.
About
The original copy of the WiFiPhisher tool for launching automated phishing attacks against WiFi users.
Источник
Wifiphisher kali linux github

![]()
![]()
![]()

Wifiphisher is a security tool that mounts automated victim-customized phishing attacks against WiFi clients in order to obtain credentials or infect the victims with malwares. It is primarily a social engineering attack that unlike other methods it does not include any brute forcing. It is an easy way for obtaining credentials from captive portals and third party login pages (e.g. in social networks) or WPA/WPA2 pre-shared keys.
Wifiphisher works on Kali Linux and is licensed under the GPL license.
After achieving a man-in-the-middle position using the Evil Twin or KARMA attack, Wifiphisher redirects all HTTP requests to an attacker-controlled phishing page.
From the victim’s perspective, the attack makes use in three phases:
- Victim is being deauthenticated from her access point. Wifiphisher continuously jams all of the target access point’s wifi devices within range by forging “Deauthenticate” or “Disassociate” packets to disrupt existing associations.
- Victim joins a rogue access point. Wifiphisher sniffs the area and copies the target access point’s settings. It then creates a rogue wireless access point that is modeled by the target. It also sets up a NAT/DHCP server and forwards the right ports. Consequently, because of the jamming, clients will eventually start connecting to the rogue access point. After this phase, the victim is MiTMed. Furthermore, Wifiphisher listens to probe request frames and spoofs «known» open networks to cause automatic association.
- Victim is being served a realistic specially-customized phishing page. Wifiphisher employs a minimal web server that responds to HTTP & HTTPS requests. As soon as the victim requests a page from the Internet, wifiphisher will respond with a realistic fake page that asks for credentials or serves malwares. This page will be specifically crafted for the victim. For example, a router config-looking page will contain logos of the victim’s vendor. The tool supports community-built templates for different phishing scenarios.
Performing MiTM attack
Following are the requirements for getting the most out of Wifiphisher:
- Kali Linux. Although people have made Wifiphisher work on other distros, Kali Linux is the officially supported distribution, thus all new features are primarily tested on this platform.
- One wireless network adapter that supports AP & Monitor mode and is capable of injection. For advanced mode, you need two cards; one that supports AP mode and another that supports Monitor mode. Drivers should support netlink.
To install the latest development version type the following commands:
Alternatively, you can download the latest stable version from the Releases page.
Run the tool by typing wifiphisher or python bin/wifiphisher (from inside the tool’s directory).
By running the tool without any options, it will find the right interfaces and interactively ask the user to pick the ESSID of the target network (out of a list with all the ESSIDs in the around area) as well as a phishing scenario to perform. By default, the tool will perform both Evil Twin and KARMA attacks.
Use wlan0 for spawning the rogue Access Point and wlan4 for DoS attacks. Select the target network manually from the list and perform the «Firmware Upgrade» scenario. Verify that the captured Pre-Shared Key is correct by checking it against the handshake in the handshake.pcap file.
Useful for manually selecting the wireless adapters. The «Firmware Upgrade» scenario is an easy way for obtaining the PSK from a password-protected network.
Automatically pick the right interfaces. Target the Wi-Fi with ESSID «CONFERENCE_WIFI» and perform the «Plugin Update» scenario. The Evil Twin will be password-protected with PSK «s3cr3tp4ssw0rd».
Useful against networks with disclosed PSKs (e.g. in conferences). The «Plugin Update» scenario provides an easy way for getting the victims to download malicious executables (e.g. malwares containing a reverse shell payload).
Do not load any extensions. Simply spawn an open Wi-Fi network with ESSID «FREE WI-FI» and perform the «OAuth Login» scenario.
Useful against victims in public areas. The «OAuth Login» scenario provides a simple way for capturing credentials from social networks, like Facebook.
Following are all the options along with their descriptions (also available with wifiphisher -h ):
| Short form | Long form | Explanation |
|---|---|---|
| -h | —help | show this help message and exit |
| -jI EXTENSIONSINTERFACE | —extensionsinterface EXTENSIONSINTERFACE | Manually choose an interface that supports monitor mode for running the extensions. Example: -jI wlan1 |
| -aI APINTERFACE | —apinterface APINTERFACE | Manually choose an interface that supports AP mode for spawning an AP. Example: -aI wlan0 |
| -nJ | —noextensions | Do not load any extensions. |
| -e ESSID | —essid ESSID | Enter the ESSID of the rogue Access Point. This option will skip Access Point selection phase. Example: —essid ‘Free WiFi’ |
| -p PHISHINGSCENARIO | —phishingscenario PHISHINGSCENARIO | Choose the phishing scenario to run.This option will skip the scenario selection phase. Example: -p firmware_upgrade |
| -pK PRESHAREDKEY | —presharedkey PRESHAREDKEY | Add WPA/WPA2 protection on the rogue Access Point. Example: -pK s3cr3tp4ssw0rd |
| -qS | —quitonsuccess | Stop the script after successfully retrieving one pair of credentials. |
| -lC | —lure10-capture | Capture the BSSIDs of the APs that are discovered during AP selection phase. This option is part of Lure10 attack. |
| -lE LURE10_EXPLOIT | —lure10-exploit LURE10_EXPLOIT | Fool the Windows Location Service of nearby Windows users to believe it is within an area that was previously captured with —lure10-capture. Part of the Lure10 attack. |
| -iAM | —mac-ap-interface | Specify the MAC address of the AP interface. Example: -iAM 38:EC:11:00:00:00 |
| -iEM | —mac-extensions-interface | Specify the MAC address of the extensions interface. Example: -iEM E8:2A:EA:00:00:00 |
| -iNM | —no-mac-randomization | Do not change any MAC address. |
| -hC | —handshake-capture | Capture of the WPA/WPA2 handshakes for verifying passphrase. Example: -hC capture.pcap |
| -dE | —deauth-essid | Deauth all the BSSIDs having same ESSID from AP selection or the ESSID given by -e option. |
| —logging | Enable logging. Output will be saved to wifiphisher.log file. | |
| -cM | —channel-monitor | Monitor if the target access point changes the channel. |
| —payload-path | Enable the payload path. Intended for use with scenarios that serve payloads. | |
| -wE | —wpspbc-exploit | Monitor if the button on a WPS-PBC Registrar side is pressed. |
| -wAI | —wpspbc-assoc-interface | The WLAN interface used for associating to the WPS AccessPoint. |
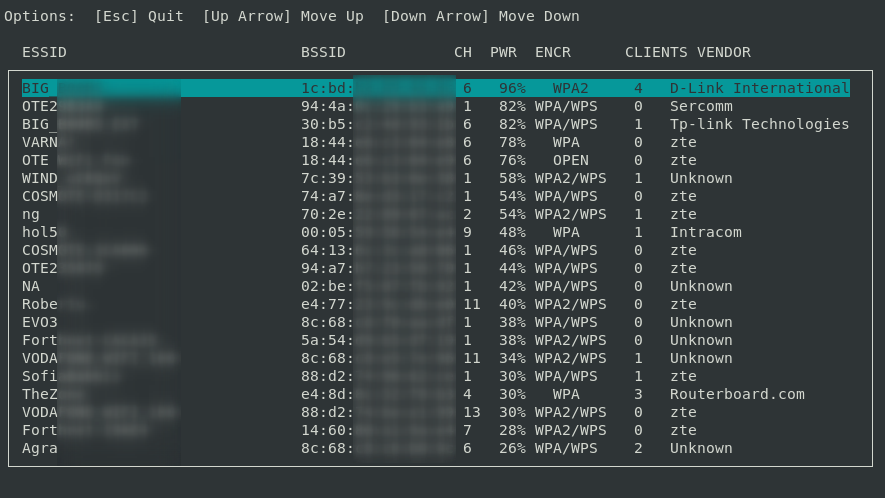
Targeting an access point

A successful attack
If you are a Python developer or a web designer you can help us improve wifiphisher. Feel free to take a look at the bug tracker for some tasks to do.
If you don’t know how to code, you can help us by proposing improvements or reporting bugs. Please have a look at the Bug Reporting Guidelines and the FAQ document beforehand. Note that the tool does not aim to be script-kiddie friendly. Make sure you do understand how the tool works before opening an issue.
The script is based on an idea from Dan McInerney.
A full list of contributors lies here.
Wifiphisher is licensed under the GPL license. See LICENSE for more information.
Wifiphisher’s current version is 1.3. You can download the latest release from here. Otherwise you can get the latest development version by cloning this repository.
- Usage of Wifiphisher for attacking infrastructures without prior mutual consistency can be considered as an illegal activity. It is the final user’s responsibility to obey all applicable local, state and federal laws. Authors assume no liability and are not responsible for any misuse or damage caused by this program.
Note: Be aware of sites pretending to be related with the Wifiphisher Project. They may be delivering malware.
For Wifiphisher news, follow us on Twitter or like us on Facebook.
Источник


