- OpenEmu is about to change the world of video game emulation. One console at a time.
- Take Control
- Up, Up, Down, Down, Left, Right, Left, Right, B, A, Start
- Time To Get Organized
- Features Overview
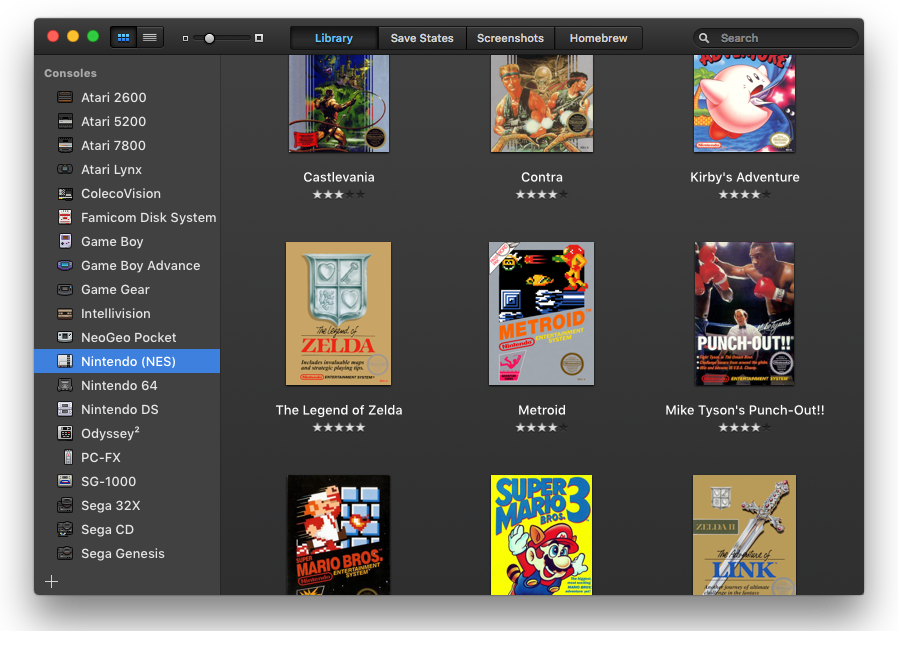
- Library
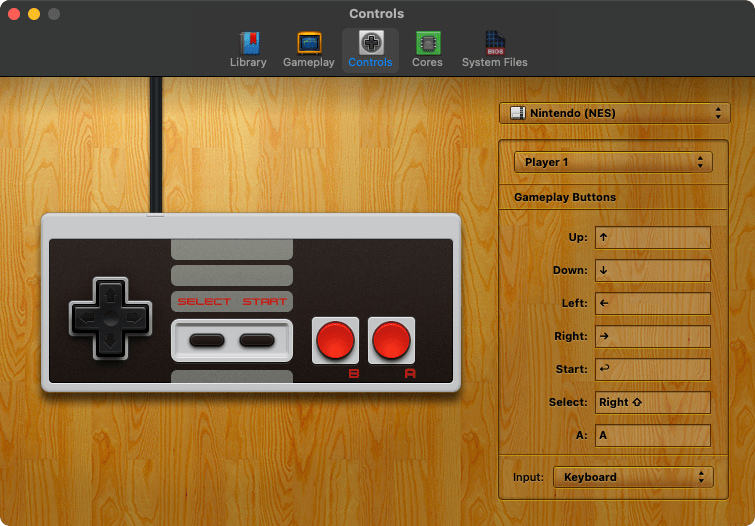
- Controls & Controllers
- Cores & Systems
- 5 Best Wii Emulators for PC and Mac
- Here are the 5 Best Wii Emulators for PC and Mac
- 1. Dolphin Wii Emulator App
- 2. GCube
- 3. CubeSX Emulator for Mac and PC
- 4. Dolwin Wii Emulator for PC
- 5. Cube64 Wii Emulator for Windows PC
- Wii u emulator mac os
- Cemu emulator MMJ for Mac
- Description
- Features
- System requirements
- Update
- Cemu — бесплатный Wii U эмулятор для ПК (+запуск TLoZ: BotW)
- Системные требования
- Устанавливаем сам эмулятор
- Настройка эмулятора
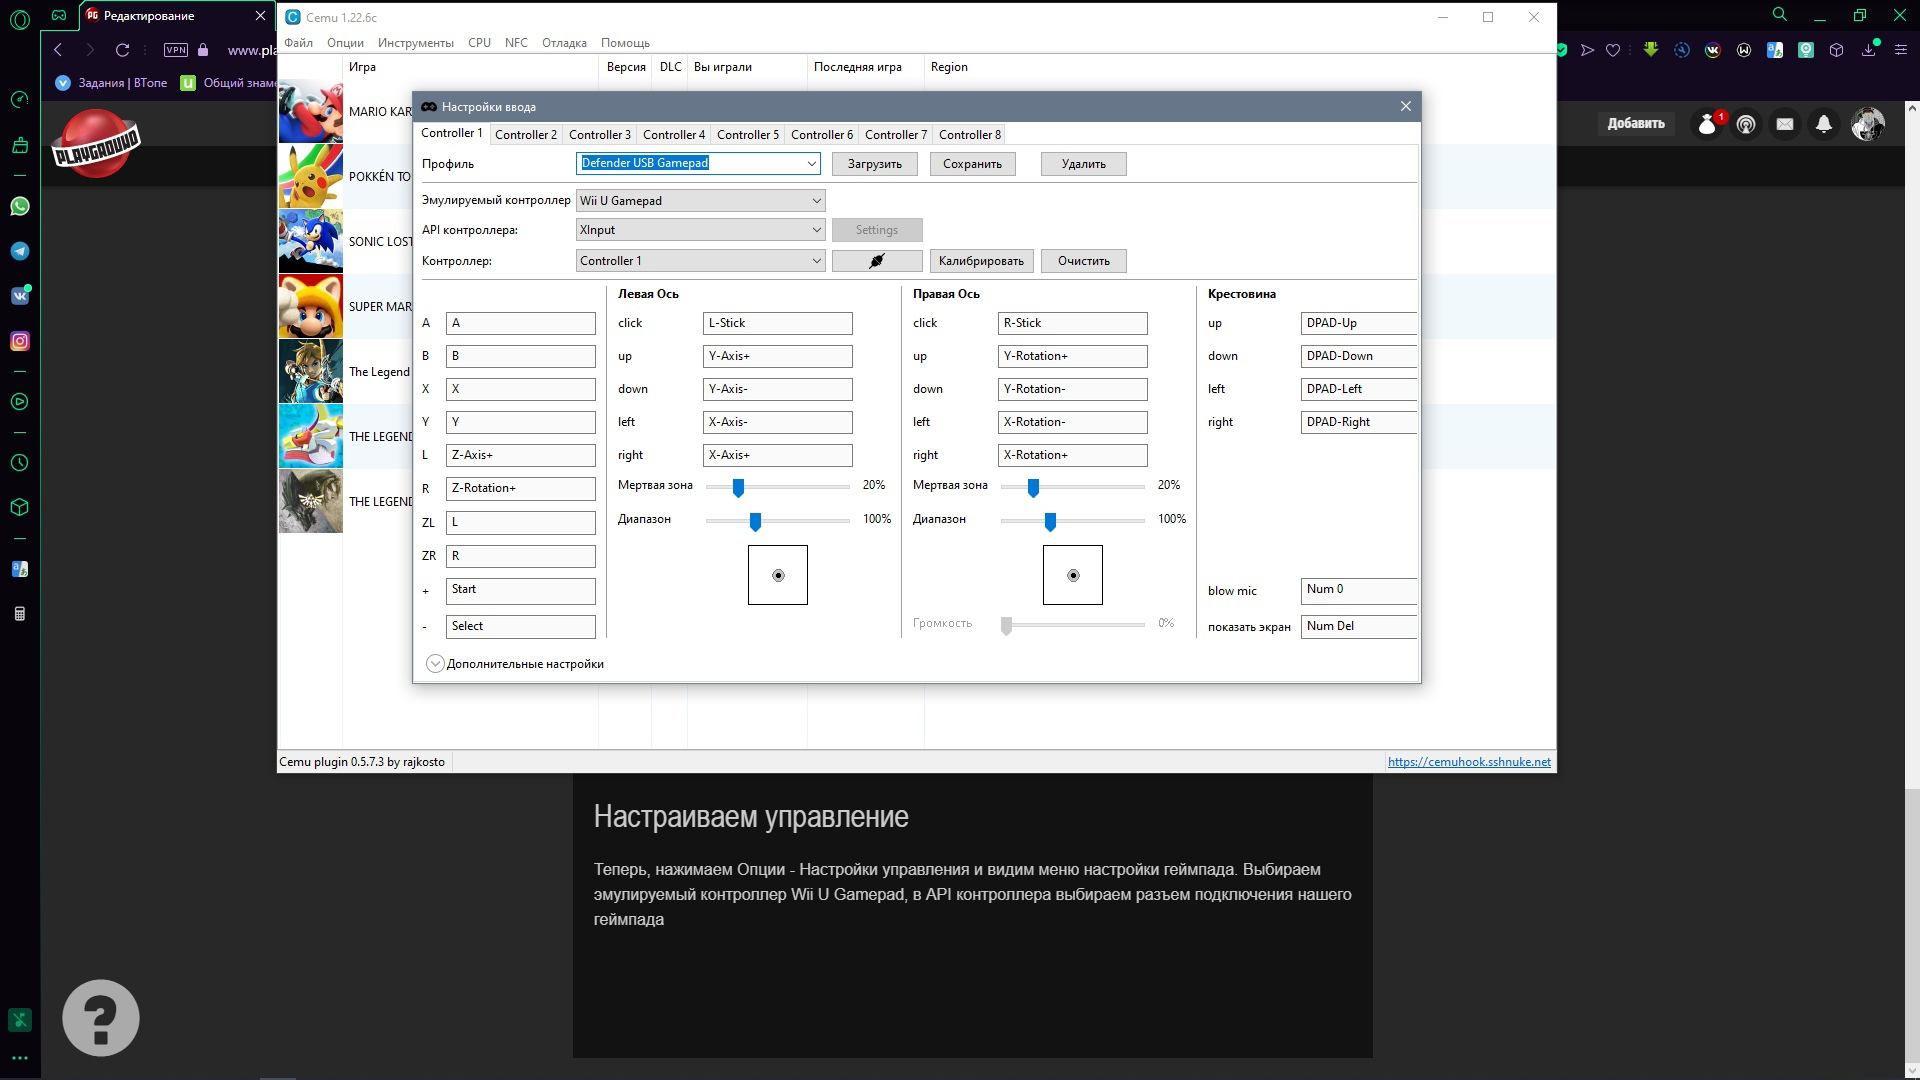
- Настраиваем управление
- Качаем и обновляем игры
- Добавляем, обновляем игру и DLC в CEMU
- Финальная настройка
- Включаем возможность активирования Amiibo
- Наконец-таки запускаем игру
OpenEmu is about to change the world of video game emulation. One console at a time.
For the first time, the ‘It just works’ philosophy now extends to open source video game emulation on the Mac. With OpenEmu, it is extremely easy to add, browse, organize and with a compatible gamepad, play those favorite games (ROMs) you already own.
Take Control
Up, Up, Down, Down, Left, Right, Left, Right, B, A, Start
Why restrict yourself to just the keyboard? Although it is not a requirement, OpenEmu is best used with a peripheral gamepad or controller to interact with your games.
Via the Controller Preferences, simply auto- magically assign buttons with any generic HID compliant USB or Bluetooth game controller.
Plug in your gamepad, select it from the list… and press start to begin your adventures!

Time To Get Organized
Everything in its place. Automatically
We combine some of the best emulation projects together into one beautiful unified application that simply organizes your personal games library. Watch as you drop in backups of your games (ROMs) & they are gracefully added to their appropriate library along with original box art!
Drag n’ Drop a backup game (ROM) from your Mac desktop.
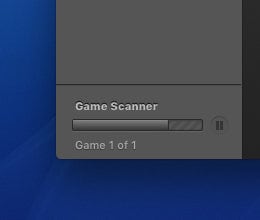
OpenEmu ‘scans’ your game and begins the organisation process.
Your game is now neatly organized and you are ready to start playing!
Features Overview
An exciting world of video games is within your grasp.

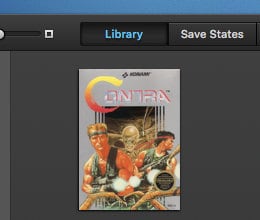
Library
One of the standout features of OpenEmu is how it organizes all your games into one unique, unified games library. Watch as backups of the games (ROMs) you already own are gracefully added to their appropriate library and box art is magically added. You can even create your own ‘collections’ mix and matched from different consoles.
- Memory: 88MB main memory and 3 MB embedded GPU texture memory and framebuffer.
- Storage: 512 MB built-in NAND flash. SD card memory of up to 2GB.
- Video: 480p (PAL & NTSC), 480I (NTSC), or 576i (PAL/SECAM).
- PowerPC based CPU
- 2 USB ports, WI-FI capabilities and Bluetooth.
- Audio: Stereo-Dolby Pro Logic 11. Built-in speaker controller.

- Минимум 8 гб ОЗУ, чем больше, тем лучше
- Видеопамять размером не менее 4 гб
- Процессор не менее 4 ядер, работающий на тактовой частоте 3-3.5 ггц
- Минимум 25 гб свободного пространства на диске
- (((((((настоящая консоль и купленная игра))))))))
- Options — Console Region — Europe (поддержка европейских игр)
- Options — Console Language — Russian (русский язык в играх, включая озвучку)
- Options — General Setting — General — Language — поменять Default на Russian (язык программы — русский)
- Перезапускаем эмулятор для полного вступления изменений в силу. Видим, что всё на русском языке.
- В настройках графики ставим OpenGL и указываем всё, как на скриншоте:

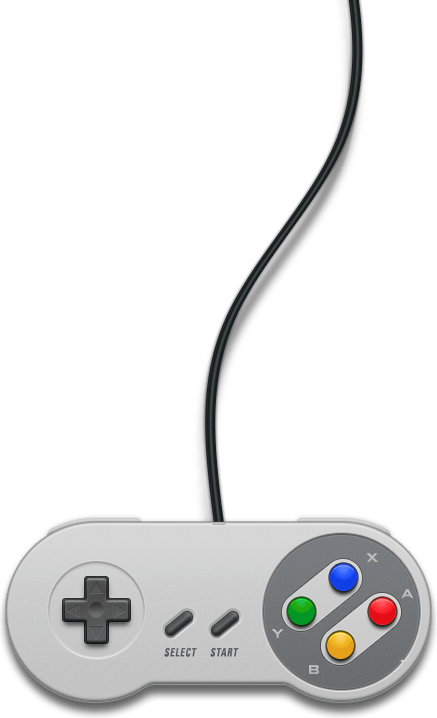
Controls & Controllers
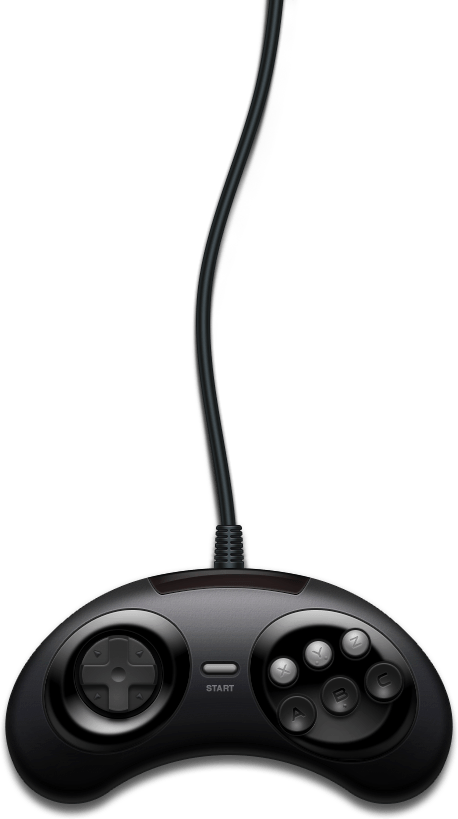
Any generic HID compliant USB or Bluetooth game controller should work with OpenEmu out of the box. OpenEmu now automatically maps controls for the following recognized devices in our database:

Cores & Systems
OpenEmu is modular, and thanks to the work of other great open source projects, it can emulate a wide variety of video game systems (we call them ‘cores’). OpenEmu emulates the following systems:
Источник
5 Best Wii Emulators for PC and Mac
Nintendo’s Wii is the seventh gen. console which was released in 2006. Its primary competitor at that time was Xbox 360 and PS3. There are many new editions to the Wii from ‘Wii Family Edition’ to ‘Wii U’ which has to offer their own unique configurations and features. Like us, many users either buy one console over the other, I had Xbox 360 now upgraded to PS4. However, we still like exclusives from the Wii console such as the new Super Mario, Zelda and Smash Brawl games. Hence, instead of paying top dollars to buy a Wii console you can just use the Wii emulator to play Nintendo Wii games on your system.
Here are the 5 Best Wii Emulators for PC and Mac
Before we list down the emulators, you need to check that whether your system is compatible with the Wii emulators. The specs required to play Wii games on the Wii emulator:
The Wii emulator can run on Windows, Linux, MacOS X and Android that supports the specs above.
1. Dolphin Wii Emulator App
This is the first ever emulator to run GameCube games, now it runs Wii games. In order to use this Wii emulator, you need to have a powerful system which has a good performance built. You can play both GameCube and Wii games in Hi-Definition 1080 resolution. More features offered by this emulator is the support to all PC controllers, network play, max speed and much more.
2. GCube
Yet another open-source GameCube emulator, which can run least one commercial games with full emulation. Though you can’t play any commercial games on this emulator, but you can run homebrew programs and games on it.
3. CubeSX Emulator for Mac and PC

CubeSX is an emulator that supports more than one video game console. It can run games from PlayStation, Nintendo GameCube and Wii. However the emulator is fairly new and is in beginner stage, therefore has a stable speed and compatibility with other devices. But if you like to enjoy games from different consoles then you can try this emulator.
4. Dolwin Wii Emulator for PC
An open-source emulator for GameCube is developed in C language. Though the emulator is still in development stages, you can use the emulator to run some of the games and demos. If you’re not sure of the emulator you can surely test it out as it comes with a zip file. The zip file includes a demo that you can run to test it.
5. Cube64 Wii Emulator for Windows PC
Now, this is both a Wii emulator and a GameCube emulator which use SD/DVD to run games. Technically it is a N64 emulator but can play games from both Wii and GameCube console. So to use it as a Wii emulator you would need to copy the ROMs in ‘Wii64 > ROMs’ and load up the game in Cube64.
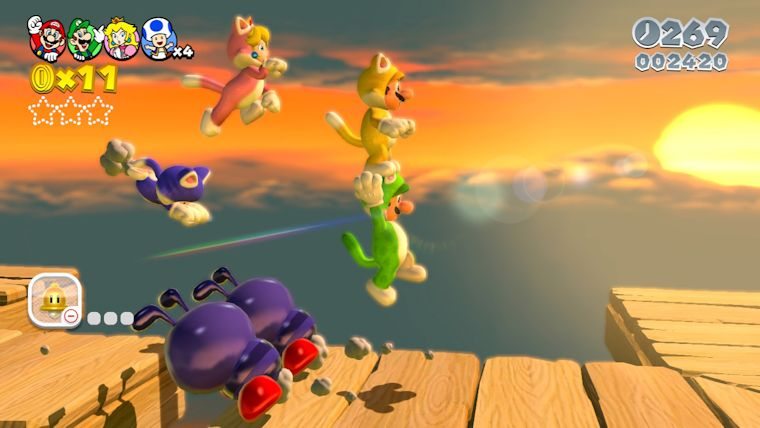
Let us know in the comments below which is your favorite Nintendo Wii game? Mine is the Super Mario Galaxy 2.
Источник
Wii u emulator mac os

Cemu emulator MMJ for Mac
| Version | 1.0.4m |
| Developer | shiftinv |
| Category | Emulator |
| OS | MacOS |
| Uploaded by | RandAS |
Description
Cemu Wii U emulator for Mac OS has received a new version 1.0.3 update which brings support for devices running MacOS X and lower, thanks to a new exploit. The update is also available to install via Cydia, for iOS jailbreak users, and AltStore, for non-jailbreak users (download also version for Windows, Android and iOS).
Beta version program is now open. The last version is aviable in the download link on the button below.


Features
Cemu supports most online features. In order to connect to official servers some system files must be dumped from a Nintendo Wii U.
At this point Cemu can already be considered highly optimized and possible future optimizations will only arrive in small and incremental steps. Keep in mind that emulation always comes with overhead and requires a higher performance system than the emulated system.
For Cemu, the single core performance of your CPU (and by extension RAM speed) is the most important factor for fullspeed emulation.
Cemu is not intended for general use yet.
System requirements
System requirements may vary depending on your hardware configuration. For the best experience, users should be running within the recommended system requirements. We cannot guarantee the performance of system specifications below the minimum requirements, but you’re always welcome to experiment. Do not expect stable performance or consistent compatibility as changes are always being made to the codebase.
| OS version | Mac OS X – 10.14 or above |
| Device | N.D. |
| RAM | 2 GB (4 GB recommended) |
| Disk space | 70 MB |
The table lists the minimum system requirements for running Cemu emulator Mac OS
Update
•Async-shader compilation is now multi-threaded
•Added support for Mac.Gaming.Input
•Fixed graphic bugs
•Reduced the app size by around 75MB.
•Fixed a bug where scroll behaviour was incorrect in certain pop-up notices.
•Further improvements to overall system stability and other minor adjustments have been made to enhance the user experience.
•Various smaller tweaks and fixes
•Fixed new installations shown the CPUCore warning
Leave your vote on this app!
Average rating 4.4 / 5. Vote count: 44
No votes so far! Be the first to rate this app.
As you found this app useful.
Follow us on social media!
We are sorry that this app was not useful for you!
Источник
Cemu — бесплатный Wii U эмулятор для ПК (+запуск TLoZ: BotW)
Сегодня я покажу и расскажу, как же начать пользоваться Wii U эмулятором Cemu на вашем компьютере, а примером игры, которую мы будем тестить, будет The Legend Of Zelda: Breath of the Wild. Заодно рассмотрим несколько интересных файлов и оптимизацию этой игры.
Итак, начнем с установки эмулятора. Если кто не знает — речь идет о программе, которая позволяет нам запускать игры для WiiU на ПК. Вместо того, чтобы платить +- 20тыс. за консоль и игру, мы получаем бесплатный, полностью функционирующий способ наслаждаться играми от Nintendo на вашем компьютере, да еще и с возможностью установки графических модов, читов и т.д. (об этом позже), можно даже онлайн играть! (почти, об этом тоже позже).
Системные требования
P.S. Если кому интересно, на моем ПК (GTX 1660, Ryzen 5 2600, 16gb RAM) игра идет в 40-60 фпс на максималках, да еще и с графическими модами)

Правда, понадобится геймпад. На клавиатуре тут играть не вариант, но не думаю, что для кого-то будет сложно найти 500-600 рублей и купить в каком-нибудь магазине техники самый дешманский USB контроллер (как я и сделал, лол)
Устанавливаем сам эмулятор
Загружаем архив с программой. Распаковываем его в любое удобное для вас место. Обязательно, в пути, к исполняемому файлу не должно быть русских символов. После распаковки, заходим в директорию с архивом и создаем 2 папки (можно создать где вам угодно и назвать как угодно). К примеру, GAMES и MLC01. В одной папке должны храниться наши игры, а во второй — обновления для игр и прочее. При первом запуске указываем пути к этим папкам.

После проделанной работы жмём на кнопку Download Community Graphic Packs, она будет отображаться в самом низу этой вкладки настроек, на скрине не видно, т.к. я эти график-пакеты уже скачал, да и версия моего эмулятора чуть-чуть отличается от представленной в гайде. Кхм-кхм, ладно, ближе к делу.
Настройка эмулятора

Настраиваем управление
Теперь, нажимаем Опции — Настройки управления и видим меню настройки геймпада. Выбираем эмулируемый контроллер Wii U Gamepad, в API контроллера выбираем разъем подключения нашего геймпада, во вкладке Контроллер выбираем Controller 1 и нажимаем на значок проверки сопряжения рядом. Если будет показано, что подключение установлено, то все ок, назначаем кнопки геймпада, как у меня, и сохраняем профиль конфигурации под любым удобным для вас именем.
Качаем и обновляем игры
Конечно, я не рекомендую никому заниматься пиратством, и желательно иметь настоящий сдампленный образ купленной лицензионной игры, но вдруг, вы просто оставили свою консоль, прям как я, где-то, например, на полке в магазине. Я знаю, как вам помочь)
Добываем игры через программу USB Helper. После установки программы из архива, создаем 2 дополнительные папки для удобства: USB_Helper_Game и USB_Helper_Extract — В первую будет идти закачки обновлений в виде образов из интернета, во второй — распакованные архивы этих самых обновлений. При первом запуске нужно выбрать регион игр и указать адрес сайта, с которого будут качаться игры и обновления для игр (ссылка в текстовом документе в архиве). После чего программа сама обновится и покажет всю библиотеку со всеми возможными обновлениями. Также, будут доступны для загрузки файлы для предыдущих консолей нинтендо. Выбираем все нужные каталоги для загрузки образов игр и обновлений, а для распаковки самой игры, которую нужно будет воспроизводить в эмуляторе, я, например, сразу выбрал папку в которой и будут храниться игры для Cemu.
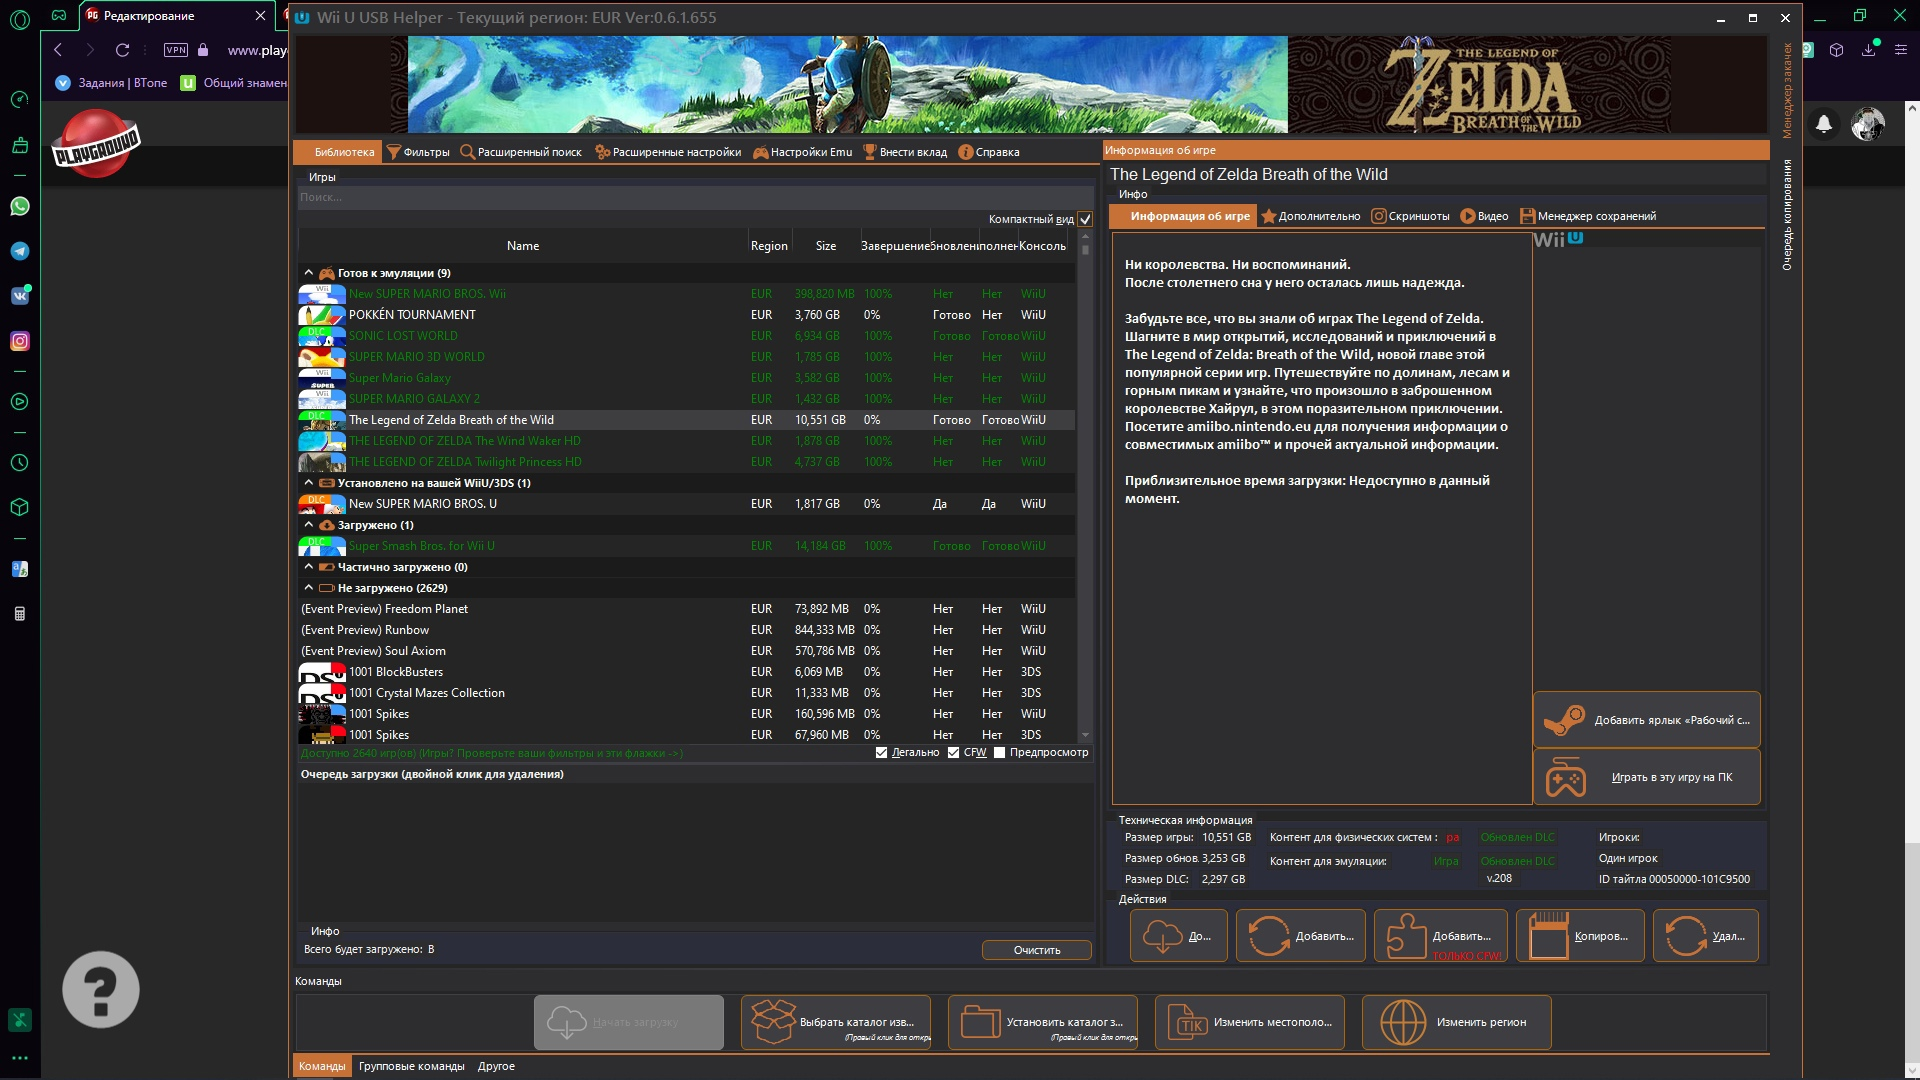
Чтобы найти игру, которую хотите скачать, пишите к примеру «zelda» и нажимаете на зельду botw ПКМ, скачать игру(ы) и добавляете в очередь загрузок, после успешного окончания загрузки нажимаем по игре ПКМ, распаковать, распаковываем в папку с играми для Cemu, опять ПКМ, подготовить к эмуляции. Если у вас остался нераспакованный загрузочный образ игры, его можно удалить.
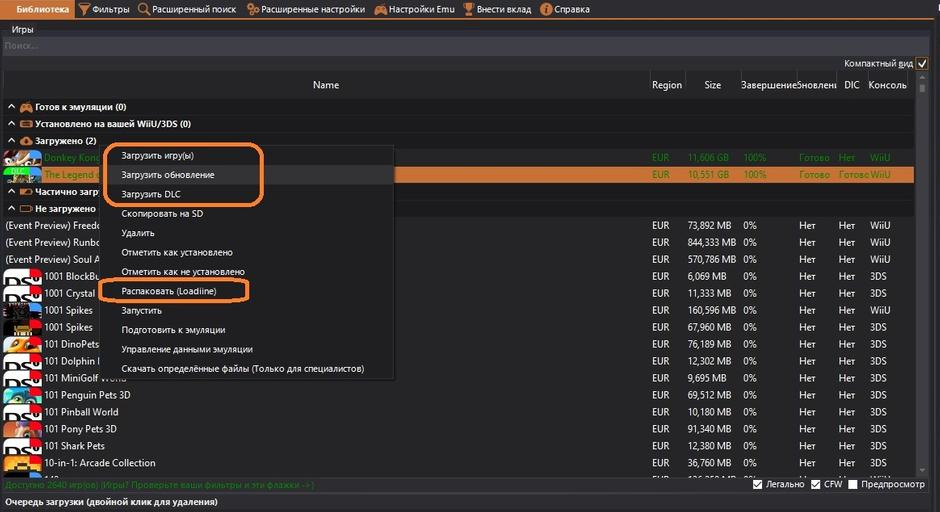
Добавляем, обновляем игру и DLC в CEMU
После проделанного, запускаем Cemu. ПКМ по пустому пространству, нажимаем «обновить список игр» и видим, что в списке появилась игра, которую мы скачали.

Затем нажимаем: Файл — Install game title, update or DLC и выбираем папку с нашими DLC и обновлениями. Выбираем файл «meta» и устанавливаем.

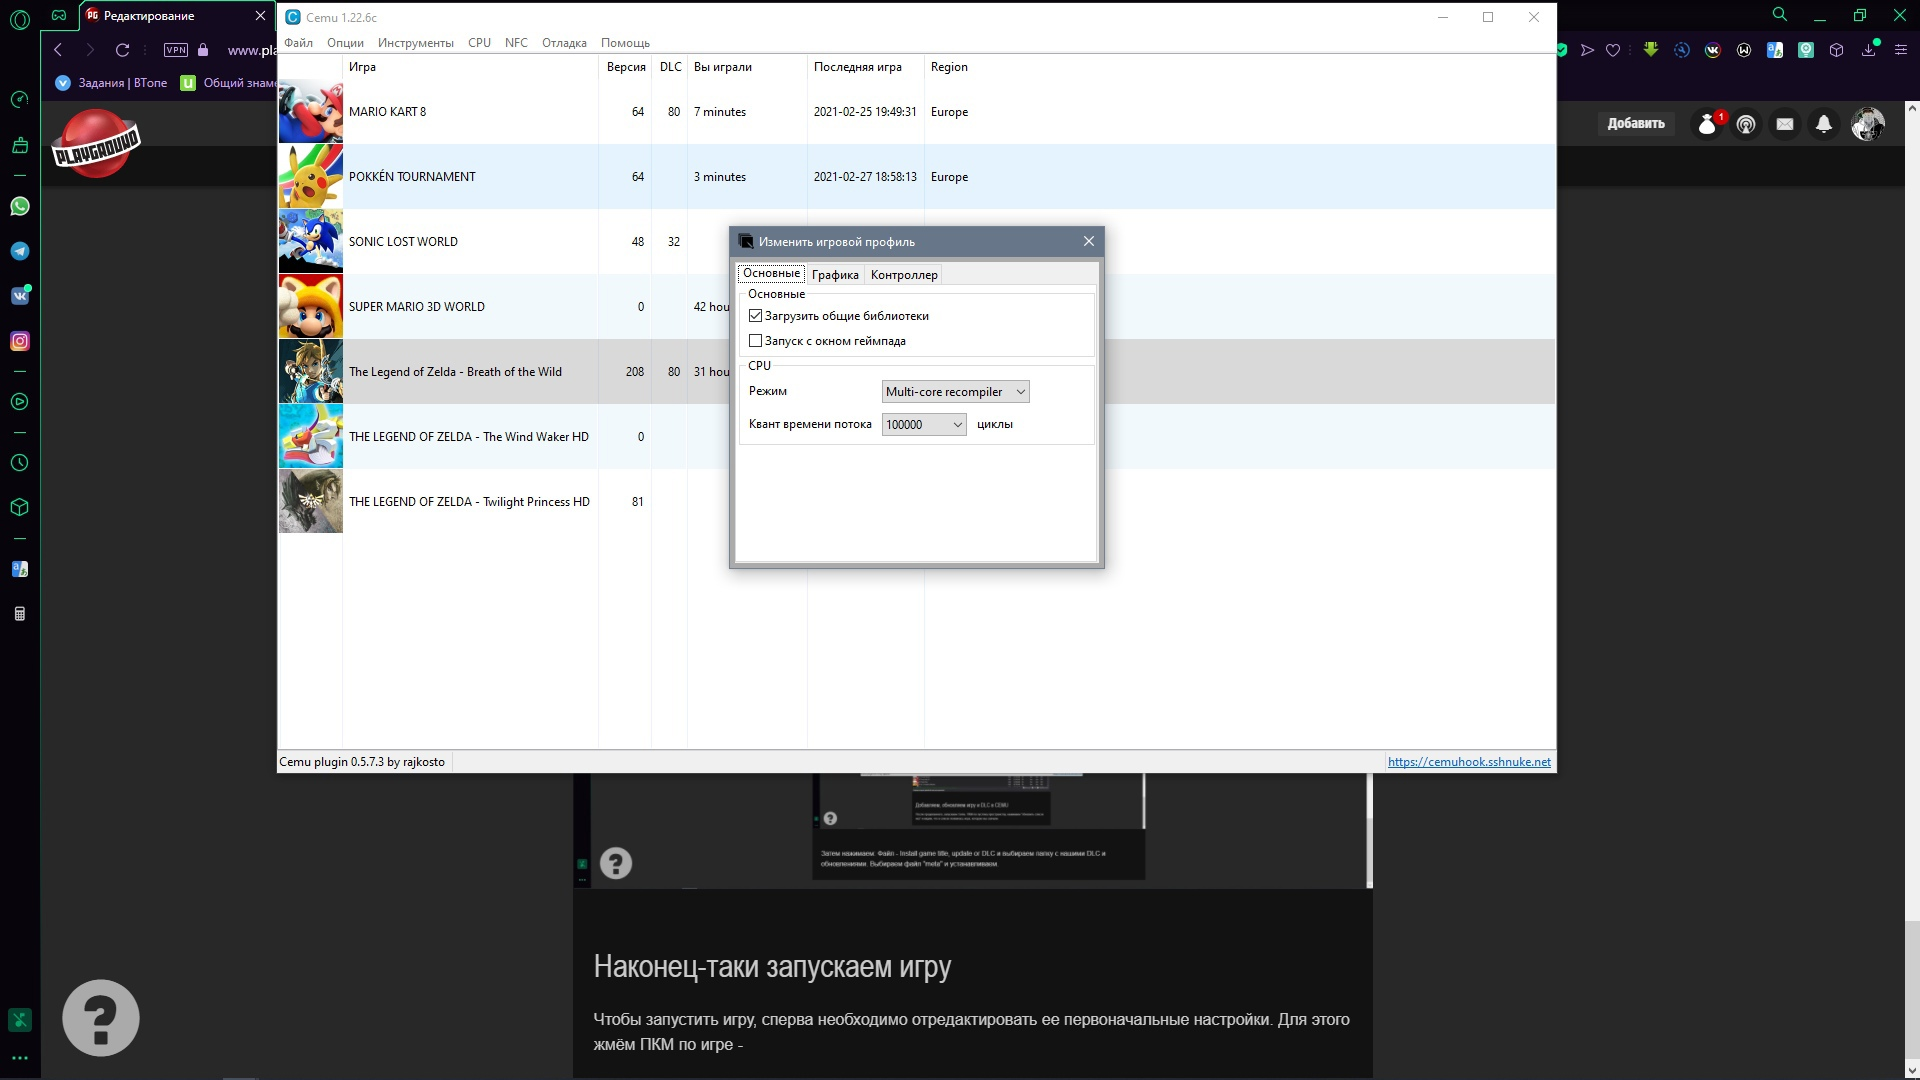
Финальная настройка
Чтобы запустить игру, сперва необходимо отредактировать ее первоначальные настройки. Для этого жмём ПКМ по игре — Изменить игровой профиль и указываем все значения как на скриншоте. Если максимальное число циклов у вас меньше 10000, то устанавливайте свое МАКСИМАЛЬНОЕ.
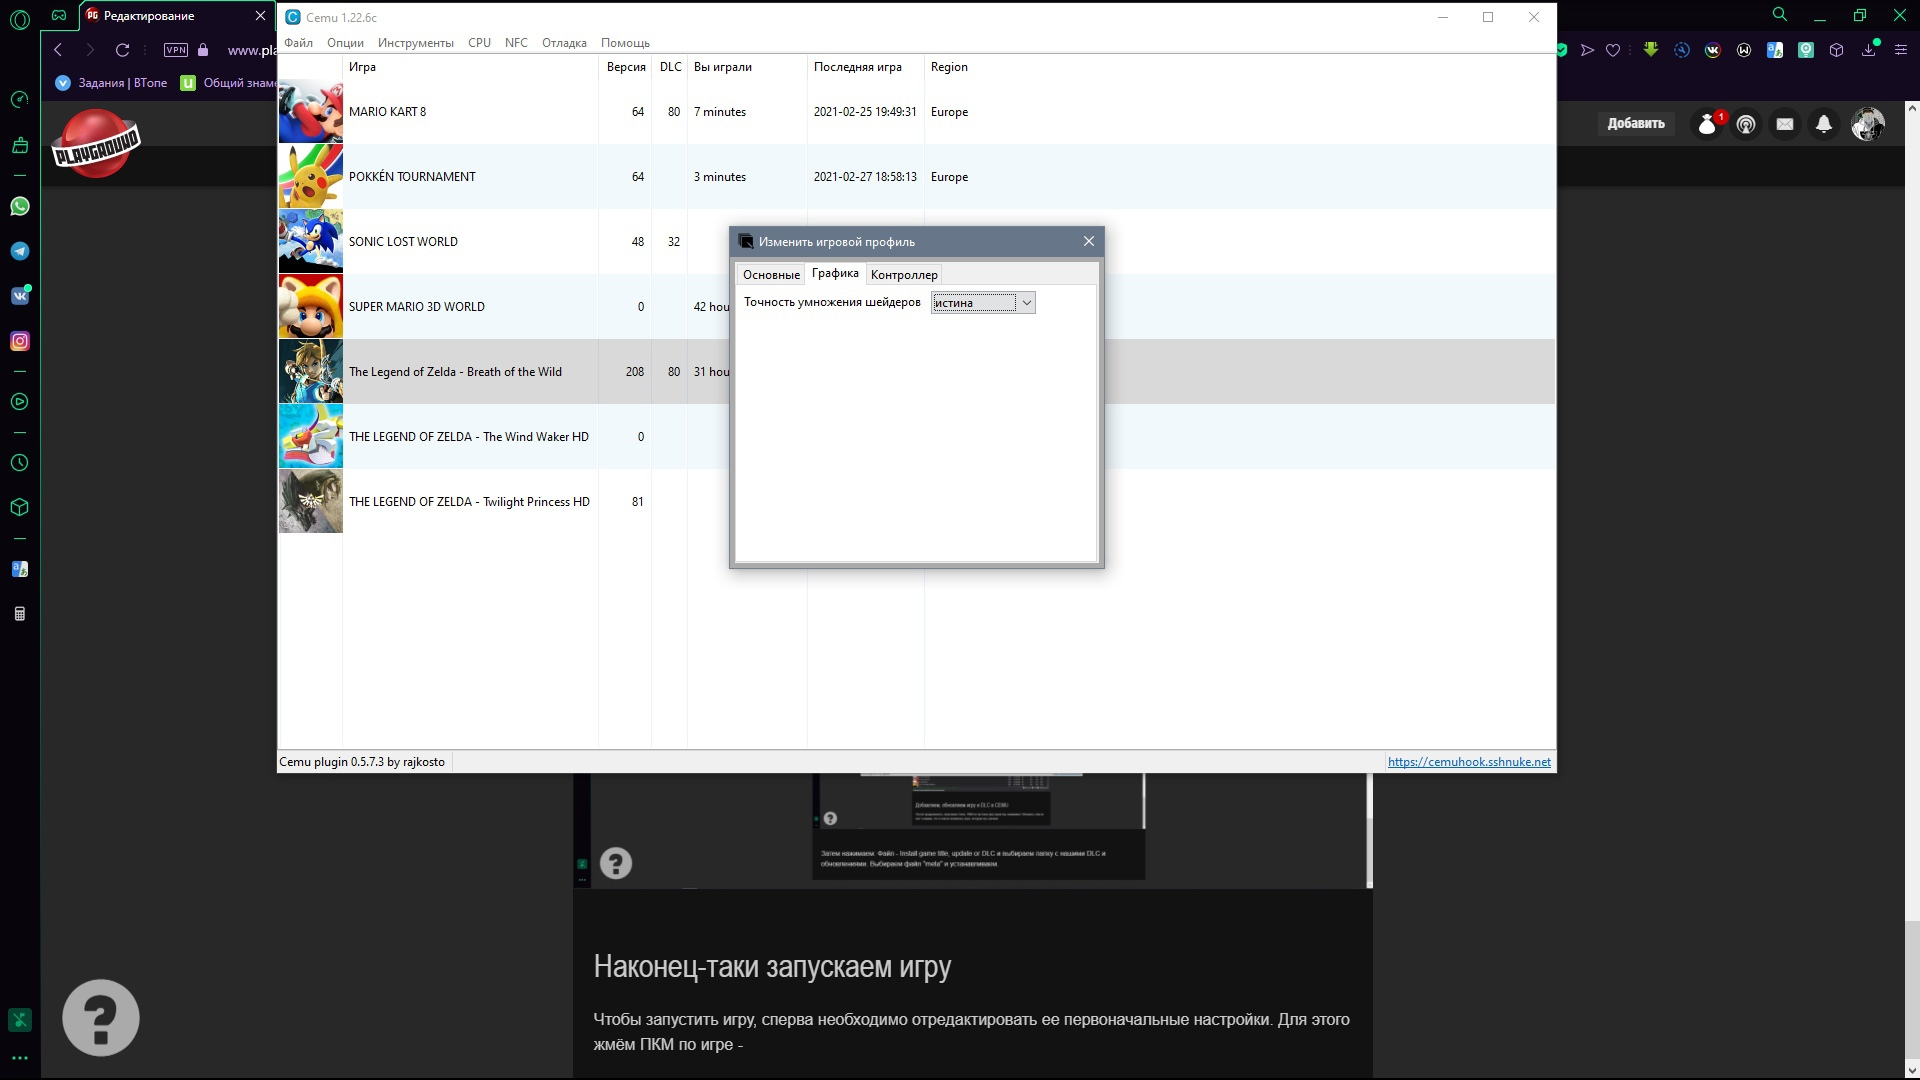
Теперь поэкспериментриуем с графическими пакетами, которые мы с вами устанавливали еще в начале пути. Так же тыкаем ПКМ по игре, выбираем «изменить графические пакеты» и настраиваем все как у меня на скриншотах (можете добавлять читов каких захотите, вкладку Weather тоже настройте по своему желанию)


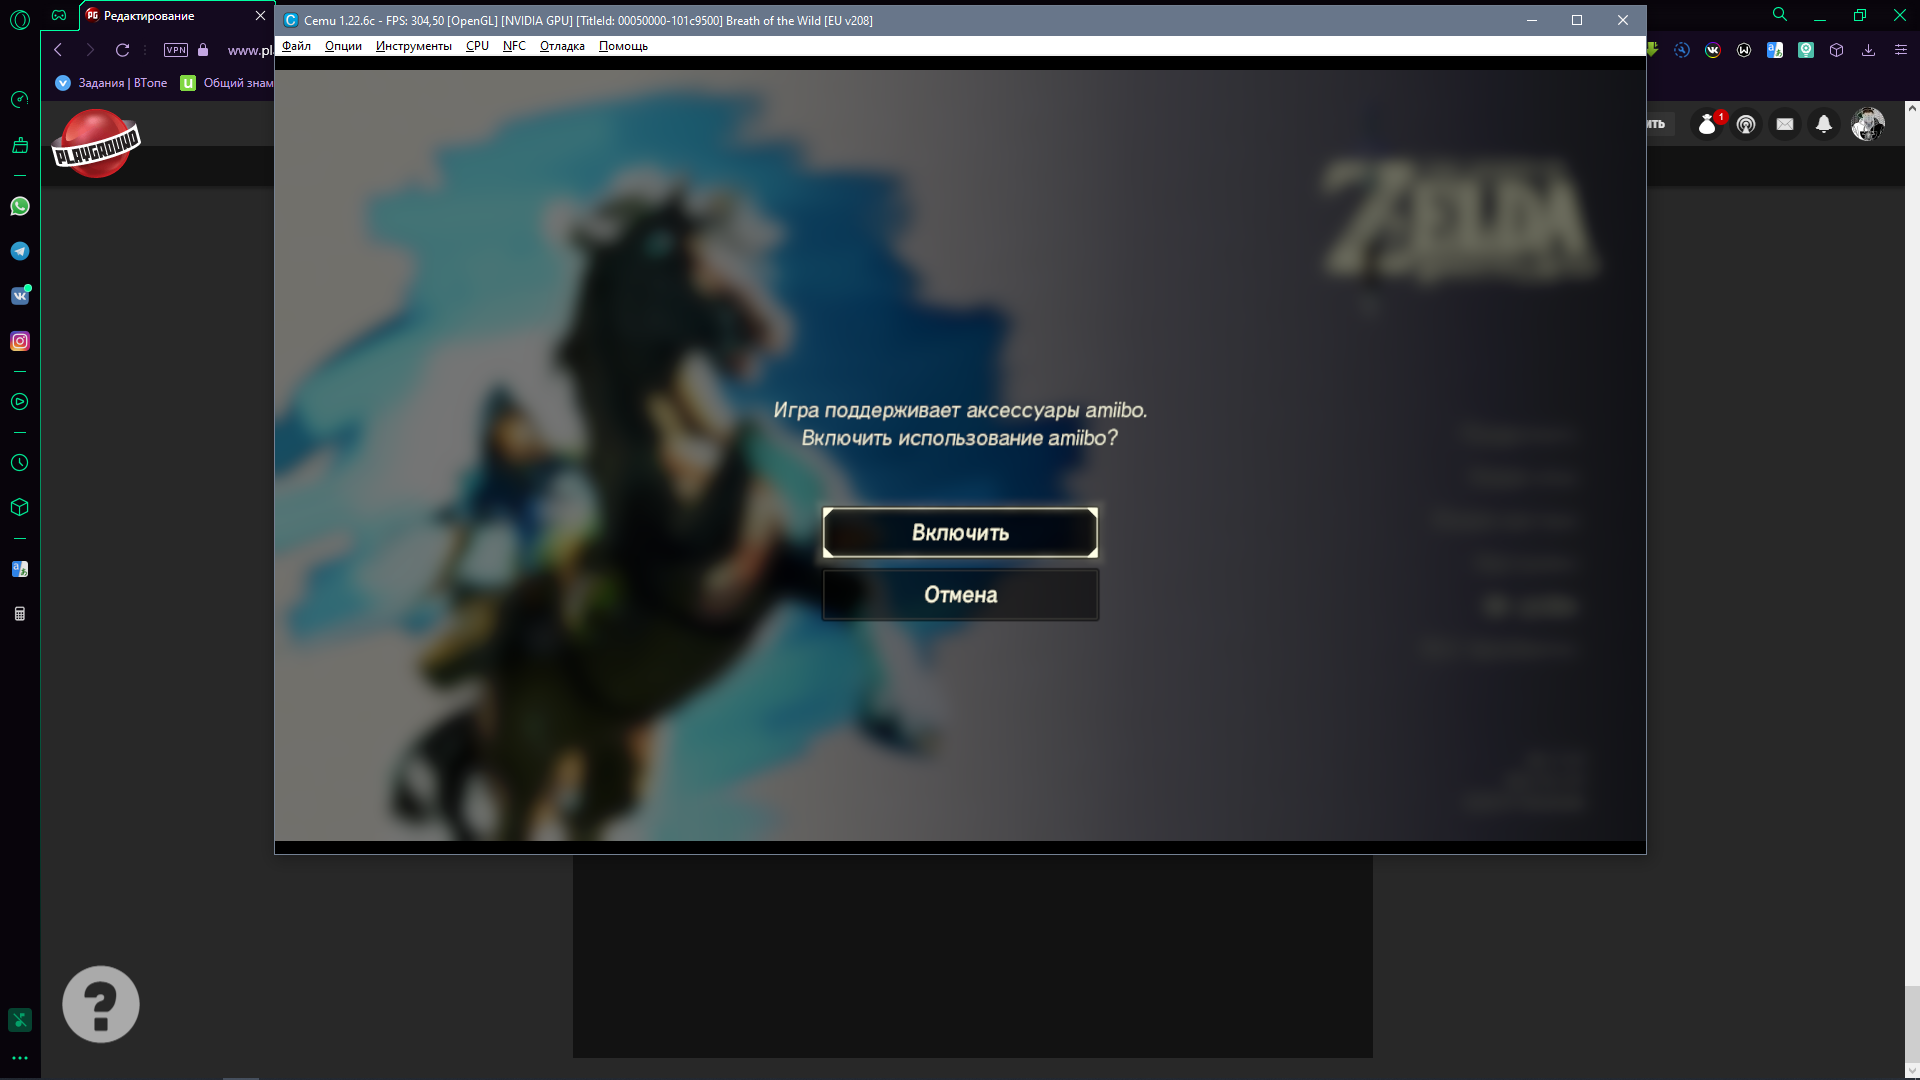
Включаем возможность активирования Amiibo
Многие, наверное, видели в магазинах техники в отделах с Nintendo Switch фигурки с персонажами нинтендо? Все верно, это и есть Amiibo. Фишка в том, что ты покупаешь фигурку, ставишь на NFC сканер на консоли, чудо — в предназначенной запущенной игре появилась какая-то штука! Но мы с вами не имеем на руках консоли и фигурок, а ништяков получить хочется. Что же мы с вами можем сделать? Извлекаем из архива папку со всеми Amiibo для нашей зельды для Wii U, затем заходим в игру.

Наконец-таки запускаем игру
Двойным кликом нажимаем на нашу игру, видим главное меню. Жмём надпись amiibo и подтверждаем включение функции сканирования amiibo. Нажимаем «новая игра«, проходим обучение, после выхода в открытый мир жмём стрелочку вверх на геймпаде и выбираем руну Amiibo. После чего, удерживая LT на геймпаде, мышкой кликаем на кнопку в верхней панели эмулятора «NFC«. Выбираем там папку с нашими amiibo, нажимаем на тот который хотим отсканировать и радуемся.
В общем, надеюсь помог кому-то и всем все понятно, желаю всем хорошего времяпрепровождения, удачи всем и всех благ 🙂
Источник


