- HowTo: Find out If MySQL Is Running On Linux Or Not
- Sergey Danielyan
- Правильная установка и настройка MySQL в Linux
- Установка MySQL
- Настройка сервера
- Will mysql run on linux
- How do you start a MySQL server on linux?
- 2 Answers 2
- MySQL on Linux Tutorial
- Red Hat / Fedora Core RPM Packages:
- Ubuntu / Debian package installation:
- Start the database:
- Post installation:
- Create a database user:
- Assign user privileges:
- Passwords and connecting to the database:
- MySQL root password recovery:
- Disabling networking:
- Loading a SQL file into MySQL:
- Loading CSV or tab delimeted files into MySQL:
- Load a tab delimited file into the database:
- Load a comma delimited file (CSV) into the database:
- Quiesce Database:
HowTo: Find out If MySQL Is Running On Linux Or Not
H ow do I find out if my MySQL server is running or not under Linux / UNIX operating systems?
You can use mysql startup script or mysqladmin command to find out if it is running on Linux. Then you can use ps command and telnet command too (it is not reliable but it works.). mysqladmin is a utility for performing administrative operations. You can also use shell script to monitor MySQL server. You can use mysqladmin as follows:
# mysqladmin -u root -p status
Output:
If MySQL serer is running it will display output as above. It displays uptime and number of queries etc. If server is not running then it will dump error as follows
# mysqladmin -u root -p status
Output:
Under Debian Linux you can type following command to find out if MySQL server is running or not
# /etc/init.d/mysql status Output:
- No ads and tracking
- In-depth guides for developers and sysadmins at Opensourceflare✨
- Join my Patreon to support independent content creators and start reading latest guides:
- How to set up Redis sentinel cluster on Ubuntu or Debian Linux
- How To Set Up SSH Keys With YubiKey as two-factor authentication (U2F/FIDO2)
- How to set up Mariadb Galera cluster on Ubuntu or Debian Linux
- A podman tutorial for beginners – part I (run Linux containers without Docker and in daemonless mode)
- How to protect Linux against rogue USB devices using USBGuard
Join Patreon ➔
If you are using RedHat of Fedora then you can use following script”
# service mysqld status OR # /etc/init.d/mysqld status See also:
🐧 Get the latest tutorials on Linux, Open Source & DevOps via
Источник
Sergey Danielyan
Правильная установка и настройка MySQL в Linux
Эта статья, по замыслу, должна служить пошаговым руководством по корректной настройки MySQL сервера в Linux в общем и в CentOS в частности, начиная от подготовки системы и заканчивая настройкой прав пользователей.
В этот раз текста будет минимум — только команды.
Установка MySQL
Проверяем, установлен ли MySQL сервер
Если установлен, шаги по установке можете пропустить, хотя ознакомиться я все же советую с ними.
Существуют следующие основные пакеты связанные с mysql:
- mysql — клиент mysql
- mysql-server — сервер mysql
- mysql-devel — для разработки и подключения библиотек и хидеров mysql
- mysql-connector-java — JDBC коннектор (используется, например, в EJBCA)
sudo yum install mysql mysql-server mysql-devel mysql-connector-java
Теперь надо установить сервер mysql на запуск в определенные runlevel‘ы (2, 3 и 5):
Если кто забыл соответствие цифрового значения runlevel‘а символьному:
Стартуем демон mysql:
Настройка сервера
Теперь пора настроить сервер. Начнем с пользователей.
Вот состояние таблицы user до начала действий с ней:
mysql -u root
> use mysql
> select host,user from user;
5 rows in set (0.00 sec)
> quit
Как видете, безопасность на уровне плинтуса. Хорошо хоть, что анонимного пользователя нет.
Для настройки базовых вещей в сервере, запустим настройку сервера через mysql_secure_installation. На время этой установки, пароль будет security. Ваш же пароль, как понимаете, должен отличаться.
Запустится скрипт, с запросами на то или иное действие. Вот ответы:
Skip root password for root
Мы еще не устанавливали пароль для root, поэтому при запуске скрипта и запросе пароля для root , просто нажмите Enter .
Install new password for root: security
А вот тут можно установить пароль для root
Do remove an anonymous user
На вопрос о том, удалить ли анонимного пользователя, отвечаем да
Do not disallow remote connections
Не запрещаем коннект к нашему северу с удаленных серверов (если, конечно, эта опция вам нужна, в другом случае, запретите ее)
Do remove a test database
Тестовая база нам не нужна — удаляйте ее
Do reload the privileges
Перегрузим привилегии для их активации
Теперь для всех root пользователей установлен пароль.
Если в ходе этой конфигурации вы не установили пароль для root , можете сделать это так:
SET PASSWORD FOR ‘root’@’localhost’ = PASSWORD(‘security’);
SET PASSWORD FOR ‘root’@’localhost.localdomain’ = PASSWORD(‘security’);
SET PASSWORD FOR ‘root’@’127.0.0.1’ = PASSWORD(‘security’);
UPDATE mysql.user SET Password = PASSWORD(‘security’) WHERE user = ‘root’;
Если же вы не запускали конфигурацию через mysql_secure_installation или не хотите этого делать по каким-то другим причинам, следующие команды удалят any пользователей:
DROP USER »@’localhost’;
DROP USER »@’localhost.localdomain’;
Также, пароль для IPv6 localhost (@::1) можно установить таким образом:
Близится финал нашего действия. Осталось две вещи:
- открыть порты для mysql:
sudo iptables -I INPUT -p tcp —dport 3306 -m state —state NEW,ESTABLISHED -j ACCEPT
sudo iptables -I OUTPUT -p tcp —sport 3306 -m state —state ESTABLISHED -j ACCEPT
выставить кодировку UTF-8 по-умолчанию — файл /etc/my.cnf :
[mysqld]
init_connect=‘SET collation_connection = utf8_unicode_ci’
character-set-server = utf8
collation-server = utf8_unicode_ci
[client]
default-character-set = utf8
Источник
Will mysql run on linux
Linux supports a number of different solutions for installing MySQL. We recommend that you use one of the distributions from Oracle, for which several methods for installation are available:
Table 2.8 Linux Installation Methods and Information
| Type | Setup Method | Additional Information |
|---|---|---|
| Apt | Enable the MySQL Apt repository | Documentation |
| Yum | Enable the MySQL Yum repository | Documentation |
| Zypper | Enable the MySQL SLES repository | Documentation |
| RPM | Download a specific package | Documentation |
| DEB | Download a specific package | Documentation |
| Generic | Download a generic package | Documentation |
| Source | Compile from source | Documentation |
| Docker | Use the Oracle Container Registry. You can also use Docker Hub for MySQL Community Edition and My Oracle Support for MySQL Enterprise Edition. | Documentation |
| Oracle Unbreakable Linux Network | Use ULN channels | Documentation |
As an alternative, you can use the package manager on your system to automatically download and install MySQL with packages from the native software repositories of your Linux distribution. These native packages are often several versions behind the currently available release. You are also normally unable to install development milestone releases (DMRs), since these are not usually made available in the native repositories. For more information on using the native package installers, see Section 2.5.7, “Installing MySQL on Linux from the Native Software Repositories”.
Источник
How do you start a MySQL server on linux?
Pretty simple question here. I just want a SQL database on my version of Kali linux so I can practice SQL.
I opened the command line and entered tried to start mysql and get an error.
I also made sure it was already installed using apt-get.
What are the steps I need to take to be able to make a database with tables and data that I can query?

2 Answers 2
I don’t know about Kali, but on Ubuntu it would be
Once that command returns, the mysqld service has started, so you can use the mysql client to connect to it.
Of course, you also have to make sure you have the mysql-server package installed, not just mysql-client and mysql-common , and that you’ve initialized the database instance. Complete post-installation instructions can be found in the official documentation, but the short version is
- Make sure the installer has created the mysql user account. This is the account that will «own» the server process once it starts.
- Change to your data directory. (I used the installer’s default of /var/lib/mysql ; you can change this by editing my.cnf .)
As root, execute the server daemon with the —initialize switch. Check whereis to determine the correct path, then
This command will twiddle itself for a while, then display an automatically-generated password and exit. Once the command returns, the database instance has been initialized and the system tables created. You can now start the database instance normally (using service start ), then log in as the database user root (which is not the same as the system user root ) using the password from above, then change your password, create a new database user, log in as that user, create a user database, and start creating tables.
Again, the official documentation is the place to look for this; if any of the instructions in the official documentation differ from my instructions, you should ignore me and follow the official documentation’s instructions.
Источник
MySQL on Linux Tutorial
This tutorial covers the MySQL database running on a Linux server. This tutorial will also cover the generation and use a simple database. The interface language of the MySQL database is the standard SQL (Standard Query Language) which allows for inserts, updates and queries of data stored in relational tables. The SQL language is also used for the administration of the database for the creation and modification of tables, users and access privileges. Tables are identified by unique names and hold data in a row and column (record) structure. A fixed number of named columns are defined for a table with a variable number of rows.
Related YoLinux Tutorials:
Red Hat / Fedora Core RPM Packages:
Also see YoLinux.com package management — using RPM to set GPG signatures and install RPM packages.
Installing MySQL.com RPM packages: If installing newer versions of MySQL from RPM packages obtained from MySQL.com, you must first import and register their public GPG key:
- Download public key named build@mysql.com from http://www.keyserver.net/ with one of two methods:
- wget --output-document=pubkey_mysql.asc http://keyserver.veridis.com:11371/export?id=-8326718950139043339
(Saves key 0x5072E1F5 as file pubkey_mysql.asc) - gpg --keyserver keyserver.veridis.com --recv-key 5072e1f5
gpg --export -a 5072e1f5 > pubkey_mysql.asc
- wget --output-document=pubkey_mysql.asc http://keyserver.veridis.com:11371/export?id=-8326718950139043339
- Import key: rpm --import pubkey_mysql.asc
[Potential Pitfall] : Your system should have a host name other than the default «localhost». Give your systems a host name if you get the following installation error:
Use the command hostname to give your system a hostname and also set in the configuration file /etc/sysconfig/network
Ubuntu / Debian package installation:
- apt-get install mysql-client
- apt-get install mysql-server
Start the database:
Notes:
- I use the command word «restart» instead of «start» because the database might already be running. There is no penalty to trying to stop a database that has already been stoppped.
- The init script will run /usr/bin/mysql_install_db to create a default database in /var/lib/mysql/ if the mysql init script has never been run before. Only executes the first time the MySQL init script is run. The install script will not be run again as long as the default database directory exists.
The database executes as user mysqld and group mysqld. - Default config file installed by RPM: /etc/my.cnf
(Ubuntu: /etc/mysql/my.cnf)
[Potential Pitfall] : AWS uses a secure install script to force the setting of the default root password:
sudo /usr/libexec/mysql55/mysql_secure_installation
The secure install script will give the following error if you don’t start the database first. Start the database:
- Red Hat/CentOS/AWS: sudo service mysqld restart
Post installation:
- The first step is to assign the database «root» user a password.
Admin user id: root
Default password: blank
You can use the following command to reset the database «root» password: Also look at the mysql_secure_installation man page to see the full list of the command’s capabilities.
The database «root» password can also be set with the command mysqladmin All subsequent password changes will require the specification of the current password:
Note: the following SQL commands will also work:
Create a database: (Creates directory /var/lib/mysql/bedrock) (or use SQL command: CREATE DATABASE bedrock;)
Show all mysql databases: mysqlshow -u root -ppassword
Add tables, data, etc:
Connect to database and issue the following SQL commands:
Note: Data type used was CHAR. Other data types include:
- CHAR(M) : Fixed length string. Always stores M characters whether it is holding 2 or 20 characters. Where M can range 1 to 255 characters.
- VARCHAR(M) : Variable length. Stores only the string. If M is defined to be 200 but the string is 20 characters long, only 20 characters are stored. Slower than CHAR.
- INT : Ranging from -2147483648 to 2147483647 or unsigned 0 to 4294967295
- FLOAT(M,N) : FLOAT(4,2) — Four digits total of which 2 are after the decimal. i.e. 12.34 Values are rounded to fit format if they are too large.
- DATE, TEXT, BLOB, SET, ENUM
Add a user. Use the MySQL SQL console to enter SQL commands. The command mysql with the correct login/password will connect you to the database. The admin tables are stored in the database «mysql».
Note:
- There is NO space between the -p and the password! You can omit the password and you will be prompted for it.
- The SQL flush command is equivalent to issuing the command:
Test the database:
Quit from the SQL shell:
Create a database user:
or generate a user by adding them to the user table directly: Note that the user is defined in the «user» mysql table.
Assign user privileges:
Use the user table to grant connection privileges to database by a user (host, user name and password). Grant database and table access for transaction access. i.e. grant «SELECT», «UPDATE», «CREATE», «DELETE», «ALTER» etc. permission for database, table, field (columns) or database server access.
Access can be granted by network permissions: GRANT ALL PRIVILEGES on bedrock.* to david@'192.168.10.0/255.255.255.0';
This grants access from nodes 192.168.10.0 — 192.168.10.255. Or the network definitions can reference resolvable names: ‘%.domain.com‘. The host definition of ‘%‘ or » (null) refers to any host. (..according to the documentation. My experience is that in the mysql.user table use only ‘%’ for «Host» to refer to any host.)
or (be specific) or (more promiscuous — global privileges rather than database specific) or (be specific by direct assignment in the mysql «Db» table:) Note that database specific privileges (eg. Select_priv, Insert_priv, etc) are defined in the «db» mysql table. The mysql «user» table can assign the same (Select_priv, Insert_priv, etc) but global privileges (usually all default to ‘N’).
Show privileges: SHOW GRANTS FOR Dude2@'%';
Network security: Use firewall rules (ipchains or iptables) to block internet access to port 3306. (default port used by MySQL)
Note: I have found that when adding access from «anywhere» (‘%’), the MySQL database table ‘user’ requires two entries, ‘localhost’ and ‘%’. Also, it is typically safer to allow more privileges to those with ‘localhost’ access than to users from ‘%’ («anywhere»).
Passwords and connecting to the database:
- Connect: [prompt]$ mysql -h host_name -u user_name -ppassword
- Using default blank password: [prompt]$ mysql -h localhost -u root -p
If a password is required, you will be prompted. Note, blank passwords are a security hole which has already lead to one mySQL internet worm. Change any default blank passwords. - Delete null/blank users: DELETE FROM user WHERE User = '';
- Beware of open access permissions from hosts '%': SELECT * FROM db WHERE Host = '%';
- Change a password:
You will be prompted to enter the old root password to complete this command.
or: or: - As an added security precaution it is wise to delete any user id not used. i.e. any defaults generated for demonstration purposes.
- Note that the default port used by MySQL is 3306. This can be protected with firewall rules. See the YoLinux IpTables tutorial.
[Potential Pitfall] : Upgrade to 5.7.4 or using passwords generate in MySQL 4.1 or earlier:
The password encryption hashing algorithm was changed and thus old passwords generated with the old algorithm fail to authenticate correctly. Backwards compatibility with the old scheme was eliminated in version 5.7.4. 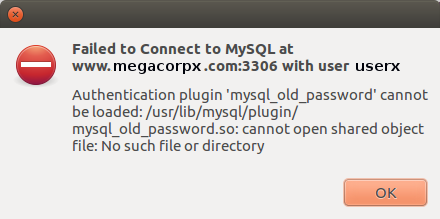
Error: (MySQL Workbench) Reseting the password will encrypt the password with the new hashing algorithm and authentication will work.
For more details see password hashing docs
RHEL6/AWS (MySQL 5.5):
The installation script mysql_secure_installation is executed by the RPM upon installation to secure default passwords with the following dialog:
Debian/Ubuntu upgrades: Note that the Debian/Ubuntu distribution will have an additional file /etc/mysql/debian.conf. This file holds a password for the user «debian-sys-maint» which is used by the install tool dpkg to perform database upgrades. This can also be used in emergencies if you forget the root password. It is also a security hole if the file is available to others.
[Potential Pitfall] : It is very easy to make mistakes which get entered into important tables. If you enter the command twice you may have one incorrect and one correct entry. Look at the table data after a mistake to see what happened in case it needs to be fixed.
Example:
User entries may also be found in the table mysql.db.
[Potential Pitfall] : Any changes (UPDATE) to the user table will require a «FLUSH PRIVILEGES» before the changes will be effective.
This will allow a connection with mysql client from any host:
[prompt]$ mysql -u Dude2 -ppassword -h node.your-domain.com
[Potential Pitfall] : If you can login to the database with a user account locally on the system with a localhost connection but not remotely (or vice-versa) you may be faced with the following anomaly:
Note that there will be two user entries, one for the user with localhost access and another with remote access and the two can have different passwords. Adding a remote access for a user database login will not apply the current user database localhost password to the remote access («%») entry. You will have to assign a password. Note this shows that user1 has no password assigned for remote access.
This example shows the same password assigned for both localhost and remote database access. Also note that MySQL encrypts the passwords.
MySQL root password recovery:
- As Linux system root user stop the database process: /etc/init.d/mysql stop
(or: service mysql stop) - Start MySQL in safe mode and skip the use of the «grant tables»: /usr/bin/mysqld_safe --user=mysql --socket=/var/lib/mysql/mysql.sock --pid-file=/var/run/mysqld/mysqld.pid --datadir=/var/lib/mysql --skip-grant-tables --skip-networking &
- Reset the MySQL root password: mysqladmin -u root flush-privileges password newpassword
- Stop MySQL running in safe mode: kill `cat /var/run/mysqld/mysqld.pid`
- Start MySQL: /etc/init.d/mysql start
- The new MySQL root password can now be used: mysql -u root -p
Respond with the password: newpassword
Disabling networking:
Mysql 5.0 configuration: Networking is disabled by default on the default Red Hat and Ubuntu installation.
Red Hat/CentOS: To enable remote database access, add the «bind-address» with the public IP address to the file: /etc/my.cnf. To force local access only without remote access, set the «bind-address» to 127.0.0.1 Restart the database after making changes.
Ubuntu: To enable remote database access, comment out (or remove) the following line with a «#» in the file: /etc/mysql/my.cnf Restart the database after making changes.
A firewall rule can further restrict access to a single server (eg web server at 192.168.1.13):
/sbin/iptables -A INPUT -i eth0 -s 192.168.1.13 -p tcp --destination-port 3306 -j ACCEPT
or LAN only access:
/sbin/iptables -A INPUT -i eth0 -s 192.168.1.0/24 -p tcp --destination-port 3306 -j ACCEPT
- Statistics: [prompt]$ mysqladmin version
- List database environment: [prompt]$ mysqladmin variables
- Show if database is running: [prompt]$ mysqladmin ping
- Show databases available:
OR - Delete database: mysql> drop database bedrock;
- Show list of active threads in server:
- Delete a database: [prompt]$ mysqladmin drop database-name
- Execute SQL from Linux command line interface:
[prompt]$ mysql -h localhost -u root -p -e "select host,db,user from db" mysql - Execute SQL command file from Linux command line interface:
- Load test (benchmark) the system:
SQL requests are either administrative or data-related. The following are sample SQL segments and are not necessarily pertinent to the previous example:
Create and use a new database named «bedrock»:
Create and populate table with data:
Add constraints to a table:
Interrogate an existing database:
Database cleanup: See section 3 of MySQL manual for more examples.
Tip: Execute a shell command from the MySQL client interface, use either option:
- system ls -l
OR - \! ls -l
Example: execute the «ls» command to list files from the MySQL client.
Loading a SQL file into MySQL:
One may import data into the MySQL database from SQL files or «load» data from CSV or tab delimited files using the LOAD command:
Loading CSV or tab delimeted files into MySQL:
Load a tab delimited file into the database:
Command: LOAD DATA LOCAL INFILE 'file.dat' INTO TABLE employer;
Input tab delimited file: file.dat
Note:
- The number of tab delimited fields MUST match the number and order of fields in the database.
Load a comma delimited file (CSV) into the database:
Note:
- MS/Windows generated files will have lines terminated by «\r\n».
- Linux/Unix generated files will have lines terminated by «\n».
- File locations on database server must be absolute path names, relative path or relative to the mysqld process owner’s home directory (typically /var/lib/mysql/). File locations on the client may be fully qualified or relative to the current mysql client directory.
- Fully qualified: /tmp/TableData.csv
- Relative to current mysql client directory: ./TableData.csv
(Verify current directory: mysql> \! pwd) - Database process owner home directory: TableData.csv
(Actual: /var/lib/mysql/TableData.csv)
- Text strings often are encapsulated by quotes so that the strings may contain a comma without representing a new field.
[Potential Pitfalls] :
- ERROR 13 (HY000): Can't get stat of '/tmp/TableData.csv' (Errcode: 13)
The file is local and you have not specified the «LOCAL» directive. - ERROR 29 (HY000): File '/var/lib/mysql/test/TableData.csv' not found (Errcode: 2)
Error from command LOAD DATA INFILE 'TableData.csv' INTO . where the file is assumed to be read from the /database-process-home-directory/mysql-database-name/TableData.csv
(Note: Database name «test» is being used.) - ERROR 1045 (28000): Access denied for user 'user1'@'%' (using password: YES)
OR
ERROR 2 (HY000): File '/tmp/TableData.csv' not found (Errcode: 2)
Error from command LOAD DATA INFILE '/tmp/TableData.csv' INTO . . This is a common pitfall, trying to load a file located on the database server remotely from a client. Getting the file permissions correct is difficult. Avoid this method. Use the LOAD DATA LOCAL INFILE instead of the LOAD DATA INFILE method (it is so much easier).
Also look at the mysqlimport command.
The mysqldump command will read the mySQL database and generate a SQL command text file. This allows data to be migrated to other versions of mySQL (i.e. upgrade versions to a newer and more advanced mySQL) or to other SQL databases. SQL command file generated can create tables, insert data, .
| Option | Description |
|---|---|
| -A —all-databases | Dump all the databases. |
| -B —databases | Dump the specified databases. |
| -h —host= | Specify host to connect to. |
| -p —password= | Specify password. If you do not specify a password, then you will be queried. |
| -u —user= | Specify user. Defaults to current user logged in. |
| —opt | Same as: —add-drop-table —add-locks —all —extended-insert —quick —lock-tables |
| —add-drop-table | Add a «drop table» SQL statement before each «create» SQL statement. |
| —add-locks | Add «lock» SQL statements around «insert» SQL statements. |
| -a —all | Include all mySQL specific SQL «create» options. |
| -e —extended-insert | Allows utilization of the new, much faster INSERT syntax. Database you are migrating to must support this notation. |
| -q —quick | Don’t buffer query, dump directly to stdout. |
| -l —lock-tables | Lock all tables for read. |
| -? —help | Display command line options. |
- Dump database to a file:
- Dump specified database:
mysqldump --opt database >db-dump-file.sql - Dump specified table in database:
mysqldump --opt databasetable-name >db-dump-file.sql - Dump multiple databases:
mysqldump --opt --databases database1database2database3 >db-dump-file.sql - Dump everything:
mysqldump --opt --all-databases >total-db-dump-file.sql
mysqldump -u user-id -h host-name -p --opt --all-databases >total-db-dump-file.sql
You be asked for your password.
[Potential Pitfall] : If you experience the following error: Fix with the following command: mysqlcheck -r -u root -p Database-Name
Import dumped file:
mysql database [Potential Pitfall] : If you experience the following error while importing a large SQL dump file: Fix by adding the following line to file under the "mysqld" section: /etc/my.cnf[Potential Pitfall] : If transferring a single database between versions (in this case MySQL version 5.0 to 5.5) and you get the following errors:
One has the option to set the various variables before the data transfer so that they are not NULL, or, transfer all databases. I found that by exporting "--all-databases", these errors were avoided.
To set the variables, add the following to the beginning of the mysqldump file:
Quiesce Database:
Check Database Status:
Show process list (database activity):
Show the database status:
Flush table transactions and lock: Closes all open tables and locks all tables for all databases with a global read lock. This will temporary make MySQL read only. It also requires LOCK TABLES privileges.
Database activity: One can then view database activity with the SQL command: SHOW PROCESSLIST;
If configured for replication in a master/slave cluster, the master node may have binary log files of changes for the slaves.
View status: SHOW MASTER STATUS/G
If backing up from a slave: SHOW SLAVE STATUS/G
Database activity should rapidly complete and when it has, this is the time to perform backups and snapshots.XFS volume freeze: Note file system considerations (XFS): (after the "READ LOCK" has been applied and the database has been locked)
Freeze from further modification, an entire file system volume on which the MySQL data resides: SYSTEM xfs_freeze -f /var/lib/mysql;
The backlog of write activity will complete and further file system modification will be denied.
Perform backups now.
Unfreeze filesystem volume: SYSTEM xfs_freeze -u /var/lib/mysql;Take database snapshot then unlock:
[Potential Pitfall] : Ubuntu mysql 5.0 database migration - When migrating the mysql database by copying files from /var/lib/mysql/. and /etc/mysql/. from one system running Ubuntu 6.11 to 8.04, I got nebulous error message in /var/log/syslog. The root cause of the problem was apparmor. If turning off apparmor (/etc/init.d/apparmor stop) allows your database to start and function properly, then go fix your apparmor security rules in /etc/apparmor.d/usr.sbin.mysqld. Also note that you must use the newer script /etc/mysql/debian-start from release 8.04 after copying /etc/mysql/. .
Note: Debian and Ubuntu distributions manage mysql package upgrades using a mysql user debian-sys-maint which has its information located in /etc/mysql/debian.cnf. If you ever forget your mysql root password, you can always get back into the mysql database using the user debian-sys-maint and its password held in /etc/mysql/debian.cnf.
- C compiler: 2.95.2 or later. (Check with the command: rpm -q gcc)
Compile and install: (as root)
- Downloaded source from http://dev.mysql.com/downloads/mysql/4.1.html
- Expand tar file: tar xzf mysql-4.1.16.tar.gz
- cd mysql-4.1.16
- ./configure --prefix=/opt/mysql --sysconfdir=/opt/etc --localstatedir=/opt/var/mysql --with-unix-socket-path=/opt/tmp/mysql.sock
(Use the command ./configure --help to see all options.)
This should create an installation which will not clobber an existing RPM mySQL installation. - make
- make install
- Create mysql config file: cp support-files/my-medium.cnf /opt/var/my.cnf
- Create user/group mysql
- Test if user/group mysql already exists: groups mysql
- Create group: groupadd mysql
- Create user: useradd -g mysql -M -r -d /opt/lib/mysql -s /sbin/nologin -c "MySQL Server" mysql
- chown -R mysql:mysql /opt/var/mysql
Configure:
- Install default database: /opt/mysql/bin/mysql_install_db --user=mysql
Since this command is run as root, specify the --user option to operate command as user mysql.
Creates help database with SQL script: /opt/mysql/share/mysql/fill_help_tables.sql - Start mySQL database: /opt/mysql/bin/mysqld_safe --user=mysql &
- /opt/mysql/bin/mysqladmin -u root password 'new-password'
- /opt/mysql/bin/mysqladmin -u root -h yoserver2 password 'new-password'
- See tutorial above for use and administration.
- Check defaults: (Defaults from config file: /opt/var/my.cnf)
- /opt/mysql/bin/my_print_defaults --config-file=my client mysql
- /opt/mysql/bin/my_print_defaults --config-file=my client mysql mysql_install_db
- myisamchk - Check and repair of ISAM tables.
- myisamlog - Write info about whats in an ISAM log file.
- msql2mysql
- my_print_defaults
- myisamchk
- myisamlog
- myisampack
- mysql - text-based client for mysqld, a SQL-based relational database daemon
- mysql_config
- mysql_convert_table_format
- mysql_find_rows
- mysql_fix_privilege_tables
- mysql_install_db
- mysql_setpermission
- mysql_zap - a perl script used to kill processes
- mysqlaccess - Create new users to mysql.
- mysqlbinlog
- mysqlbug
- mysqlcheck
- mysqld_multi - Used for managing several mysqld processes running in different UNIX sockets and TCP/IP ports.
- mysqldump - text-based client for dumping or backing up mysql databases , tables and or data.
- mysqldumpslow
- mysqlhotcopy
- mysqlimport
- mysqlshow - Shows the structure of a mysql database (databases,tables and columns)
- mysqltest
- pack_isam
- perror - used to display a description for a system error code, or an MyISAM/ISAM table handler error code.
- replace - A utility program to replace changes strings in place in files or on the standard input.
- resolve_stack_dump
- resolveip
Server:
- mysqladmin - A utility for performing administrative operations
- safe_mysqld - Safely start a mysqld daemon on Unix.
- MySQL Workbench - Admin tool for the MySQL database (design and admin) - TUTORIAL
- SQL Workbench/J - Supports many databases (admin) (Java) - TUTORIAL
- Webyog
- phpMyAdmin - Web based
If one would like to generate a GUI interface to the database, I would recommend a web form to a PHP or Java servlet back-end or use a JAVA GUI program and JDBC. See the YoLinux tutorial on accessing MySQL with JDBC in a Tomcat servlet example.
Источник
- Dump specified database:


