- How to enable Virtualization (VT) on Windows 10 for BlueStacks 4
- How will this help?
- Table of Contents
- 1. Check if Virtualization is enabled/disabled on your PC.
- 2. Check if Virtualization is supported on your CPU.
- 3. Enter BIOS to enable Virtualization.
- 4. Enable Virtualization in your BIOS.
- Run Hyper-V in a Virtual Machine with Nested Virtualization
- Prerequisites
- Configure Nested Virtualization
- Disable Nested Virtualization
- Dynamic Memory and Runtime Memory Resize
- Networking Options
- MAC Address Spoofing
- Network Address Translation (NAT)
- How nested virtualization works
- 3rd Party Virtualization Apps
- Как включить виртуализацию на компьютере с Windows — все о hyper-v
- Как проверить возможна ли виртуализация на вашем ПК?
- Как войти в BIOS для включения виртуализации ?
- Настройка виртуализации для популярных процессоров
- Как активировать виртуализацию на Windows 10 и 8?
How to enable Virtualization (VT) on Windows 10 for BlueStacks 4
How will this help?
This article will guide you through the process of enabling Virtualization on Windows 10.
However, if you want to learn how to enable Virtualization on Windows 7, 8 or 8.1, click on the links below.
NOTE: If you cannot find UEFI Firmware Settings, as shown in the video above, click here for an alternate way to enable Virtualization.
Table of Contents
1. Check if Virtualization is enabled/disabled on your PC.
Before enabling Virtualization, you can check whether it is enabled or disabled through the Task Manager. The steps below will teach you how to do this.
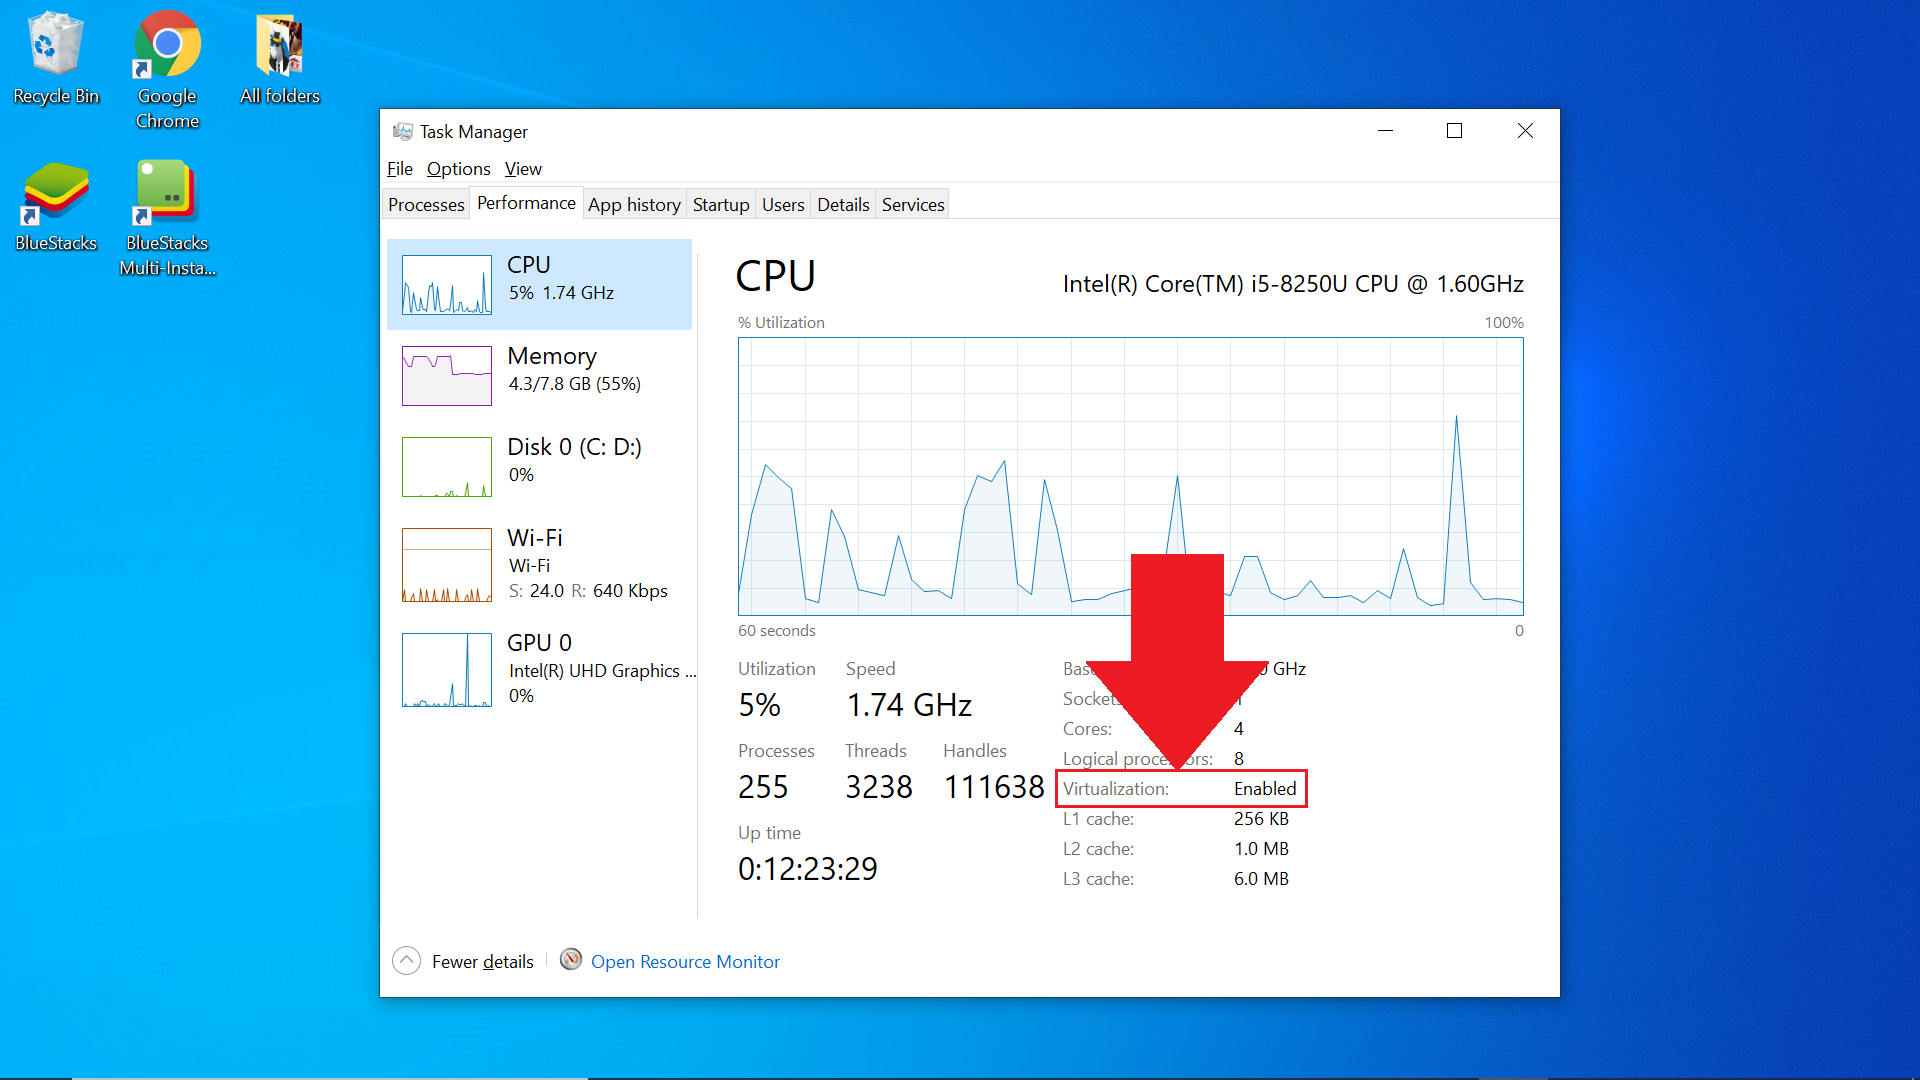
1. O pen up the Task Manager by pressing the Ctrl + Shift + Esc keys. Next, go to the Performance tab.
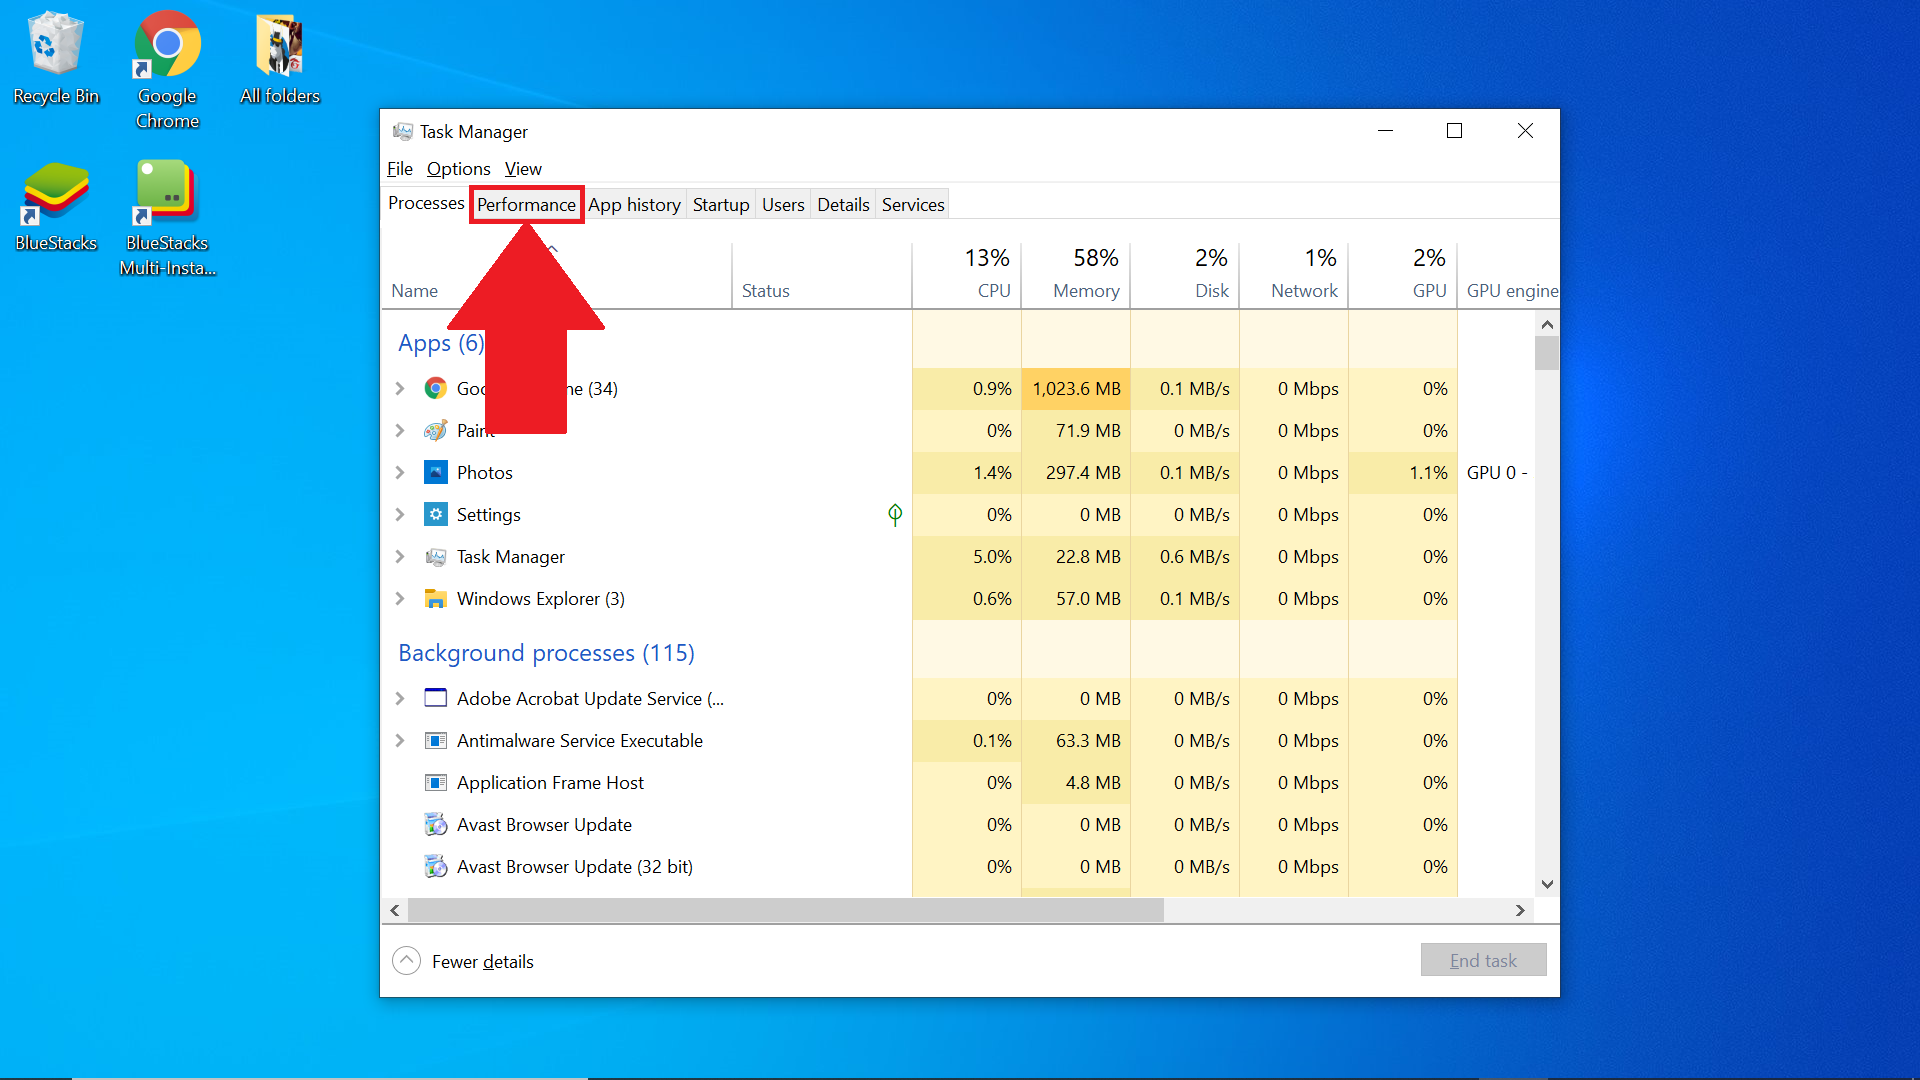
2. Here, you will find information about Virtualization on your PC. If it says Enabled, then Virtualization is turned on. However, if it says Disabled, then Virtualization is turned off.
2. Check if Virtualization is supported on your CPU.
If the CPU inside of your PC has Hardware-Assisted Virtualization, then your PC will support Virtualization. In order to learn if your PC supports virtualization, click on one of the links below, based on your CPU.
Virtualization support on Intel CPU.
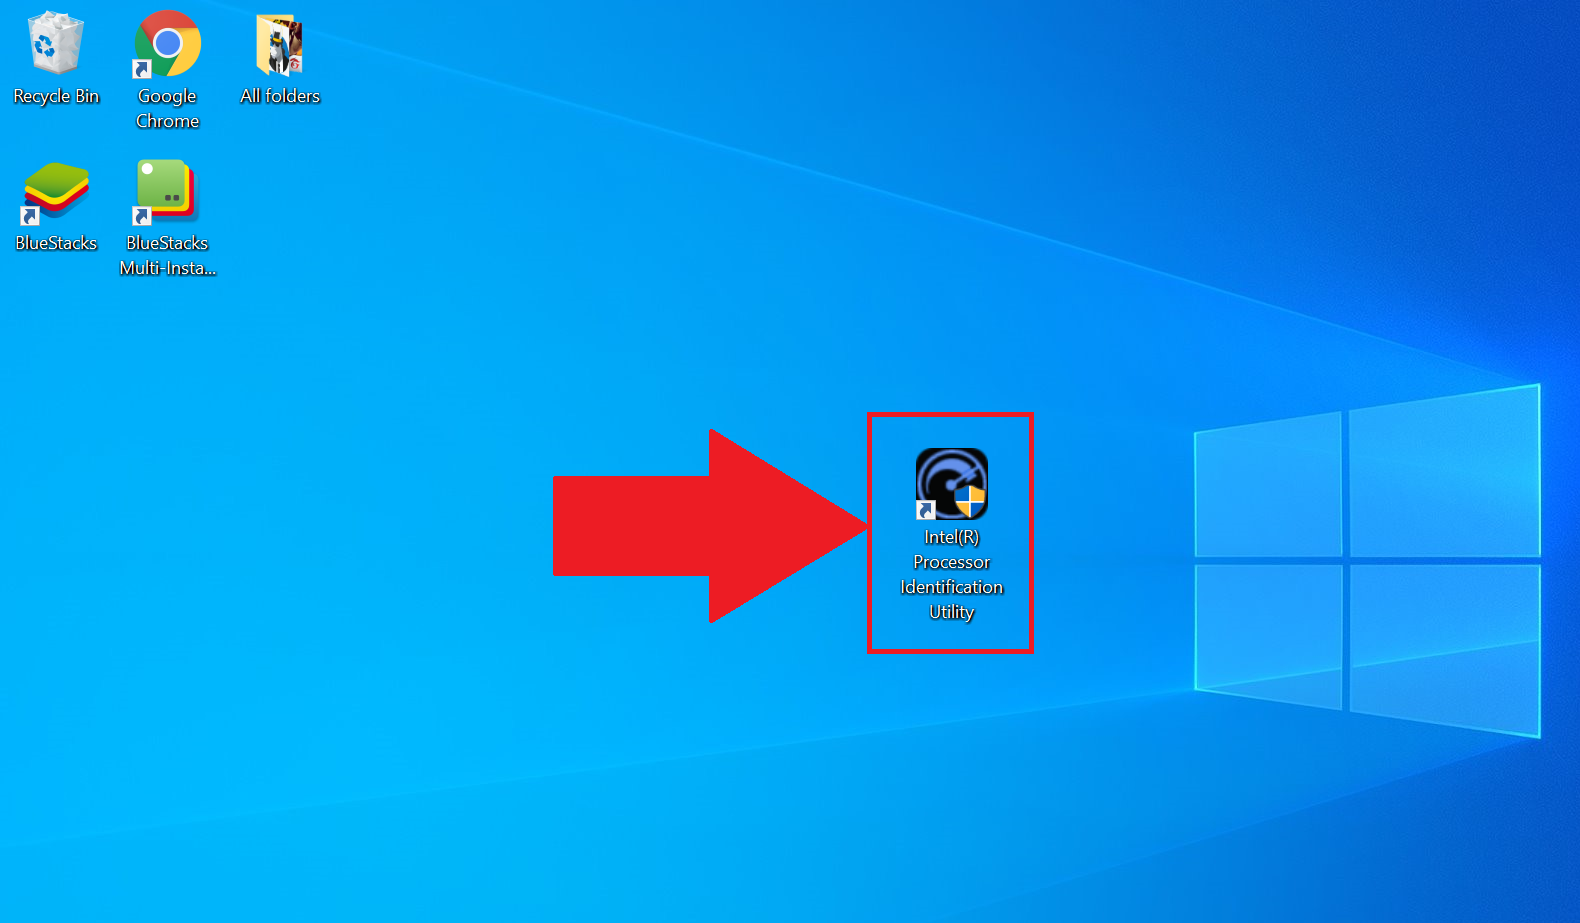
1. Download and install the Intel Processor Identification utility from their official website.
2. Once it is installed, launch it on your PC.
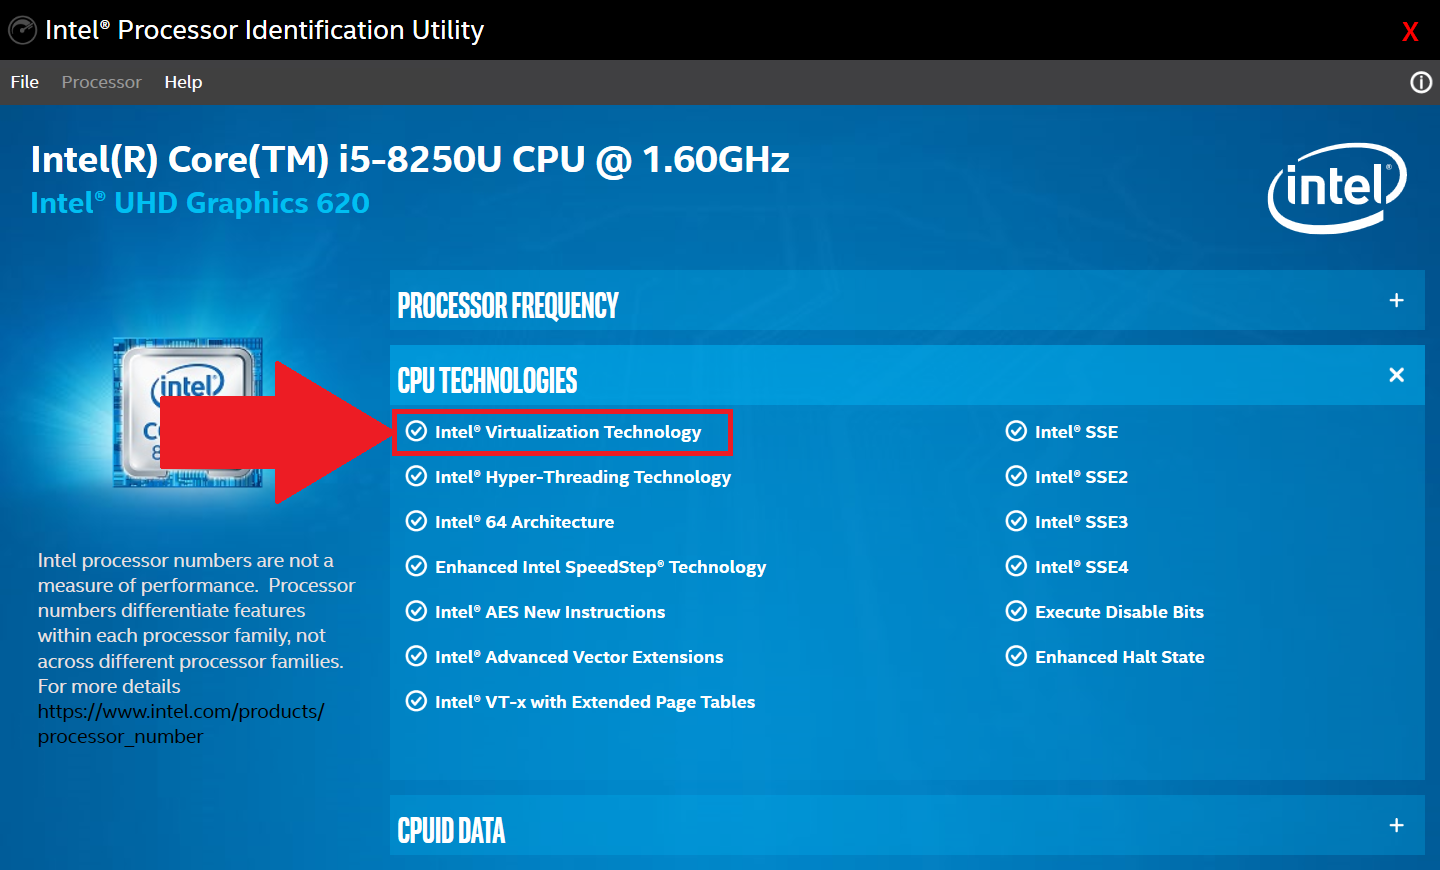
 3. Now, click on the CPU Technologies tab, as shown below.
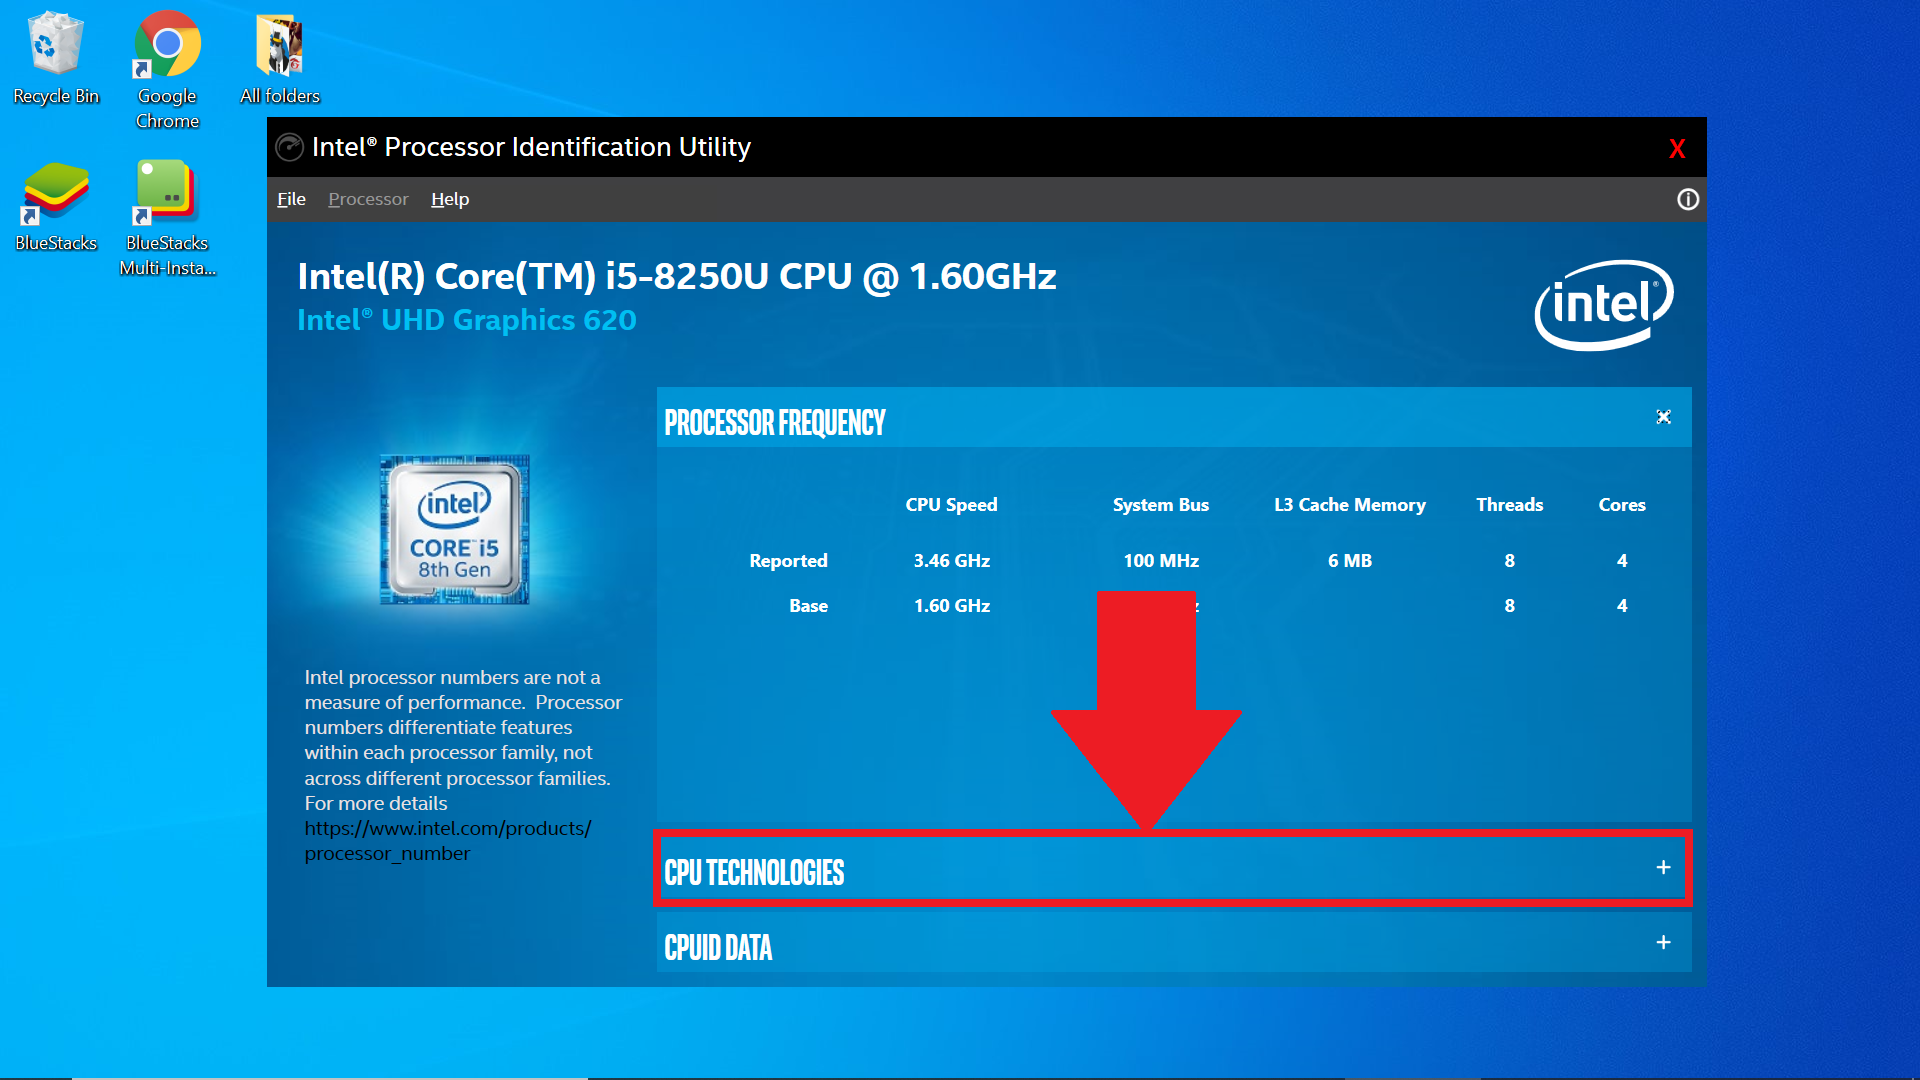 4. A drop-down menu will appear. If there is a tick-mark before «Intel® Virtualization Technology», then Virtualization is supported on your PC.
 To learn the next steps for the process of enabling Virtualization, click here.
Virtualization support on AMD CPU.
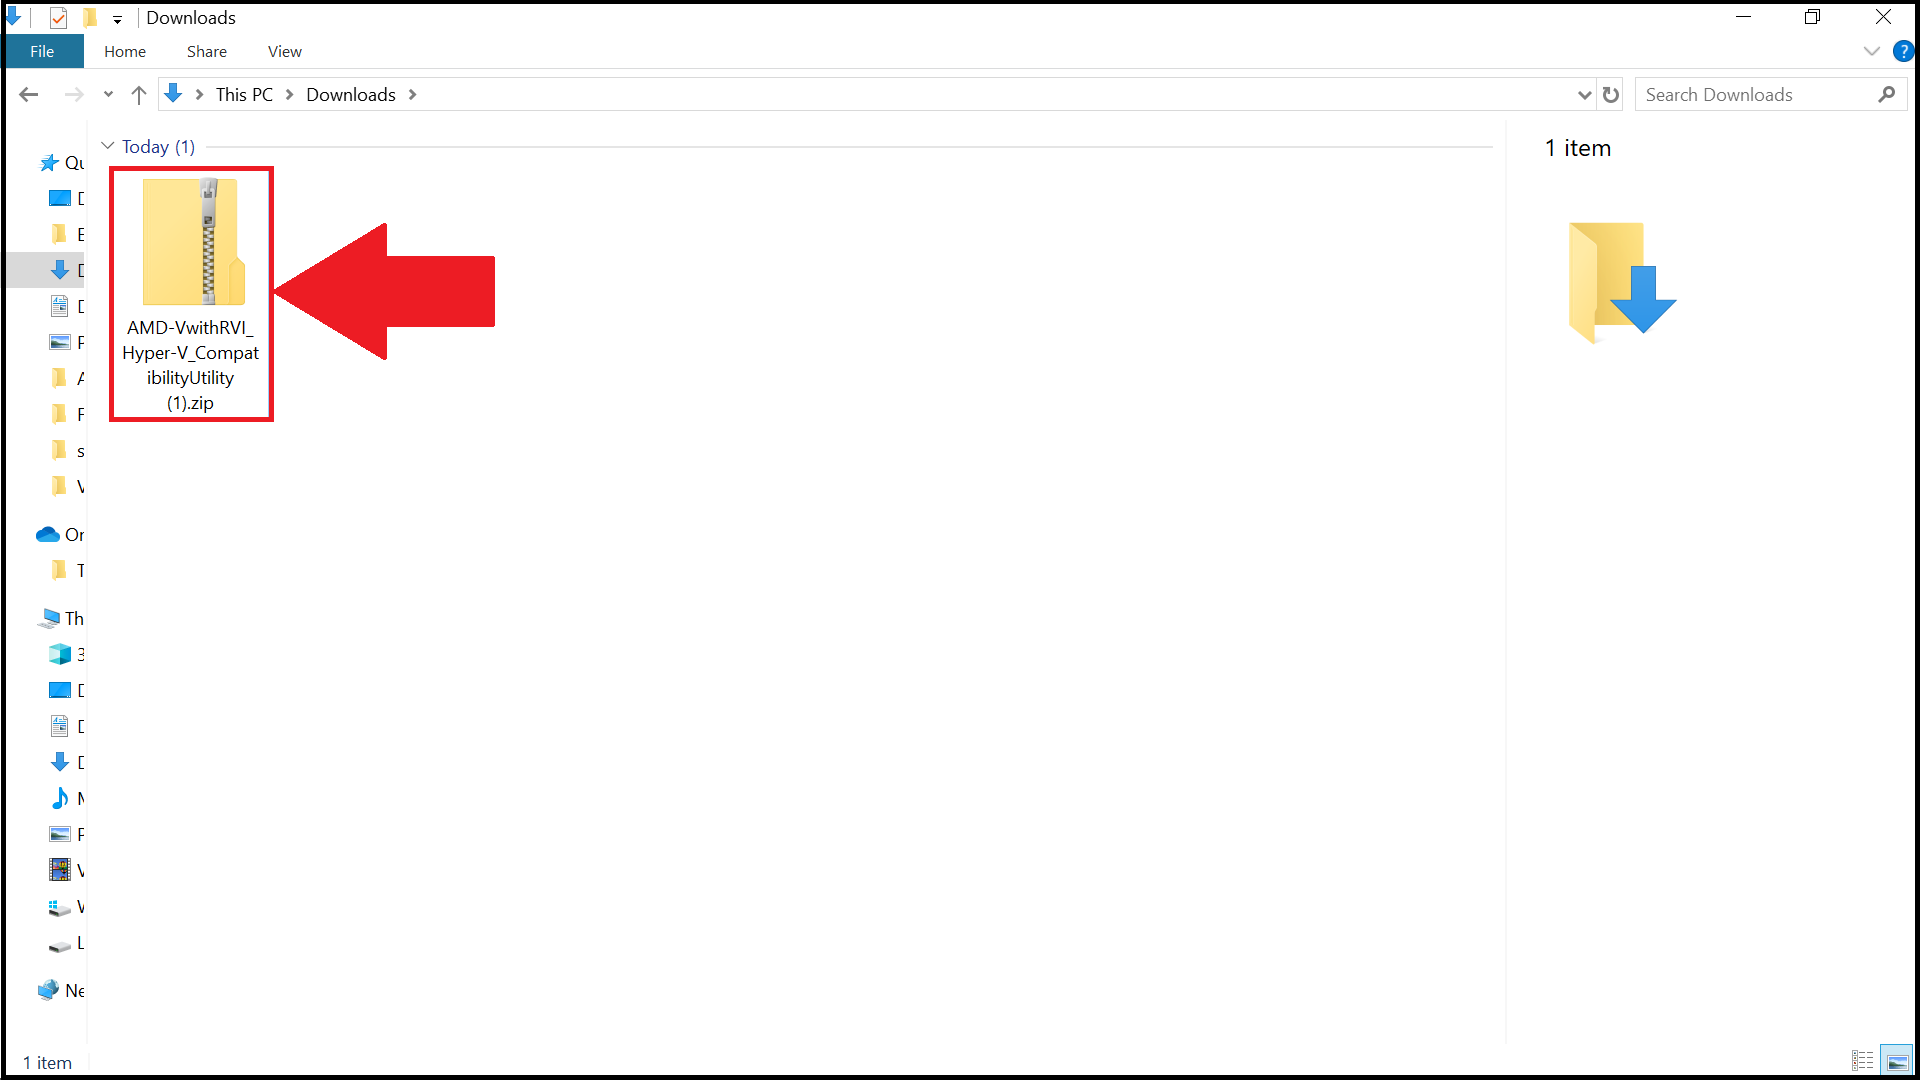
1. Download the AMD-V Detection Utility by clicking here.
2. Now, right-click on the ZIP file for the utility and select Extract All.
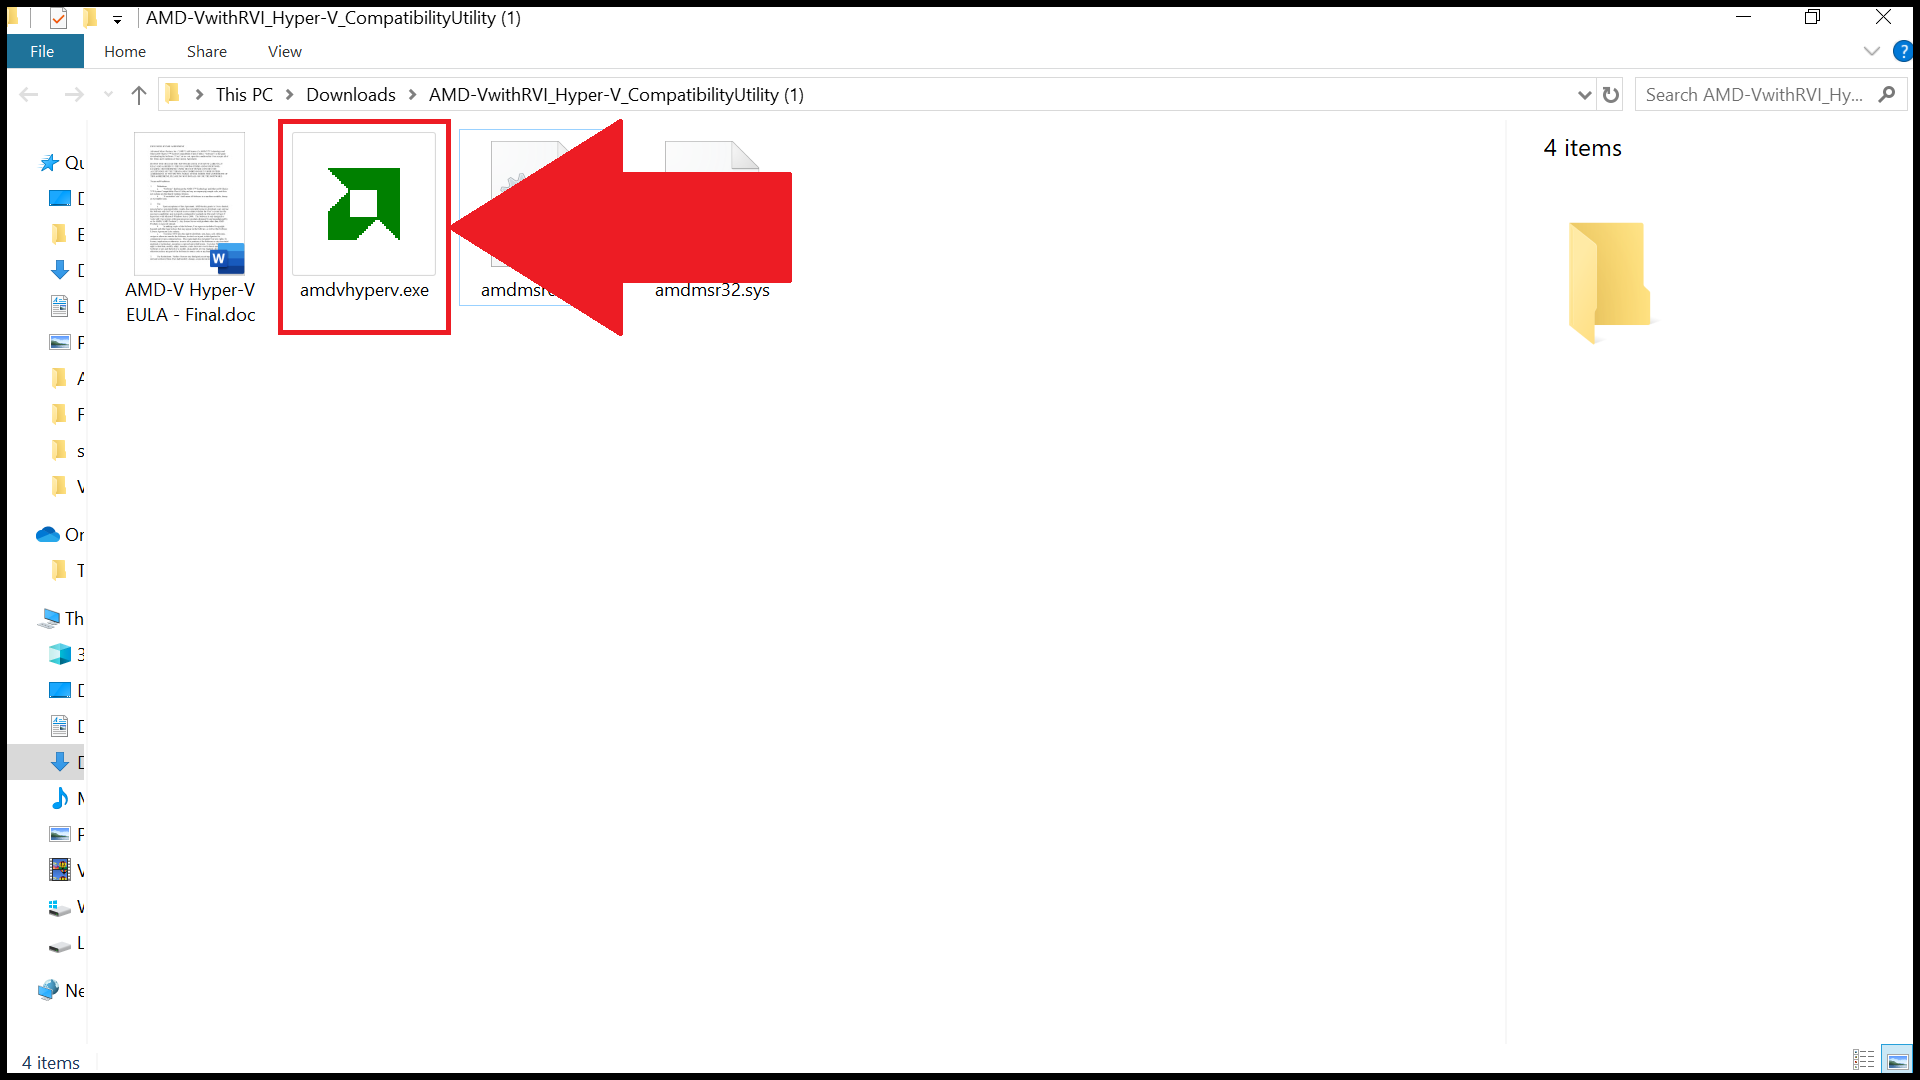
3. Once it’s extracted, right-click on the .exe file for the AMD-V Detection Utility and select Run as administrator.
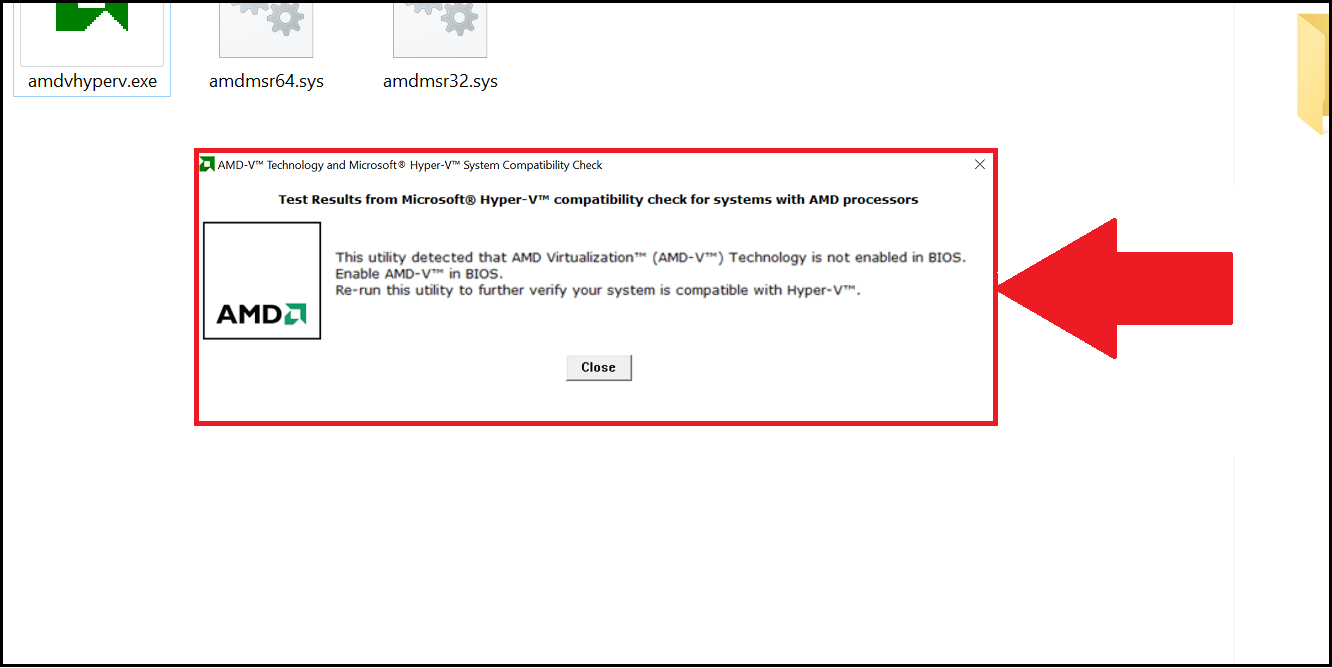
4. You will now be notified about the status of Virtualization on your PC. For example, the image below shows that the PC supports Virtualization, but it is not yet enabled.
3. Enter BIOS to enable Virtualization.
BIOS (Basic Input Output System) is used for performing hardware initialization and also lets you control various attributes and functions in your PC.
By entering your PC’s BIOS settings, you can control the Virtualization process and enable or disable it.
The steps below will teach you how to enter BIOS in Windows 10.
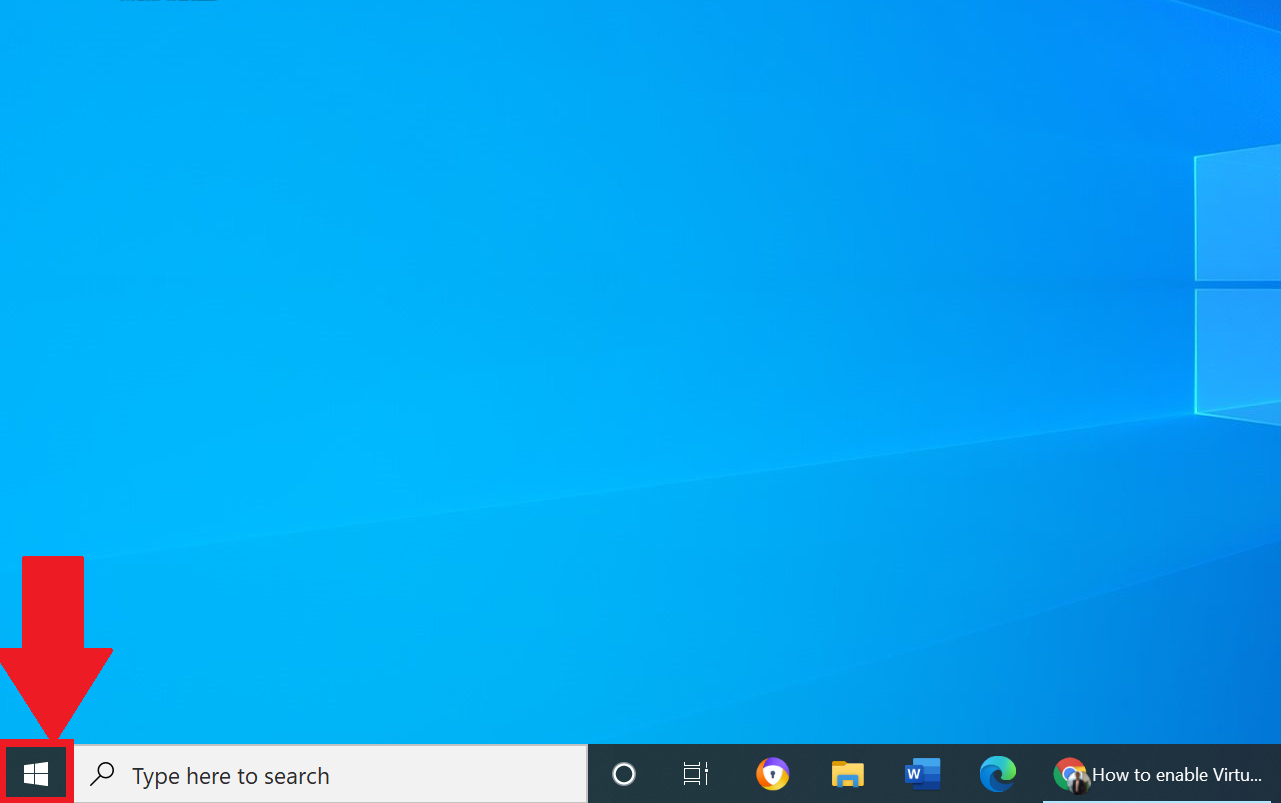
1. Boot up your computer and click on the Start button , as shown below.
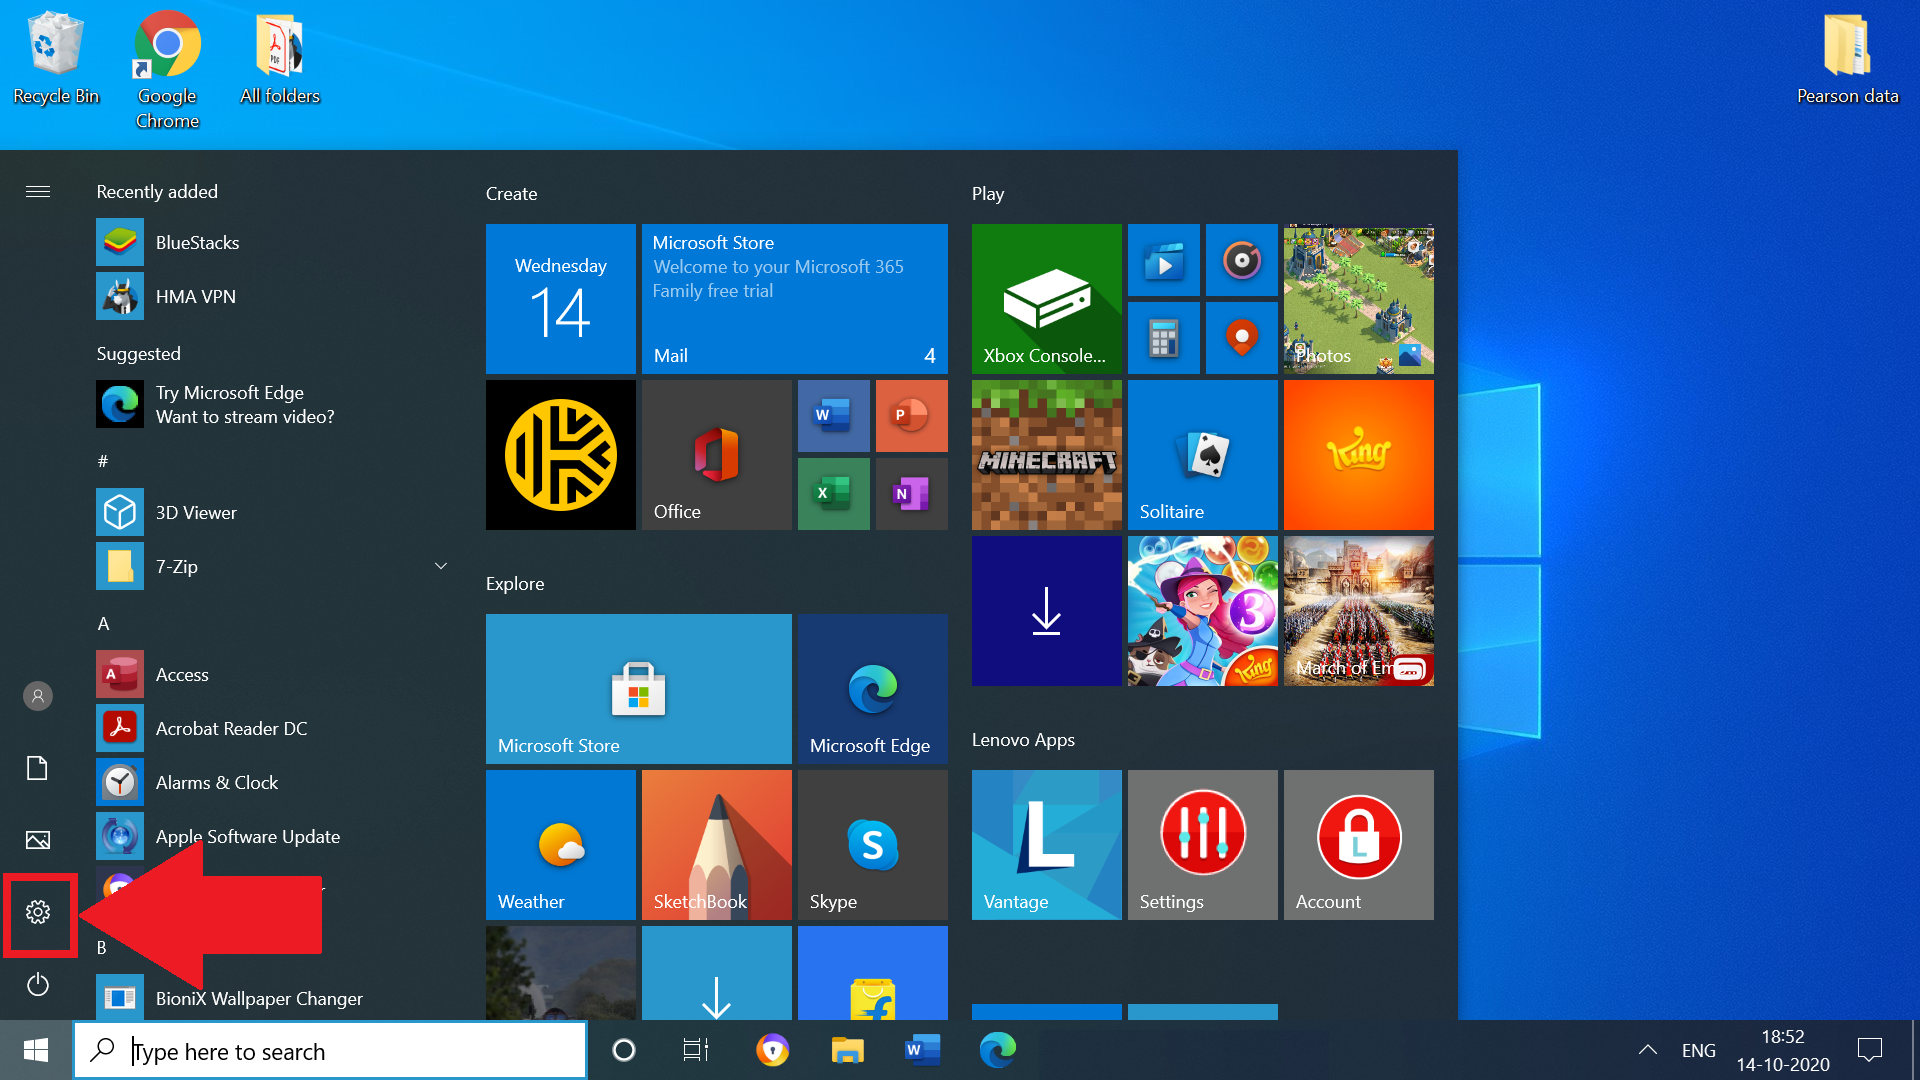
2. The Start menu will now pop open. Here, click on the Settings button.
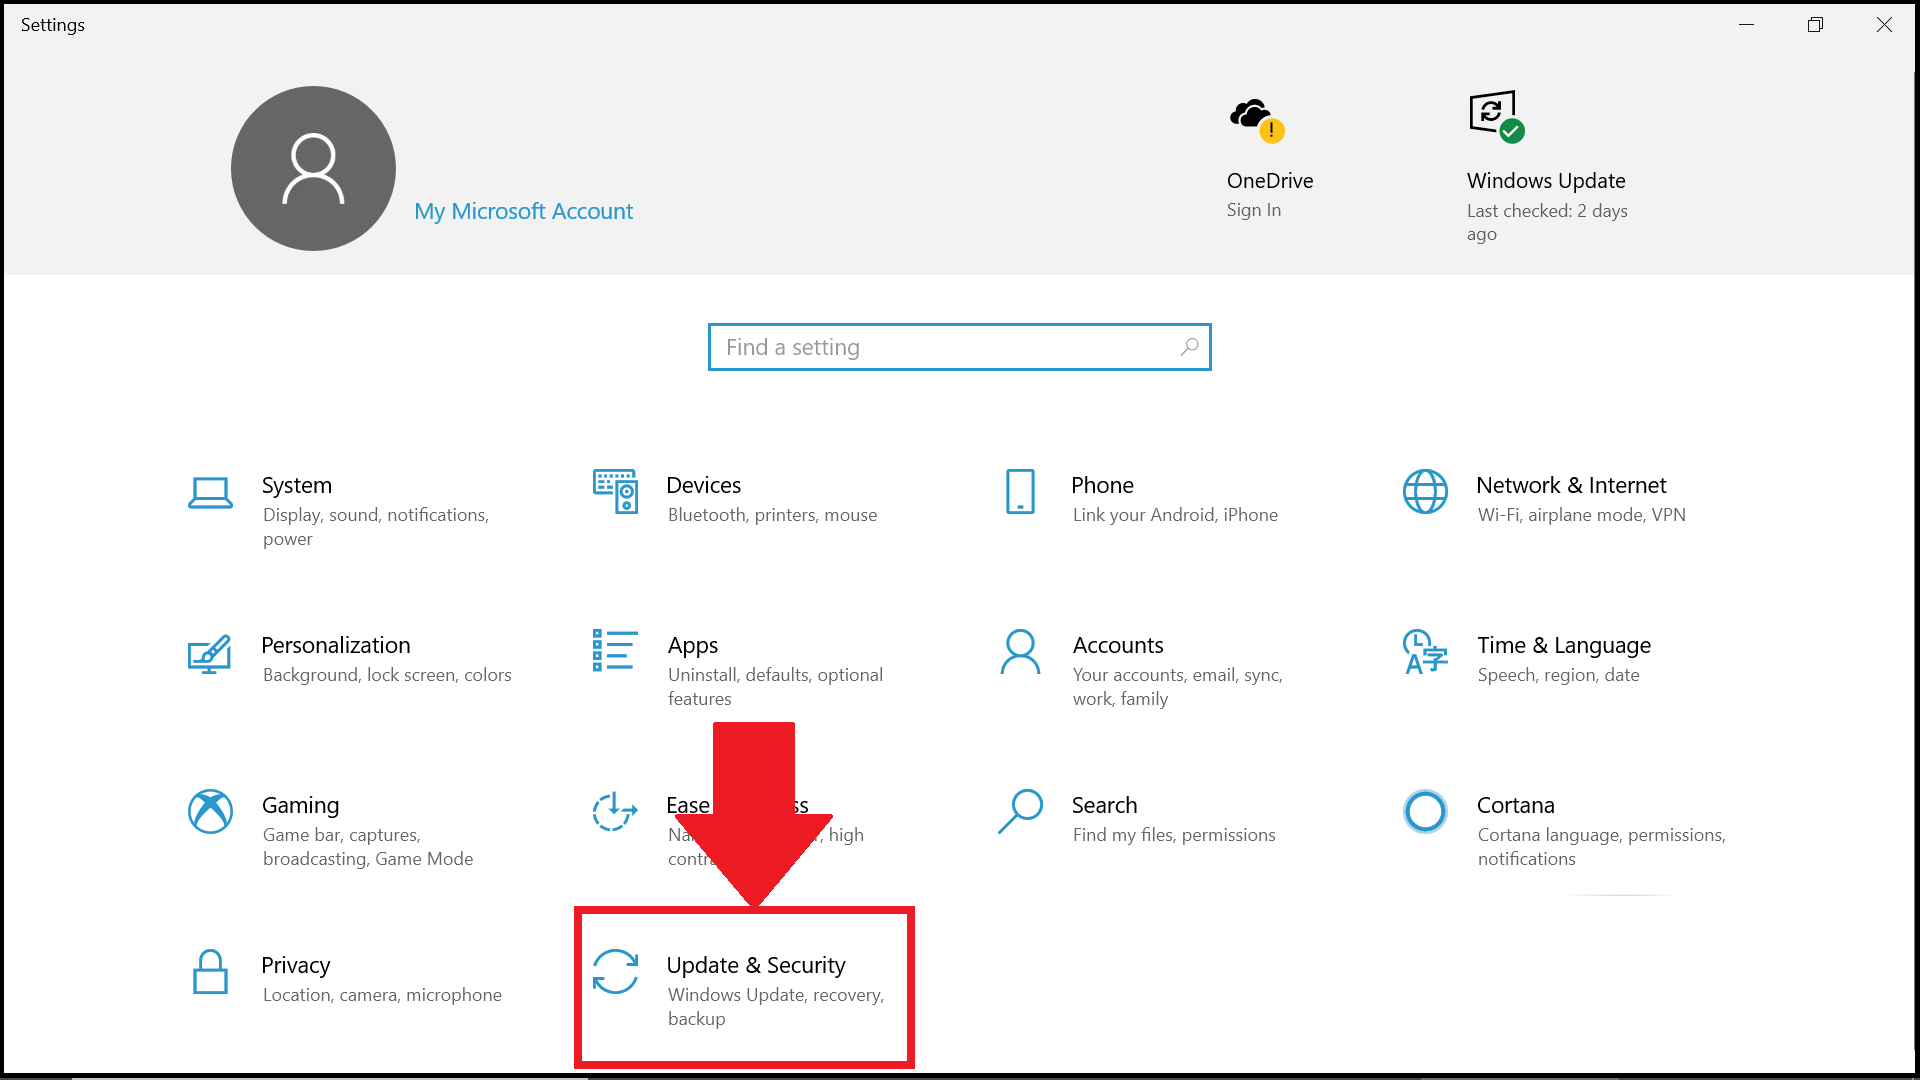
3. The Windows Settings will appear on your computer. Here, open the Update & Security settings.
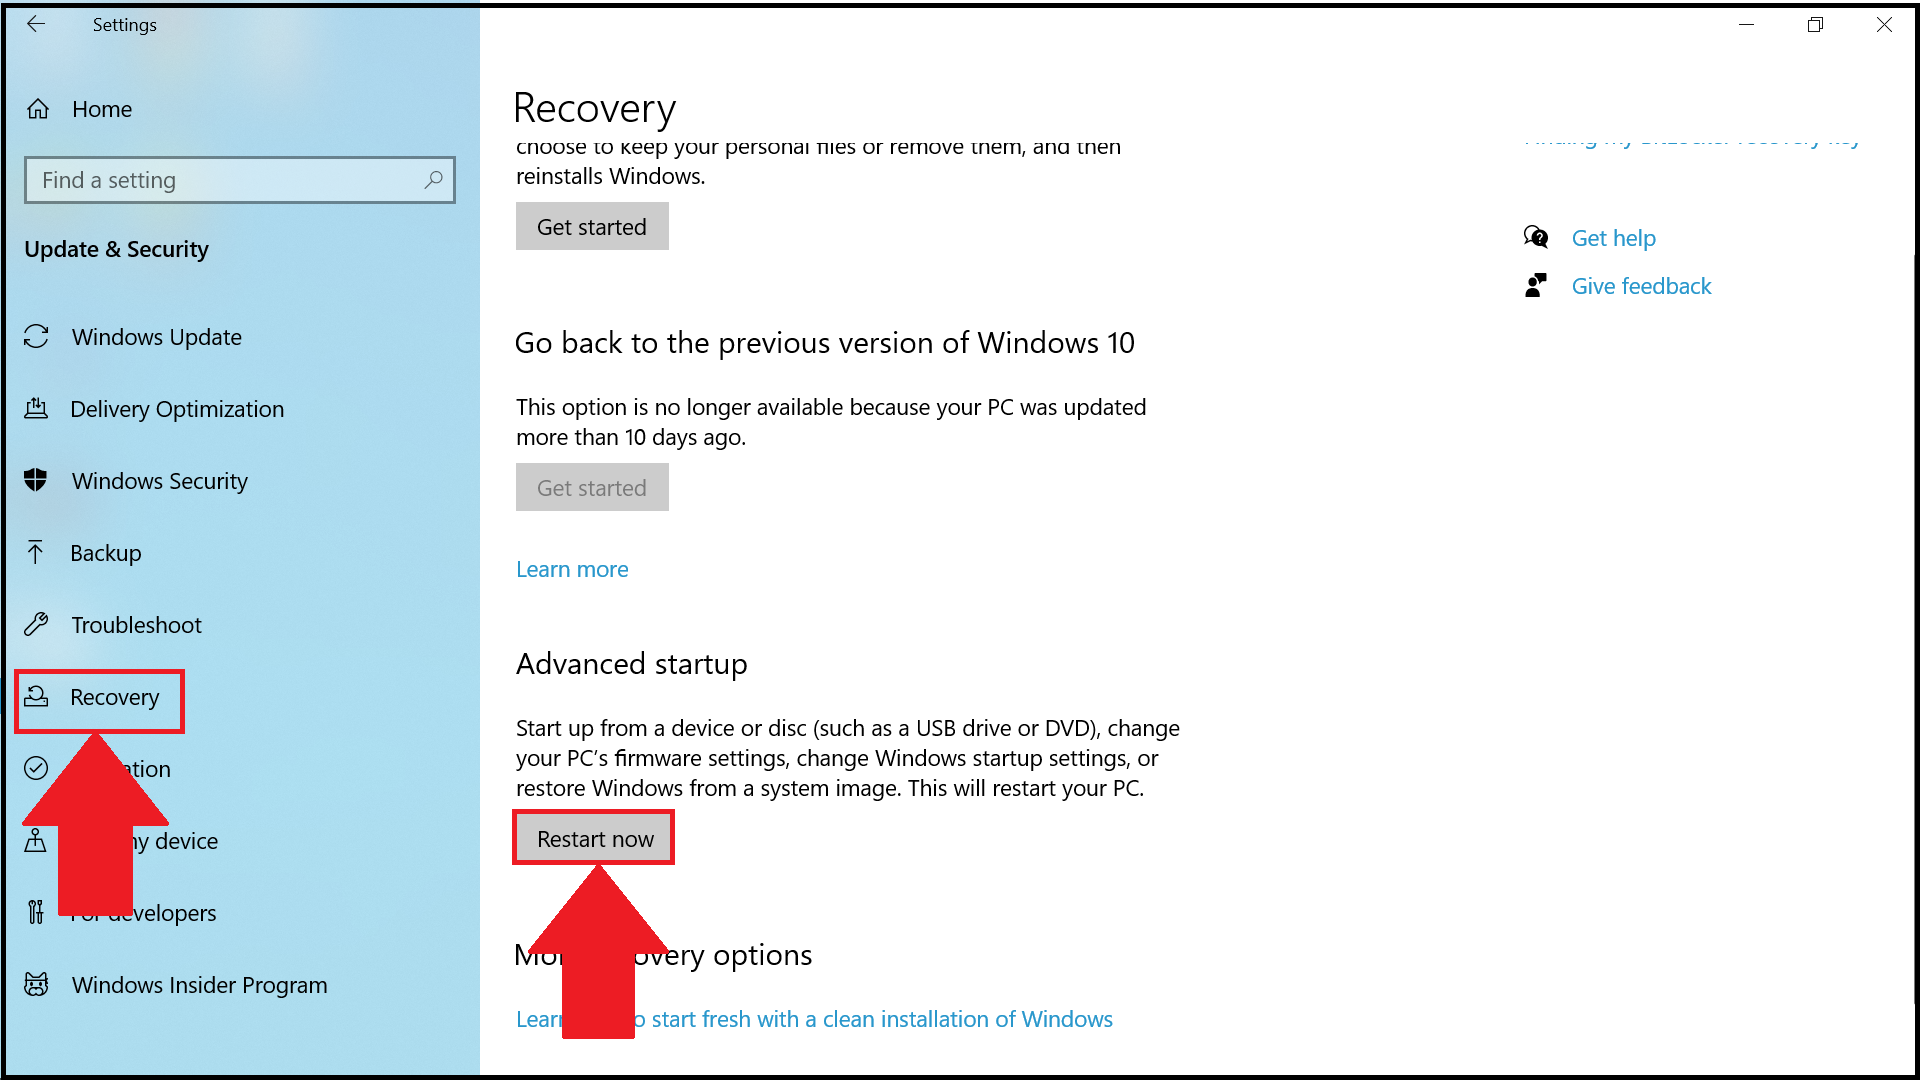
4. Now, go to the Recovery tab and click on Restart now, as shown below.
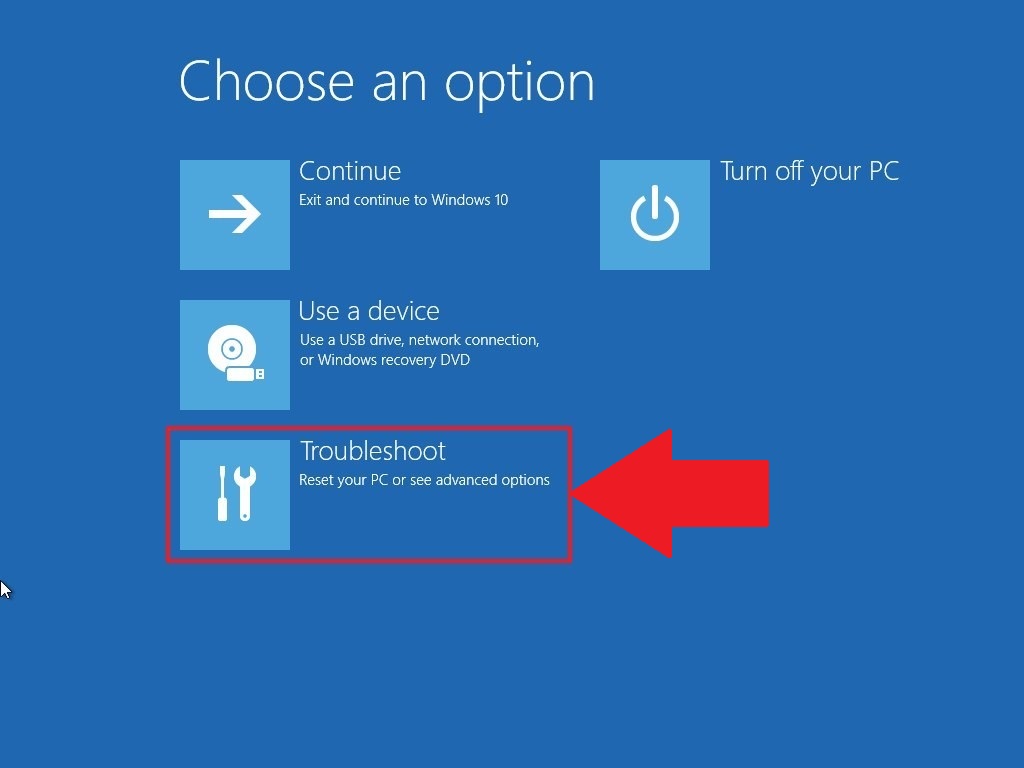
5. You will now be presented with 4 options to choose from. Click on Troubleshoot.
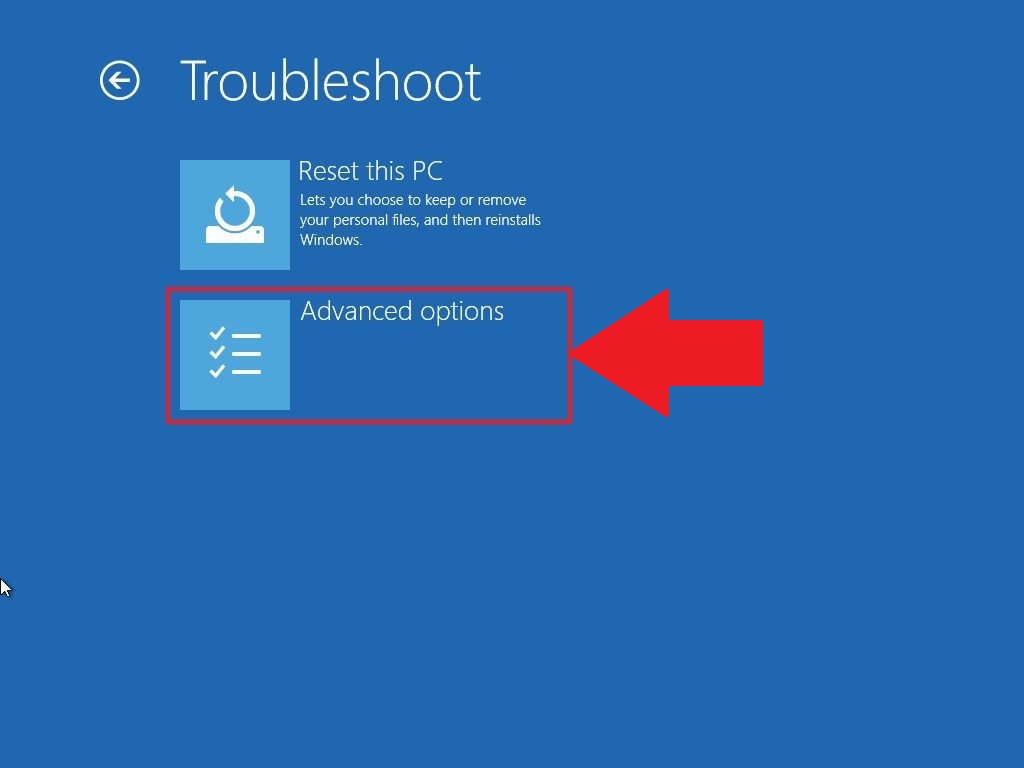
6. Next, click on Advanced Options.
7. Within the Advanced options , select UEFI Firmware Settings, as shown below.
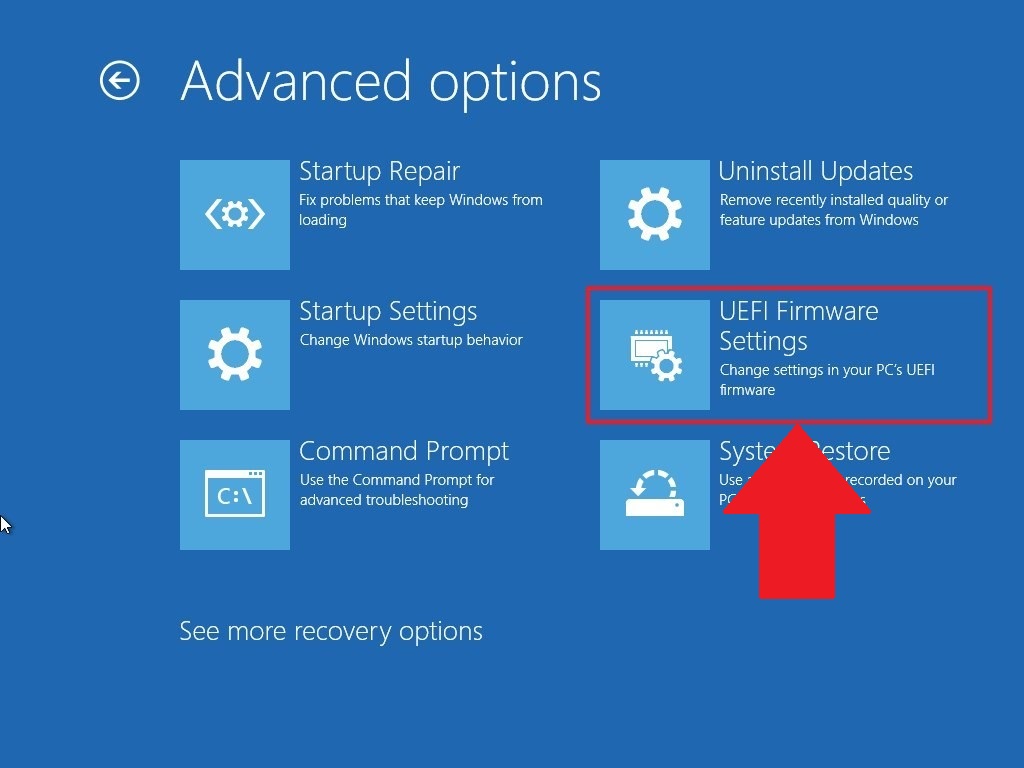
NOTE: If you don’t see UEFI Firmware Settings then disable Fast Startup or refer to this alternate method for accessing your BIOS.
8. You will now be prompted to restart your machine. Click on Restart Now.
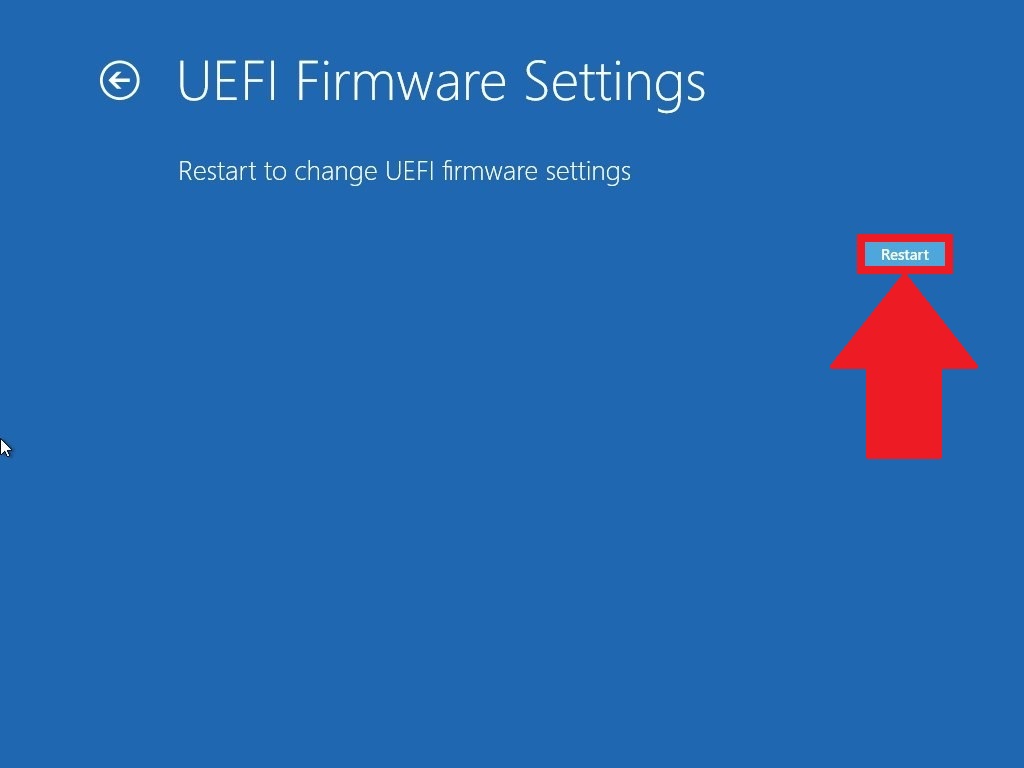
After this step, you will enter the BIOS settings on your PC. To learn how to enable Virtualization, refer to the section below.
4. Enable Virtualization in your BIOS.
Virtualization allows a single processor to run different operating systems simultaneously and it is a requisite for running BlueStacks efficiently.
Once you have entered the BIOS settings in your PC, the steps for enabling virtualization will vary according to the CPU you have. Based on the CPU you have in your PC, click on one of the links below.
Enabling Virtualization in BIOS for Intel CPU.
NOTE: The layout of BIOS Settings can also vary on various other factors such as your motherboard, chipset, computer model and OEM.
1. After entering the BIOS settings, press the F7 key or click on the Advanced Mode button, as shown below.
2. Now, open the Advanced tab, as shown below.
3. Here, you will be presented with various options. Select CPU Configuration.
4. To enable Virtualization, click on Disabled next to «Intel Virtualization Technology» and change it to Enabled.
5. Lastly, click on Exit and select «Save changes & reset».
NOTE: The nomenclature may vary depending on your PC model, but in all cases make sure to save before exiting.
Enabling Virtualization in BIOS for AMD CPU.
NOTE: The layout of BIOS Settings can also vary on various other factors such as your motherboard, chipset, computer model and OEM.
1. Within the BIOS settings, press the F7 key or click on the Advanced Mode option, as shown below.
2. Now, navigate to the Advanced tab.
3. Find and select CPU configuration.
4. To enable Virtualization, open the drop-down menu next to «SVM Mode» and choose Enabled.
5. Next, click on Exit.
6. You will now be asked to save your changes. Click on OK to apply the changes you have made to BIOS settings.
Run Hyper-V in a Virtual Machine with Nested Virtualization
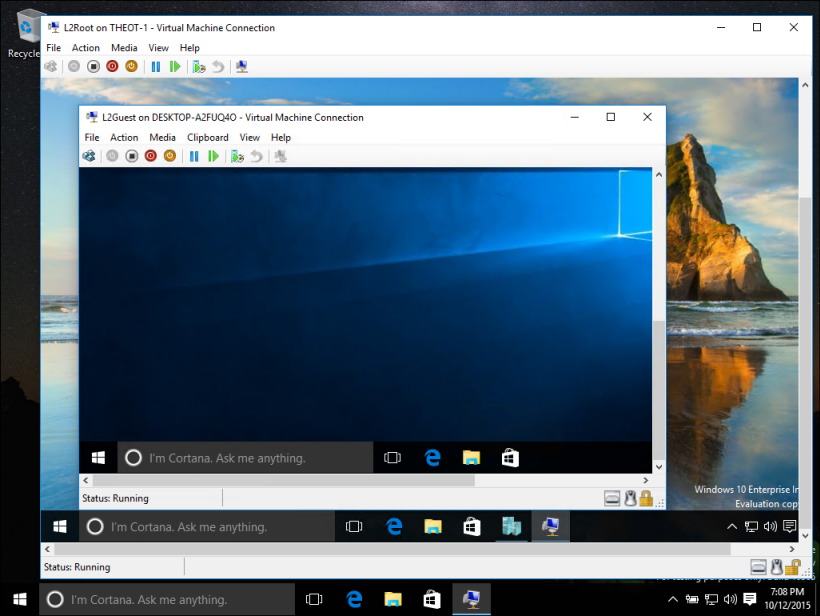
Nested virtualization is a feature that allows you to run Hyper-V inside of a Hyper-V virtual machine (VM). This is helpful for running a Visual Studio phone emulator in a virtual machine, or testing configurations that ordinarily require several hosts.
Prerequisites
- The Hyper-V host and guest must both be Windows Server 2016/Windows 10 Anniversary Update or later.
- VM configuration version 8.0 or greater.
- An Intel processor with VT-x and EPT technology — nesting is currently Intel-only.
- There are some differences with virtual networking for second-level virtual machines. See «Nested Virtual Machine Networking».
Configure Nested Virtualization
- Create a virtual machine. See the prerequisites above for the required OS and VM versions.
- While the virtual machine is in the OFF state, run the following command on the physical Hyper-V host. This enables nested virtualization for the virtual machine.
- Start the virtual machine.
- Install Hyper-V within the virtual machine, just like you would for a physical server. For more information on installing Hyper-V see, Install Hyper-V.
Disable Nested Virtualization
You can disable nested virtualization for a stopped virtual machine using the following PowerShell command:
Dynamic Memory and Runtime Memory Resize
When Hyper-V is running inside a virtual machine, the virtual machine must be turned off to adjust its memory. This means that even if dynamic memory is enabled, the amount of memory will not fluctuate. For virtual machines without dynamic memory enabled, any attempt to adjust the amount of memory while it’s on will fail.
Note that simply enabling nested virtualization will have no effect on dynamic memory or runtime memory resize. The incompatibility only occurs while Hyper-V is running in the VM.
Networking Options
There are two options for networking with nested virtual machines:
- MAC address spoofing
- NAT networking
MAC Address Spoofing
In order for network packets to be routed through two virtual switches, MAC address spoofing must be enabled on the first (L1) level of virtual switch. This is completed with the following PowerShell command.
Network Address Translation (NAT)
The second option relies on network address translation (NAT). This approach is best suited for cases where MAC address spoofing is not possible, like in a public cloud environment.
First, a virtual NAT switch must be created in the host virtual machine (the «middle» VM). Note that the IP addresses are just an example, and will vary across environments:
Next, assign an IP address to the net adapter:
Each nested virtual machine must have an IP address and gateway assigned to it. Note that the gateway IP must point to the NAT adapter from the previous step. You may also want to assign a DNS server:
How nested virtualization works
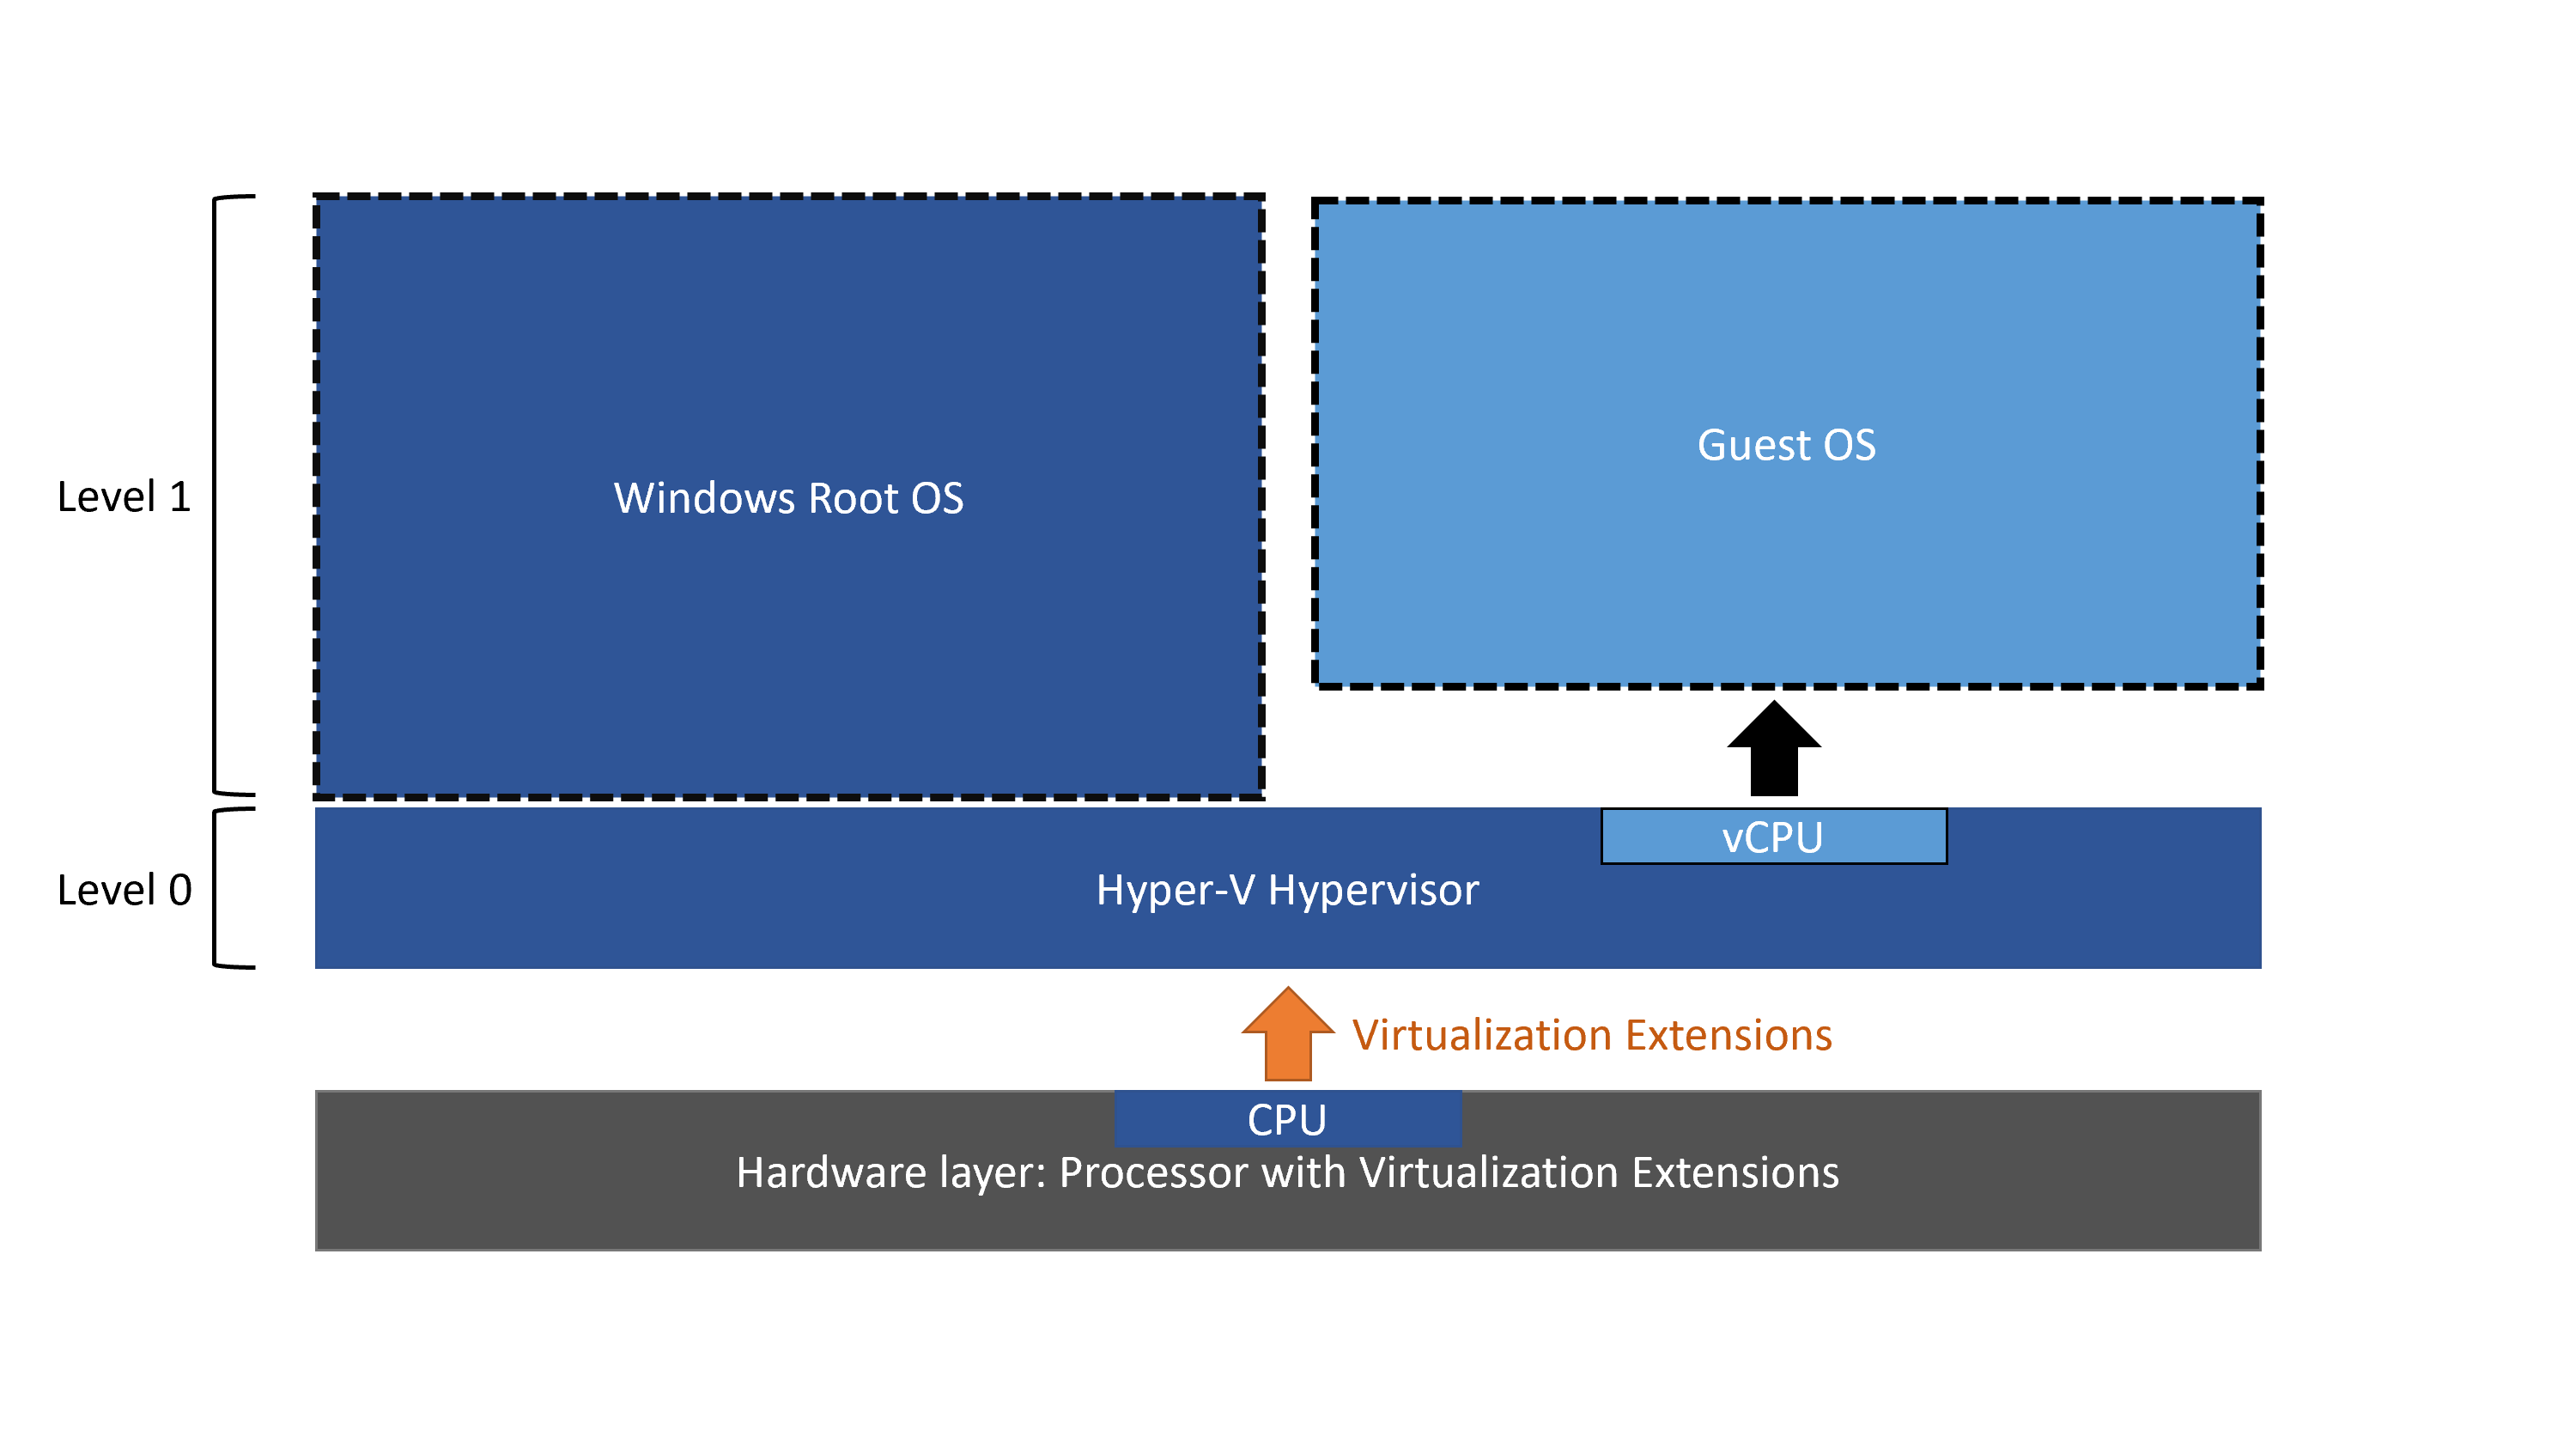
Modern processors include hardware features that make virtualization faster and more secure. Hyper-V relies on these processor extensions to run virtual machines (e.g. Intel VT-x and AMD-V). Typically, once Hyper-V starts, it prevents other software from using these processor capabilities. This prevents guest virtual machines from running Hyper-V.
Nested virtualization makes this hardware support available to guest virtual machines.
The diagram below shows Hyper-V without nesting. The Hyper-V hypervisor takes full control of the hardware virtualization capabilities (orange arrow), and does not expose them to the guest operating system.
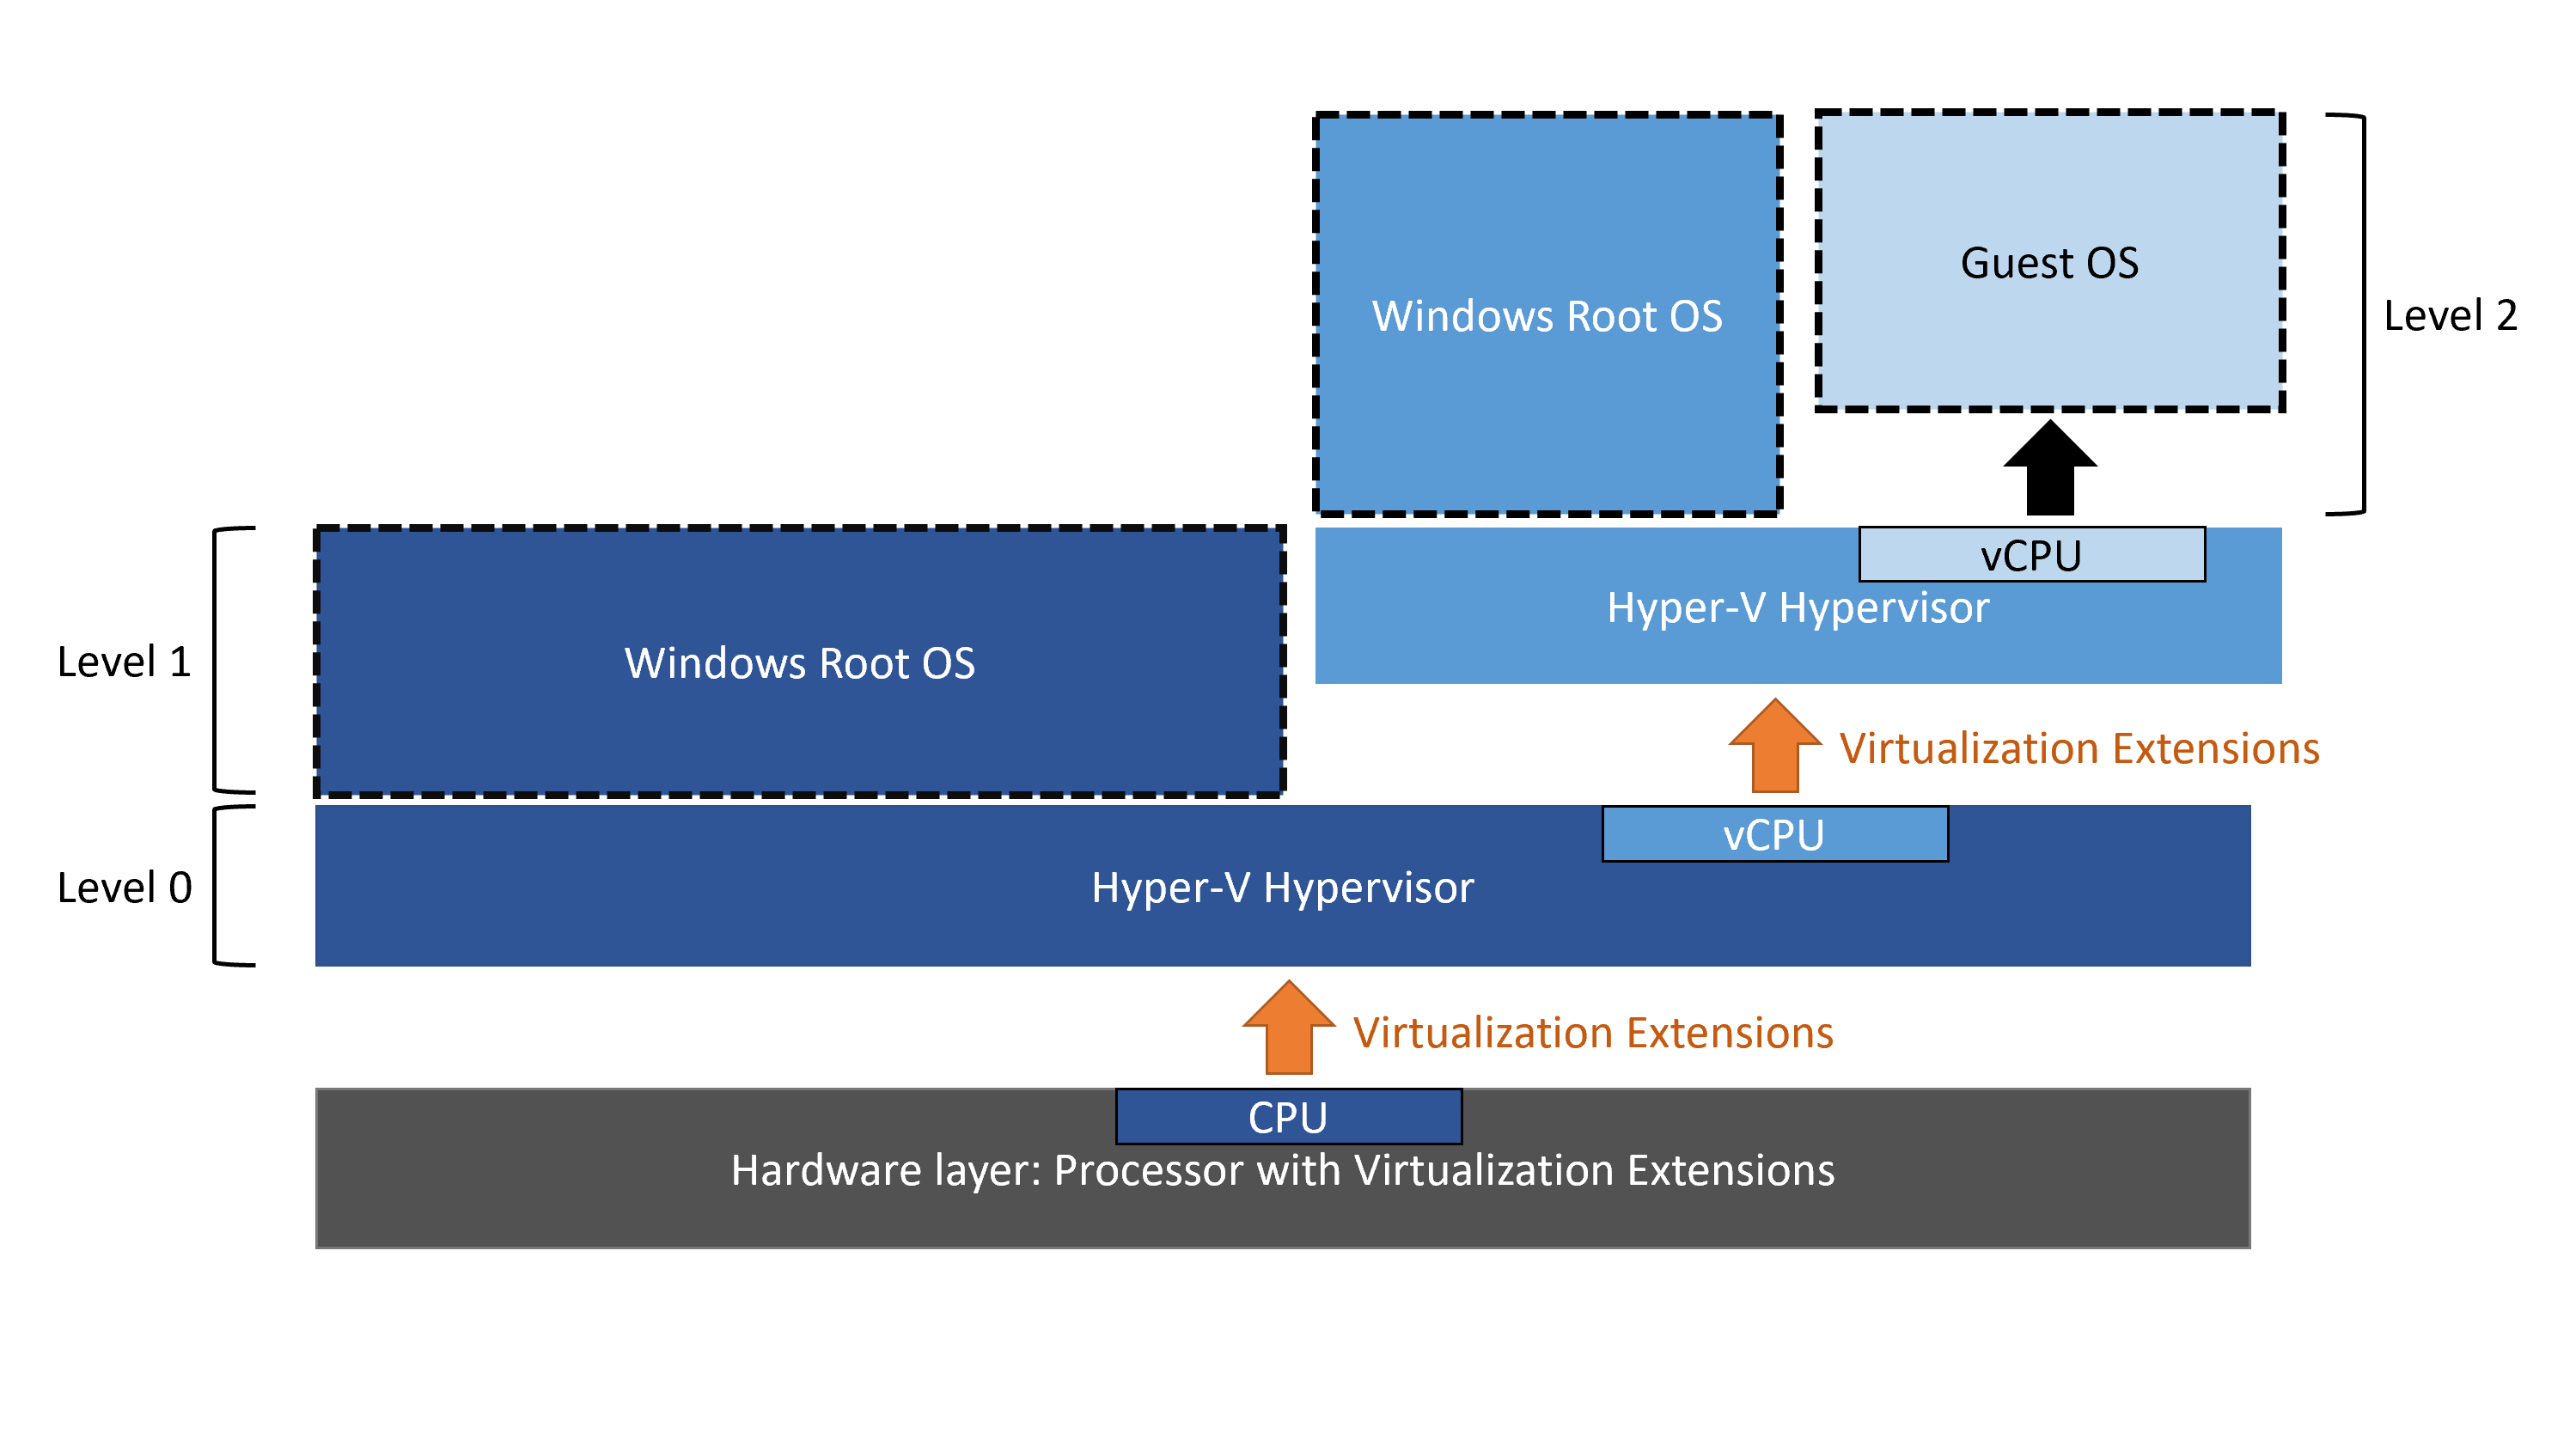
In contrast, the diagram below shows Hyper-V with nested virtualization enabled. In this case, Hyper-V exposes the hardware virtualization extensions to its virtual machines. With nesting enabled, a guest virtual machine can install its own hypervisor and run its own guest VMs.
3rd Party Virtualization Apps
Virtualization applications other than Hyper-V are not supported in Hyper-V virtual machines, and are likely to fail. This includes any software that requires hardware virtualization extensions.
Как включить виртуализацию на компьютере с Windows — все о hyper-v

Виртуализация позволяет пользователям запускать некоторые программы, и даже операционные системы в виртуальной машине, а не ставить их на жесткий диск. Изначальной возможностью пользовались тестировщики, которые работали с новыми программными продуктами. С ее помощью они защищали свою операционную систему от повреждения или вирусов. Сейчас у каждого пятого пользователя стоят эмуляторы для виртуализации рабочей среды Android или принадлежащей к другим операционным системам. Если вы решили использовать защищенную рабочую среду в своем компьютере, то необходимо знать, как включить виртуализацию в Windows .
Как проверить возможна ли виртуализация на вашем ПК?
По умолчанию в операционные системы не включают в себя программы, позволяющие оценить возможность виртуализации. По этой причине пользователю необходимо предпринять пару действий:
- В десятой версии операционной системы для того, чтобы уточнить модель процессора, откройте «Диспетчер задач» при помощи сочетания клавиш Ctrl + Alt + Del . Этот способ вызова этого системного компонента работает во всех версиях операционной системы. Затем перейдите во вкладку «Производительность», над верхним графиком вы увидите полную модель процессора. Есть еще один способ уточнения модели, работающий с операционными системами более старых версий. Найдите на рабочем столе иконку «Компьютер», щелкните по ней правой кнопкой мыши, а затем выберите пункт «Свойства» из списка. Перед вами появятся параметры компьютера, в том числе и наименование процессора, который в нем стоит.
- Теперь вам нужно зайти на сайт производителя вашего процессора и скачать с него утилиту, которая предназначена для идентификации ЦП (Intel Processor Identification Utility, AMD-V или другую). Вам необходимо найти вкладку или сноску CPU Technologies или похожую на нее. В ней нужно найти строку, связанную с виртуализацией и посмотреть статус.
В качестве альтернативного способа проверки возможностей процессора стоит использовать поиск в Интернете. Забейте модель своего процессора и задайте системе вопрос, поддерживает ли он виртуализацию.
Как войти в BIOS для включения виртуализации ?
Если вы проверили процессор и узнали, что на нем возможно применение виртуализации, то перед вами встает следующий вопрос – как в биосе включить виртуализацию. Windows 10 по умолчанию требует использования этого сервиса, но иногда настройки приходится вводить вручную.
Для начала вам потребуется перейти в BIOS . Для его запуска необходимо читать информацию на стартовой заставке при запуске компьютера. На ней обычно указывается, какой клавишей в диапазоне от F 1 – F 12, производится установка. Ориентируйтесь на слово Setup .
Есть альтернативный способ запуска Bios прямо из Windows:
- откройте раздел параметров компьютера;
- зайдите в настройки, отвечающие за его обновление и безопасность;
- выберите вкладку «Восстановление»;
- остановитесь на пункте с особыми вариантами загрузки;
- откройте пункт диагностика;
- в параметрах найдите вариант встроенное ПО.
После выбора этого пункта, компьютер перезагрузится, автоматически запустив BIOS . Первый вариант запуска проще. Если вы часто общаетесь с системными настройками, то проблем с переходом к ним не возникнет.
Настройка виртуализации для популярных процессоров
Устройство BIOS зависит от производителя вашего процессора и компьютера. Важно знать, где искать нужный пункт. Приведенные алгоритмы можно также использовать, чтобы решить проблему, как проверить, включена ли виртуализация Windows .
Intel

С этим процессором в BIOS необходимо работать по следующему алгоритму:
- найдите вкладку Advanced ;
- в ней перейдите в CPU Configuratio n ;
- перед вами появится список, в котором нужно найти строку Intel Virtualization Technology;
- смените напротив этой строки параметр с Disable на Enable;
- подтвердите свои действия.
После этого компьютер перезапустится и вы сможете пользоваться виртуализацией без ограничений. Если в строке напротив Intel Virtualization Technology стояло Enable, то ничего менять не нужно – на этом уровне все уже настроено.
Работа с настройкам и в этом случае не будет отличаться от описанной выше. Изменится лишь только название некоторых пунктов:
- найдите CPU Configuratio n ;
- перед вами появится список, в котором нужно найти строку SVM Mode ;
- смените напротив этой строки параметр на Enable;
- подтвердите свои действия.
После активации этого параметра, вы сможете работать с эмуляторами.
Как активировать виртуализацию на Windows 10 и 8?
Основным отличием десятой версии ОС является то, что у вас не будет особой проблемы решить вопрос, как включить виртуализацию в Windows 10. Вам даже не придется работать с BIOS . Этот параметр управляется из самой операционной системы:
- Вызовите опцию «Выполнить» клавишами Win + R .
- Впишите в строке слово « control ». Подтвердите команду кнопкой « Ок ».
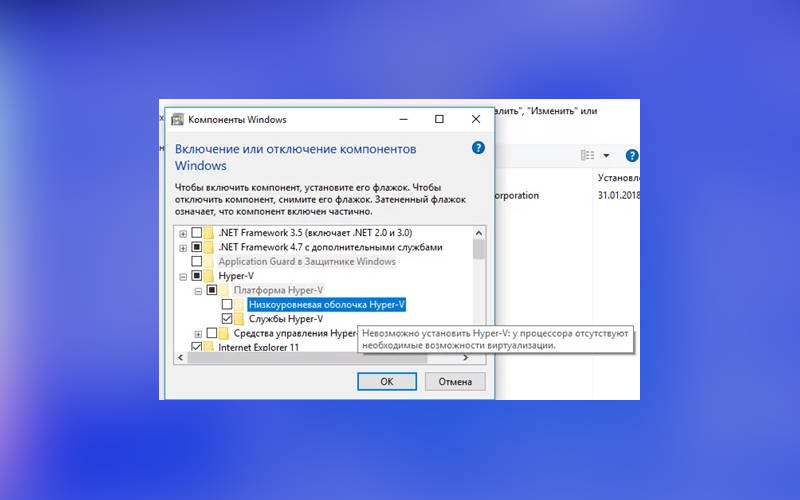
- Перейдите к списку программ и компонентов. Откройте по ссылке раздел активации отдельных компонентов операционной системы.
- Найдите в папках Hyper — V , разверните список подпапок и поставьте галочки напротив каждой из них.
- Сохраните изменения, выйдите из меню и перезагрузите компьютер.
Если вы все правильно сделали, то Hyper — V сразу появится в списке программ. После перезагрузки эта встроенная утилита начнет свою работу. Аналогично включается виртуализация на восьмой версии операционной системы.
В чем особенности настройки виртуализации на Windows 7?
Теперь разберемся, как включить виртуализацию на Windows 7. В отличие от более современных модификаций операционной системы, в «семерке» нет встроенной утилиты для создания виртуальных машин. Если вам потребовалась виртуализация, то необходимо действовать так:
- проверить возможность работы процессора в этом режиме;
- активировать виртуализацию в BIOS ;
- скачать программную утилиту Hyper — V с сайта Microsoft ;
- установить и настроить эту программу.
Есть и альтернативный вариант – обновить операционную систему до десятой версии. Тогда вам не нужно будет долго настраивать многие современные возможности. Если вы пока не готовы переходить на новую ОС, то воспользуйтесь первым вариантом.
Теперь вы знаете, как включить аппаратную виртуализацию в Windows . Напомним, что сделать это можно только в том случае, если ваш процессор поддерживает этот параметр. Если у вас есть вопросы по этой теме, то их можно задать в комментариях. Поделитесь этим тестом с друзьями, вполне вероятно, что они столкнуться с необходимостью решить эту проблему.


