- Will a Clean Install of Windows 10 Delete My Files
- When you should perform a clean install?
- Resetting PC
- Restoring from Recovery Drive
- Reinstalling Windows 10 without losing data
- Clean install without losing data
- Recent Posts
- About Me
- Cleaning the Windows\Installer folder
- Можно ли удалить папку Windows\Installer и файлы из неё
- Можно ли удалять файлы из C:\Windows\Installer в Windows 10
- Как очистить папку Windows\Installer
- Видео инструкция
Will a Clean Install of Windows 10 Delete My Files
Every so often I need to reinstall Windows on my PC. Reasons to do a clean install are various. When I keep installing new applications on my machine, they often run processes on the background and slow down Windows.
Sometimes I need to reinstall because Windows is getting crashed and sometimes when I want to clean malware (clean install does not guarantee to remove viruses, however). At the same time, I don’t want to lose my data.
So, will a clean install of Windows 10 delete your files?
A fresh, clean Windows 10 install will not delete user data files, but all applications need to be reinstalled on the computer after the OS upgrade. The old Windows installation will be moved into the “Windows.old” folder, and a new “Windows” folder will be created.
When you should perform a clean install?
A clean install of Windows is the last resort to go with when all other troubleshooting steps you have tried have been unsuccessful and you want to install or reinstall a clean copy of Windows back on your computer.
A clean install will return your system to the same state it was on the day you first turned your computer on. It means that all files on the primary drive (the C drive) will be gone. Additionally, you will have to reinstall all programs you again (MS Office, Photoshop, Chrome browser, etc.).
Fortunately, there are other options available in Windows besides clean install. Windows allows several recovery options: restoring from a system restore point, resetting PC and restoring from a recovery drive:
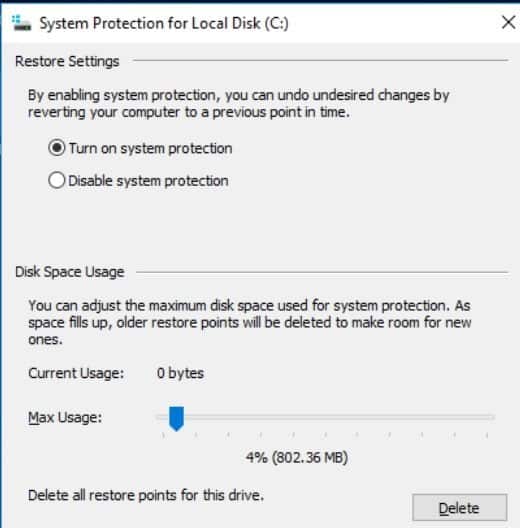 System Protection must be enabled to use restore points
- If your PC is having problems after the new application was installed, you can restore from a previous restore point. However, you can only restore if system protection was enabled. If it wasn’t then this option is not available.
- If a new windows update was installed and PC is having problems, then it is possible to delete newly installed Windows update. Just go to Control Panel, click on Programs, under Programs and Features click on View installed updates. Click on Installed On column to sort updates. Right click on the latest update and Uninstall.
- If the computer does not start and you have a recovery drive, you can use the recovery drive to restore or reset your PC. Most people do not have recovery drives.
- If the computer does not start or Windows is not working well, and you do have recovery drive then try to reset PC.
- In all other cases, you may need to reinstall Windows.
Resetting PC
If the computer is not working well, resetting it might fix the problem. Resetting reinstalls Windows 10 but gives you the option to keep your files.
Steps to reset PC:
- Click the Start button
- Click the Settings button
- In a new “Windows Settings” window find and click Update and Security link
- Click Recovery link
- Under Reset this PC find and click the button “Get started”.

Windows lets you choose from 2 options:
- Keep my files. Selecting this option will remove all installed applications and resets your settings but will keep files on the primary drive.
- Remove everything. As expected, selecting this option will remove all installed applications, resets your settings and delete all files on the primary drive.

Click on Keep my files option. Windows will warn two more times that all apps will be removed.
Click Reset button on the last screen and wait until the reset is finished and computer restarts several times.
- Remove all programs that didn’t come with this PC originally
- Change Windows settings back to their defaults
- Reinstall Windows without removing your personal files
Restoring from Recovery Drive
If you have a recovery drive (doesn’t happen often) then instead of resetting the PC, you can go with Advanced Startup option in Windows Settings -> Recovery menu. Just plug in CD or USB flash recovery drive and click on Restart now button. Windows will restart and start from recovery drive.
Reinstalling Windows 10 without losing data
This method will work only if the PC is bootable. If the PC doesn’t start then you have to perform a clean install.
Steps to reinstall Windows:
1.Plug in USB flash drive to the computer. Make sure that it has enough space for install media (about 3 Gb)
2.Download Windows 10 ISO image using Windows 10 Media Creation Tool.
On the first screen select “Create installation media for another PC” option. Next accept language, architecture, and edition. Choose USB flash drive as media and hit Next. Downloading of the install media will start.
3.Once the install media has been created start Setup.exe in the install media folder. Click Yes when you see the User Account Control dialog.
4.The window Get important updates will pop with two options:
Download and install updates (recommended)
Not right now
Select the first option and hit Next
5.Accept License on the next screen.
6.The setup program will download updates and make sure that everything is ready for install.
7.IMPORTANT STEP. The setup program will show Ready to Install screen. On this screen will see two options:
- Keep personal files and apps
- Change what to keep
- Click on the last option
8.The setup program will let you choose from 3 options:
- Keep personal files and apps
- Keep personal files only
- Nothing

Since you wanted to keep the files you have to choose between the first and second option. Select the first option labeled Keep personal files and apps if you don’t want to lose apps installed from the Store. The apps include apps like Edge or Photos. If you have problems with either one, then select the Keep personal files only option.
9.Click on Install button. The reinstall process will take quite a while to complete.
Clean install without losing data
1.Back up your files just in case. You can use a backup utility that comes with Windows or just copy the files you need either to another drive (other than primary) if you have one or save on external drive.
2.You will need to find the Windows product key. It usually on the computer or laptop itself. If there is no key found, you may need to use third-party tools to extract the product key.
3.Download Windows 10 ISO image using Windows 10 Media Creation Tool.
On the first screen select “Create installation media for another PC” option.
The Media Creation Tool for Windows 10 can be used to download Windows 10 in both 32-bit and 64-bit versions. Most likely your PC is 64 bit, so download 64-bit version. When downloading you have to pick the edition you already have installed: Home or Pro.
If you don’t know which Windows edition you have on your computer then click on Settings button, then click on System link, and About link. On the About screen check System type (32 or 64 bit) and Edition under Windows Specifications.
Now select either USB flash drive or ISO file. If you select ISO file then you would need to burn a DVD later.
4.Restart PC and hit F12. Windows will let you choose the bootable media. Select USB or DVD where ISO was copied to.
5.When setup program starts select Language, Time and Keyboard on the first screen.
6.Hit Install Now on the next screen.
7.Enter Windows Product Key from step 2.
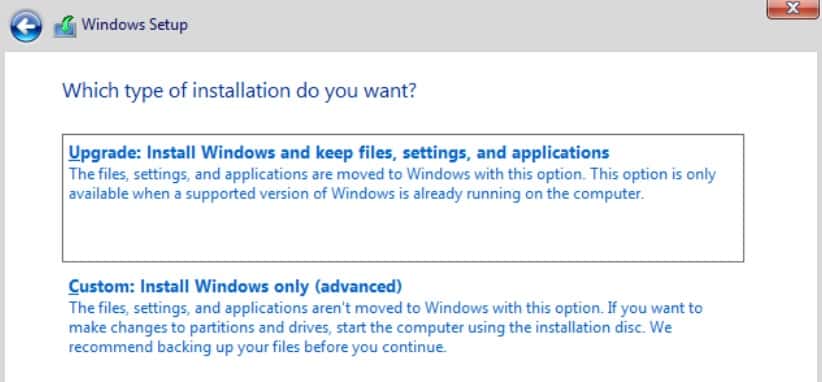
9.The setup program will present 2 options: Upgrade or Custom. Upgrade option is the same as the reinstall process we reviewed above. So select Custom option this time.
10.The setup program will ask Where do you want to install Windows? You have the option to select the drive different from the current primary drive (if you have one). DO NOT DELETE, FORMAT OR EXTEND PARTITIONS!
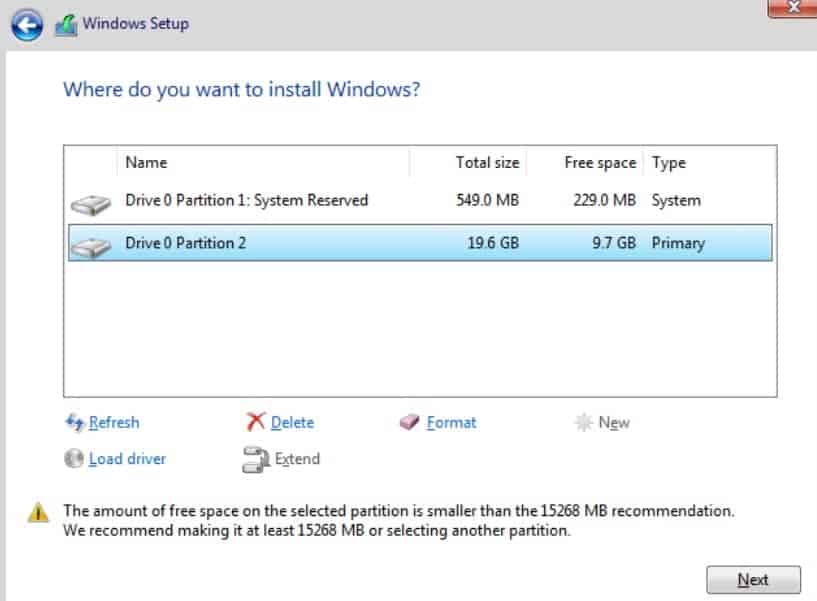
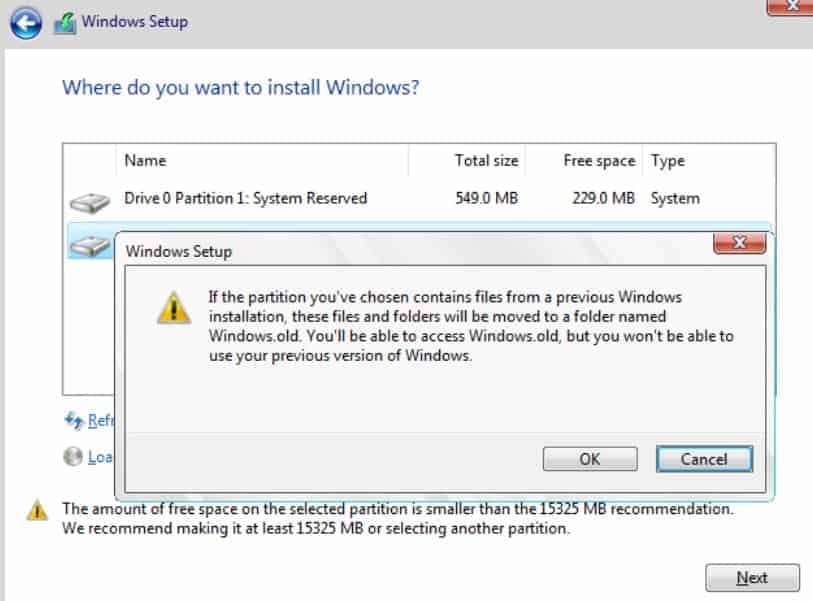
11.If you only have one disk then select the primary partition. You will see the warning that old Windows install will be copied to Windows.old folder.
12.Proceed with Windows install.
At the end, you will have 2 Windows directories and all files will be safe.
Hi, I am Al. I’ve been working with computers for more than 20 years and I am passionate about Apple products. You can reach me at [email protected]
Recent Posts
Setting up your router may be a very foreign idea for most of us since a cyberattack seems highly unlikely until it happens to us. In fact, even famous people are always prone to cyberattacks, so it.
This article will discuss the eligibility of Apple’s AirPods Pro, as well as Beats earphones and headphones for replacement under Apple’s warranty policy.AppleCare and AppleCare+ for.
About Me
Hi, I am Al. I’ve been working with computers for more than 20 years and I am passionate about Apple products. You can reach me at [email protected]
Cleaning the Windows\Installer folder
After installing Windows 10 on my laptop, I noticed that the C:\Windows\Installer folder has now reached 23.8 GB. Since I only have a 128 GB SSD, the size is getting ridiculous. It’s not nearly so large on other Windows installations I’ve checked.
My question is: can I clean this somehow?
Some preemptive notes:
— I have already done all disk cleanup procedures, including system files and old windows installs
— The folder is already compressed
— I gather from other forum posts that programs like msizap and cclean don’t work
— Some of the msi/msp files are super old: like 2008, whereas I bought the laptop in 2013.
Thanks for your help!
Note: This is a non-Microsoft website. The page appears to be providing accurate, safe information. Watch out for ads on the site that may advertise products frequently classified as a PUP (Potentially Unwanted Products). Thoroughly research any product advertised on the site before you decide to download and install it.
194 people found this reply helpful
Was this reply helpful?
Sorry this didn’t help.
Great! Thanks for your feedback.
How satisfied are you with this reply?
Thanks for your feedback, it helps us improve the site.
How satisfied are you with this reply?
Thanks for your feedback.
![]()
Thank you for posting your query in Microsoft Community.
The Windows Installer Cache, located in c:\windows\installer folder, is used to store important files for applications installed using the Windows Installer technology and should not be deleted.
The installer cache is used to maintain (remove / update) the applications and patches installed on the machine. The installer files are a record of file versions and registry dependencies involved in a particular application or application update installation. The availability of this record in the cache helps to uninstall and update applications properly.
Let us know if you have any further query on Windows, we are glad to assist.
102 people found this reply helpful
Was this reply helpful?
Sorry this didn’t help.
Great! Thanks for your feedback.
How satisfied are you with this reply?
Thanks for your feedback, it helps us improve the site.
Можно ли удалить папку Windows\Installer и файлы из неё
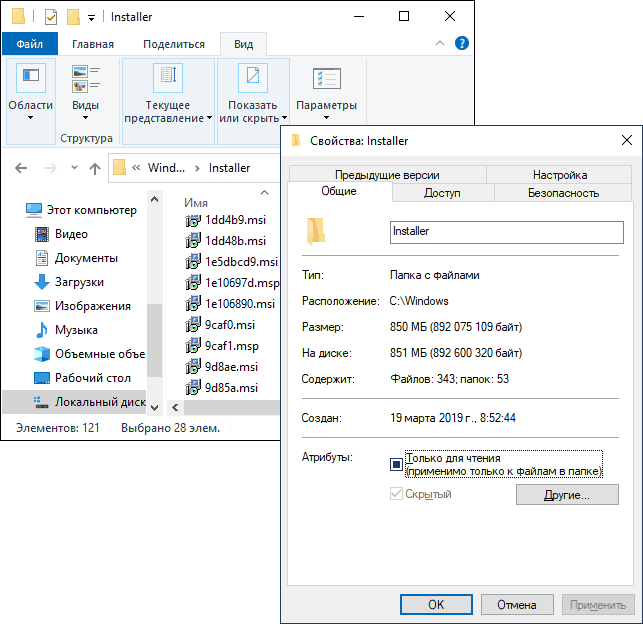
 Если вы используете какие-либо программы для анализа содержимого диска, то можете обнаружить, что в Windows 10 скрытая системная папка C:\Windows\Installer занимает много места: иногда сотни мегабайт, а иногда и гигабайты, отсюда и вопрос — что это за папка и что с ней можно, а чего нельзя делать.
В этой инструкции о том, можно ли удалять папку Windows\Installer, файлы в ней, к чему это может привести и есть ли возможность уменьшить занимаемое этой папкой место на жестком диске или SSD. Также может быть интересным: Как очистить место на диске C.
Можно ли удалять файлы из C:\Windows\Installer в Windows 10
Если вы загляните в папку C:\Windows\Installer (папка скрыта по умолчанию, но в нее легко попасть, введя в адресную строку проводника путь к папке, либо включив показ и скрытых и защищенных системных файлов Windows 10), в ней вы обнаружите набор файлов с расширениями .msi и .msp, а также папки: состоящие из кодов и отдельные с расширением .tmp.
Можно ли это всё удалить? Короткий ответ: нет, не следует. Вы можете безопасно удалить лишь папки .tmp, но они и не занимают много места. Однако, существует возможность в какой-то степени очистить эту папку, о чем в следующем разделе.
А сначала о том, что представляют собой эти файлы в Windows\Installer — это файлы установщиков программ (тех, что установлены на вашем компьютере), использующих для установки службу «Установщик Windows» и они используются когда программа обновляется или когда вы её, наоборот, удаляете через «Панель управления» — «Программы и компоненты». Также они могут использовать для функции «Исправить установку». Соответственно, при их удалении могут возникнуть проблемы при выполнении этих задач.
Как очистить папку Windows\Installer
Иногда случается, что в этой папке присутствуют установщики программ .msi и .msp, более не используемые нигде в системе и такие файлы можно удалить, но для этого нужно определить, какие именно это файлы. Примечание: теоретически далее описанные шаги могут привести к нежелательным последствиям.
Для этого можно использовать бесплатную утилиту PatchCleaner, официальный сайт разработчика — https://www.homedev.com.au/Free/PatchCleaner (для загрузки используйте вкладку «Downloads» в верхней части описания программы).
После запуска PatchCleaner, утилита проанализирует содержимое указанной папки и, если среди файлов в C:\Windows\Installer окажутся файлы, которые более не используются (они будут отображены в разделах «Excluded by filters» и «Orphaned». Такие файлы можно сразу удалить (Delete) или переместить в указанную папку «Move» (лучше сначала использовать второй вариант, чтобы убедиться, что всё работает как прежде).
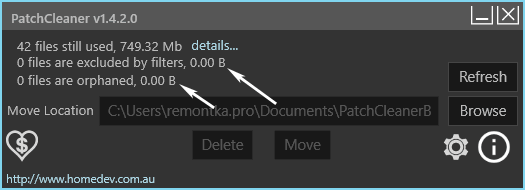
Также, если нажать по «Details» рядом с количеством найденных файлов, в том числе используемых в настоящее время (still used), можно увидеть информацию о том, каким программам соответствуют найденные файлы .msi и .msp, сколько места на диске они занимают и, возможно, принять решение об удалении некоторых из этих программ, если вы ими более не пользуетесь и они не требуются для правильного функционирования другого ПО.

Видео инструкция
Надеюсь, информация была полезной. К слову, о больших папках в Windows 10: вы можете очистить папку DriverStore\FileRepository.
А вдруг и это будет интересно:
Почему бы не подписаться?
Рассылка новых, иногда интересных и полезных, материалов сайта remontka.pro. Никакой рекламы и бесплатная компьютерная помощь подписчикам от автора. Другие способы подписки (ВК, Одноклассники, Телеграм, Facebook, Twitter, Youtube, Яндекс.Дзен)
24.12.2019 в 21:44
Здравствуйте. Подскажите, пожалуйста, а можно удалять файлы из папки «C:\Windows\servicing\LCU»
После ежемесячных обовлений туда записываются файлы типа Package_for_RollupFix
18362.535.1.6 и уже занимают довольно много
места (до 6-8 Гб)
С уважением, Игорь
25.12.2019 в 14:27
Здравствуйте.
Если не ошибаюсь, встроенная утилита очистки дика умеет вычищать из этой папки то, что можно:
Win+R, вводим cleanmgr жмем Enter.
Нажимаем кнопку «очистить системные файлы». И чистим обновления Windows.
27.12.2019 в 21:20
Встроенная утилита не чистит эту папку. Очистка хранилища компонентов, программа DISM++ тоже не видят эту папку. Все это чистит «C:\Windows\SoftwareDistribution\Download»
25.12.2019 в 00:34
Так эта папка и предыдущих Windows присутствует. Помнится, лет так десять назад, когда мой HDD был скудного объёма и папка Installer всё росла и росла я начал искать ответ что же с ней делать. Тогда я как дилетант придумал что перенесу её на другой раздел, а ярлык к ней помещу в C:\Windows, но фокус не получился. Пошел я дальше искать ответ на просторах интернета и наткнулся на одном из похожих сайтов кстати тоже очень полезный для начинающих пользователей, но связь я как-то с ним потерял ну та ладно так вот наткнулся на статью о том, как перенести папку Installer на другой раздел диска без потери работоспособности ОС. Ответ был прост создание символьной ссылки она же жесткая ссылка на тот момент для меня понять, что к чему было сложновато и долго помучился пока понял, что к чему за то теперь для меня этот опыт был полезен и часто бывает полезен. Если кому интересно, то коротко объясню. Запускаете командную строку от имени администратора вводите команду «mklink /j c:\windows\installer d:\installer» без кавычек и при условии, что у вас системный раздел С, а куда будете переносить папку installer это раздел D или другая буква соответственно указываете вашу и не маловажный момент перед тем как вы нажмёте Enter в командной строке папка installer должна быть перенесена на раздел D. Всё теперь ОС думает, что папка installer находится на прежнем месте, но её там нет при этом всё работает, как и до переноса папки. Проверено на личном опыте так что не опасайтесь тем более это всё можно вернуть в исходное состояние просто удаляете ярлык к папке installer из C:\Windows и папку Installer с раздела D возвращаете обратно. После всех манипуляций лучше перезагрузить ПК так на всякий случай. Да ещё в той статье было написано цитирую (Мне символьные ссылки нужны довольно редко, и я без проблем запомнил команду командной строки и использую первый метод. Но в Windows есть альтернативный способ для папок:
1) Копируем папку, для которой нам нужно создать символьную ссылку.
2) Идём в каталог:
C:\Users\*имя пользователя*\AppData\Roaming\Microsoft\Windows\Network Shortcuts
Папка AppData скрытая, для того чтобы включить отображение скрытых папок, воспользуйтесь этой статьей.
3) Жмём правой клавишей по окну каталога и выбираем «Вставить ярлык». Система создаст символьную ссылку до исходного каталога и теперь её можно перенести в нужное для вас место и переименовать) но этот метод мне лично не понравился так как через раз получалось добиться результата и в чём проблема я, так и не понял, да и не стал разбираться так как набил руку на выполнение команды проще и быстрее. Буду рад если кому пригодится и надеюсь, что написал понятно. Спасибо за внимание!
27.04.2020 в 13:56
У моего ноутбука «ASUS» ОЗУ 1.00 ГБ, это, наверное, все из-за виндовс-установщика, он занял память, и придется «стереть» его, а ведь он нужен для системы! У меня 7 32-система.
Или комп таким слабым и должен быть? Пожалуйста, не удаляйте вин-установщик.
28.04.2020 в 15:39
Ну вообще оперативную память Windows-установщики не занимают (или я не понял, что вы имеете в виду). 1 Гб — действительно мало и многое у вас может просто не запускаться. Но если у вас правда 1 Гб оперативной памяти, то вы не можете что-то стереть, вам нужно добавлять ее (если есть такая возможность), т.е. устанавливать новые модули памяти.
В следующем комментарии вы пишете что эмуляторы Android не устанавливаются, тут кроме памяти еще один нюанс — если не ошибаюсь, они на 32-бит ни один и не работает.
01.12.2020 в 23:05
Папка C:\Windows\Installer занимает более 35 ГБ Операционная система установлена в 2013 году и обновляется с тех пор. К сожалению, сайт недоступен. Но за наводку спасибо 🙂


