- Начало работы с WebView2 Getting started with WebView2
- Предварительные условия Prerequisites
- Шаг 1 . Создание приложения с одним окном Step 1 — Create a single-window app
- Шаг 2 . Установка SDK WebView2 Step 2 — Install WebView2 SDK
- Сборка пустого примера приложения Build your empty sample app
- Шаг 3 . Создание единого webView в родительском окне Step 3 — Create a single WebView within the parent window
- Сборка примера приложения Bing Build your Bing sample app
- Шаг 4 — события навигации Step 4 — Navigation events
- Шаг 5 — сценарий Step 5 — Scripting
- Шаг 6 . Связь между хост-контентом и веб-контентом Step 6 — Communication between host and web content
- Сборка примера URL-адреса отображения Build your display URL sample app
- Дальнейшие действия Next steps
- См. также See also
- Контакт с командой Microsoft Edge WebView Getting in touch with the Microsoft Edge WebView team
Начало работы с WebView2 Getting started with WebView2
В этой статье присвойте начало созданию первого приложения WebView2 и узнайте об основных особенностях WebView2. In this article, get started creating your first WebView2 app and learn about the main features of WebView2. Дополнительные сведения об отдельных API WebView2 перейдите по ссылке API. For more information about individual WebView2 APIs, navigate to API reference.
Предварительные условия Prerequisites
Убедитесь, что перед началом работы необходимо установить следующий список предварительных условий. Ensure you install the following list of pre-requisites before proceeding.
WebView2 Runtime или любой канал Microsoft Edge (Chromium), установленный на поддерживаемой ОС (в настоящее время Windows 10, Windows 8.1 и Windows 7). WebView2 Runtime or any Microsoft Edge (Chromium) non-stable channel installed on supported OS (currently Windows 10, Windows 8.1, and Windows 7).
Команда WebView рекомендует использовать канарский канал, а минимальная требуемая версия — 82.0.488.0. The WebView team recommends using the Canary channel and the minimum required version is 82.0.488.0.
Visual Studio 2015 или более поздней с установленной поддержкой C++ Visual Studio 2015 or later with C++ support installed.
Шаг 1 . Создание приложения с одним окном Step 1 — Create a single-window app
Начните с базового настольного проекта с одним основным окном. Start with a basic desktop project that contains a single main window.
Чтобы лучше сосредоточиться на погонах, используйте измененный пример кода из Walkthrough: Create a traditional Windows Desktop application (C++) для примера приложения. To better focus the walkthrough, use modified sample code from Walkthrough: Create a traditional Windows Desktop application (C++) for your sample app. Чтобы скачать измененный пример и начать работу, перейдите в WebView2 Samples. To download the modified sample and get started, navigate to WebView2 Samples.
- В Visual Studio откройте WebView2GettingStarted.sln . In Visual Studio, open WebView2GettingStarted.sln .
Если вы используете более старую версию Visual Studio, наведите курсор на проект WebView2GettingStarted, откройте контекстное меню (правой кнопкой мыши) и выберите Свойства. If you use an older version of Visual Studio, hover on the WebView2GettingStarted project, open the contextual menu (right-click), and choose Properties. В соответствии с общимисвойствами конфигурации измените Windows > **** SDK Version и Platform Toolset, чтобы использовать доступный вам Visual Studio win10 SDK и Visual Studio. Under Configuration Properties >General, modify Windows SDK Version and Platform Toolset to use the Win10 SDK and Visual Studio toolset available to you.

Версия инструмента Tool version
Visual Studio могут отображаться ошибки, так как в проекте отсутствует файл загона WebView2. Visual Studio may display errors, because your project is missing the WebView2 header file. Ошибки должны быть исправлены после шага 2. The errors should be fixed after Step 2.
Шаг 2 . Установка SDK WebView2 Step 2 — Install WebView2 SDK
Добавьте SDK WebView2 в проект. Add the WebView2 SDK into the project. Используйте NuGet для установки SDK Win32. Use NuGet to install the Win32 SDK.
Наведите курсор на проект, откройте контекстное меню (правой кнопкой мыши) и выберите Управление пакетами NuGet. Hover on the project, open the contextual menu (right-click), and choose Manage NuGet Packages.

Управление пакетами NuGet Manage NuGet packages
Установите библиотеку реализации Windows. Install the Windows Implementation Library.
В панели поиска введите Microsoft.Windows.ImplementationLibrary > Microsoft.Windows.ImplementationLibrary. In the search bar, type Microsoft.Windows.ImplementationLibrary > choose Microsoft.Windows.ImplementationLibrary.
В правом окне выберите Установите. In the right-hand side window, choose Install. NuGet загружает библиотеку на компьютер. NuGet downloads the library to your machine.
Библиотека реализации Windows и библиотека шаблонов C++ для Windows являются необязательными и упрощают работу с COM в примере. The Windows Implementation Library and Windows Runtime C++ Template Library are optional and make working with COM easier for the example.

Библиотека реализации Windows Windows Implementation Library
Установите SDK WebView2. Install the WebView2 SDK.
В панели поиска введите Microsoft.Web.WebView2 > Microsoft.Web.WebView2. In the search bar, type Microsoft.Web.WebView2 > choose Microsoft.Web.WebView2.
В правом окне выберите Установите. In the right-hand side window, choose Install. NuGet загружает SDK на компьютер. NuGet downloads the SDK to your machine.

NuGet диспетчер пакетов NuGet Package Manager
Добавьте в проект заглавную страницу WebView2. Add WebView2 header to your project.
В HelloWebView.cpp файле скопируйте следующий фрагмент кода и вклеите его после последней #include строки. In the HelloWebView.cpp file, copy the following code snippet and paste it after the last #include line.
Раздел include должен выглядеть так же, как и следующий фрагмент кода. The include section should look similar to the following code snippet.
Готовый к использованию и сборке с API WebView2. Ready to use and build against the WebView2 API.
Сборка пустого примера приложения Build your empty sample app
Чтобы создать и запустить пример приложения, выберите F5 . To build and run the sample app, select F5 . В приложении отображается пустое окно. Your app displays an empty window.
![]()
Пустое приложение Empty app
Шаг 3 . Создание единого webView в родительском окне Step 3 — Create a single WebView within the parent window
Добавьте WebView в главное окно. Add a WebView to the main window.
Используйте метод, чтобы настроить среду и найти браузер CreateCoreWebView2Environment Microsoft Edge (Chromium) с питанием управления. Use the CreateCoreWebView2Environment method to set up the environment and locate the Microsoft Edge (Chromium) browser powering the control. Вы также можете использовать метод, если вы хотите указать расположение браузера, папку пользователя, флаги браузера и так далее, а не использовать параметр CreateCoreWebView2EnvironmentWithOptions по умолчанию. You may also use the CreateCoreWebView2EnvironmentWithOptions method if you want to specify browser location, user folder, browser flags, and so on, instead of using the default setting. После завершения метода запустите метод внутри вызова и запустите метод, чтобы CreateCoreWebView2Environment ICoreWebView2Environment::CreateCoreWebView2Controller получить ICoreWebView2CreateCoreWebView2EnvironmentCompletedHandler ICoreWebView2Controller::get_CoreWebView2 связанное WebView. Upon the completion of the CreateCoreWebView2Environment method, run the ICoreWebView2Environment::CreateCoreWebView2Controller method inside the ICoreWebView2CreateCoreWebView2EnvironmentCompletedHandler callback and run the ICoreWebView2Controller::get_CoreWebView2 method to get the associated WebView.
В вызываемом вызове установите еще несколько параметров, повторно установите webView, чтобы занять 100% родительского окна, и перейдите в Bing. In the callback, set a few more settings, resize the WebView to take 100% of the parent window, and navigate to Bing.
Скопируйте следующий фрагмент кода и вклейку после комментария и HelloWebView.cpp // перед // комментарием. Copy the following code snippet and paste into HelloWebView.cpp after the // comment and before the // comment.
Сборка примера приложения Bing Build your Bing sample app
Чтобы создать и запустить приложение, выберите F5 . To build and run the app, select F5 . Теперь у вас есть окно WebView, отображаее страницу Bing. Now you have a WebView window displaying the Bing page.

Окно Bing Bing window
Шаг 4 — события навигации Step 4 — Navigation events
Команда WebView уже перекрыла переход на URL-адрес с ICoreWebView2::Navigate помощью метода на последнем шаге. The WebView team already covered navigating to URL using the ICoreWebView2::Navigate method in the last step. Во время навигации WebView запускает последовательность событий, к которым может прослушиваться хост. During navigation, WebView fires a sequence of events to which the host may listen.
- NavigationStarting
- SourceChanged
- ContentLoading
- HistoryChanged
- NavigationCompleted
Дополнительные сведения перейдите к событиям навигации. For more information, navigate to Navigation events.
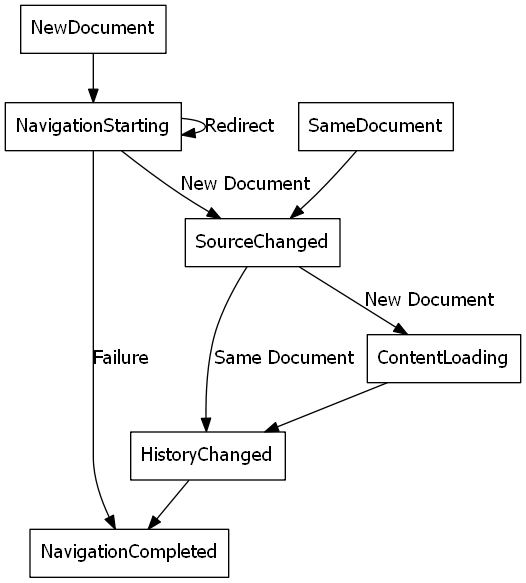
События навигации Navigation events
В случаях ошибок может произойти одно или несколько следующих событий в зависимости от того, будет ли навигация продолжена на веб-странице ошибки. In error cases, one or more of the following events may occur depending on whether the navigation is continued to an error webpage.
- SourceChanged
- ContentLoading
- HistoryChanged
Если происходит перенаправление HTTP, в строке несколько NavigationStarting событий. If an HTTP redirect occurs, there are multiple NavigationStarting events in a row.
В качестве примера использования событий зарегистрируйте обработник события, чтобы отменить любые запросы, не NavigationStarting относясь к https. As an example of using the events, register a handler for the NavigationStarting event to cancel any non-https requests. Скопируйте следующий фрагмент кода и вклеите в HelloWebView.cpp . Copy the following code snippet and paste into HelloWebView.cpp .
Теперь приложение не переходит на сайты без https. Now the app does not navigate to any non-https sites. Аналогичный механизм можно использовать для выполнения других задач, например ограничения навигации в пределах собственного домена. You may use similar mechanism to accomplish other tasks, such as restricting navigation to within your own domain.
Шаг 5 — сценарий Step 5 — Scripting
Можно использовать хост-приложения, чтобы вводить код JavaScript в элементы управления WebView2 во время работы. You may use host apps to inject JavaScript code into WebView2 controls at runtime. Вы можете поручено WebView выполнить произвольный JavaScript или добавить сценарии инициализации. You may task WebView to run arbitrary JavaScript or add initialization scripts. Введенный JavaScript применяется ко всем новым документам верхнего уровня и к любым детским кадрам до удаления JavaScript. The injected JavaScript applies to all new top-level documents and any child frames until the JavaScript is removed. Вводный JavaScript запускается с определенными сроками. The injected JavaScript is run with specific timing.
- Запустите его после создания глобального объекта. Run it after the creation of the global object.
- Запустите его перед запуском любого другого сценария, включенного в HTML-документ. Run it before any other script included in the HTML document is run.
Скопируйте следующий фрагмент кода и вклеите в HelloWebView.cpp . Copy the following code snippet and paste into HelloWebView.cpp .
Теперь WebView всегда должен замораживать объект и Object возвращать документ страницы один раз. Now, WebView should always freeze the Object object and returns the page document once.
API впрыскивания скрипта (и некоторые другие API WebView2) являются асинхронными, если код должен запускаться в определенном порядке, следует использовать вызовы. The script injection APIs (and some other WebView2 APIs) are asynchronous, you should use callbacks if code is must be run in a specific order.
Шаг 6 . Связь между хост-контентом и веб-контентом Step 6 — Communication between host and web content
Хост и веб-контент могут также взаимодействовать друг с другом с помощью postMessage метода. The host and the web content may also communicate with each other through the postMessage method. Веб-контент, запущенный в WebView, может отправляться хосту с помощью метода, и сообщение обрабатывается любым зарегистрированным обработивимом событий на window.chrome.webview.postMessage ICoreWebView2WebMessageReceivedEventHandler хосте. The web content running within a WebView may post to the host through the window.chrome.webview.postMessage method, and the message is handled by any registered the ICoreWebView2WebMessageReceivedEventHandler event handler on the host. Кроме того, хост может отправлять сообщения веб-контенту с помощью или методом, который ловят обработчики, ICoreWebView2::PostWebMessageAsString ICoreWebView2::PostWebMessageAsJSON добавленные из window.chrome.webview.addEventListener слушателя. Likewise, the host may message the web content through ICoreWebView2::PostWebMessageAsString or ICoreWebView2::PostWebMessageAsJSON method, which is caught by handlers added from window.chrome.webview.addEventListener listener. Механизм связи позволяет веб-контенту использовать личные возможности, передав сообщения, чтобы попросить хост запустить личные API. The communication mechanism allows the web content to use native capabilities by passing messages to ask the host to run native APIs.
В качестве примера для понимания механизма при попытке вывода URL-адреса документа в WebView возникают следующие действия. As an example to understand the mechanism, the following steps occur when you try to output the document URL in WebView.
- Хост регистрирует обработник, чтобы вернуть полученное сообщение обратно в веб-контент The host registers a handler to return received message back to the web content
- Хост вводит сценарий в веб-содержимое, которое регистрирует обработок для печати сообщения с хоста The host injects a script to the web content that registers a handler to print message from the host
- Хост вводит сценарий в веб-контент, который публикует URL-адрес в хост The host injects a script to the web content that posts the URL to the host
- Обработник хостов запускается и возвращает сообщение (URL-адрес) в веб-содержимое The handler of the host is triggered and returns the message (the URL) to the web content
- Обработник веб-контента запускается и печатает сообщение из хоста (URL-адрес) The handler of the web content is triggered and prints message from the host (the URL)
Скопируйте следующий фрагмент кода и вклеите в HelloWebView.cpp . Copy the following code snippet and paste into HelloWebView.cpp .
Сборка примера URL-адреса отображения Build your display URL sample app
Чтобы создать и запустить приложение, выберите F5 . To build and run the app, select F5 . URL-адрес отображается в всплывающее окно перед переходом на веб-страницу. The URL appears in a pop-up window before navigating to a webpage.

Отображение URL-адреса Display url
Поздравляем, вы создали свое первое приложение WebView2. Congratulations, you built your first WebView2 app.
Дальнейшие действия Next steps
Многие функции WebView2 не охватываются в этой статье, в следующем разделе содержится больше ресурсов. Many of the WebView2 functionalities are not covered on this article, the following section provides more resources.
См. также See also
- Для полного примера возможностей WebView2 перейдите к примеру API WebView2. For a comprehensive example of WebView2 capabilities, navigate to WebView2 API Sample.
- Для примера приложения, построенного с помощью WebView2, перейдите в WebView2Browser. For a sample app built using WebView2, navigate to WebView2Browser.
- Подробные сведения об API WebView2 перейдите по ссылке API. For detailed information about the WebView2 API, navigate to API reference.
Контакт с командой Microsoft Edge WebView Getting in touch with the Microsoft Edge WebView team
Поделитесь своими отзывами, чтобы помочь создать более насыщенные опытом WebView2. Share your feedback to help build richer WebView2 experiences. Чтобы отправить запросы на функции или ошибки или найти известные проблемы, перейдите к репо обратной связи Microsoft Edge WebView. To submit feature requests or bugs, or search for known issues, navigate to the Microsoft Edge WebView feedback repo.


