- Virus & threat protection in Windows Security
- Run the scans you want
- Manage your Virus & threat protection settings
- Manage your real-time protection
- Get access to cloud-delivered protection
- Send us files with automatic sample submission
- Tamper Protection defends your security settings
- Protect files from unauthorized access
- Exclude items from virus scans
- Curate your notifications
- Protect your device with the latest updates
- Stay protected with Windows Security
- Important security info
- Understand and customize Windows Security features
- Status icons indicate your level of safety:
- Run a malware scan manually
- Run a quick scan in Windows Security
- Run an advanced scan in Windows Security
- Schedule your own scan
- Schedule a scan
- Turn Microsoft Defender Antivirus real-time protection on or off
- Turn real-time protection off temporarily
- Включение Защитника Windows для доступа к ресурсам организации Turn on Windows Defender to access company resources
- Включение Защитника Windows Turn on Windows Defender
- Включение облачной защиты в реальном времени Turn on real-time and cloud-delivered protection
- Обновление определений для антивирусного ПО Update your antivirus definitions
- Дальнейшие шаги Next steps
Virus & threat protection in Windows Security
If you’re running Windows 10 in S mode, some of the features of the Windows Security interface will be a little different. Windows 10 in S mode is streamlined for tighter security, so the Virus & threat protection area has fewer options than those described here. This is because the built-in security of Windows 10 in S mode automatically prevents viruses and other threats from running on your device. Additionally, devices running Windows 10 in S mode receive security updates automatically.
In previous versions of Windows 10, Windows Security is called Windows Defender Security Center.
Virus & threat protection in Windows Security helps you scan for threats on your device. You can also run different types of scans, see the results of your previous virus and threat scans, and get the latest protection offered by Microsoft Defender Antivirus.
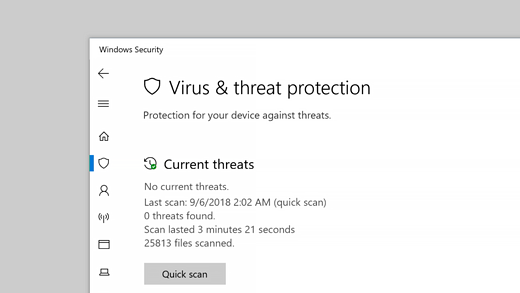
The Current threats area lets you:
See any threats currently on your device.
See the last time a scan was run on your device, how long it took, and how many files were scanned.
Start a new scan.
See threats that have been quarantined before they can affect you.
See anything identified as a threat that you have allowed to run on your device.
Note: If you are using third-party antivirus software, you’ll be able to use its virus and threat protection options here.
Run the scans you want
Even though Windows Security is turned on and scans your device automatically, you can perform an additional scan whenever you want.
Quick scan. Concerned that you may have done something to introduce a suspicious file or virus to your device? Select Quick scan (called Scan now in previous versions of Windows 10) to immediately check your device for any recent threats. This option is useful when you don’t want to spend the time running a full scan on all your files and folders. If Windows Security recommends that you run one of the other types of scans, you’ll be notified when the Quick scan is done.
Scan options .Select this link (called Run a new advanced scan in previous versions of Windows 10) to choose from one of the following advanced scan options:
Full scan. Scans every file or program that’s currently running on your device to make sure there’s nothing dangerous in progress.
Custom scan. Scans only files and folders that you select.
Microsoft Defender Offline scan. Uses the latest definitions to scan your device for the latest threats. Run it when you are concerned that your device has been exposed to malware or a virus, or if you want to scan your device without being connected to the Internet. This will restart your device, so be sure to save files you may have open.
Manage your Virus & threat protection settings
Use Virus & threat protection settings when you want to customize your level of protection, send sample files to Microsoft, exclude trusted files and folders from repeated scanning, or temporarily turn off your protection.
Manage your real-time protection
Want to stop running real-time protection for a short while? You can use the Real-time protection setting to turn it off temporarily; however, real-time protection will turn back on automatically after a short while to resume protecting your device. While real-time protection is off, files you open or download won’t be scanned for threats.
Note: If the device you’re using is part of an organization, your system administrator may prevent you from turning off real-time protection.
Get access to cloud-delivered protection
Provide your device with access to the latest threat definitions and threat behavior detection in the cloud. This setting allows Microsoft Defender to get constantly updated improvements from Microsoft while you’re connected to the internet. This will result in more accurately identifying, stopping, and fixing, threats.
This setting is turned on by default.
Send us files with automatic sample submission
If you’re connected to the cloud with cloud-delivered protection, you can send suspicious sample files to Microsoft to check them for potential threats. Microsoft will notify you if you need to send additional files—and alert you if a requested file contains personal information.
Tamper Protection defends your security settings
Microsoft Defender Antivirus settings can occasionally get changed by malicious, or careless, apps or processes; or sometimes by unaware people. With Tamper Protection turned on, important settings like real-time protection, can’t be easily or accidentally turned off.
This setting is turned on, by default, for consumers.
Protect files from unauthorized access
Use the Controlled folder access setting to manage which folders untrusted apps can make changes to. You can also add additional apps to the trusted list so they can make changes in those folders. This is a powerful tool to make your files safer from ransomware.
When you turn on Controlled folder access, a lot of the folders you use most often will be protected by default. This means that content in any of these folders cannot be accessed or changed by any unknown or untrusted apps. If you add additional folders, they become protected as well.
Exclude items from virus scans
There may be times when you’ll want to exclude specific files, folders, file types, or processes from being scanned, such as if these are trusted items and you are certain you don’t need to take time to scan them. In those rare instances you can add an exclusion for them.
Curate your notifications
Windows Security will send notifications about the health and safety of your device. You can turn these notifications on, or off, on the notifications page. In Virus & threat protection, under Virus & threat protection settings, select Manage settings, scroll down to Notifications and select Change notification settings.
Protect your device with the latest updates
Security intelligence (sometimes referred to as «definitions») are files that contain information about the latest threats that could infect your device. Windows Security uses security intelligence every time a scan is run.
Microsoft automatically downloads the latest intelligence to your device as part of Windows Update, but you can also manually check for it. On the Virus & threat protection page, under Virus & threat protection updates, select Check for updates to scan for the latest security intelligence.
Stay protected with Windows Security
Windows 10 includes Windows Security, which provides the latest antivirus protection. Your device will be actively protected from the moment you start Windows 10. Windows Security continually scans for malware (malicious software), viruses, and security threats. In addition to this real-time protection, updates are downloaded automatically to help keep your device safe and protect it from threats.
Windows 10 in S mode
Some features will be a little different if you’re running Windows 10 in S mode. Because this mode is streamlined for tighter security, the Virus & threat protection area has fewer options. But don’t worry—the built-in security of this mode automatically prevents viruses and other threats from running on your device, and you’ll receive security updates automatically. For more info, see Windows 10 in S mode FAQ.
Important security info
Windows Security is built-in to Windows 10 and includes an antirvirus program called Microsoft Defender Antivirus. (In previous versions of Windows 10, Windows Security is called Windows Defender Security Center).
If you have another antivirus app installed and turned on, Microsoft Defender Antivirus will turn off automatically. If you uninstall the other app, Microsoft Defender Antivirus will turn back on automatically.
If you’re having problems receiving Windows Security updates, see Fix Windows Update errors and the Windows Update FAQ.
For info on how to uninstall an app, see Repair or remove an app in Windows 10.
To change your user account to an admin account, see Create a local user or administrator account in Windows 10.
Understand and customize Windows Security features
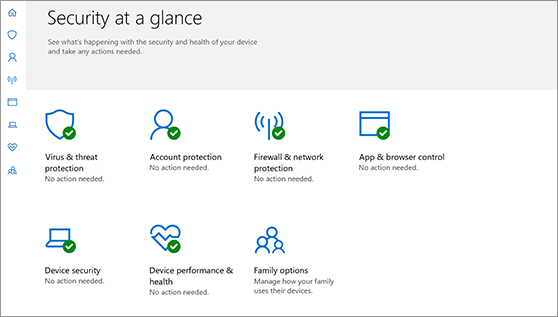
Windows Security is your home to manage the tools that protect your device and your data:
Virus & threat protection. Monitor threats to your device, run scans, and get updates to help detect the latest threats. (Some of these options are unavailable if you’re running Windows 10 in S mode.)
Account protection. Access sign-in options and account settings, including Windows Hello and dynamic lock.
Firewall & network protection. Manage firewall settings and monitor what’s happening with your networks and internet connections.
App & browser control. Update settings for Microsoft Defender SmartScreen to help protect your device against potentially dangerous apps, files, sites, and downloads. You’ll have exploit protection and you can customize protection settings for your devices.
Device security. Review built-in security options to help protect your device from attacks by malicious software.
Device performance & health. View status info about your device’s performance health, and keep your device clean and up to date with the latest version of Windows 10.
Family options. Keep track of your kids’ online activity and the devices in your household.
You can customize how your device is protected with these Windows Security features. To access them, select Start > Settings > Update & Security > Windows Security . Then select the feature you want to explore.
Open Windows Security settings
Status icons indicate your level of safety:
Green means your device is sufficiently protected and there aren’t any recommended actions.
Yellow means there is a safety recommendation for you.
Red is a warning that something needs your immediate attention.
Run a malware scan manually
When you’re concerned about risks to a specific file or folder, you can right-click the file or folder in File Explorer, then select Scan with Microsoft Defender.
If you suspect there’s malware or a virus on your device, you should immediately run a quick scan. This is much faster than running a full scan on all your files and folders.
Run a quick scan in Windows Security
Select Start > Settings > Update & Security > Windows Security and then Virus & threat protection.
Open Windows Security settings
Under Current threats, select Quick scan (or in previous versions of Windows 10, under Threat history, select Scan now).
If the scan doesn’t find any issues, but you’re still concerned, you may want to check your device more thoroughly.
Run an advanced scan in Windows Security
Select Start > Settings > Update & Security > Windows Security and then Virus & threat protection.
Under Current threats, select Scan options (or in previous versions of Windows 10, under Threat history, select Run a new advanced scan).
Select one of the scan options:
Full scan (check files and programs currently running on your device)
Custom scan (scan specific files or folders)
Microsoft Defender Offline scan (run this scan if your device has been, or could potentially be, infected by a virus or malware). Learn more about Microsoft Defender Offline
Select Scan now.
Note: Because of streamlined security, this process isn’t available if you’re running Windows 10 in S mode.
Schedule your own scan
Even though Windows Security is regularly scanning your device to keep it safe, you can also set when and how often the scans occur.
Schedule a scan
Select the Start button, type schedule tasks in the Search box, and in the list of results, select Task Scheduler.
In the left pane, select the arrow (>) next to Task Scheduler Library to expand it, do the same with Microsoft > Windows, and then scroll down and select the Windows Defender folder.
In the top-center pane, select Windows Defender Scheduled Scan. (Point to the choices to see the full names.)
In the Actions pane on the right, scroll down and then select Properties.
In the window that opens, select the Triggers tab, and then select New.
Set your preferred time and frequency, and then select OK.
Review the schedule and select OK.
Note: Because of streamlined security, this process isn’t available if you’re running Windows 10 in S mode.
Turn Microsoft Defender Antivirus real-time protection on or off
Sometimes you may need to briefly stop running real-time protection. While real-time protection is off, files you open or download won’t be scanned for threats. However, real-time protection will soon turn on automatically again to protect your device.
Turn real-time protection off temporarily
Select Start > Settings > Update & Security > Windows Security and then Virus & threat protection > Manage settings. (In previous versions of Windows 10, select Virus & threat protection > Virus & threat protection settings.)
Open Windows Security settings
Switch the Real-time protection setting to Off and choose Yes to verify.
Note: Because of streamlined security, this process isn’t available if you’re running Windows 10 in S mode.
Включение Защитника Windows для доступа к ресурсам организации Turn on Windows Defender to access company resources
Организации хотят обеспечить защиту устройств, обращающихся к ресурсам, чтобы можно было требовать использования Защитника Windows. Organizations want to ensure that devices accessing their resources are secured so they may require you to use Windows Defender. Защитник Windows — это антивирусное программное обеспечение, включенное в Windows, которое помогает защитить устройство от вирусов и других вредоносных программ и угроз. Windows Defender is an antivirus software that’s included in Windows and can help protect your device from viruses and other malware and threats.
В этой статье описывается, как обновить параметры устройства в соответствии с требованиями вашей организации к антивирусным программам и устранить проблемы с доступом. This article describe how to update your device settings to meet your organization’s antivirus requirements and resolve access problems.
Включение Защитника Windows Turn on Windows Defender
Чтобы включить Защитник Windows на устройстве, выполните следующие действия. Complete the following steps to turn on Windows Defender on your device.
- Щелкните меню Пуск. Select the Start menu.
- В поисковой строке введите групповая политика. In the search bar, type group policy. Затем выберите Изменить групповую политику из списка результатов. Then select Edit group policy from the listed results. Откроется редактор локальных групповых политик. The Local Group Policy Editor will open.
- Выберите Конфигурация компьютера >Административные шаблоны >Компоненты Windows >Антивирусная программа «Защитник Windows» . Select Computer Configuration >Administrative Templates >Windows Components >Windows Defender Antivirus.
- Прокрутите список до конца и выберите Отключить антивирусную программу «Защитник Windows» . Scroll to the bottom of the list and select Turn off Windows Defender Antivirus.
- Выберите Отключен или Не настроен. Select Disabled or Not configured. Может показаться, что при выборе этих параметров вы отключаете Защитник Windows. It might feel counter-intuitive to select these options because the names suggest that you’re turning Windows Defender off. Но на самом деле такой выбор гарантирует его включение. Don’t worry, these options actually ensure that it’s turned on.
- Выберите Применить >ОК. Select Apply >OK.
Включение облачной защиты в реальном времени Turn on real-time and cloud-delivered protection
Выполните следующие действия, чтобы включить облачную защиту в реальном времени. Complete the following steps to turn on real-time and cloud-delivered protection. Вместе эти антивирусные функции защищают вас от программ-шпионов и могут предоставлять исправления для проблем с вредоносными программами через облако. Together, these antivirus features protect you against spyware and can deliver fixes for malware issues via the cloud.
- Щелкните меню Пуск. Select the Start menu.
- В строке поиска введите безопасность Windows. In the search bar, type Windows Security. Выберите соответствующий результат. Select the matching result.
- Выберите Защита от вирусов угроз. Select Virus & threat protection.
- В разделе Параметры защиты от вирусов и угроз выберите Управление параметрами. Under Virus & threat protection settings, select Manage settings.
- Переведите каждый переключатель в разделе Защита в реальном времени и Облачная защита в положение «Включено». Flip each switch under Real-time protection and Cloud-delivered protection to turn them on.
Если эти параметры не отображаются на экране, они могут быть скрыты. If you don’t see these options on your screen, they may be hidden. Выполните следующие действия, чтобы сделать их видимыми. Complete the following steps to make them visible.
- Щелкните меню Пуск. Select the Start menu.
- В поисковой строке введите групповая политика. In the search bar, type group policy. Затем выберите Изменить групповую политику из списка результатов. Then select Edit group policy from the listed results. Откроется редактор локальных групповых политик. The Local Group Policy Editor will open.
- Выберите Конфигурация компьютера >Административные шаблоны >Компоненты Windows >Безопасность Windows >Защита от вирусов и угроз. Select Computer Configuration >Administrative Templates >Windows Components >Windows Security >Virus and threat protection.
- Выберите Скрыть область «Защита от вирусов и угроз» . Select Hide the Virus and threat protection area.
- Выберите Отключено >Применить >ОК. Select Disabled >Apply >OK.
Обновление определений для антивирусного ПО Update your antivirus definitions
Выполните следующие действия, чтобы обновить определения для антивирусного ПО. Complete the following steps to update your antivirus definitions.
- Щелкните меню Пуск. Select the Start menu.
- В строке поиска введите безопасность Windows. In the search bar, type Windows Security. Выберите соответствующий результат. Select the matching result.
- Выберите Защита от вирусов угроз. Select Virus & threat protection.
- В разделе Обновления защиты от вирусов и угроз выберите Проверить наличие обновлений. Under Virus & threat protection updates, select Check for updates. Если этот параметр не отображается на экране, выполните инструкции, приведенные в разделе Включение защиты в реальном времени. If you don’t see this option on your screen, complete the first set of steps in Turn on Real-time Protection. Затем снова попробуйте проверить наличие обновлений. Then try checking for updates again.
Дальнейшие шаги Next steps
По-прежнему нужна помощь? Still need help? Обратитесь в службу поддержки вашей компании. Contact your company support. Его контактные данные доступны на веб-сайте корпоративного портала. For their contact information, check the Company Portal website.


