- 100% disk usage on Windows 10
- Replies (6)
- Диск загружен на 100 процентов в Windows 10
- Программы, активно использующие диск
- Неправильная работа драйверов AHCI
- Если не удается найти официальные драйвер AHCI или он не устанавливается
- Дополнительные способы исправить нагрузку на HDD или SSD в Windows 10
- High/100% Disk Usage on Win 10
- Replies (34)
100% disk usage on Windows 10
Replies (6)
Hi Kristina. I’m Greg, an installation specialist, 9 year Windows MVP and Independent Advisor, here to help you.
2) Update your drivers from the PC or motherboard maker’s Support Downloads web page, using the full model number, Serial Number or Dell Service Tag on sticker. Compare the latest drivers available for download with the ones presently installed in Device Manager reached by right clicking the Start Menu. Make sure you have the latest BIOS or UEFI firmware, Chipset, Display (Video), Sound, USB3, Bluetooth, Network and all other drivers, or else download and install the latest now.
3) Go over this checklist to make sure the install is set up correctly, optimized for best performance, and any needed repairs get done: http://answers.microsoft.com/en-us/windows/wiki.
Start with Step 4 to turn off Startup freeloaders which can conflict and cause issues, then Step 7 to check for infection the most thorough way, then step 10 to check for damaged System Files, and also Step 16 to test a new Local Admin account. Then continue with the other steps to go over your install most thoroughly.
4) If nothing else helps you can run a Repair Install by installing the Media Creation Tool and choosing from it to Upgrade Now. This reinstalls Windows in about an hour while saving your files, apps and most settings, solves many problems while also bringing it up to the latest version 1809 which you need anyway and by the most stable method. http://windows.microsoft.com/en-us/windows-10/m.
But remember that in Windows 10 everything depends upon the quality of the install, and Factory or Upgrade installs are inferior installs which most enthusiasts won’t even run because they’d expect endless issues.
Compare the Install you did with the gold-standard Install in this link which compiles the best possible Clean Install of Windows which will stay that way as long as you stick with the tools and methods given, has zero reported problems, and is better than any amount of money could buy: http://answers.microsoft.com/en-us/windows/wiki. . The reason I suggest this is because no one of the several million consumers who have performed my Clean Install tutorials over the past ten years has ever come back to report an issue if they stick with the tools and methods given.
There is also an automated Fresh Start that reinstalls WIndows while shedding corrupting factory bloatware, saves your files, but doesn’t clear the drive to get it cleanest: https://www.howtogeek.com/265054/how-to-easily-.
I hope this helps. Feel free to ask back any questions and let us know how it goes. I will keep working with you until it’s resolved.
Please do not mark «No» to the popup asking if this post helped you, as it may remove my ability to help you further. Just ignore it until problem is solved and then please mark the post which helped most as Answer to help others..
________________________________________________________
Standard Disclaimer: There are links to non-Microsoft websites. The pages appear to be providing accurate, safe information. Watch out for ads on the sites that may advertise products frequently classified as a PUP (Potentially Unwanted Products). Thoroughly research any product advertised on the sites before you decide to download and install it.
Windows MVP 2010-20
Over 100,000 helped in forums in 10 years
I do not quit for those who are polite and cooperative.
I will walk you through any steps and will not let you fail.
Диск загружен на 100 процентов в Windows 10
 Одна из проблем, встречающаяся в Windows 10, похоже, чаще, чем в предыдущих версиях ОС — загрузка диска на 100% в диспетчере задач и, как следствие, заметные тормоза системы. Чаще всего это просто ошибки работы системы или драйверов, а не работа чего-либо вредоносного, но возможны и иные варианты.
В этой инструкции подробно о том, почему жесткий диск (HDD или SSD) в Windows 10 может быть загружен на 100 процентов и что делать в этом случае, чтобы исправить проблему.
Примечание: потенциально некоторые из предложенных способов (в частности, способ с редактором реестра), могут привести к проблемам с запуском системы при невнимательности или просто стечении обстоятельств, учитывайте это и беритесь, если готовы к такому результату.
Программы, активно использующие диск
Несмотря на то, что этот пункт сравнительно нечасто оказывается причиной нагрузки на HDD в Windows 10, рекомендую начать с него, особенно если вы не являетесь опытным пользователем. Проверьте, а не является ли какая-то установленная и запущенная (возможно, находящаяся в автозагрузке) программа причиной происходящего.
Для этого вы можете выполнить следующие действия
- Откройте диспетчер задач (сделать это можно через правый клик по меню пуск, выбрав соответствующий пункт в контекстном меню). Если в нижней части диспетчера задач вы увидите кнопку «Подробнее», нажмите ее.
- Отсортируйте процессы в колонке «Диск», нажав на ее заголовок.


Обратите внимание, а не какая-то из ваших собственных установленных программ вызывает нагрузку на диск (т.е. находится первой в списке). Это может быть какой-либо антивирус, выполняющий автоматическое сканирование, торрент-клиент, или просто неправильно работающее ПО. Если это так, то стоит убрать эту программу из автозагрузки, возможно, переустановить ее, то есть искать проблему с нагрузкой на диск не в системе, а именно в стороннем ПО.
Также нагружать диск на 100% может какая-либо служба Windows 10, запущенная через svchost.exe. Если вы видите, что именно этот процесс вызывает нагрузку, рекомендую посмотреть статью про svchost.exe грузит процессор — в ней приводится информация о том, как с помощью Process Explorer узнать, какие именно службы запущены через конкретный экземпляр svchost, вызывающий нагрузку.
Неправильная работа драйверов AHCI
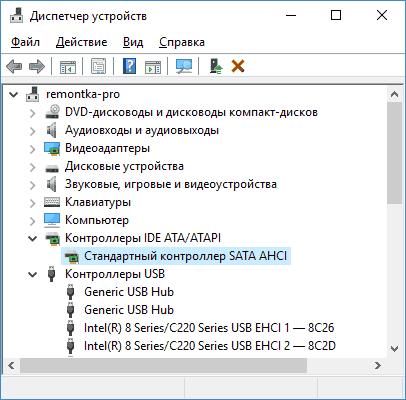
Мало кто из пользователей, устанавливающих Windows 10, выполняет какие-либо действия с драйверами дисков SATA AHCI — у большинства в диспетчере устройств в разделе «Контроллеры IDE ATA/ATAPI» будет значится «Стандартный контроллер SATA AHCI». И обычно это не вызывает проблем.
Однако, если без видимых причин вы наблюдаете постоянную нагрузку на диск, следует обновить этот драйвер на тот, что предусмотрен производителем вашей материнской платы (если у вас ПК) или ноутбука и доступен на официальном сайте производителя (даже если там он в наличии только для предыдущих версий Windows).
Как произвести обновление:
- Зайдите в диспетчер устройств Windows 10 (правый клик по пуску — диспетчер устройств) и посмотрите, действительно ли у вас установлен «Стандартный контроллер SATA AHCI».
- Если да, найдите раздел загрузки драйверов на официальном сайте производителя вашей материнской платы или ноутбука. Найдите там драйвер AHCI, SATA (RAID) или Intel RST (Rapid Storage Technology) и загрузите его (на скриншоте ниже пример таких драйверов).
- Драйвер может быть представлен в виде установщика (тогда просто запускаем его), либо в виде zip-архива с набором файлов драйвера. Во втором случае распаковываем архив и выполняем следующие шаги.
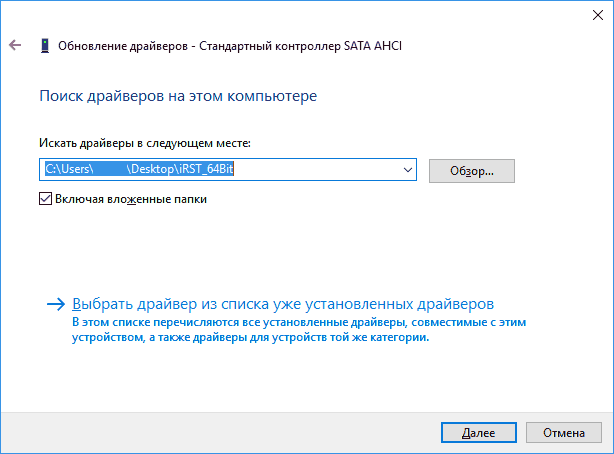
- В диспетчере устройств нажмите правой кнопкой мыши по Стандартному контроллеру SATA AHCI и нажмите «Обновить драйверы».
- Выберите «Выполнить поиск драйверов на этом компьютере», затем указываем папку с файлами драйвера и нажимаем «Далее».
- Если всё прошло успешно, вы увидите сообщение о том, что ПО для данного устройства было успешно обновлено.

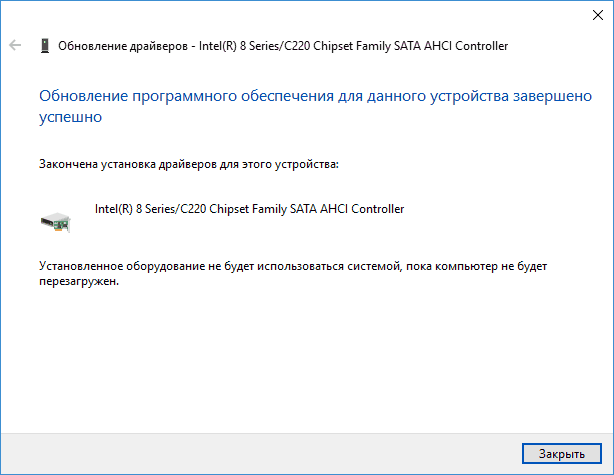
По завершении установки, перезагрузите компьютер и проверьте, остается ли проблема с нагрузкой на HDD или SSD.
Если не удается найти официальные драйвер AHCI или он не устанавливается
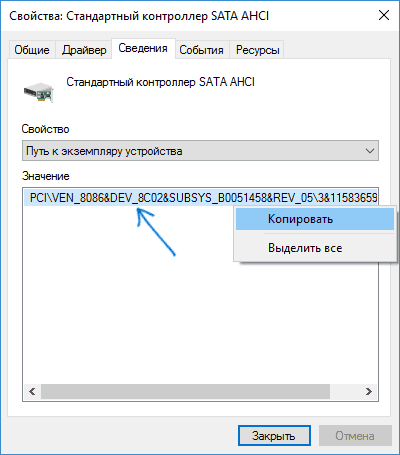
Данный способ может исправить 100-процентную нагрузку на диск в Windows 10 только в тех случаях, когда у вас используется стандартный драйвер SATA AHCI, а в сведениях о файле драйвера в диспетчере устройств указан файл storahci.sys (см. скриншот ниже).
Способ срабатывает в тех случаях, когда отображаемая нагрузка на диск вызвана тем, что оборудование не поддерживает технологию MSI (Message Signaled Interrupt), которая по умолчанию включена в стандартном драйвере. Это достаточно распространенный случай.
Если это так, то выполните следующие шаги:
- В свойствах контроллера SATA откройте вкладку «Сведения», выберите свойство «Путь к экземпляру устройства». Не закрывайте это окно.
- Запустите редактор реестра (нажать клавиши Win+R, ввести regedit и нажать Enter).
- В редакторе реестра перейдите к разделу (папки слева) HKEY_LOCAL_MACHINE\ System\ CurrentControlSet\ Enum\ Путь_к_контроллеру_SATA_из_окна_в_пункте_1\ Подраздел_со_случайным_номером\ Device Parameters\ Interrupt Management\ MessageSignaledInterruptProperties\
- Дважды кликните по значению MSISupported в правой части редактора реестра и задайте для него значение 0.
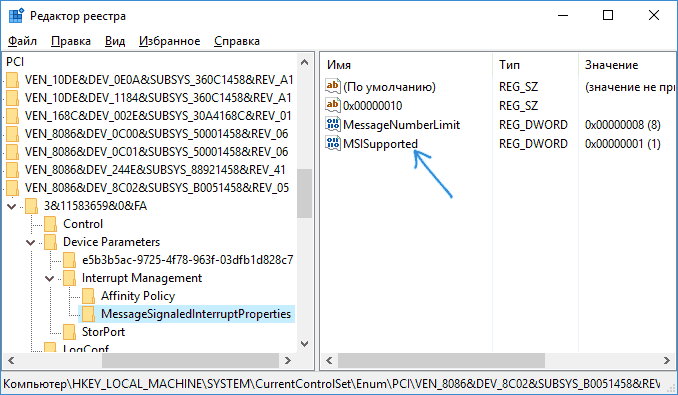

По завершению закройте редактор реестра и перезагрузите компьютер, после чего проверьте, была ли исправлена проблема.
Дополнительные способы исправить нагрузку на HDD или SSD в Windows 10
Существуют дополнительные простые способы, которые могут исправить нагрузку на диск в случае некоторых ошибок работы стандартных функций Windows 10. Если ни один из способов выше не помог, попробуйте и их.
- Зайдите в Параметры — Система — Уведомления и действия и отключите пункт «Получать советы, подсказки и рекомендации при использовании Windows».
- Запустите командную строку от имени администратора и введите команду wpr -cancel
- Отключите службы Windows Search и О том, как это сделать, см. Какие службы можно отключить в Windows 10.
- В проводнике в свойствах диска на вкладке «Общие» снимите отметку «Разрешить индексировать содержимое файлов на этом диске в дополнение к свойствам файла».
На данный момент времени — это все решения, которые я могу предложить на ситуацию, когда диск загружен на 100 процентов. Если ничто из перечисленного не помогает, и, при этом, раньше в этой же системе подобное не наблюдалось, возможно, стоит попробовать сброс Windows 10.
High/100% Disk Usage on Win 10
Hello everyone, I’ve Win 10 Home installed on my laptop and I’m facing a horrible problem, which is 100% Disk usage. I tried many things to solve this problem like disabling the Windows superfetch, windows search and I changed google chrome settings and many other things, but nothing helps, it stills 100%, sometimes 75%-95% and in other times it’s 0% and that’s confusing!
I hope that you guys help me to solve this problem, because I swear I’m gonna break my laptop I can’t deal with that anymore !
Thanks In Advance 🙂
***post moved to the appropriate category by the forum moderator***
Replies (34)
* Please try a lower page number.
* Please enter only numbers.
* Please try a lower page number.
* Please enter only numbers.
The issue may occur due to corrupted system files. Here are a few troubleshooting steps that may help us resolve the 100% disk usage issue. It is best to create a system restore point first before performing the suggestions on the list:
- Using the Control Panel, uninstall all browsers – except Edge and Internet Explorer. This is to isolate the issue with the plugins. The other suggestion is to remove the plugins one by one from each browser and test. After uninstalling the browsers, please delete the ‘Temp’, ‘%Temp%’ and ‘Prefetch’ files. Restart the system and check if it solves the issue. If it does, wait for 10-15 minutes to verify that it doesn’t reoccur. Then re-install the browsers.
- Run ChkDsk. Run Chkdsk and see if it helps.
Open an elevated CMD windows, type the following command and hit Enter: chkdsk.exe /f /r
* /f Fixes errors detected.
* /r Identifies Bad Sectors and attempts recovery of information. - Open Windows Defender and disable Cloud-based protection.
- Disable Windows Search Indexer. The Windows Search Indexer is one process which is known to cause this.
- Disable the ‘Print Spooler’. Run services.msc and disable the ‘Print Spooler’. Your printer will stop working after this. But at least it helps isolate the issue.
- Adjust the Visual Effects in Windows. This post will show you how to tweak Visual Effects to optimize Windows performance.
* Press Windows Key + X and select System.
* Click on Advanced system settings.
* In the System Properties window, select Settings for Performance.
* In the Performance Options window, choose option: Adjust for best performance.
* Click Apply and then OK. - Update your Drivers.
- Run System File Checker as well as DISM to repair to system image. Refer to this article created by ZigZag3143 (MS -MVP) regarding System file check (SFC) Scan and Repair System Files & DISM.
- Update your firmware or upgrade your RAM.
- The final option if nothing works would be reinstalling Windows.
We look forward to your response.
2 people found this reply helpful
Was this reply helpful?
Sorry this didn’t help.
Great! Thanks for your feedback.
How satisfied are you with this reply?
Thanks for your feedback, it helps us improve the site.
How satisfied are you with this reply?
Thanks for your feedback.
The issue may occur due to corrupted system files. Here are a few troubleshooting steps that may help us resolve the 100% disk usage issue. It is best to create a system restore point first before performing the suggestions on the list:
- Using the Control Panel, uninstall all browsers – except Edge and Internet Explorer. This is to isolate the issue with the plugins. The other suggestion is to remove the plugins one by one from each browser and test. After uninstalling the browsers, please delete the ‘Temp’, ‘%Temp%’ and ‘Prefetch’ files. Restart the system and check if it solves the issue. If it does, wait for 10-15 minutes to verify that it doesn’t reoccur. Then re-install the browsers.
- Run ChkDsk. Run Chkdsk and see if it helps.
Open an elevated CMD windows, type the following command and hit Enter: chkdsk.exe /f /r
* /f Fixes errors detected.
* /r Identifies Bad Sectors and attempts recovery of information. - Open Windows Defender and disable Cloud-based protection.
- Disable Windows Search Indexer. The Windows Search Indexer is one process which is known to cause this.
- Disable the ‘Print Spooler’. Run services.msc and disable the ‘Print Spooler’. Your printer will stop working after this. But at least it helps isolate the issue.
- Adjust the Visual Effects in Windows. This post will show you how to tweak Visual Effects to optimize Windows performance.
* Press Windows Key + X and select System.
* Click on Advanced system settings.
* In the System Properties window, select Settings for Performance.
* In the Performance Options window, choose option: Adjust for best performance.
* Click Apply and then OK. - Update your Drivers.
- Run System File Checker as well as DISM to repair to system image. Refer to this article created by ZigZag3143 (MS -MVP) regarding System file check (SFC) Scan and Repair System Files & DISM.
- Update your firmware or upgrade your RAM.
- The final option if nothing works would be reinstalling Windows.
We look forward to your response.
I’ll also try them . I hope that fix my problem 🙁 why win 10 🙁
I was wondering if you fixed your 100% disc usage with any of these tips mentioned above. Did it help?
Any update would be greatly appreciated.
1 person found this reply helpful
Was this reply helpful?
Sorry this didn’t help.
Great! Thanks for your feedback.
How satisfied are you with this reply?
Thanks for your feedback, it helps us improve the site.


