- How to Install 3rd Party Themes on Windows 10
- 4 Steps to a New Theme:
- 1. Find your Windows build
- 2. Create a Restore Point
- 3. Patch your System
- 4. Activate the 3rd Party Theme
- 4.b. Additional Manual Patching
- Windows 10 and Third Party Software
- Replies (13)
- How to Install Third-Party Themes on Windows 10
- How to apply third party visual themes to your Windows 10 PC/laptop?
- Various themes on your Windows PC
- Error 1935 during 3rd party installation on Windows 10 64bit
- Replies (38)
How to Install 3rd Party Themes on Windows 10
Installing a 3rd party theme or a Visual Style on Windows can be a complex and scary process for beginners. Especially when it comes to patching and messing around with registry files. This tutorial will break things down to make it easy for first timers to patch their Windows 10 PC for installing custom Visual Styles.
4 Steps to a New Theme:
- Find out your Windows Build
- Create a system restore point
- Patch your system using UXThemePatcher
- Run the .theme of your 3rd party theme
1. Find your Windows build
At the moment, themes made for certain builds of Windows 10 are not compatible with other builds. To find out which version of Windows you have, type winver in the start menu and hit enter.
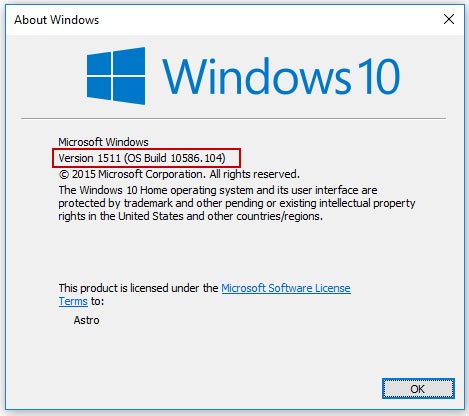
You can still use 3rd party themes for other builds but make sure you use the right patcher and theme combination. For example, do NOT use a theme made for Windows builds earlier than 10586 while your system is patched for 10586 build and vice versa.
In other words, make sure your patcher AND theme both support your Windows Build.
2. Create a Restore Point
Before you begin patching your computer, make sure you create a system restore point so that we can restore our PC in case something goes wrong. It is really important you do this before going to the next step as a worst case scenario.
3. Patch your System
You only need to patch your system once to enable the use of any visual style on your PC. The most popular option to patch it using UXThemePatcher.
Extract the UXThemePatcher setup, run it and complete the installation. After this, your computer will restart for changes to take effect.
4. Activate the 3rd Party Theme
Extract the contents of the Visual Style file that you downloaded into a new folder. You should find a .theme file and a folder of the same name inside it. For example, as seen below, a ALIEN_RETURN_AZURE .theme file and a folder of the same name.
Copy and paste these two into the C:\Windows\Resources\Themes folder of your PC so you have something like this.

Run the .theme file to activate the theme.
If your system was patched correctly, your theme should be activated and your Windows Explorer should look completely different and you’re done! You can stop reading and enjoy your new themes.
If not, don’t worry. Keep reading.
4.b. Additional Manual Patching
If your theme did not work as intended after the previous step, reset your theme back to Windows default. Then download this Theme Patcher file and we’ll manually change system files.
Extract the contents of the Theme Patcher.rar that you downloaded into a new folder. You’ll find a Add_Take_Ownership_to_context_menu file inside a Take Ownership REG files folder. Run it and confirm to complete the registry change.
a. Now go to your C:\Windows\System32 folder and search for themeui.dll. Right click the file and click Open File Location.

b. Right click the file and click Take Ownership. Select Yes when prompted for confirmation.

c. Now right click the file again and rename it to themeui.dll.del. Click Yes and then Continue when prompted.

d. Now copy/paste the themeui.dll file that you’ll find in the File Patch x86 (if your Windows 10 is 32-bit) or File Patch x64 (if your Windows 10 is 64-bit) folders from Step 5 to the C:\Windows\System32 folder.
e. Repeat steps a to d for two more files: uxtheme.dll and uxinit.dll.
Once you’ve copy/pasted all 3 files, restart your system for patches to take effect.
After restart, run the .theme file of the theme that you want to use and it should work properly.
Once you’ve successfully patched your system once, you can then download any 3rd party theme and just run the .theme files to activate them.
If you run into any problems or questions, drop a comment below. Good luck!
Windows 10 and Third Party Software
all of my expensive and valuable 64 bit third party software works
fine in Windows 8.1, but none of it will load into Windows 10.
Replies (13)
* Please try a lower page number.
* Please enter only numbers.
* Please try a lower page number.
* Please enter only numbers.
Hi Roy. I’m Greg, an installation specialist and 8 year Windows MVP, here to help you.
Are you right clicking the program .exe file to Run as Administrator, and installing from an Administrator account?
Check at Settings > System >About for the Edition of Windows 10. If it is «S» version then it limits what programs can be installed. You’d need to upgrade to Pro which I believe is free right now.
Otherwise go over this checklist to make sure the install is set up correctly, optimized for best performance, and any needed repairs get done: http://answers.microsoft.com/en-us/windows/wiki.
If nothing else helps then run a Repair Install by installing the Media Creation Tool and choosing from it to Upgrade Now. This solves many problems and will also bring it up to the latest version which you need anyway and by the most stable method. http://windows.microsoft.com/en-us/windows-10/m.
I hope this helps. Feel free to ask back any questions and let us know how it goes. I will keep working with you until it’s resolved.
Over 100,000 helped in forums for 11 years. I don’t quit for those who are polite and cooperative.
How to Install Third-Party Themes on Windows 10

We’re all excited about Windows 10 operating system, and so far, Microsoft has done a great job with its Technical Previews. We saw all sorts of changes, ranging from visual to performance updates, and speaking of visual changes, if you want to change the look of your Windows 10 with custom themes, today we’re going to teach you how to easily install third-party themes on Windows 10.
Windows 10 is similar to Windows 8.1 since it doesn’t allow you to install third party themes by default, but luckily for you, there are few solutions that allow you to bypass this limitation.
How to apply third party visual themes to your Windows 10 PC/laptop?
Before you install third-party themes on your Windows 10 PC, you’ll have to patch system files. Patching system files isn’t a simple process, but fortunately for you, there are several apps that will patch system files for you, and allow you to install third party themes.
We have to warn you that patching system files using the third party software might create unexpected issues, so please perform the patching task at your own risk. That being said, here are best three applications for patching system files.
UxStyle is an application that removes Windows theme signature requirements in order to enable third-party customization of your Windows. This application supports a wide array of Windows systems including Windows XP, Windows Vista, Windows 7, Windows 8, Windows 8.1, Windows Server 2003, Windows Server 2008, Windows Server 2008 R2, Windows Server 2012 and Windows Server 2012 R2. As you can see, you’re not limited to Windows 10, and you can also use this software on almost any Windows system.
Next on our list is UXTheme Multi-Patcher. This applications lets you use non-certified visual styles by bypassing Microsoft’s certification verification in uxtheme.dll.
Like the previous application, UXTheme Multi-Patcher supports almost all Windows versions, including Windows 10 32-bit and 64-bit versions.
Last on our list is UltraUXThemePatcher, a well-known application for patching system files. This software can be used for patching files on Windows XP, Windows Server 2003, Windows Vista, Windows Server 2008, Windows 7, Windows 8 and Windows 8.1, both 32-bit and 64-bit versions. Before using this application you should know that UltraUXThemePatcher application will make few changes to your system files, so keep that in mind.
After you have successfully patched the system files, copy the selected theme folder (available with a .theme file) to “%windir%ResourcesThemes” folder. In addition, you can also open this folder by pressing Win + R keys to open the run command and typing the folder path.
After doing that, you just need to double click .theme file of your third-party theme and your new theme will be applied on your Windows 10 computer.
Various themes on your Windows PC
For all of you that like to customize visually your PC, it is very important to know how to correctly apply third-party themes. But, where to take some themes that could fit your taste? We have many lists of best themes that you coiuld get for your WIndows 10 PC or laptop, and will list the best of them below. Here they are:
Installing third-party themes on Windows 10 isn’t impossible, although it’s disabled by default but if you don’t feel comfortable with patching systems files and potential risks, maybe you shouldn’t try to do it.
Error 1935 during 3rd party installation on Windows 10 64bit
I’m trying to install the PACE License Manager and at the end of the installation I get the following error:
«Error 1935.An error occurred during the installation of assembly component <. >. HRESULT: 0x80073715.»
where «. » represents a string of letters and numbers.
I’ve been working for hours trying to fix this. Their support directs me to https://support.microsoft.com/en-us/kb/926804 but most of that is outdated for the latest .NET I’m running.
I’ve tried running the .NET repair tool as well but that didn’t work.
I’ve heard reinstalling the .NET framework can solve the problem but I’m not sure how since I can’t find an installer in my Add/Remove Programs. After uninstalling Visual Studio 2015 Community, the only .NET programs I have left are:
«Microsoft .NET Framework 4.6 SDK»
«Microsoft .NET Framework 4.6 Targeting Pack»
When I try to uninstall the SDK it warms me I might mess up 1 or more programs. Since this is the SDK and not the framework I haven’t uninstalled it yet.
I would like to get your insight on how to solve this issue.
System: Windows 10 64-bit (clean install)
Replies (38)
* Please try a lower page number.
* Please enter only numbers.
* Please try a lower page number.
* Please enter only numbers.
Thank you for being part of Windows 10.
If you receive a 1935 error when you try to install software, the Windows file system transaction log has become corrupted.
To correct this install error, you need to clear the log.
a. Open an Administrator command prompt. To do this, press Windows key + X keys together and choose Command Prompt(Admin).
b. Now type, fsutil resource setautoreset true C:\
c. This assumes that C: is the drive in which Windows 10 is installed. If it is installed on another drive like D:, please change the drive letter appropriately.
d. Restart the system and check the issue.
Do get back to us for any issues pertaining to Windows in the future. We will be happy to help.
184 people found this reply helpful
Was this reply helpful?
Sorry this didn’t help.
Great! Thanks for your feedback.
How satisfied are you with this reply?
Thanks for your feedback, it helps us improve the site.
How satisfied are you with this reply?
Thanks for your feedback.
Thanks for replying.
I followed your steps by running cmd as admin. Executing the line you provided it said the operation was successful. I shut off the computer and turned it back on.
After trying the installer again the same issue exists.
19 people found this reply helpful
Was this reply helpful?
Sorry this didn’t help.
Great! Thanks for your feedback.
How satisfied are you with this reply?
Thanks for your feedback, it helps us improve the site.
How satisfied are you with this reply?
Thanks for your feedback.
I have had problems with this error 1935 on Windows 10 too, but only when I have done a clean install (ie, Windows Reset and wipe files). In such a scenario, with nothing else installed, it is hard to imagine the » Windows file system transaction log has become corrupted». I even redid the Windows reset just to be sure but still received the error. I am curious if you did a clean install too, or just an normal upgrade?
I only solved my problem by reverting to Windows 8.1 from backup.
Was this reply helpful?
Sorry this didn’t help.
Great! Thanks for your feedback.
How satisfied are you with this reply?
Thanks for your feedback, it helps us improve the site.
How satisfied are you with this reply?
Thanks for your feedback.
I too did a clean install after upgrading using the Windows Reset and Wipe files. That’s good to know resetting it again for you did not work. Either there is an incompatibility in the installers with Windows 10 or Windows 10 is missing something Windows 8.1 had.
I contacted Microsoft Tech Support and they are escalating my issue because they couldn’t fix it. I should be getting a call back from them. Unless someone else has a solution for Windows 10 I’ll keep you posted on the outcome in my conversation with them.
Now that I’ve gotten all settled I’d hate to go back and set everything up again for one program 🙂
1 person found this reply helpful
Was this reply helpful?
Sorry this didn’t help.
Great! Thanks for your feedback.
How satisfied are you with this reply?
Thanks for your feedback, it helps us improve the site.
How satisfied are you with this reply?
Thanks for your feedback.
Was this reply helpful?
Sorry this didn’t help.
Great! Thanks for your feedback.
How satisfied are you with this reply?
Thanks for your feedback, it helps us improve the site.
How satisfied are you with this reply?
Thanks for your feedback.
Ok so I just got off the phone with Microsoft and at this point there is not a fix with regards to Windows 10 and this 1935 error since we have all done a clean install.
I have been notified that their engineers will have to create a Windows Update with a patch to this issue for Windows 10. How long this will take and where it is in their priority queue, I have no idea.
As far as our end goes we just need to notify the manufacturer of the program we are using of the error, and they need to provide an updated build for Windows 10. I have already done this for my program but will be forwarding this information to them again. Hopefully this will work for your issues as well.
I guess now all that’s left is to hope they can either get us the Windows Update quickly or provide an updated build of the programs we are using quickly!


