Control which apps can access your webcam in Windows 10
Webcams have become essential stuff these days. Having a camera as part of your system lets you make Skype video calls, take pictures, etc. But with a number of modern apps installed in the system, the user needs to be in control as to which apps are allowed to access the camera.
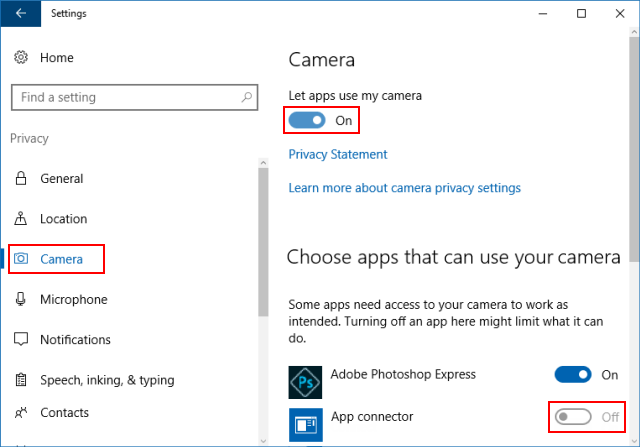
Windows 10 lets you choose which UWP or modern apps can use your camera. To configure this, open Settings (Winkey + i), click Privacy and click Camera.
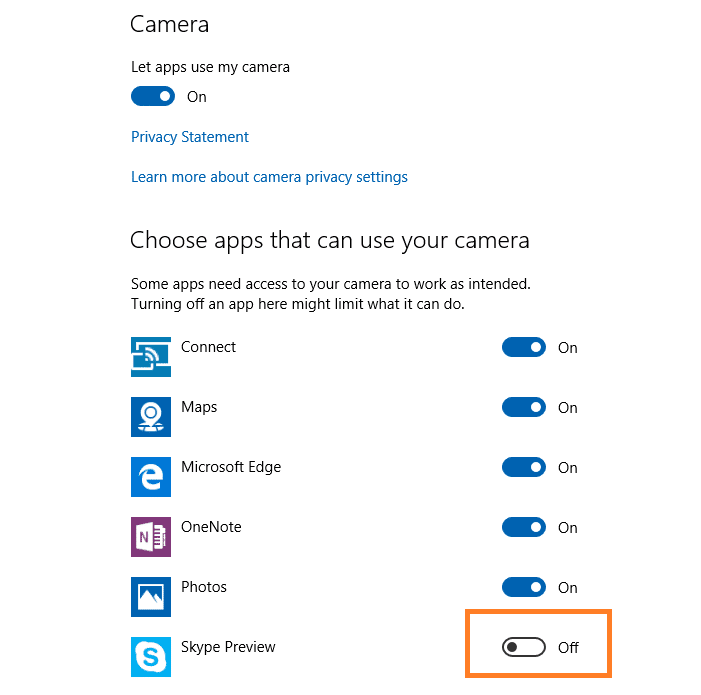
There you can enable “Let apps use my camera” and under “Choose apps that can use your camera”, you can turn off individual apps settings on or off.
To block all apps from using the camera you can turn off the master switch “Let apps use my camera”.
After blocking Skype app from accessing the camera, using webcam in Skype app showed up with a black background.
Even if you turn the camera off for each app under Choose apps that can use your camera, some of the listed apps might still be able to open the camera to let you take pictures or videos. But the camera won’t capture images or video unless you explicitly select the Photo or Video button.
If you turn on Windows Hello, it will use your camera to sign you in even if Let apps use my camera is turned off.
The above settings apply to the current user account. To apply it on a per-system basis you can use the Group Policy Editor. Start the Group Policy Editor and go to:
Double-click “Let Windows apps access the camera”.
There you can allow or deny specific applications from accessing the camera. You can deny all but specific apps (or the other way) using the Application package family name such as:
You can obtain the package family name using PowerShell’s Get-AppxPackage command.
This policy setting specifies whether Windows apps can access the camera. You can specify either a default setting for all apps or a per-app setting by specifying a Package Family Name. You can get the Package Family Name for an app by using the Get-AppPackage Windows PowerShell cmdlet. A per-app setting overrides the default setting.
If you choose the “User is in control” option, employees in your organization can decide whether Windows apps can access the camera by using Settings > Privacy on the device.
If you choose the “Force Allow” option, Windows apps are allowed to access the camera and employees in your organization cannot change it.
If you choose the “Force Deny” option, Windows apps are not allowed to access the camera and employees in your organization cannot change it.
Also, take a look at the “Allow use of Camera” GPO here:
Note that the setting and the GPO apply only to the modern or Universal apps — classic desktop programs aren’t listed on the Settings page. Desktop programs can use the camera arbitrarily, as there isn’t a unified setting or Group Policy to control which (Win32) programs can access the camera.
How to use the Camera app
If your PC has a built-in camera or a connected webcam, you can use the Camera app to take photos and videos. To find the Camera app, select Start > Camera.
Select any heading below. It’ll open to show more info about using your camera or webcam.
To find the Camera app, select Start > Camera. After you open the Camera app:
Select Photo or Video , then select it again to take a picture or start a video. If you are making a video, select Video again to finish recording.
To see your new photo or video, or ones you’ve taken before, select Start > Photos and then choose the Collection you want to see.
To change camera options for your camera, like the framing grid or photo quality, select Start > Camera > Settings .
If your device has more than one camera, like a front-facing and a rear-facing camera, here’s how to switch from one to the other:
Select Start > Camera > Change camera.
In Windows 10 the Camera app doesn’t include digital zoom, but you can get an effect similar to zooming if you take a photo and then crop it:
Select Start > P hotos .
Choose the photo you want to crop.
Select Crop & rotate .
Select Aspect ratio and pick from the preset options or drag the borders where you want them.
Select Save a copy > Save.
You can get the photos and videos you take with the Camera app to automatically save to OneDrive, so you can find them on any of your devices.
In the search box on the task bar, type File explorer and then select Open.
Select This PC, right-click on the Pictures folder, and then select Properties.
Select the Location tab, and then select Move.
Select OneDrive > Select Folder > Move.
In the search box on the task bar, type File Explorer and then select Open.
Select This PC, right-click on the Videos folder, and then select Properties.
Select the Location tab, and then select Move.
Select OneDrive > Select Folder > Move.
The Camera app can use latitude and longitude info if you take photos from a tablet or camera that uses location info and is connected to the internet or a mobile network. To do this:
Select Start > Settings > Privacy > Location .
Make sure that the location service is turned on, and then under Choose which apps can access your precise location, turn on Camera.
You can choose which apps use the camera. To block all apps from the camera:
Select Start > Settings > Privacy > Camera .
Turn off Allow apps to access your camera.
To turn on the camera for some apps, and turn it off for others:
Select Start > Settings > Privacy > Camera .
Turn on Allow apps to access your camera.
Toggle the switches to change which apps in this list have camera access turned on or off.
You can turn the camera off completely:
In the search box on the taskbar, type device manager, then select Device Manager in the list of results.
Select the arrow next to Cameras to expand the tree.
Right-click the camera you want to turn off.
Select Disable device.
To keep the Camera app from using the camera on your device, turn off the camera completely.
If you have problems with the Camera app after changing privacy settings, close it, then open it again.
If your built-in camera or connected camera has stopped working, here are some things you can try to get it working again:
Disconnect the camera from your PC, then reconnect it.
If that doesn’t help, there might be a problem with the camera’s drivers. You can install driver updates from your camera’s manufacturer, or you can use your PC’s default drivers.
To install updates from the manufacturer:
In the search box on the taskbar, type Device Manager and then select Open.
Select Cameras and then right-click on the webcam that’s having problems.
Select Scan for hardware changes, select the webcam again, and see what’s going on with your webcam in Device status. If it’s not working properly, contact the manufacturer for more info.
Restart your PC.
To install your PC’s default drivers:
In the search box on the taskbar, type Device Manager, then select Open.
Select Cameras and then right-click on the camera that’s having problems.
Select Update driver, then choose Search automatically for updated driver software.
When installation is complete, follow the instructions, then select Close.
Restart your PC.
If you don’t see your camera in Device Manager, see Camera does not work in Windows 10.
If the suggestions here don’t solve your problem, check the Music, photos, and video community page or the Devices & drivers community page in the Windows forum for solutions that other people have found for specific problems with hardware or error messages.
If your PC has a built-in camera or a connected webcam, you can use the Camera app to take photos and videos. To find the Camera app, select Start > Camera.
Select any heading below. It’ll open to show more info about using your camera or webcam.
After you open the Camera app, select the left arrow.
You can change some options for your camera in Settings, like showing grid lines to help you compose a photo, or including location info in your photos.
Open the Camera app.
Swipe in from the right edge of the screen, and then select Settings.
Adjust the settings for each option. These might include:
Change the photo aspect ratio or video quality.
Turn location info on or off.
Show or hide grid lines.
Turn video stabilization on or off.
Turn the microphone on or off.
Turn the video lamp on or off.
Change what happens when you tap the screen.
If your device has more than one camera, like a front-facing and a rear-facing camera, you can switch cameras before taking a photo or video.
Open the Camera app.
Swipe in from the bottom edge to see the app commands. If you’re using a mouse, right-click within the app.
Select Change camera.
If your device has a touchscreen, you can zoom in or out by using two fingers to pinch or stretch the image on your screen.
You can get an effect similar to zooming in if you take a photo and then crop it.
Swipe to the right or select the left arrow to see your recent photos and videos. Keep swiping or clicking the left arrow until you find the photo you want to crop.
Swipe in from the bottom edge to see the app commands. If you’re using a mouse, right-click within the app.
Select Aspect ratio and pick from the preset options or drag the borders where you want them.
Save the cropped photo. You can update the original photo or save a copy with your changes.
You can get the photos and videos you take with the Camera app to automatically save to OneDrive, where you can get to them from your other devices. You can choose what quality to use when uploading photos too.
Swipe in from the right edge of the screen, and select Settings > Change PC settings.
Go to OneDrive, and then Camera roll.
Select the settings to use for your photo and video uploads.
If your tablet or camera supports including location info and can connect to the internet or a mobile network when you take the photo, the Camera app can include latitude and longitude info with your photos.
Open the Camera app.
Swipe in from the right edge of the screen, and then select Settings.
Set Location info to On.
Turn the camera off for apps
You can choose to turn off the camera for specific apps while allowing other apps to use it, or you can turn the camera off completely.
Swipe in from the right edge of the screen, select Settings > Change PC settings.
Select Privacy > Webcam.
Set Let apps use my webcam to Off or turn it off for specific apps.
Disable the camera
Swipe in from the right edge of the screen, and then select Search.
Type Device Manager in the search box.
Select Device Manager.
Expand Imaging Devices.
Right-click the camera, and then select Disable.
Prevent the camera from being used when your PC is locked
Swipe in from the right edge of the screen, and then select Settings > Change PC settings.
Select PC and devices, and then select Lock screen.
Turn off Swipe down on the lock screen to use the camera.
Note: To keep the Camera app from using the camera, turn off the camera completely. Drag the app to the bottom of the screen and hold it there until the app flips over.
If you have problems with the Camera app after changing privacy settings, close it and re-open it.
If you’ve connected a camera to your PC and the camera stops working, here are some things you can try to get it working again:
Disconnect the camera from your PC, then reconnect it.
Close the app. Drag the app to the bottom of the screen and hold it there until the app flips over.
If that doesn’t help, there might be a problem with the camera’s drivers. You can install driver updates from your camera’s manufacturer, or you can use your PC’s default drivers.
To install updates from the manufacturer:
Swipe in from the right edge of the screen and then tap Search. (If you’re using a mouse, point to the lower-right corner of the screen, move the mouse pointer up, and then click Search.) Then enter Device Manager in the search box, select Settings, and select Device Manager in the results.
Expand Imaging devices.
Right-click the camera that’s having problems, and select Update Driver Software.
Select Search automatically for updated driver software, and then follow the on-screen instructions. This might include restarting your PC.
To install your PC’s default drivers:
Swipe in from the right edge of the screen, and then tap Search. (If you’re using a mouse, point to the lower-right corner of the screen, move the mouse pointer up, and then click Search.) Then enter Device Manager in the search box, select Settings, and select Device Manager in the results.
Expand Imaging devices.
Right-click the camera that’s having problems, and select Update Driver Software.
Select Browse my computer for driver software.
Select Let me pick from a list of device drivers on my computer.
Select USB Video Device, select Next, and then follow the on-screen instructions. This might include restarting your PC.
If the suggestions here don’t solve your problem, check the Music, photos, and video community page or the Devices & drivers community page in the Windows forum for solutions that other people have found for specific problems with hardware or error messages.
How to Allow or Block App Use Camera in Windows 10
Some apps need to access camera to work as intended. The app will require your permission before it can access the webcam and microphone. You can control which apps can use your camera, which apps have no access to the camera in Windows 10. Here shows you how to allow or block apps use camera in Windows 10.
Option 1: Turn on Let App Use Camera in Settings
You can decide to allow or block specific apps and services using the camera in Settings.
Step 1: Go to Start menu, click Settings > Privacy.

Step 2: Click on Camera tab, turn on Let apps use my camera at the top of the right pane. Under the Choose apps that can use your camera option, you can limit an individual app and service to use the camera by turning it off.
Option 2: Enable or Disable Let Windows App Access Camera
You can control whether apps can access the camera or not in the Group Policy Editor.
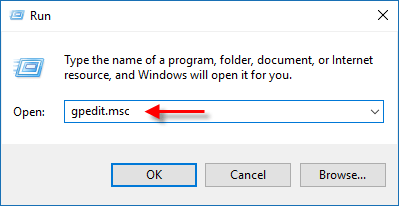
Press Win + R keys to open Run box, type in gpedit.msc, and then hit Enter.
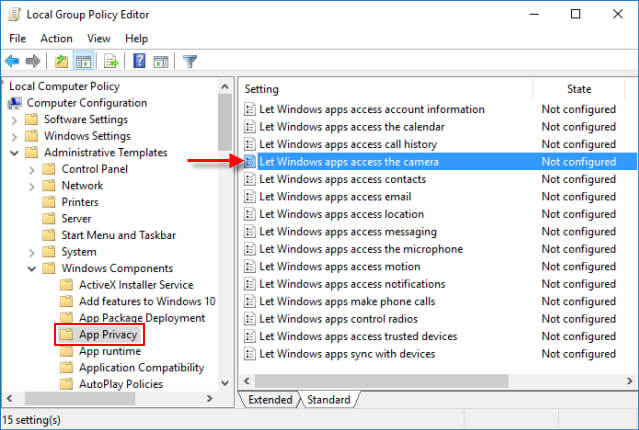
Step 2: In the Group Policy Editor, navigate to the following location:
Computer\ Configuration\Administrative Templates\Windows Components\App Privacy
Step 3: In the right pane of App Privacy, double-click on Let Windows apps access the camerapolicy to edit it.
Step 4: To let Windows apps access the camera, select Enabled, then select User is in control option.
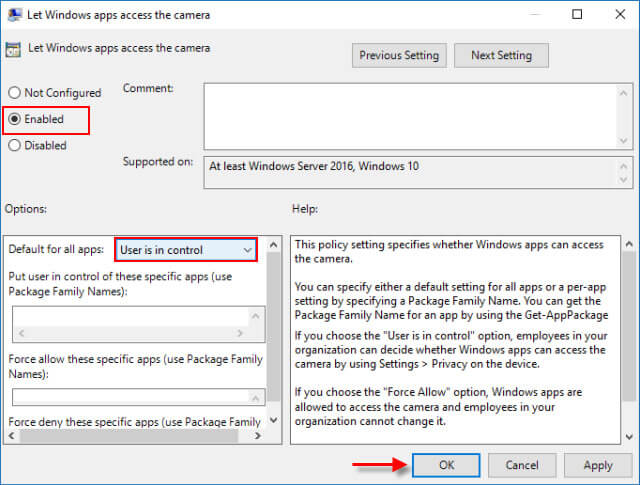
To block Windows apps from using the camera, select Disable option. That means you cannot turn on Let apps use my camera in Settings.
In Windows 10, a camera is a part of your device and system which lets users make Skype video calls, take pictures, Sign in to your device if you have set up Windows Hello, and more. It’s not recommended to disable the Let apps use my camera feature.


