- Универсальная загрузочная флешка для BIOS Legacy и UEFI
- MediaCreationTool для создания установочного носителя Windows 10
- Универсальная загрузочная флешка Legacy/UEFI
- Windows 10. Возможен ли безболезненный переход с UEFI на Legacy?
- How to enable Legacy Windows 7 boot menu on Windows 10
- How do I enable Windows 7 boot menu on Windows 10?
- Tutorial on how to enable the legacy Windows 7 boot menu using Windows 10
- Use bcdedit
- Use bootrec
- How to enable Legacy Boot in Windows 10
- Steps to enable Legacy boot on any Windows 10 PC
- How to access BIOS/UEFI settings
Универсальная загрузочная флешка для BIOS Legacy и UEFI

C появлением BIOS UEFI загрузочные флешки стали делиться на типы — адаптированные под Legacy, старый режим BIOS , и под UEFI, современный режим BIOS , современный её формат. Многие программы для записи флешек могут создавать их адаптированными под оба режима BIOS, но немногие из них предлагают универсальное решение – создание флешек, совместимых и с Legacy, и с UEFI. А такая флешка пригодилась бы большинству опытных пользователей.
Многие из них работают не только с одним личным компьютерным устройством, а с несколькими. Многие решают различные вопросы с неполадками компьютеров в кругу своих близких. И им приходится сталкиваться с компьютерами, работающими как в режиме UEFI , так и в Legacy .
Как же создать универсальную загрузочную флешку для BIOS Legacy и UEFI?
Специфика флешек UEFI заключается в обязательности форматирования носителя в файловую систему FAT32 . Флешки Legacy могут быть форматированы как в FAT32 , так и в NTFS , однако для них принципиально важно наличие активного раздела на загрузочном носителе. Т.е. флешка должна быть инициализирована в MBR -стиле диска, а её раздел должен быть первичным (основным) и активным. Само же содержимое флешки копируется на неё обычным образом с ISO -образа самозагружаемого ПО – дистрибутива операционной системы, аварийного WinPE , прочего ПО. И, кстати, ISO -образ, дабы флешка могла загрузиться в режиме UEFI , должен содержать файлы, необходимые для EFI -загрузки. Все современные образы самозагружаемого ПО такие файлы содержат, а вот если у вас завалялись какие-то старые образы со времён 2000-х, с таких UEFI -компьютеры вы не загрузите.
MediaCreationTool для создания установочного носителя Windows 10
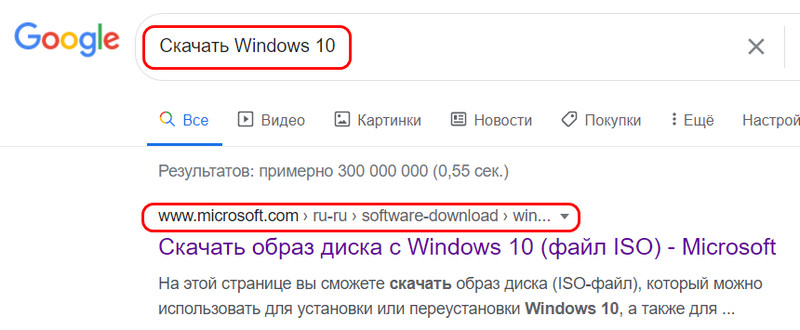
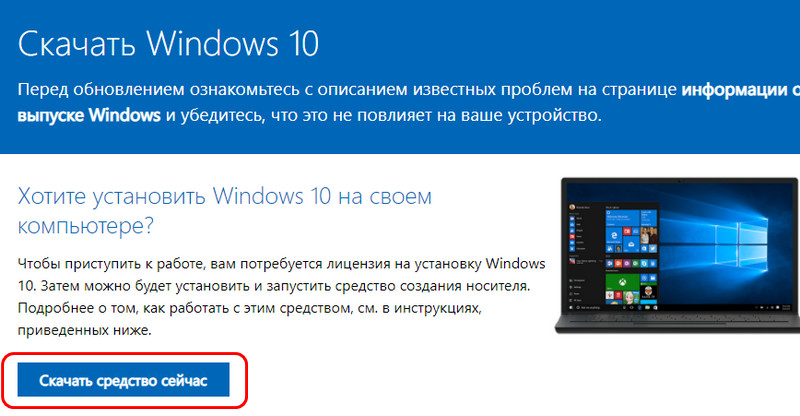
И вот чтобы обычные пользователи всеми этими тонкостями с режимами BIOS не заморачивались, компания Microsoft позаботилась о создании адаптированного и под Legacy , и под UEFI установочного флеш-носителя Windows 10. Компания на своём сайте предлагает утилиту MediaCreationTool, которая создаёт универсальную флешку, с которой мы гарантировано загрузим компьютер с любым режимом BIOS . Если вам нужно записать флешку с установочным процессом Windows 10, просто вводите в интернет-поисковик «скачать Windows 10», в числе первых результатов будет сайт Microsoft, заходите на него.
Жмите «Скачать средство сейчас».
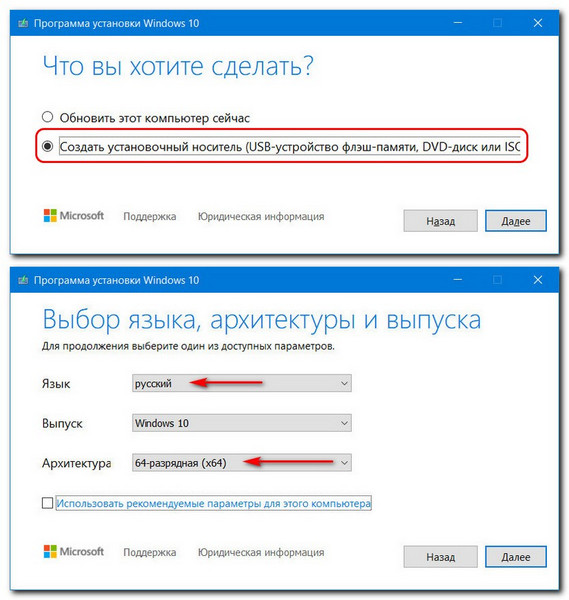
Запускайте скачанную утилиту. На первом этапе принимайте лицензионные условия. Далее выбирайте создание установочного носителя, указывайте параметры дистрибутива Windows 10 – язык и разрядность.
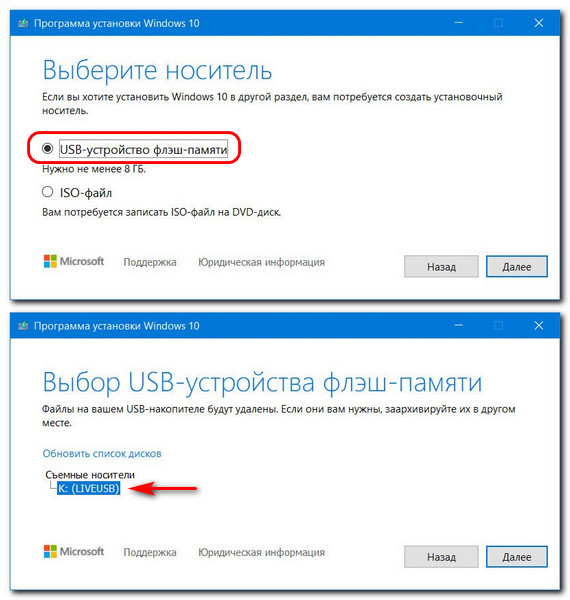
Затем выбирайте в качестве носителя USB -устройство флеш-памяти и указывайте конкретное устройство, если у вас их подключено несколько.
Ну и далее пойдёт уже процесс создания установочной флешки «Десятки». Давайте посмотрим на свойства загрузочной флешки, созданной утилитой Media Creation Tool, в системной консоли управления дисками. Видим, что раздел флешки – это основной раздел, он активен, следовательно, стиль разметки здесь MBR. Файловая система раздела – FAT32 .
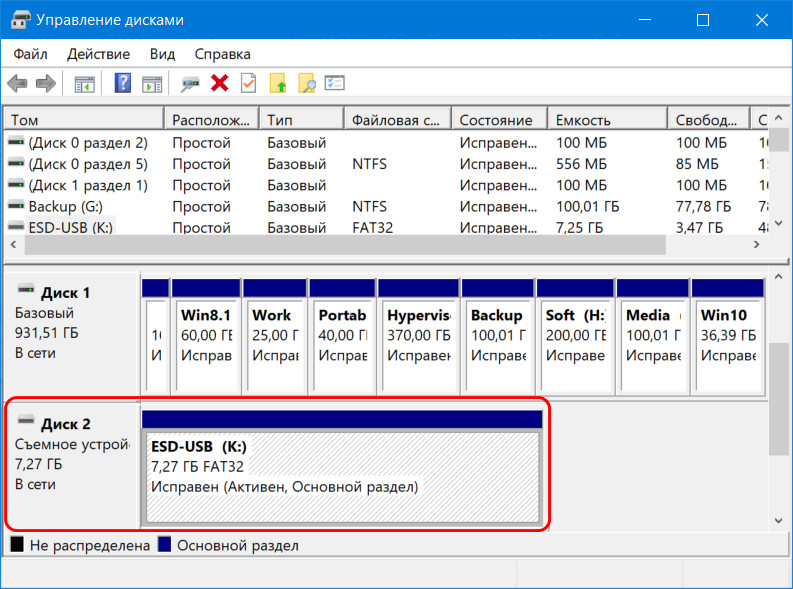
Вот такие свойства должны быть у универсальной загрузочной флешки, подходящей компьютерам и с BIOS Legacy , и с UEFI . И нам ничто не мешает самим создать такую флешку с нужным нам самозагружаемым ПО. Давайте же создадим.
Универсальная загрузочная флешка Legacy/UEFI
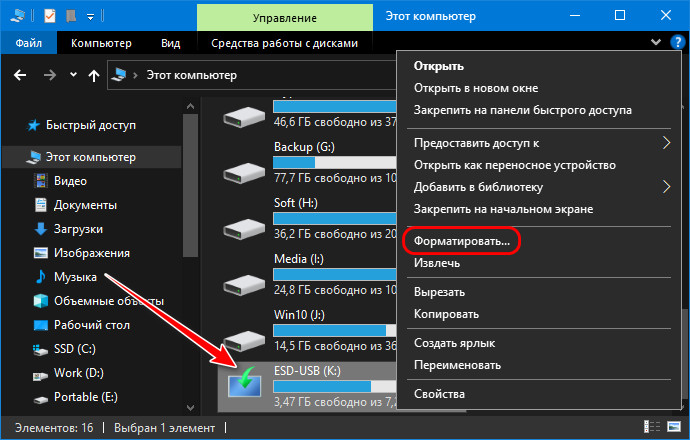
Форматируем флешку средствами Windows. В контекстном меню на флешке в проводнике выбираем «Форматировать».
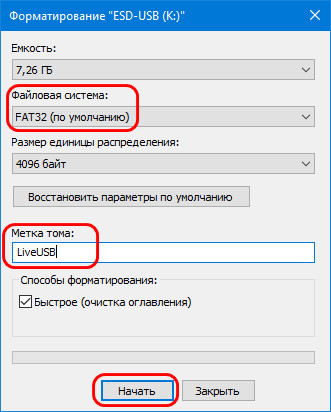
В графе файловой системы выставляем FAT32 . Указываем метку тома, т.е. метку нашей загрузочной флешки. Остальное оставляем как есть. Жмём «Начать».
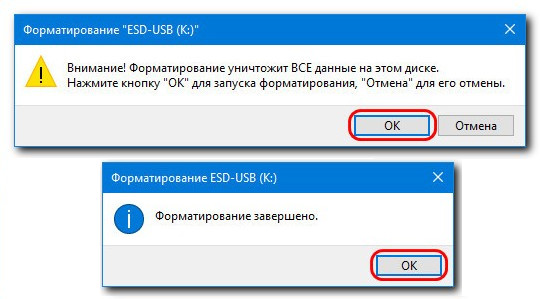
Подтверждаем форматирование. Дожидаемся его завершения.
Теперь берём ISO -образ самозагружаемого ПО, в нашем случае это аварийный WinPE . Подключаем образ для отображения в проводнике Windows, в версиях системы 8.1 и 10 это делается обычным двойным кликом.
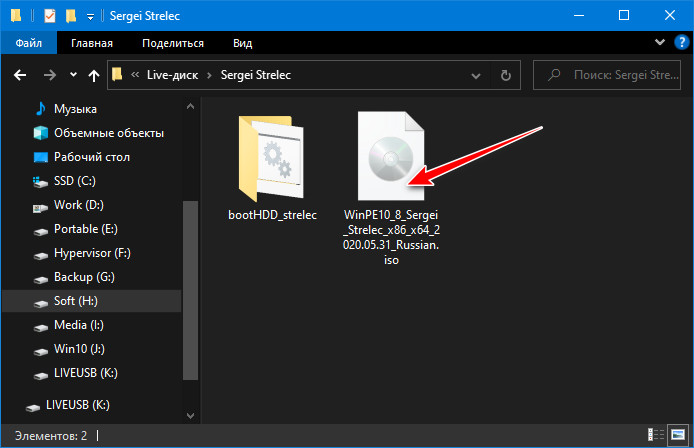
Выделяем всё содержимое подключённого ISO и копируем его на отформатированную флешку.

И вот копирование завершено, у нас готова загрузочная флешка для режима UEFI .

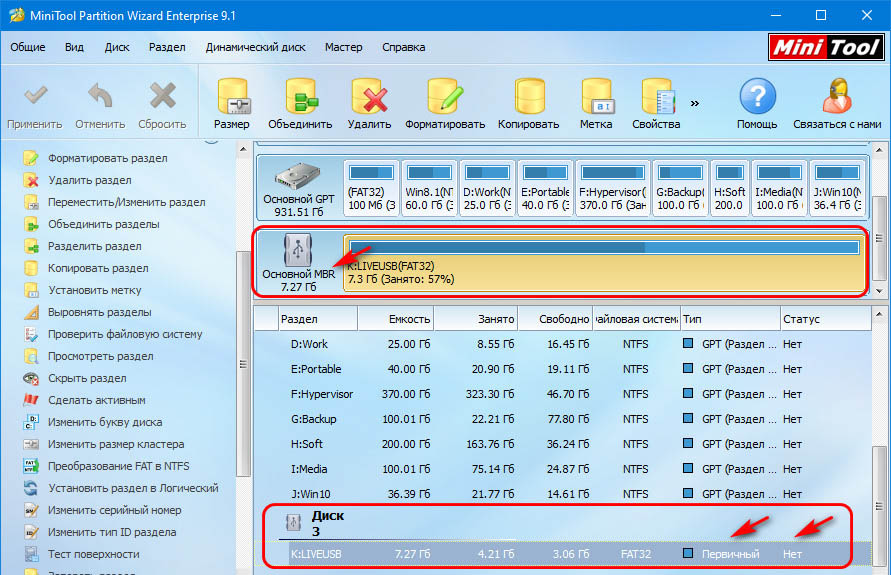
Но чтобы она подходила ещё и для режима Legacy , нужно адаптировать её. Для этого нам понадобится любая функциональная программа для разметки дискового пространства. В нашем случае мы будем использовать одну из старых версий MiniTool Partition Wizard. В окне программы смотрим карту нашей флешки и её табличное представление. Стиль разметки флешки у нас верный – MBR. Раздел флешки — первичный (основной) , всё верно. А вот статуса активного этот раздел не имеет.
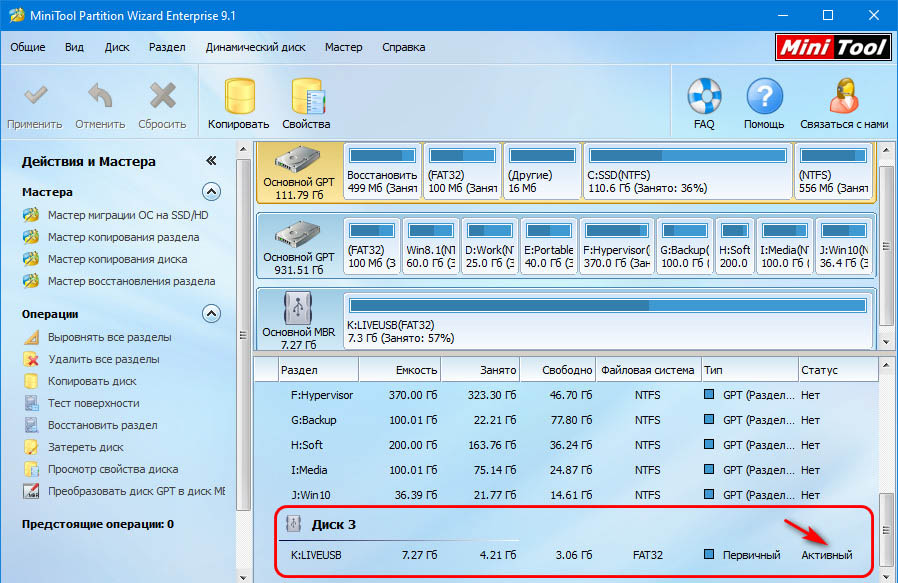
Выделяем раздел флешки и делаем его активным.

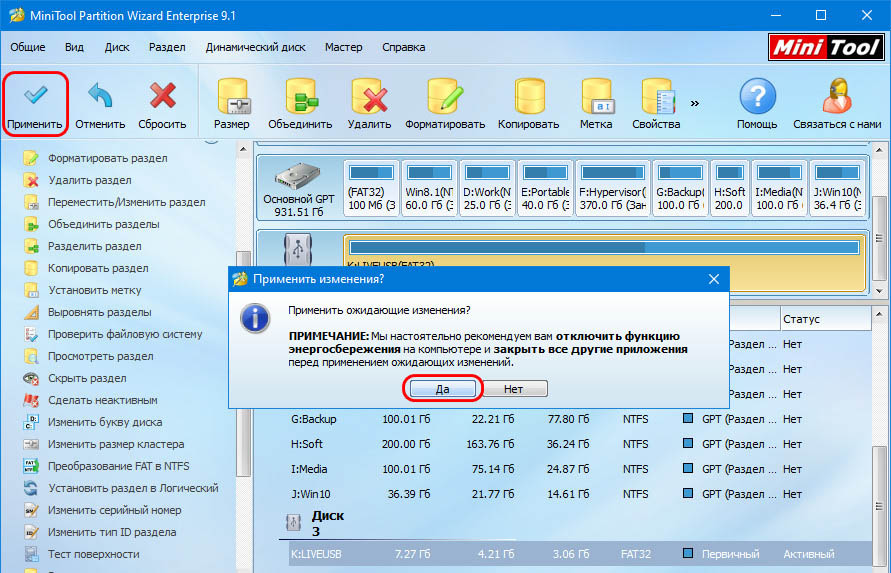
Теперь всё так, как надо.
Если у вас не соответствуют другие свойства флешки, вы меняете их. Т.е. если у вашей флешки стиль разметки GPT, вы его конвертируете в MBR и проверяете тип и статус её раздела, тип и статус должны быть, соответственно, первичным (основным) и активным.
Вот, собственно, и всё. И напоследок маленький лайфхак. Если у вас нет опыта работы с программами для разметки дискового пространства, если вы боитесь что-то сделать не то, если вам просто лень искать и устанавливать такую программу на компьютер, вы можете с помощью MediaCreationTool записать установочную фешку с Windows 10, утилита создаст её с нужными свойствами. Потом вы просто в проводнике удаляете всё содержимое флешки и копируете на флешку содержимое нужного вам ISO -образа.
Windows 10. Возможен ли безболезненный переход с UEFI на Legacy?

у меня же под рукой была только GParted.

Можно ли безболезненно сменить UEFI на Legacy?
Можно ли каким-то образом отключить защиту UEFI в самой операционной системе, чтобы специфичный софт смог работать напрямую с «железом»?
Специфичный софт работает и через efi и bios. Поправлю вас, efi — это не совсем защита, это замена bios. Efi позволяет системе пользоваться устройствами через универсальные api, что упрощает ситуацию с поиском драйверов.
Есть другие варианты решения проблемы без переустановки Windows?
Efi позволяет системе пользоваться устройствами через универсальные api, что упрощает ситуацию с поиском драйверов.
Да, но насколько я понимаю не только позволяет пользоваться через универсальные api, но и не позволяет использовать напрямую доступ к «железу»
How to enable Legacy Windows 7 boot menu on Windows 10


How do I enable Windows 7 boot menu on Windows 10?
- Use bcdedit
- Use bootrec
Are you one of the Windows users who switch from Windows 7 to the Windows 10 operating system on your device?
Well seeing that the bootloader in Windows 10 looks completely different than the one you are used to in the Windows 7 operating system you can find out by reading the tutorial posted below how exactly you can enable the legacy Windows 7 boot menu in Windows 10 as well. 
Windows 10 brought a new boot menu that is an improvement over the previous one. This boot menu is graphical, and it allows you to use your mouse, which is a major plus. In addition, it offers more options and it’s more user-friendly.
Despite the aforementioned improvements, some users still prefer the older textual boot menu. One of the main reasons is because the new boot menu will restart your PC if you’re using your PC in dual boot mode. This isn’t the case with the legacy boot menu, and instead of restarting, your PC will boot straight to the select operating system thus saving your time.
Tutorial on how to enable the legacy Windows 7 boot menu using Windows 10
Use bcdedit
- Left click or tap on the search box situated in the Start menu of your Windows 10 operating system.
- In the search dialog box write the following: “cmd.exe” without the quotes.
- After the search has finished you should have an icon with Command Prompt.
- Right click or hold tap on the Command Prompt icon and from the menu that appears left click or tap on the “Run as administrator” feature.
Note: If you are prompt by a user account control window you will need to left click or tap on the “Yes” button to proceed. - Now in the “Elevated Command Prompt” window you just opened write the following: “bcdedit /set “
” bootmenupolicy legacy ” without the start and end quotes.
Note: If you manually write the command above be very careful on the spaces in the line as the command will not work if you type something wrong. - After you wrote the command above press the Enter button on the keyboard.
- Now in the command prompt window write the following: “Exit” without the quotes.
- Press the Enter button on the keyboard.
- Reboot your Windows 10 operating system and check if the boot menu has switched to the Windows 7 like legacy.
Turn the Windows 10 boot menu on:
- If by any chance you wish to switch back to the Windows 10 boot menu go to the Start button again and in the search box write “Cmd.exe” as you did in the steps above.
- Right click again on the command prompt icon and select the “Run as administrator” feature.
- In the command prompt write the following line: “bcdedit /set
bootmenupolicy standard ” without the quotes. - Press the Enter button again in order for the command to execute.
- Close the command prompt window and reboot your operating system.
Use bootrec
You can try to use bootrec feature in order to enable legacy Windows 7 boot menu on your Windows 10.
It will be the same as fixing Windows 7 boot, but you will arrive to open Windows 7 legacy boot menu with one condition – having your Windows 7 installation CD/DVD. Here’s how you do it:
- Boot from the original Windows 7 installation CD/DVD
- Select the language you prefer; click ‘Next’
- Select the operation System from the list (Windows 7) and then click ‘Next’
- When ‘System Recovery Options’ screen appears, click on ‘Command Prompt‘
- In Commander type the following command ‘bootrec /fixmbr’ (without the quotes) and press ‘Enter’
- Type ‘bootrec /fixboot’ (without the quotes) and press ‘Enter’
- Type ‘bootrec /ScanOs’ (without the quotes) and press ‘Enter’
- Type ‘bootrec /rebuildBcd’ (without quotes) and press ‘Enter’
- Eject Windows 7 installation CD/DVD
- Type ‘exit’, press ‘Enter’ and reboot your PC
And there you go, some quick methods on how to change the new boot menu in Windows 10 to the legacy Windows 7– like boot menu you are used to.
Also if you are having trouble doing the steps above you are welcomed to write us in the comments section situated a little bit below these lines and I will help you further as soon as possible.
How to enable Legacy Boot in Windows 10


The Legacy Boot mode (BIOS) is slowly but steadily leaving the Windows platform. Albeit, lots of Linux and Windows 7 users are still using the Legacy boot, for various reasons. Nonetheless, in order to enable Legacy boot in Windows 10, you’ll have a harder time than on some earlier Windows iterations.
Luckily, we got your back. Below you can find the whole operation and even the comparison between the two.
Steps to enable Legacy boot on any Windows 10 PC
Let’s start with explaining why one would choose to use the Legacy boot option instead of the UEFI on a compatible PC. Most of the contemporary configurations support both Legacy BIOS and UEFI booting options. And the latter is the default version. However, if you have a Windows 10 installation drive with an MBR (Master Boot Record) partitioning style, you won’t be able to boot and install it in the UEFI boot mode. And this is a common problem.
Also, if you have HDD partitioned and formatted as a GPT drive, you won’t be able to install Windows 10 from an MBR drive. And vice versa. But, this is a story for some other time, as we’ll try to focus on enabling Legacy BIOS boot on your PC today.
Now, if you, for any reason, need to boot your PC in the Legacy BIOS mode instead of UEFI, the BIOS/UEFI settings are the place to be. There, you should have an easy time changing the Boot mode from one to another. However, with Windows 10 and its Fast Boot, the mere accessing the BIOS/UEFI settings isn’t exactly a walk in the park.
How to access BIOS/UEFI settings
Now, here’s the procedure you need to follow on Windows 10 in order to access the BIOS/UEFI Settings:
- Press Windows key + I to open Settings.
- Choose Update & Security.
- Select Recovery from the left pane.
- Under the Advanced startup, click Restart now.

- Choose Troubleshoot.
- Select Advanced options.
- Choose UEFI Firmware Settings and click Restart.

Once there, navigate to the Boot section and replace UEFI with the Legacy (or Legacy BIOS) option. On the other hand, if the option is grayed out, you’ll need to set the Administrator password and reboot your device.
Enter the boot password and access the BIOS/UEFI settings again. You should be able to switch to Legacy mode this time. We suggest removing the Administrative password afterward, as it’ll pop-up every time you boot the PC.
That’s it. If you have any alternative ways you can provide us with, feel free to do so. The comments section is just below.
RELATED STORIES TO CHECK OUT:


