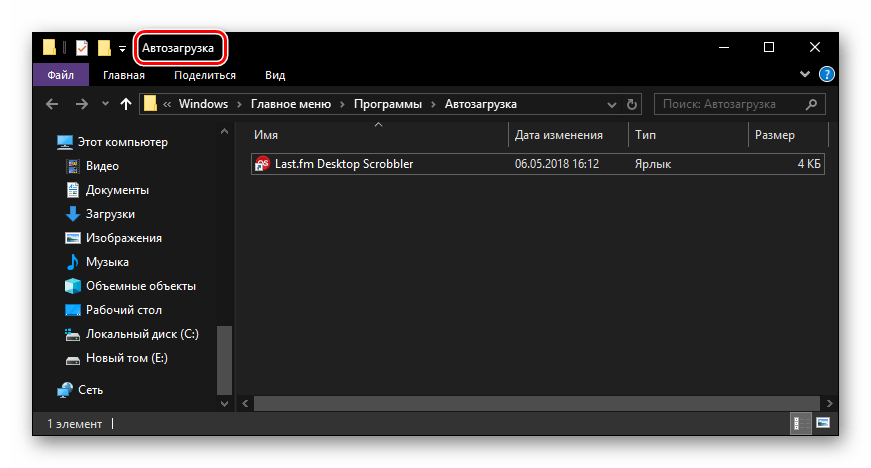
- Где находится папка «Автозагрузка» в Windows 10
- Расположение каталога «Автозагрузка» в Виндовс 10
- Способ 1: Прямой путь к папке
- Способ 2: Команда для окна «Выполнить»
- Управление автозагрузкой приложений
- Заключение
- How to find auto startup folder in Windows 10 (Where is it)?
- Under Windows 10, the startup folder in the Start menu is no longer in the form that you would expect from older Windows versions.
- 1.) . Find and Open the Startup Folder! 2.) . Startup programs and APPs in Windows-10 Task Manager!
- 1.) Find and Open the Startup Folder!
- 2.) Startup programs and APPs in Windows-10 Task Manager!
- How to Add an App or Program to Startup in Windows 10: Startup Folder, Registry, Scheduler
- Windows 10 Startup Folder Location
- How to Quickly Open the Startup Folder in Windows 10, 8, 7
- Method 1
- Method 2
- How To Add Programs To Startup In Windows 10 For The Current User
- Add a Startup Program For All Users At Once
- Alternative Method To Create A Shortcut In Windows 10 Startup Folder
- How to Make Modern Apps Run on Startup in Windows 10
- How to Disable Startup Apps in Windows 10
- Method 1: Use Settings
- Method 2: Use Task Manager
- Add or Remove Startup Apps / Programs in the Task Scheduler
- Use Registry Editor to Manage Windows 10 Startup Apps & Programs
- How to Add Programs to Startup Using the Registry Editor
- Manage Startup Apps & Programs Using the Autoruns Utility
- The Conclusion
Где находится папка «Автозагрузка» в Windows 10

«Автозагрузка» или «Startup» — полезная функция Windows, предоставляющая возможность управления автоматическим запуском стандартных и сторонних программ вместе с загрузкой операционной системы. По своей сути это не только интегрированный в ОС инструмент, но и обычное приложение, а значит, у него есть свое расположение, то есть отдельная папка на диске. В нашей сегодняшней статье мы расскажем, где же находится директория «Автозагрузки» и как в нее попасть.
Расположение каталога «Автозагрузка» в Виндовс 10
Как и полагается любому стандартному инструменту, папка «Startup» находится на том же диске, на котором установлена операционная система (чаще всего таковым является C:\). Путь к ней в десятой версии Windows, как и в предшествующих ей, является неизменным, отличается в нем лишь имя пользователя компьютера.
Попасть в директорию «Автозагрузки» можно двумя способами, причем для одного из них даже не потребуется знать точное расположение, а вместе с ним и имя юзера. Рассмотрим все более подробно.
Способ 1: Прямой путь к папке
Каталог «Startup», содержащий в себе все программы, которые запускаются вместе с загрузкой операционной системы, в Виндовс 10 располагается по следующему пути:
При этом важно понимать, что буква С – это обозначение диска с установленной Windows, а Username – директория, название которой должно соответствовать имени пользователя ПК.
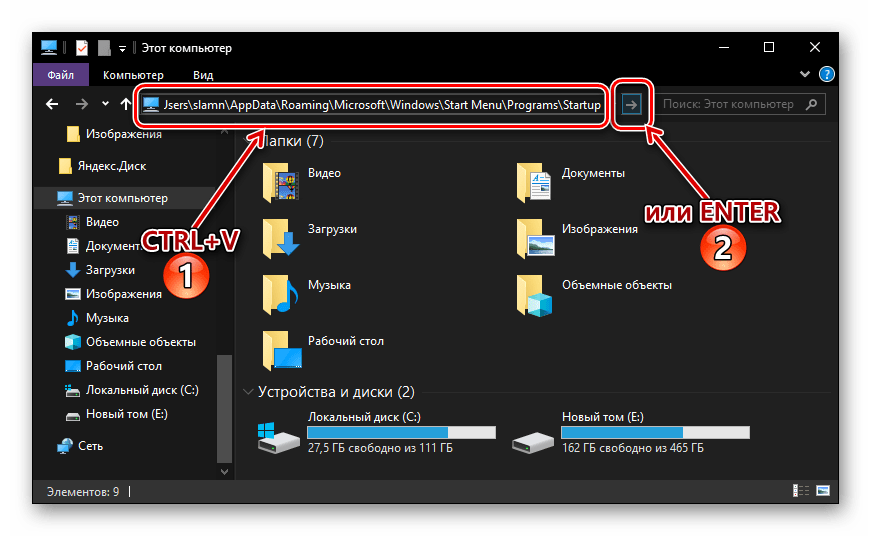
Для того чтобы попасть в данный каталог, подставьте в указанный нами путь свои значения (например, предварительно скопировав его в текстовый файл) и вставьте полученный результат в адресную строку «Проводника». Для перехода нажмите «ENTER» или указывающую вправо стрелку, расположенную в конце строки.
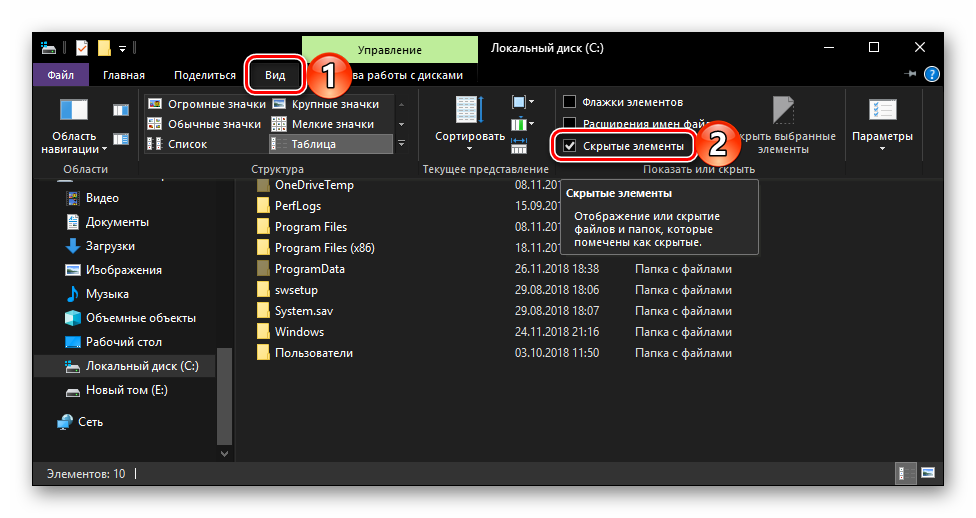
Если же вы захотите самостоятельно перейти в папку «Автозагрузки», для начала включите отображение скрытых файлов и папок в системе. О том, как это делается, мы рассказывали в отдельной статье.
Если же вы не хотите запоминать путь, по которому располагается директория «Startup», или считаете такой вариант перехода к ней слишком сложным, рекомендуем ознакомиться со следующей частью данной статьи.
Способ 2: Команда для окна «Выполнить»
Получить мгновенный доступ к практически любому разделу операционной системы, стандартному инструменту или приложению можно посредством окна «Выполнить», предназначенного для ввода и выполнения различных команд. К счастью, существует и возможность быстрого перехода в директорию «Автозагрузки».
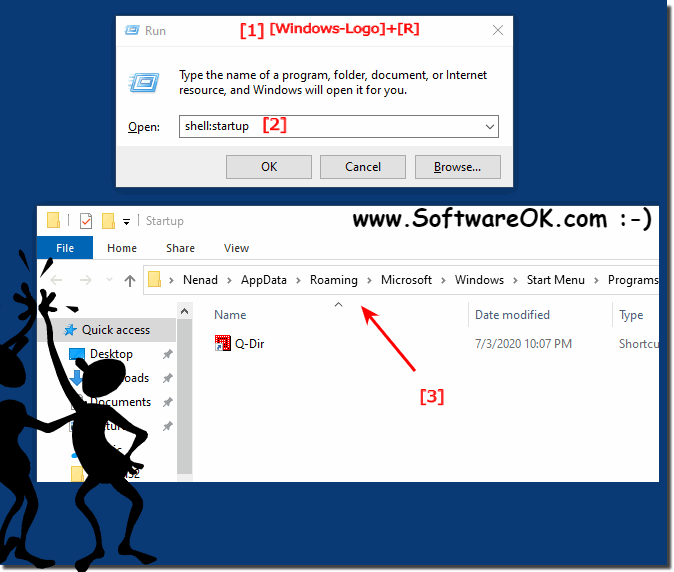
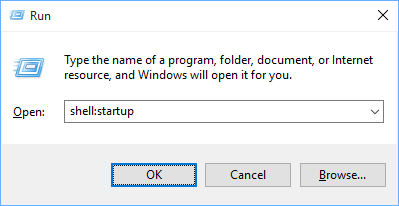
- Нажмите «WIN+R» на клавиатуре.
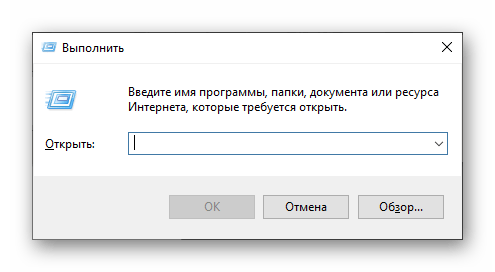
Введите команду shell:startup , после чего нажмите «ОК» или «ENTER» для ее выполнения.

Папка «Startup» будет открыта в окне системного «Проводника».
Используя стандартный инструмент «Выполнить» для перехода в каталог «Автозагрузки», вы не только экономите время, но и избавляете себя от необходимости запоминания довольно длинного адреса, по которому он располагается.
Управление автозагрузкой приложений
Если же поставленная перед вами задача заключается не только в переходе к директории «Startup», но и в управлении данной функцией, наиболее простым и удобным в реализации, но все же не единственным, вариантом будет обращение к системным «Параметрам».
- Откройте «Параметры» Windows, нажав левой кнопкой (ЛКМ) мышки по значку шестеренки в меню «Пуск» или воспользовавшись быстрыми клавишами «WIN+I».

В окне, которое появится перед вами, перейдите в раздел «Приложения».

В боковом меню кликните ЛКМ по вкладке «Автозагрузка».
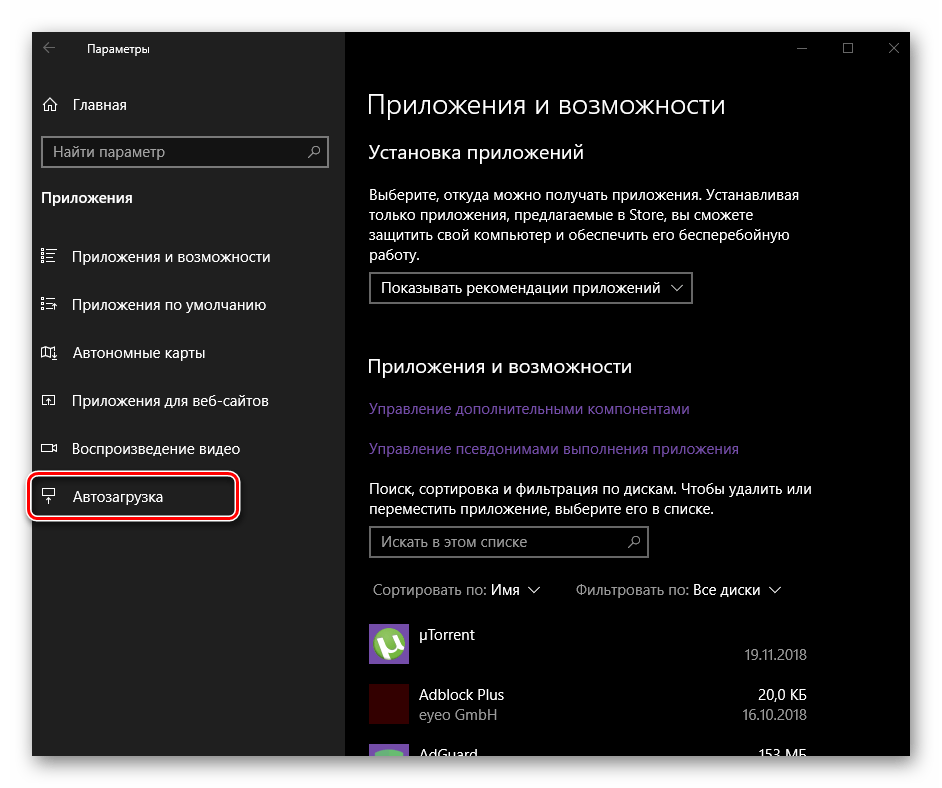
Непосредственно в этом разделе «Параметров» вы можете определить то, какие приложения будут запускаться вместе с системой, а какие нет. Узнать более детально о том, какими еще способами можно настроить «Автозагрузку» и в целом эффективно управлять этой функцией, вы можете из отдельных статей на нашем сайте. 
Заключение
Теперь вы точно знаете, где находится папка «Автозагрузка» на компьютерах, работающих под управлением Windows 10, а также знаете и о том, как можно в нее максимально быстро попасть. Надеемся, данный материал был полезен для вас и по рассмотренной нами теме не осталось вопросов. Если же таковые имеются, смело задавайте их в комментариях.
How to find auto startup folder in Windows 10 (Where is it)?
Under Windows 10, the startup folder in the Start menu is no longer in the form that you would expect from older Windows versions.
1.) . Find and Open the Startup Folder!
2.) . Startup programs and APPs in Windows-10 Task Manager!
However, you do not need any additional software to edit the files or a Quad-Explorer in Windows 10 for fast Startup edit. All you have to do is open the Windows 10 Task Manager there is no folder left. So you can easily see which programs start automatically when booting up ergo restart your computer.
1.) Find and Open the Startup Folder!
The best way to open the Startup folder in Windows 10 is with the address shell:startup, you can enter this path in address bar of MS Explorer.
Or use the Run-Dialog Box [Windows-logo] + [R] in Windows-10 and enter the command shell:startup
(. see Image-1 Arrow-1)
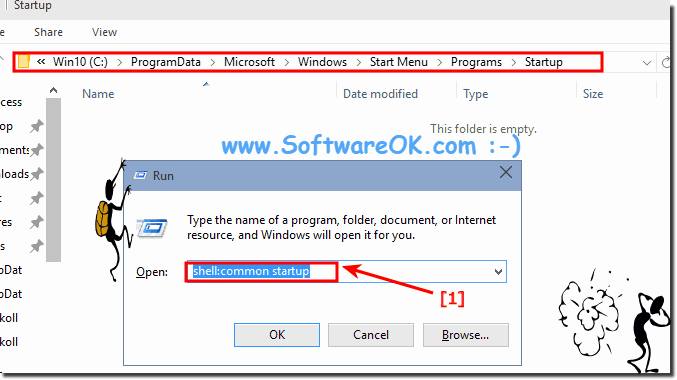
The second startup folder in Windows 10 shell:common startup is responsible for all users, when here, an entry is created, or deleted, this is valid for all users on the Windows-10 PC. (. see Image-2 Arrow-1)
Here is the alternative addresses, this can you use to create a new Windows 10 desktop shortcut.
Autostart for currently logged-on user:
shell:startup = %appdata%\Roaming\Microsoft\Windows\Start Menu\Programs\Startup
And startup folder all users:
shell:common startup = %programdata%\Microsoft\Windows\Start Menu\Programs\Startup
Tip
shell:start menu = start menu in Windows-10
shell:common start menu = all user start menu in Windows-10
| (Image-1) auto startup folder in Windows 10 current user! |
 |

| (Image-2) Windows-10 all User auto startup folder! |
 |
2.) Startup programs and APPs in Windows-10 Task Manager!
| (Image-3) Auto startup programs and APPs in Windows-10! |
 |
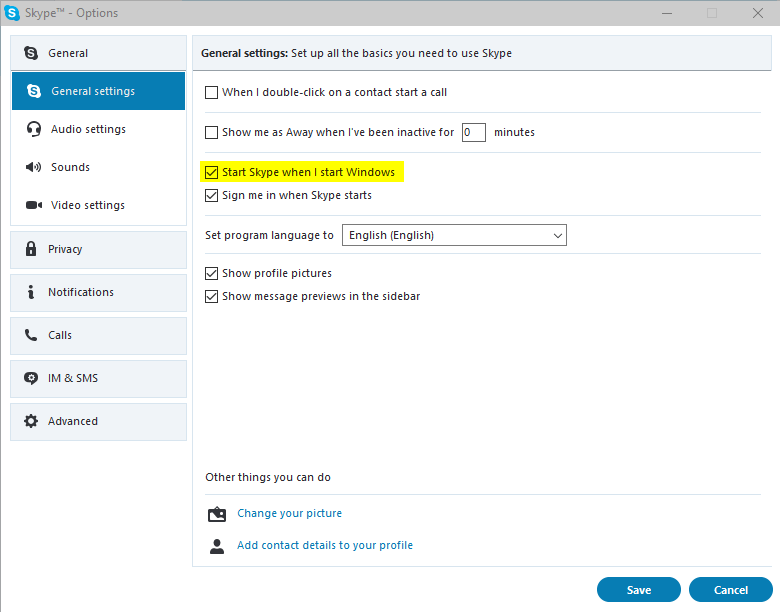
If you want to accelerate the start of Windows 10, you can remove and disable programs in the startup. It is also possible to add new startup programs. We’ll show you how both processes work. What can I do if I still have problems when » edit autostart » is a frequently asked question Restart the Windows operating system, please perform a proper Windows reboot.
How to Add an App or Program to Startup in Windows 10: Startup Folder, Registry, Scheduler
Not all programs have such an option in their settings that lets you enable or disable its automatic start when you turn on your PC.
But you may want to add apps and programs to startup in Windows 10 and make them automatically launch when the PC boots up to a user account.
By the way, it’s not only about apps. You can do the same even with a document, URL address or folder if you need.
Here is an ultimate guide on how to find the startup folder for a particular user or for all users and make any program run at startup in Windows 10.
[Quick Navigation]:
Before we start explaining the boring process, it should be mentioned that some programs have a special option in their settings called “load when Windows starts”, “launch when system starts” or something alike.
Thus, all you need to do is go to the program’s setting, enable the auto-start option and that’s all. No shortcuts needed:
 Make program run on startup in Windows 10
For programs that don’t have such parameter read the rest of the tutorial on how to find the startup folder and change startup programs in Windows 10.
Note that in the latest versions of Windows 10 all programs that were running at the moment when you shut down or rebooted your computer, automatically start the next time you log in.
This in any case doesn’t mean that those programs are added to Windows 10 startup folder, scheduler, or whatever. This is a standalone feature of Windows 10 which is enabled by default.
Windows 10 Startup Folder Location
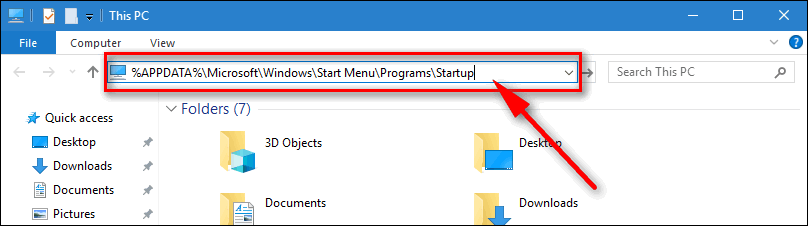
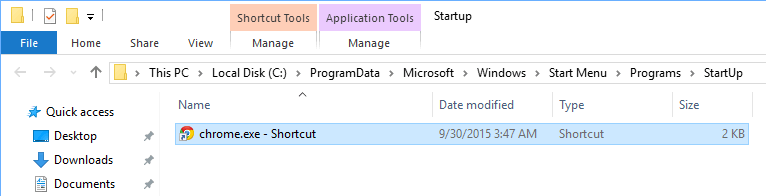
If you want to add a program, app, URL or document to startup you should place its shortcut to user startup folder. By default it is located in:
How to Quickly Open the Startup Folder in Windows 10, 8, 7
Method 1
- Copy this address: %APPDATA%\Microsoft\Windows\Start Menu\Programs\Startup
- Press Win+E to open Windows 10 Explorer.
- Paste it into the address bar:

- Hit Enter :
Method 2
Another way to open Windows 10 startup folder is to use the Run dialogue:
- Press Win+R
- Type
- Click OK or press Enter :
How To Add Programs To Startup In Windows 10 For The Current User
You may put shortcuts to various items into this directory. But be cautious: adding too many programs to the startup folder can make your PC boot slowly (especially if you are still using a classic hard disk drive as your system disk).
Perform the following steps:
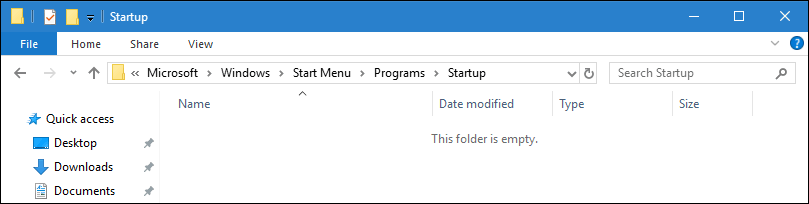
STEP 1. Open the Startup Folder using any method explained above.
STEP 2. Copy a program, app, folder, document, link or anything else: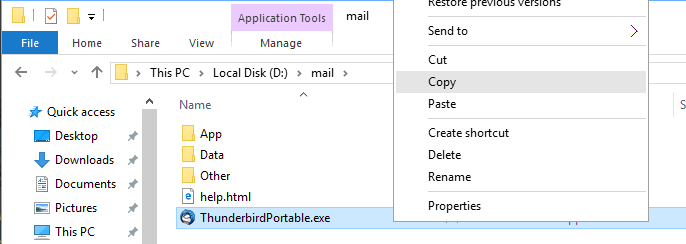
STEP 3. Paste the shortcut to startup folder: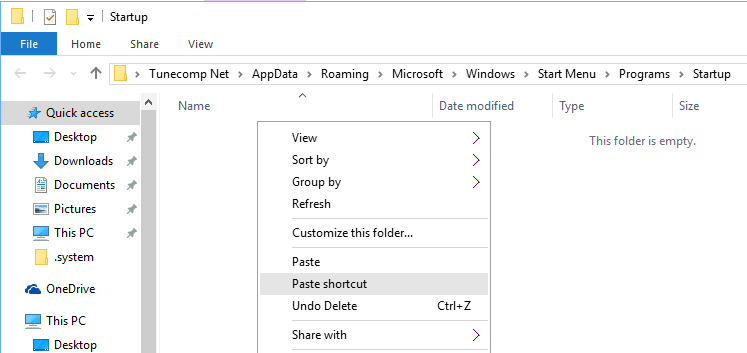
This is how it should look like: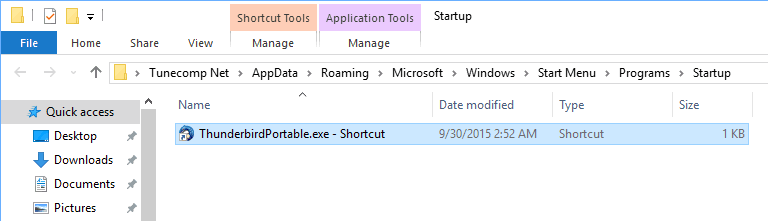
The same steps in the video guide:
Add a Startup Program For All Users At Once
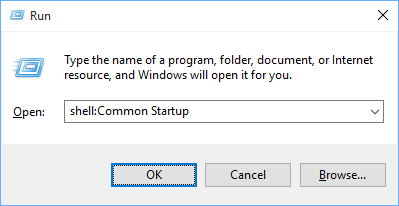
If you wish to set a program to run on startup for all users accounts, create its shortcut in common startup folder. In Windows 10 its default location is:
You can open it by the path: %ProgramData%\Microsoft\Windows\Start Menu\Programs\StartUp or using the Run dialogue as we explain below.
- Press Win+R .
- Type
- Press Enter :
- Copy the executive file or document.
- Use Paste or Paste shortcut to place one to Common startup folder:
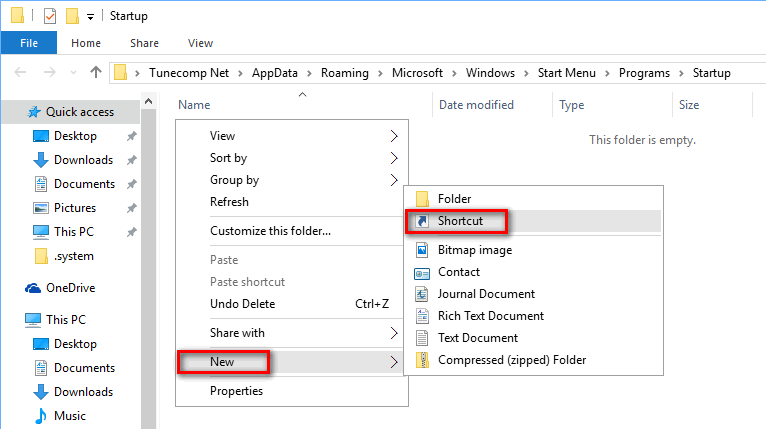
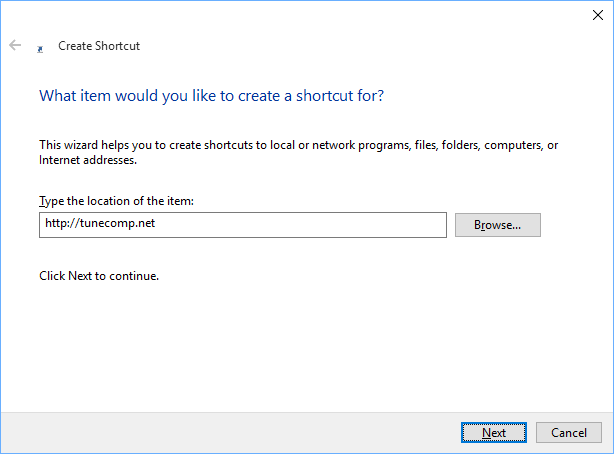
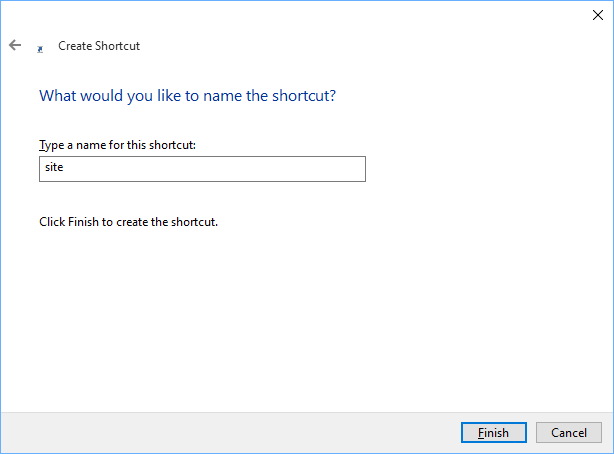
Alternative Method To Create A Shortcut In Windows 10 Startup Folder
- Right-click the empty area and select New -> Shortcut :
- Browse the file or folder or enter URL and press Next :
- Give a name to your new shortcut and press OK :
How to Make Modern Apps Run on Startup in Windows 10
You can also add Modern apps from Microsoft Store to startup folder. Follow the steps:
-
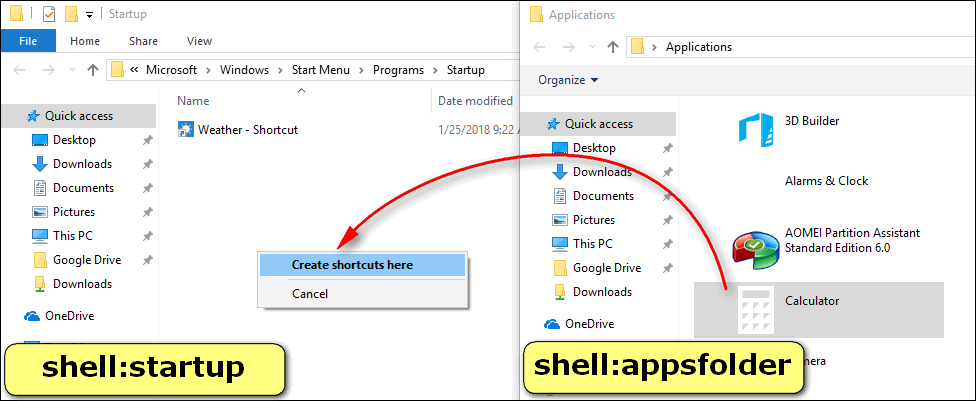
- Open the startup folder: press Win+R , type shell:startup , hit Enter .
- Open the Modern apps folder: press Win+R , type shell:appsfolder , press Enter .
- Drag the apps you need to launch on startup from the first to the second folder and select Create shortcut:
Now restart your computer and check if your program, app or another item you specified runs correctly as you log in to the user account (or as soon as your PC signs in automatically as we explained here).
How to Disable Startup Apps in Windows 10
As you might know, the more apps are added to startup, the longer you have to wait before you start using your PC.
That’s why users often apply the following steps to disable unnecessary programs from being launched at log in.
Here is how to stop programs from running at startup in Windows 10.
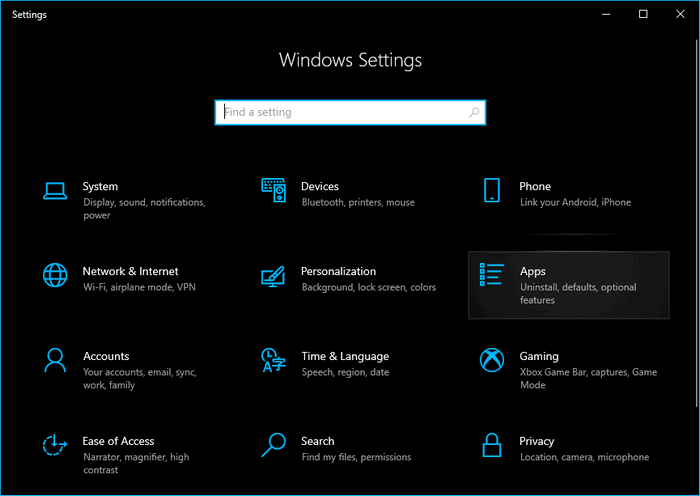
Method 1: Use Settings
- Press Win+I on your keyboard to launch Windows 10 Settings;
- Dive into the Apps category:
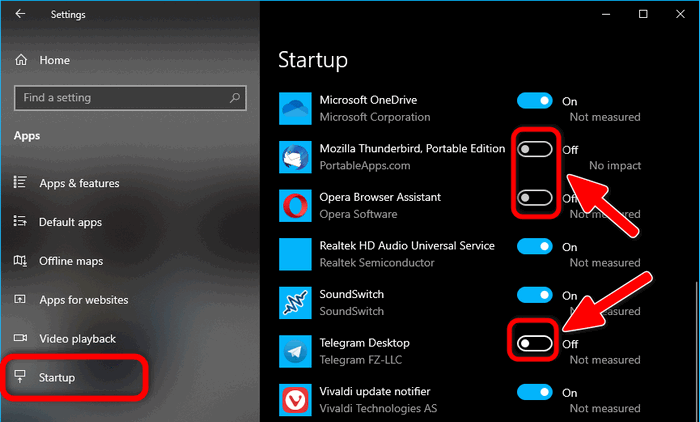
- Select Startup in the left pane;
- Disable apps you don’t want to be launched when you log in to your user account:
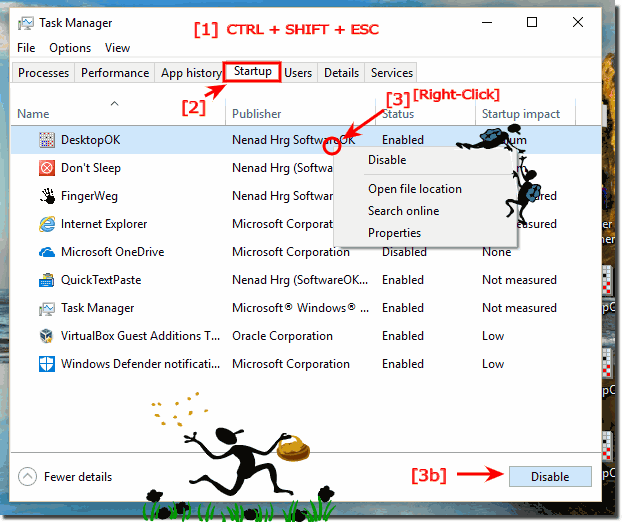
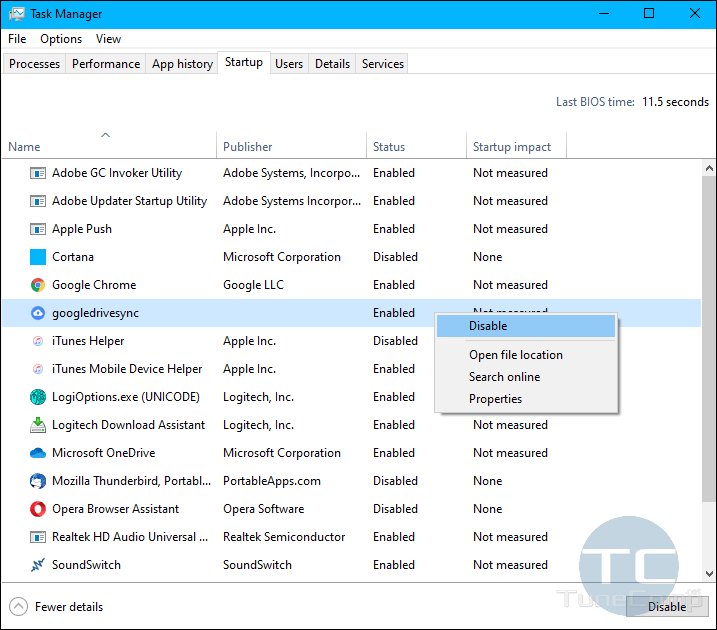
Method 2: Use Task Manager
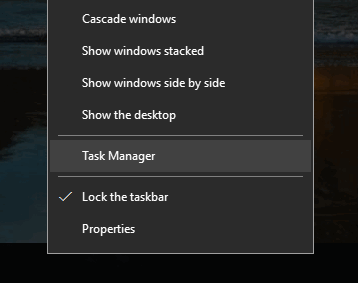
- Right-click the Taskbar and click Task Manager :
- Go to the Startup tab;
- Select the app you wish to disable from auto launching;
- Click Disable :
Here is the video guide:
Add or Remove Startup Apps / Programs in the Task Scheduler
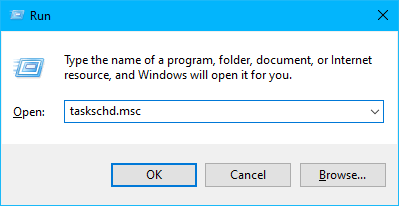
The simplest way to open the Task Scheduler in Windows 10 is to press “Win+R”, type “taskschd.msc” and hit “Enter”.
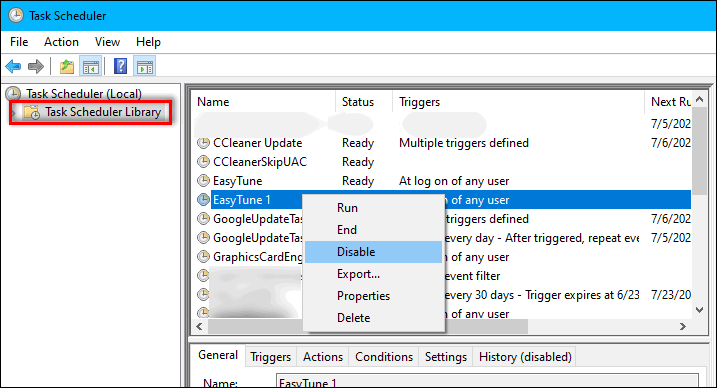 Disable startup programs in the Task Scheduler
Here you can look through the list of auto-start items, add new or remove existing. Using the Task Scheduler requires some experience. So, be careful while using it.
If you are not sure what to do with a certain startup item, first opt to “Disable” it and check the result rather than “Delete”.
Use Registry Editor to Manage Windows 10 Startup Apps & Programs
The system registry is yet another way to add or remove auto-start apps in Windows 10. Feel free to use it if this option is more preferable.
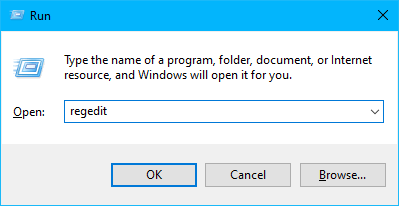
Launch the registry editor: press “Win+R”, type “regedit” and hit “Enter”.
Here you will see all programs that start when the current user logs in.
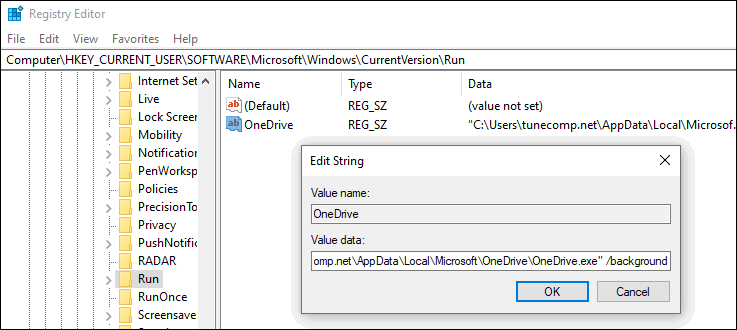
If you didn’t find the app you expected, check another registry key responsible for the common startup (for all users on the current PC):
How to Add Programs to Startup Using the Registry Editor
First, you need to decide either you want to run the program when the current user logs in, or all users on the computer at once. Depending on your decision, navigate to the one of the mentioned above registry keys.
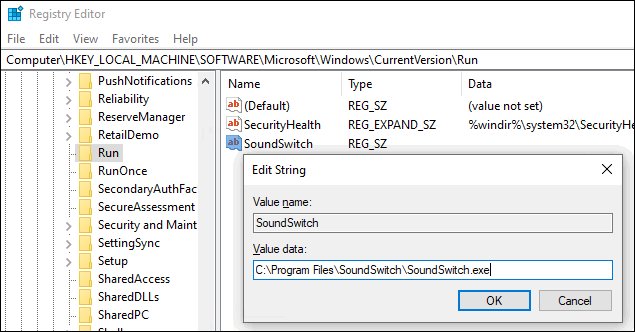
Then, in the right part of the Registry Editor window right-click on the empty area and select New > String value
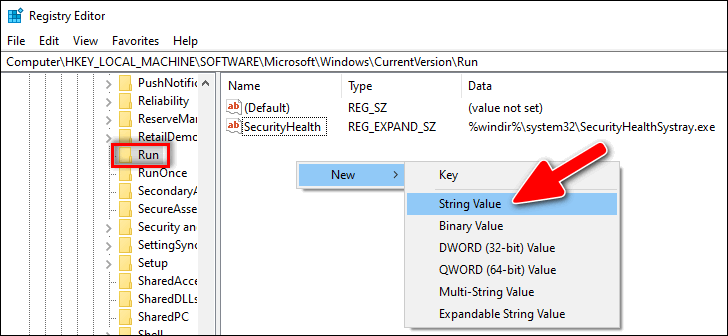
Give it a name, enter the path to the program you wish to add to Windows 10 startup and click “OK”.
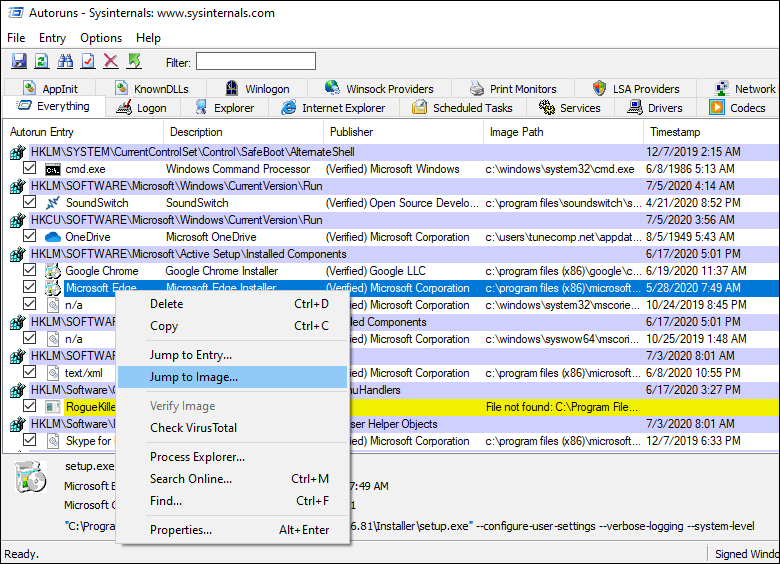
Manage Startup Apps & Programs Using the Autoruns Utility
Sysinternals Autorun is a free utility that you can download from its official website https://docs.microsoft.com/en-us/sysinternals/downloads/autoruns
It doesn’t require the installation – you need just to launch the exe file.
With the help of the Autoruns utility you can:
- view the list of everything that automatically starts on your PC and remove startup items;
- use the Jump to Image option to reveal the location of the program;
- use the Jump to entry option to find out the way how the particular program added to auto-start (startup folder, registry key, scheduler, etc);
- scan startup items for viruses using VirusTotal in 1 click and see the result in the corresponding field of the program;
- and much more.
The Conclusion
If you know how to achieve the same result in easier ways, please drop a comment below. We will also be very grateful if you share this article on social networks. Thank you and good luck!


