- Изменение яркости экрана в Windows 10
- Change screen brightness in Windows 10
- Why can’t I change my screen brightness with Windows 10?
- Replies (27)
- Adjust Brightness and Contrast on Windows 10 Desktop
- Adjust Brightness and Contrast on Windows 10 Desktop
- 1. Only to Adjust Brightness
- First Tips – The Easiest way – Through Action Center
- Second Tips – Through Settings Area
- 2. To Adjust Brightness and Contrast both from the same Platform
- 3. From Ease of Access Settings
Изменение яркости экрана в Windows 10
Выберите центр уведомлений в правой части панели задач, а затем переместите ползунок яркости для регулировки яркости. (Если ползунок отсутствует, см. раздел примечаний ниже.)
На некоторых компьютерах Windows может автоматически регулировать яркость экрана в зависимости от текущих условий освещения. Чтобы узнать, поддерживает ли ваш компьютер эту возможность, перейдите в раздел Параметры > Система > Экран. В разделе «Яркость и цвет» установите флажок Автоматически менять яркость при изменении освещения, чтобы использовать эту функцию. Благодаря этой автоматической настройке текст на экране будет хорошо виден независимо от окружающих условий. Даже если вы используете ее, вы можете переместить ползунок Изменение яркости встроенного дисплея, чтобы точно настроить уровень яркости.
Ползунок изменения яркости встроенного дисплея может не отображаться на настольных компьютерах с внешним монитором. Чтобы изменить яркость внешнего монитора, используйте кнопки на нем.
Ползунок яркости отображается в центре уведомлений Windows 10 версии 1903. Чтобы найти ползунок яркости в более ранних версиях Windows 10, выберите Параметры > Система > Экран, а затем переместите ползунок изменения яркости для регулировки яркости.
Если вы не используете настольный компьютер, но ползунок не отображается или не работает, попробуйте обновить видеодрайвер. В поле поиска на панели задач введите Диспетчер устройств, а затем выберите пункт Диспетчер устройств из списка результатов. В диспетчере устройств выберите Видеоадаптеры, затем выберите видеоадаптер. Нажмите и удерживайте (или щелкните правой кнопкой мыши) имя видеоадаптера, а затем выберите Обновить драйвер и следуйте инструкциям.
Change screen brightness in Windows 10
Select action center on the right side of the taskbar, and then move the Brightness slider to adjust the brightness. (If the slider isn’t there, see the Notes section below.)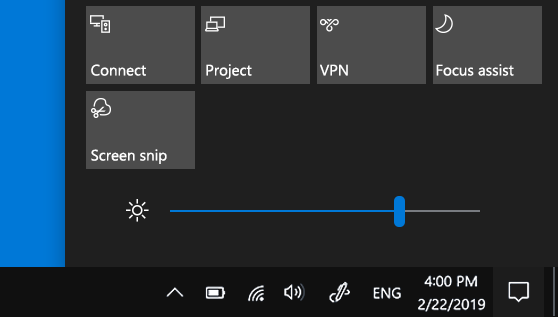
Some PCs can let Windows automatically adjust screen brightness based on the current lighting conditions. To find out if your PC supports this, go to Settings > System > Display. Under Brightness and color, look for the Change brightness automatically when lighting changes check box, and then select it to use this feature. This automatic setting helps make sure your screen is readable wherever you go. Even if you use it, you can still move the Change brightness for the built-in display slider to fine-tune the brightness level.
You might not see the Change brightness for the built-in display slider on desktop PCs that have an external monitor. To change the brightness on an external monitor, use the buttons on it.
The Brightness slider appears in action center in Windows 10, version 1903. To find the brightness slider in earlier versions of Windows 10, select Settings > System > Display, and then move the Change brightness slider to adjust the brightness.
If you don’t have a desktop PC and the slider doesn’t appear or work, try updating the display driver. In the search box on the taskbar, type Device Manager, and then select Device Manager from the list of results. In Device Manager, select Display adapters, then select the display adapter. Press and hold (or right-click) the display adapter name, then select Update driver and follow the instructions.
Why can’t I change my screen brightness with Windows 10?
Replies (27)
* Please try a lower page number.
* Please enter only numbers.
* Please try a lower page number.
* Please enter only numbers.
![]()
Thank you for your interest in Windows 10.
I suggest you to try updating the Display Adapter drivers and check if it works for you.
Follow the steps to update the Display driver:
- Press Windows Key + X key and click Device Manager.
- Expand ‘Display Adapters’.
- Right-click on the Display Adapter listed and click on ‘Update Driver Software’.
- Select the option to automatically search for the updated driver software.
- Restart the computer after its updated and verify.
Also try to access the computer manufacturer website and download and install the latest display and chipset drivers.
Hope this information is helpful. Please do let us know if you need further assistance, we’ll be glad to assist you.
1309 people found this reply helpful
Was this reply helpful?
Sorry this didn’t help.
Great! Thanks for your feedback.
How satisfied are you with this reply?
Thanks for your feedback, it helps us improve the site.
How satisfied are you with this reply?
Thanks for your feedback.
328 people found this reply helpful
Was this reply helpful?
Sorry this didn’t help.
Great! Thanks for your feedback.
How satisfied are you with this reply?
Thanks for your feedback, it helps us improve the site.
How satisfied are you with this reply?
Thanks for your feedback.
![]()
Thank you for keeping us updated.
Install the same driver in compatibility mode for previous version of Windows.
a. Right click the driver installation file and select Properties then tap or click the Compatibility tab.
b. Place a check in the Run this program in compatibility mode for: box.
c. Tap or click the drop down box and select a previous operating system, then tap or click OK.
d. Try installing the driver and check.
Hope this information is helpful. Please feel free to reply in case you face any other issues with Windows in future.
73 people found this reply helpful
Was this reply helpful?
Sorry this didn’t help.
Great! Thanks for your feedback.
How satisfied are you with this reply?
Thanks for your feedback, it helps us improve the site.
How satisfied are you with this reply?
Thanks for your feedback.
Kudos and thankou very much, Giridhar J
I followed your instructions and let the driver update as you said and the screen brightness came back as the driver finished updating. Main thing, it works again! 😀 Thanks
26 people found this reply helpful
Was this reply helpful?
Sorry this didn’t help.
Great! Thanks for your feedback.
How satisfied are you with this reply?
Thanks for your feedback, it helps us improve the site.
How satisfied are you with this reply?
Thanks for your feedback.
231 people found this reply helpful
Was this reply helpful?
Sorry this didn’t help.
Great! Thanks for your feedback.
How satisfied are you with this reply?
Thanks for your feedback, it helps us improve the site.
How satisfied are you with this reply?
Thanks for your feedback.
This is a little ridiculous. I’m trying to change my brightness, which used to be a press of Fn + F2 and now I have to go into settings restart my computer run as compatibility which doesn’t even show up for me. My eyes are hurting and I just want windows 8 back. Oh wait, that also used to be at the touch of a few buttons and it would take me back. Now I have to apparently have a recovery drive on a flash drive. Why do you make everything so hard for us? Why cant it be as easy as before? What is the purpose, even, of changing it to be more difficult. I’d like to say I’m quite adept with computers, but if you ask people to do these basic tasks when even I can’t I’m surprised you aren’t flooded with complaints.
Go to settings — display. Scroll down and move the brightness bar. If the brightness bar is missing, go to control panel, device manager, monitor, PNP monitor, driver tab and click enable.
Then go back to settings — dispay and look for the brightness bar and adjust.
281 people found this reply helpful
Was this reply helpful?
Sorry this didn’t help.
Great! Thanks for your feedback.
How satisfied are you with this reply?
Thanks for your feedback, it helps us improve the site.
Adjust Brightness and Contrast on Windows 10 Desktop
While you are working continuously on a desktop for a few hours your eyes start to stretch and also feel burning. It happens while you set high contrast and brightness. This is for any desktop whether it is Windows 10. Sometimes, high contrast desktop affects the eyes badly and might cause damage. To secure your eyes from the injury, you should have to work on low brightness desktop. Windows 10 offers you to Adjust Brightness and Contrast on Windows 10 Desktop in pursuance of your eye sensation.
Putting the above facts, we are elaborating a few tips to Adjust brightness and contrast on Windows 10 Desktop using the built-in color calibration configuration on Windows 10 desktop.
Adjust Brightness and Contrast on Windows 10 Desktop
Here is How to Adjust Brightness and Contrast on Windows 10 Desktop –
1. Only to Adjust Brightness
First Tips – The Easiest way – Through Action Center
- Take your mouse pointer to the right of the taskbar and hit the Notification icon.
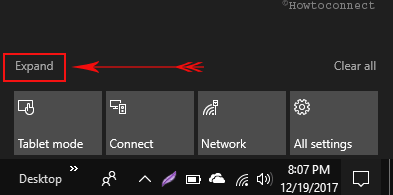
- Press Expand if the lower part of the Action center is shrunken.
- The brightness control slider here helps to increase or decrease the same on your desktop.

- Dragging the control bar to the right will increase the brilliance and to the left will decrease. Hence, you are pretty efficient to adjust the brightness on Windows 10 machine from this location.
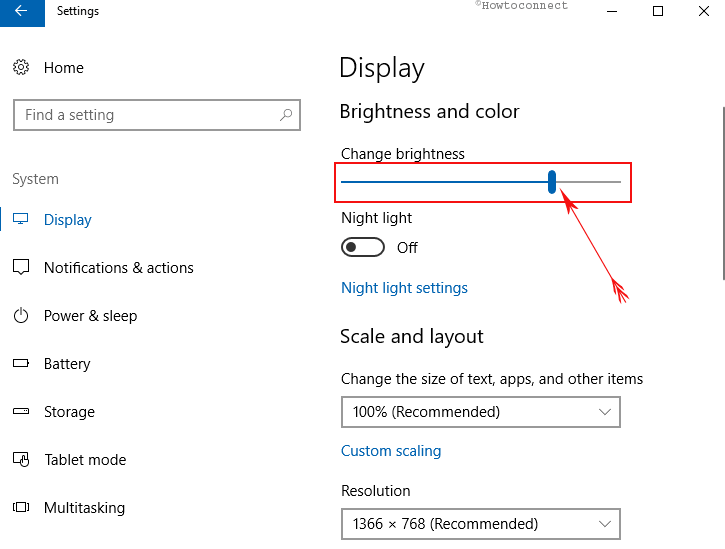
Second Tips – Through Settings Area
- Take your mouse pointer to the Settings icon located at the lower part of the start menu.
- Hit System.
- Toggle the Brightness level slider to Adjust Brightness on Windows 10 Desktop.
2. To Adjust Brightness and Contrast both from the same Platform
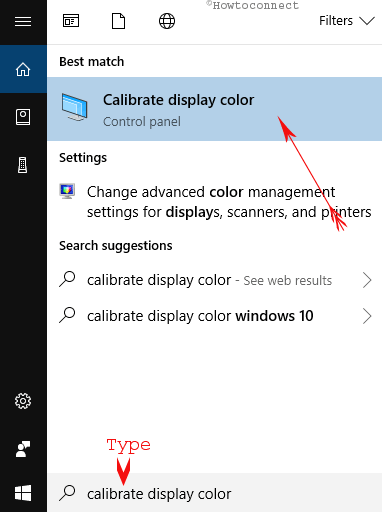
1. Click the taskbar search at the “taskbar” using the mouse.
2. Write the text Calibrate display color and click the same from Best match.
3. On Display Color Calibration window, click Next button at the bottom to proceed further.
4. A new window called Set basic color settings appears on the screen. Again Click Next button.
5. Similarly, you get another window How to adjust gamma and click Next button to continue.
6. Adjust gamma window prompts. Set the gamma color settings by sliding up or down (as you prefer) the gamma sliders. When you drag the slider upward brightness of your desktop enhances and when pull it downward brightness decreases. This is the center step to adjust brightness so perform carefully. Press Next button.

7. Then you will see the Find the brightness and contrast controls for your display. Tap on Skip brightness and contrast adjustment if you want to avoid the adjustment of brightness and contrast.

Otherwise, you only click Next button to open the window How to adjust brightness.
8. In the How to adjust brightness window, you can see three examples of brightness pictures each labeled with too dark, good brightness, and too bright. Click Next button.
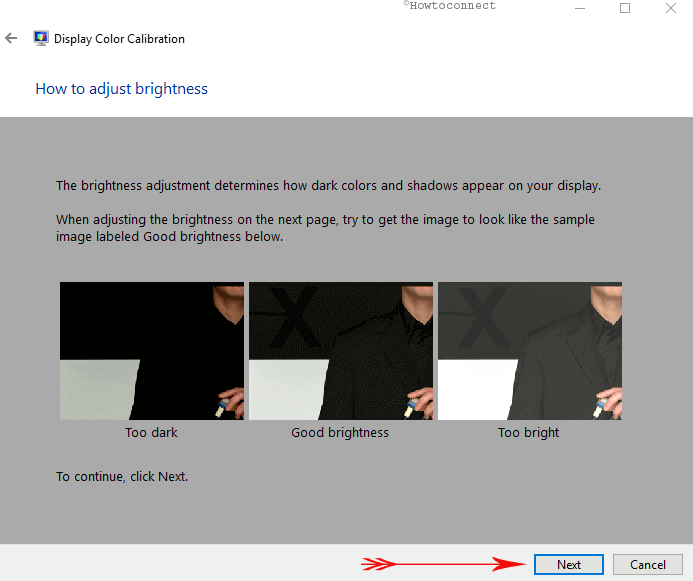
9. Use the controls of your display to increase or reduce the brightness until you clearly see the given picture. (There are many ways to set the brightness. You can do it with your keyboard keys, from the action center or from the Settings app also).
10. After adjusting the brightness, click Next button.
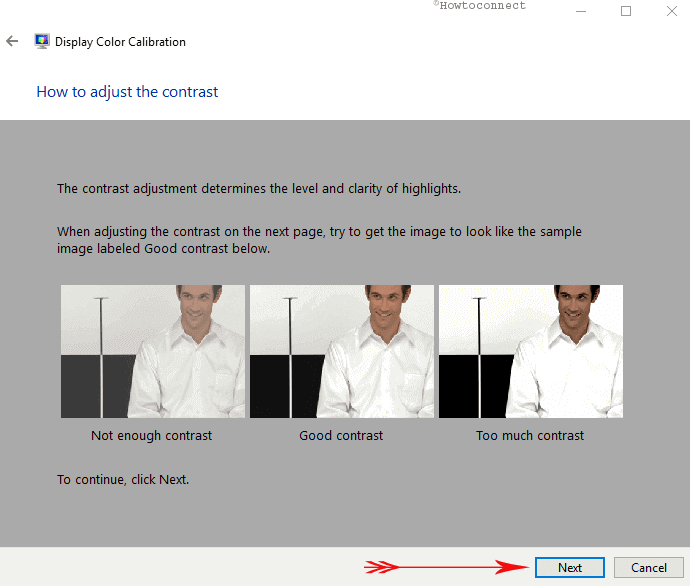
11. Now, you will be explained How to adjust the contrast. Here also you will be shown three instances of Not enough contrast, good contrast and too much contrast. Click Next.
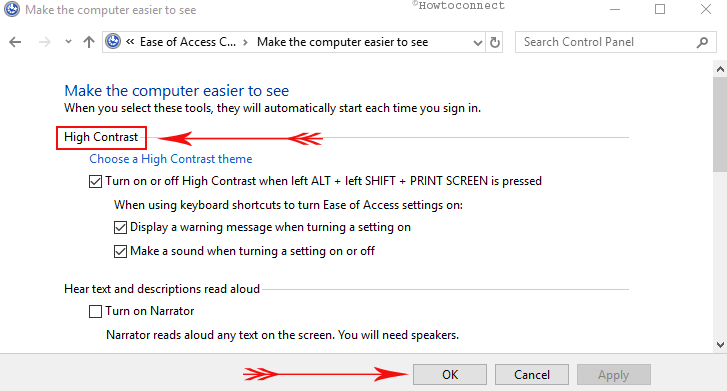
12. The following screen will tell you to use the contrast controls of your display to adjust the contrast. Well, presently there are no toggles to adjust contrast and also most of the laptops do not provide a key to adjust contrast. But if needed, you can set a high contrast theme. Read the below sub-points to set high contrast theme or go to point number 13.
- With the Ease of Access center under Control Panel, you can choose a high contrast theme.
- So, when you are into the Ease of Access window, click Make the computer easier to see link.

- This takes you to another window where you can see High Contrast section. Now to set a high contrast theme, jointly press left Alt, left Shift and PrtSc keys.
- A separate dialog box of High Contrast will emerge asking for your confirmation. Click Yes and you can see everything changed into high contrast.

- To get back to the previous settings of contrast theme, again press left Alt, left Shift and PrtScn keys.
13. Click Next button until you get the window called How to adjust color balance.
14. In the window How to adjust color balance, hit the Next button to go further window.
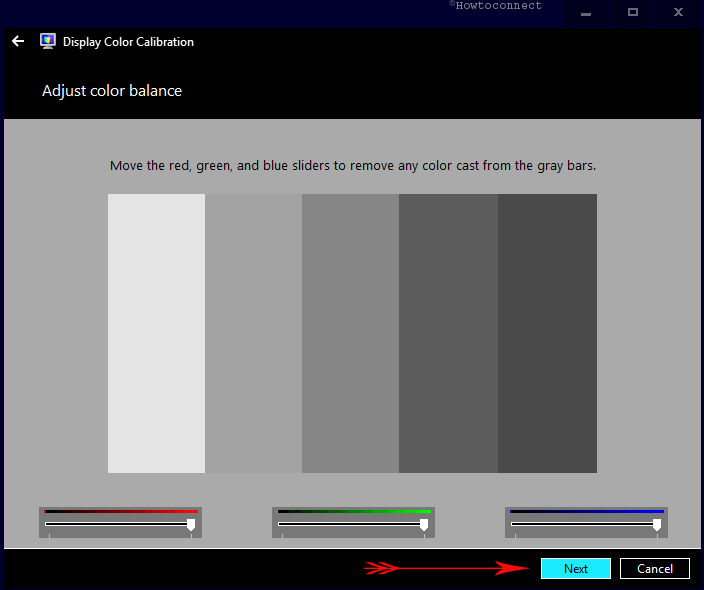
15. Here, you will notice another window Adjust color balance. In this window, you have the option to adjust the primary colors like red, blue and green by sliding these (right or left) with mouse according to your need. After you optimize the colors press the Next button.
16. Finally, click Finish button to save the current color calibration settings on your Windows 10 desktop.
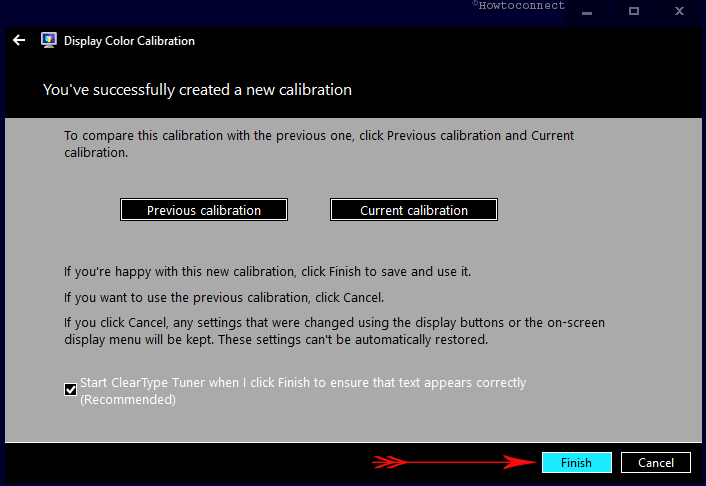
All the calibration settings will enhance your experience of working on Windows 10 desktop for sure. So to Adjust Brightness and Contrast on Windows 10 Desktop is not too hard to work.
Update –
3. From Ease of Access Settings
Windows 10 allows to increase and decrease Brightness from Ease of access settings.
Step-2: Click on Ease of access after the application appears.

Step-3: The next page will open with Display by default; find – Make everything brighter in the right side.
Step-4: Move the Control bar forward to increase and backward to decrease the brightness.


