- Password Recovery
- Add or Remove News and Interests Button from Taskbar in Windows 10
- To Add News and Interests Button to Taskbar
- To Remove News and Interests Button from Taskbar
- Add or Remove News and Interests from Taskbar in Registry
- About Sergey Tkachenko
- 7 thoughts on “ Add or Remove News and Interests Button from Taskbar in Windows 10 ”
- How to Remove the Shutdown Button from the Windows 10 Login Screen
- Using Group Policy Editor
- Using Windows Registry Editor
- No «Remove» button for Microsoft account in Windows 10 settings? SOLVED
- Replies (33)
Password Recovery
Unlike Windows Server operating system, there is a shutdown/power button on Windows 10, 8 and 7 logon screen which lets you to shutdown the system without ever logging in.
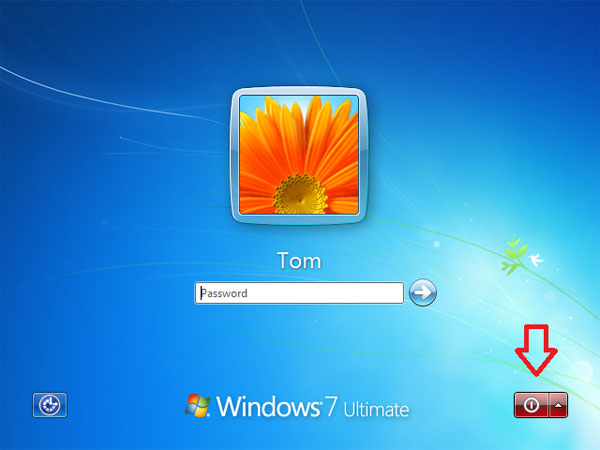
Sometimes you might have a shared / public computer where you want to prevent others from shutting down or restarting. In this tutorial we’ll show you two methods to remove the shutdown button from the login screen in Windows 10, 8 and 7.
Method 1: Remove Shutdown Button with Group Policy
- Press the Windows key + R to bring up the Run box. Type gpedit.msc and press Enter to open the Local Group Policy Editor.
- In left-side pane, navigate to Computer Configuration -> Windows Settings -> Security Settings -> Local Policies -> Security Options.
- In the right pane select the “Shutdown: Allow system to be shut down without having to log on” policy and double-click on it. Select Disable and click Apply and OK.
Method 2: Remove Shutdown Button with Registry Trick
However, the Group Policy Editor is not included in every edition of Windows, such as Windows 7 Home Premium, Home Basic and Starter editions. If you can’t use Group Policy Editor, here is a registry hack for you to remove the shutdown button from the login screen:
- Press the Windows key + R to bring up the Run box. Type regedit and press Enter to open the Registry Editor.
- In left-side pane, navigate to HKEY_LOCAL_MACHINE\SOFTWARE\Microsoft\Windows\CurrentVersion\Policies\System .
- In the right pane, double-click on shutdownwithoutlogon and set its value to 0 as shown in screenshot below:
Add or Remove News and Interests Button from Taskbar in Windows 10
How to Add or Remove News and Interests Button from Taskbar in Windows 10
Starting in Windows 10 Build 21286, Microsoft has added a new News and Interests widget to the taskbar. You way want to know how to add, remove, or customize its appearance.
In Windows 10 Build 21286, Microsoft has added a new button that opens a flyout that reminds of the new tab page in the Edge browser. It contents is a news feed that also includes weather forecast, and it updates dynamically throughout the day. Once you hover over the button, a flyout appears with a personalized news feed.
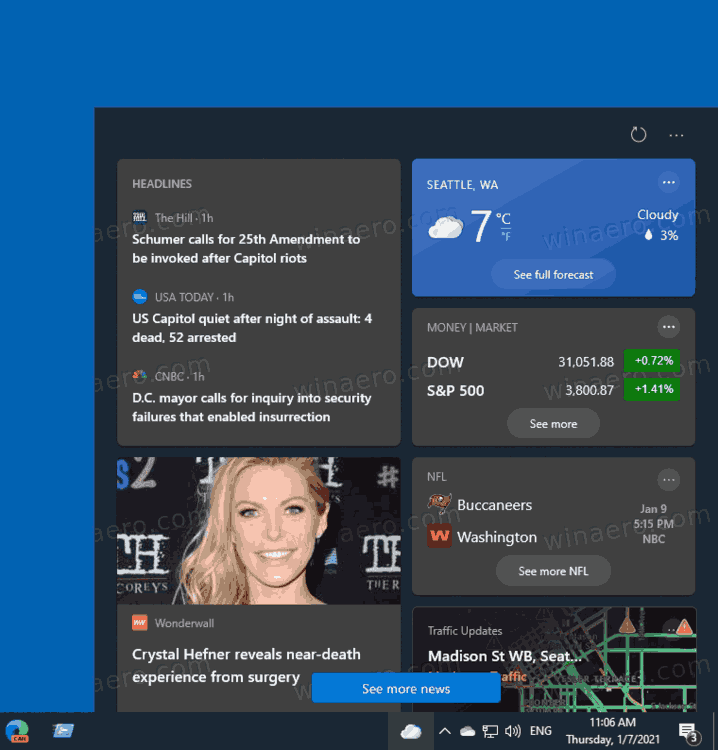
The company finds this solution a useful alternative to news apps, sites, and smartphone apps. It allows you to see the actual info with one click without opening anything extra or switching to a mobile device.
Note that Microsoft is running the A/B testing with this feature. So, at the moment of this writing it is not available to everyone. Microsoft says that it will be initially available to Windows Insiders in United States, Canada, Great Britain, Australia, and India. But the good news is that you can activate the News and Interests feature and have it enabled for your right now:
This post will show you how to add or remove the News and Interests button from the taskbar in Windows 10. This assumes that you have activated the feature manually, or have it available by default for you user account.
To Add News and Interests Button to Taskbar
- Right-click anywhere on the empty space on the taskbar.
- From the menu, select either News and interests >Show icon and text or Show icon only (default).
- The icon will appear in the taskbar to the left of the notification area.
- If you select the Show icon and text option, you will have the icon with the current weather temperature.
Similarly to the above, you can remove the the News and Interests button from the taskbar.
To Remove News and Interests Button from Taskbar
- Right-click the empty space on the taskbar.
- Select News and interests >Hidden from the context menu.
- The icon is now removed from the taskbar.
Finally, you can add or remove the news feed control from the taskbar in the Registry.
Add or Remove News and Interests from Taskbar in Registry
- Open the Registry Editor app.
- Go to the following Registry key: HKEY_CURRENT_USER\Software\Microsoft\Windows\CurrentVersion\Feeds . See how to go to a Registry key with one click.
- On the right, modify or create a new 32-Bit DWORD value ShellFeedsTaskbarViewMode . Note: Even if you are running 64-bit Windows you must still create a 32-bit DWORD value.
- Set its value data to one of the following values:
- 0 = Show icon and text
- 1 = Show only icon
- 2 = Hide everything
- To make the changes done by the Registry tweak take effect, you need to sign out and sign in to your user account. Alternatively, you can restart the Explorer shell.
To save your time, you can download the following Registry files.
The included files are:
- Add News and Interests Icon.reg
- Add News and Interests Icon with Text.reg
- Remove News and Interests from taskbar.reg
Winaero greatly relies on your support. You can help the site keep bringing you interesting and useful content and software by using these options:
Share this post
About Sergey Tkachenko
Sergey Tkachenko is a software developer from Russia who started Winaero back in 2011. On this blog, Sergey is writing about everything connected to Microsoft, Windows and popular software. Follow him on Telegram, Twitter, and YouTube.
7 thoughts on “ Add or Remove News and Interests Button from Taskbar in Windows 10 ”
Why MS trying to add garbage feature to Windows?
Because they do not consider it garbage.
Some people will love it. I bet they get paid per click
Sergey; Thanks for all the hard work you do. It is appreciated
Thanks for you kind words Rick!
I’m currently on build 21301.1010 and I don’t have the option to activate it at all. Any idea what might be wrong?
How to Remove the Shutdown Button from the Windows 10 Login Screen
When you first turn on your system or when you lock your system, Windows displays a simple login screen which enables you to log in to your system. On the login screen Windows 10 provides you with different options like Ease of Access, Power options, Sign-in options, etc. The Power button on the login screen allows you to quickly restart, shut down, or put your system into sleep mode. As useful as it is, you may sometimes need to disable or remove the Power button from the login screen so as to prevent other users from shutting down your PC when it is locked. Here is how you can remove a shutdown or power button from the Windows 10 login screen.
To remove the power button from the Windows 10 login screen you can either use the Group Policy Editor or the Registry Editor. I will show both ways; follow the one you are comfortable with.
Using Group Policy Editor
Removing the shutdown button from the login screen using the Group Policy Editor is the easiest way. To start, press Win + R , type gpedit.msc and press the Enter button.
The above action will open the Windows Group Policy Editor. Here, navigate to the follow policy on the left panel: “Computer Configuration -> Windows Settings -> Security Settings -> Local Policies -> Security Options.”
Find and double-click on the policy “Shutdown: Allow system to be shut down without having to log on.”
This will open the respective policy settings window. Here, select the “Disabled” radio button, and then click on the “Ok” button to save the changes.
From this point onward you won’t see the power button on the login screen.
If you ever want to revert back, simply change the policy setting from “Disabled” to “Enabled” and you are good to go.
Using Windows Registry Editor
If you don’t have access to the Group Policy Editor, then you can use the Windows Registry editor. However, make sure that you have a good backup before making any changes.
To start, press Win + R , type regedit and press the Enter button to open the Windows Registry Editor.
Once the Registry Editor has been opened, navigate to the follow key on the left panel:
Right-click on the empty space in the right pane, and then select the “New” option and then “DWORD (32-bit) Value.”
The above action will create a new Dword Value. Rename the new value to “shutdownwithoutlogon” and press the Enter button.
After creating the value double-click on it and make sure that the value data is set to “0.” If the value data is not set to “0” then change it accordingly.
You’ve successfully removed the power or shutdown button from the login screen. If you ever want to revert back, simply change the value data from “0” to “1” and you are good to go.
Do comment below sharing your thoughts and experiences about using the above method to remove the power or shutdown button from the Windows 10 login screen.
Vamsi is a tech and WordPress geek who enjoys writing how-to guides and messing with his computer and software in general. When not writing for MTE, he writes for he shares tips, tricks, and lifehacks on his own blog Stugon.
No «Remove» button for Microsoft account in Windows 10 settings? SOLVED
I wanted to share this in case anyone else was having the same frustrating problem. I had a personal Microsoft account that I had mistakenly signed into on a work PC. To remove it, I followed the steps to go to Settings >> Email & Accounts, then select the account and click «Remove». Well, I got there, and there was no «Remove» button! Only a «Manage» button appeared.
The «Your info» page probably also looks like this
If you are having this problem, look for a text link on the «Your info» page that says something like «Stop signing in to all Microsoft apps automatically». Click on that text.
«Your info» should now say «Local Account» instead of your email
Go back to the «Email & accounts» page and you should now be able to remove the account
Hope this helps someone.
Was this discussion helpful?
Sorry this didn’t help.
Great! Thanks for your feedback.
How satisfied are you with this discussion?
Thanks for your feedback, it helps us improve the site.
How satisfied are you with this discussion?
Thanks for your feedback.
Replies (33)
* Please try a lower page number.
* Please enter only numbers.
* Please try a lower page number.
* Please enter only numbers.
213 people found this reply helpful
Was this reply helpful?
Sorry this didn’t help.
Great! Thanks for your feedback.
How satisfied are you with this reply?
Thanks for your feedback, it helps us improve the site.
How satisfied are you with this reply?
Thanks for your feedback.
133 people found this reply helpful
Was this reply helpful?
Sorry this didn’t help.
Great! Thanks for your feedback.
How satisfied are you with this reply?
Thanks for your feedback, it helps us improve the site.
How satisfied are you with this reply?
Thanks for your feedback.
2 people found this reply helpful
Was this reply helpful?
Sorry this didn’t help.
Great! Thanks for your feedback.
How satisfied are you with this reply?
Thanks for your feedback, it helps us improve the site.
How satisfied are you with this reply?
Thanks for your feedback.
2 people found this reply helpful
Was this reply helpful?
Sorry this didn’t help.
Great! Thanks for your feedback.
How satisfied are you with this reply?
Thanks for your feedback, it helps us improve the site.
How satisfied are you with this reply?
Thanks for your feedback.
3 people found this reply helpful
Was this reply helpful?
Sorry this didn’t help.
Great! Thanks for your feedback.
How satisfied are you with this reply?
Thanks for your feedback, it helps us improve the site.
How satisfied are you with this reply?
Thanks for your feedback.
1 person found this reply helpful
Was this reply helpful?
Sorry this didn’t help.
Great! Thanks for your feedback.
How satisfied are you with this reply?
Thanks for your feedback, it helps us improve the site.
How satisfied are you with this reply?
Thanks for your feedback.
46 people found this reply helpful
Was this reply helpful?
Sorry this didn’t help.
Great! Thanks for your feedback.
How satisfied are you with this reply?
Thanks for your feedback, it helps us improve the site.
How satisfied are you with this reply?
Thanks for your feedback.
1 person found this reply helpful
Was this reply helpful?
Sorry this didn’t help.
Great! Thanks for your feedback.
How satisfied are you with this reply?
Thanks for your feedback, it helps us improve the site.
How satisfied are you with this reply?
Thanks for your feedback.
While trying to troubleshoot a login issue that was preventing me from installing the Raw Image Extension from the Store application, I signed into a PC using a work, and personal Microsoft account. Both accounts were then linked to the local admin account. «Access school or Work» allowed me to remove my work account, but not my personal account. I had to «manage» my account (launched Edge with account info) then remove the device from my personal account. When I refreshed settings\accounts on the device, my personal account was no longer listed.
Thanks to all who came before who helped point me in the right direction. Fixing this was pretty counter-intuitive.
I hope this helped someone else.
4 people found this reply helpful
Was this reply helpful?
Sorry this didn’t help.
Great! Thanks for your feedback.
How satisfied are you with this reply?
Thanks for your feedback, it helps us improve the site.


